VIMAR 4622.028EA Network Camera
IP Dome Day&Night colour camera, CMOS 1/2.7″ sensor, 5 Mpx (2880×1620) resolution, 2.8 mm fixed focus lens, mechanic IR filter, H.265+ Multistream, VA functions, PoE or 12 Vdc supply, IR 20-30 m, WDR, 3DNR, HLC, BLC, Mask, Motion, Smart IR, RTSP functions, IP67 protection degree. Dimensions 0 95×83 mm. Weight 430 g.
Package content
After you receive your device, please check the following accessories. The pictures here are for reference only.
| Camera | Quick and start guide | Drill template | Screws & spiles | Screw-driver | Water-proof Cap |
 |  |  |  |  |  |
Introduction
This IP-camera (short for IP-CAM) is designed for high performance CCTV solutions. It adopts state of the art video processing chips. It utilizes most advanced technologies, such as video encoding and decoding technology, complies with the TCP/IP protocol, SoC (System on chip), etc to ensure this system more stable and reliable. Complete manuals and CVM.exe, lptool.exe Diskcalculator.exe software are available to download in the Product info sheet section of www.vimar.com website.
Connections
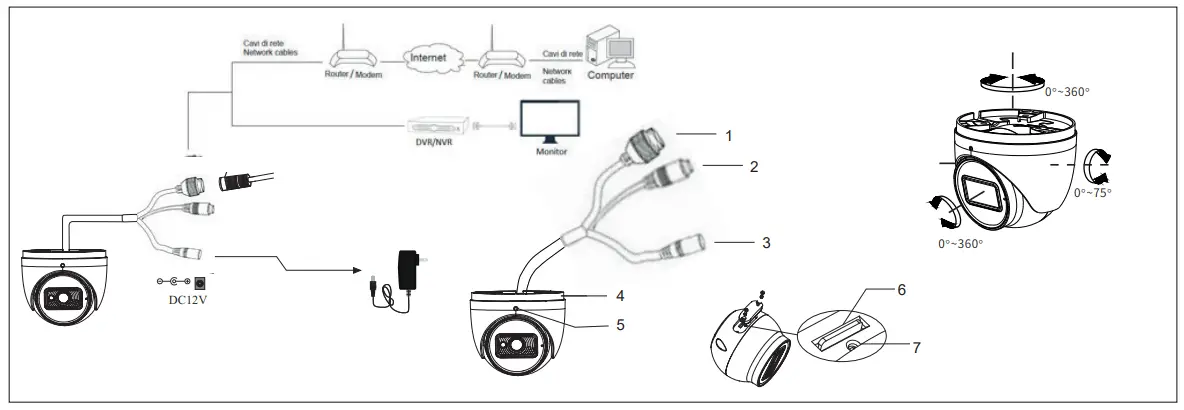
Here below the main connections of the camera.
| 1 | Network Cable |
| 2 | Microphone cable |
| 3 | Power Cable |
| 4 | Mounting base |
| 5 | Fixing screw |
| 6 | Micro SD card slot |
| 7 | Reset |
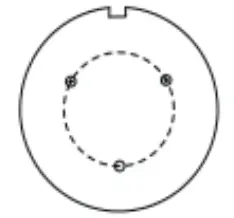
Installation
Before start, please make sure that the wall or ceiling is strong enough to withstand 3 times the weight of the camera. The mounting steps are as follows:
- Loosen the fixed screw to disassemble the camera.
- Drill the screw holes and the cable hole on the wall according to the drill template.
- Route the cables and connect the power cable and video cable.
- Secure the mounting base with camera to the wall with screws as shown below.
- Before the adjustment, display the image to a monitor and then adjust the camera and then loosen the fixed ring to adjust the view angle of the camera angle. Finally, fix the camera with the fixed screw
- Remove the protective film to complete the installation procedure.


Network Connections
Here we take accessing IP camera via LAN for example. In LAN, there are two ways to access.
- Access through IP-Tool;
- Directly Access through Web Browser
Access the camera through IP-Tool
- Make sure that the camera and the PC are well connected to the LAN.
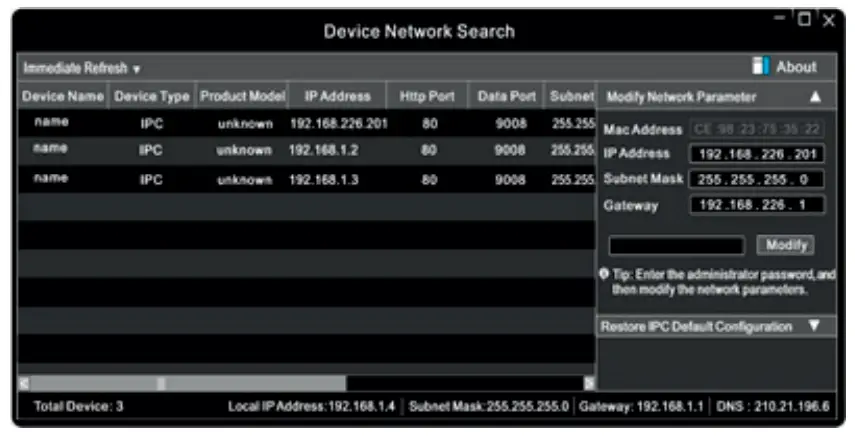
- download IP-Tool Product info sheet section of www.vimar.com website and then install it in the computer. After that, run the IP-Tool as shown below.

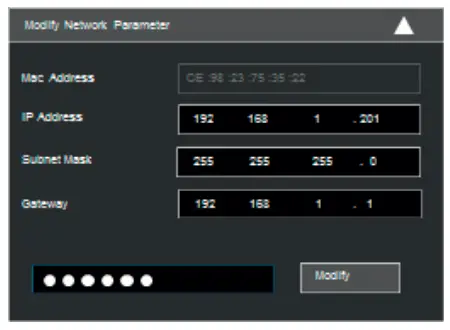
- Modify the IP address. The default IP address of this camera is 192.168.226.201 . Click the information of the camera listed in the above table to show the network information on the right hand. Modify the IP address and gateway of the camera and make sure its network address is in the same local network segment as the computer’s. Please modify the IP address of your device according to the practical situation.

For example, the IP address of your computer is 192.168.1.4. So the IP address of the camera shall be changed to 192.168.1 .X.
After modification, please input the password of the administrator and click “Modify” button to modify the setting. The default password of the administrator is 123456.
 - Double-click the IP address and then the system will pop up the IE browser to connect IP-CAM. IE browser will automatically download the Active X control.
After downloading, a login window will pop up. Input the user name and password to login. The default password of the administrator is 123456.
Directly Access Through Web Browser
The default network settings are as shown below:
IP address: 192.168.226.201 HTTP:80
Subnet Mask: 255.255.255.0 Data Port:9008
Gateway: 192.168.226.1
 The default user is ad min, password of the administrator is 123456.
| 4622.028EA | ||
| Cam | Sensor | 1/2,7″ CMOS Progressive scan |
| Pixel image | 2880 X 1620 | |
| Electronic shutter | 1/25s ~ 1/100-000s I AUTO | |
| Sensitivity | 0,007 lux @F1.6, AGC ON; 0 lux (IR led ON) | |
| Lens | 2,8 mm@ F1.6 (110°) | |
| Fixing type | M12 | |
| Image | Video compression | H264 – H265 – H265+ – MJPEG |
| Resolution | 5Mpx (2880×1620), 4Mpx (2560×1440), 3Mpx (2304×1296), 1080p (1920 x 1080), 720p (1280 x 720), D1, CIF, 480 x 240 | |
| Bit Rate | 64 Kbps ~ 8 Mbps | |
| Primary frame rate Frame rate Secondary frame rate | 20 Fps 5Mpx 30 Fps 4Mpx, 3Mpx, 1080p, 720p 30 Fps 720p, D1, CIF | |
| Codification | VBR/CBR | |
| Quality | Level VBR 5, CBR unlimited | |
| Connections | Network | RJ45 |
| CVBS video output | No | |
| SD card | Yes not included (256GB max) | |
| RS485 | No | |
| Audio In/out | 1/0 (MIC Integrated MIC) | |
| Alarm In/out | 0/0 | |
| Functions | Functions | WDR, smart IR, 3D-DNR, ROI, Privacy Mask, Motion, HLC, BLC |
| Remote control | Browser IE, Google Chrome, Edge, Firefox, Safari, CMS per CMS for remote control | |
| Online users | 10 users, transmission supported on more flux in real time | |
| Network protocol | UDP, IPv4, IPv6, DHCP, NTP, RTSP, PPPoE, DONS, SMTP, FTP, HTTP, 802.1x, UPnP, HTTPs, QoS | |
| Compatibility | ONVIF | |
| Storage | SD card storage, Remote storage | |
| Day & Night | ICR | |
| Intelligent Video Analysis | Anomaly: Blur, Scene change – Abandoned or missing object – Line crossing -Area intrusion | |
| Other | PoE | SI /Yes (IEEE802.3 af) |
| Range IR | 20-30 m | |
| Degree IP | IP67 | |
| Temperature range | -30° C I +60° C con with humidity 10% – 90% | |
| Power supply | 12 Vdc- 370 mA/ PoE | |
| Consumptions | 4,5W | |
| Dimensions (mm) | 0 95 X 83 | |
| Peso/Weight (g) | 430 | |
| Note | RTSP, multi-stream | |
Cautions
- Before operation, we strongly advise users to read this manual and keep it properly for using later.
- Please use the specified power supply to connect.
- Avoid from in correct operation, shock vibration, heavy pressing which can cause damage to product.
- Do not use corrosive detergent to clean main body of the camera. If necessary, please use soft dry cloth to wipe dirt; for hard contamination, use neutral detergent. Any cleanser for high grade furniture is applicable.
- Avoid aiming the camera directly towards extremely bright objects, such as, sun, as this may damage the image sensor.
- Please follow the instructions to install the camera. Do not reverse the camera, or the reversing image will be received.
- Do not operate it incase temperature, humidity and power supply are beyond the limited stipulations. Keep away from heat sources such as radiators, heat registers, stove., etc.
- This is product instructions not quality warranty. We may reserve the rights of amending the typographical errors, inconsistencies with the latest version, software upgrades and product improvements, interpretation and modification. These changes will be published in the latest version without special notification.
- When this product is in use, the relevant contents of Microsoft, Apple and Google will be involved in. The pictures and screenshots in this manual are only used to explain the usage of our product. The ownerships of trademarks, logos and other intellectual properties related to Microsoft, Apple and Google belong to the above-mentioned companies.
 Installation rules
Installation should be carried out by qualified staff in compliance with the current regulations regarding the installation of electrical equipment in the country where the products are installed.
Conformity to Standards
EMC Directive. RoHS Directive
Standards EN 55032, EN 55035, EN IEC 63000
REACH (EU) Regulation no. 1907/2006-Art.33. The product may contain traces of lead.
WEEE – User information
 If the crossed-out bin symbol appears on the equipment or packaging, this means the product must not be included with other general waste at the end of its working life. – The user must take the worn product to a sorted waste center, or return it to the retailer when purchasing a new one. Products for disposal can be consigned free of charge (without any new purchase obligation) to retailers with a sales area of at least 400 m’, if they measure less than 25 cm. An efficient sorted waste collection for the environmentally friendly disposal of the used device, or its subsequent recycling, helps avoid the potential negative effects on the environment and people’s health, and encourages the re-use and/or recycling of the construction materials.
Privacy
Privacy Policy
As required by Regulation (EU) 2016/679 on the protection of personal data, Vimar S.p.A. guarantees that the electronic processing of data minimises the use of personal and other identification information, which is only processed to the extent strictly necessary in order to achieve the purposes for which it was collected. The personal information of the Data Subject is processed in accordance with the product/application privacy policy available on our website www.vimar.com in the legal section (Product -App Privacy Policy – Vimar energia positiva). Please remember that, pursuant to Regulation (EU) 2016/679 on the protection of personal data, the user is the controller of processing for the data collected during use of the products and, as such, is responsible for adopting suitable security measures that protect the personal data recorded and stored, and avoid its loss.
Customer Support
Viale Vicenza, 14
36063 Marostica VI – Italy
www.vimar.com


