
viatom PD-30092 Checkme Lite Health Monitor
Checkme Lite Health Monitor User’s Manual
Warnings and CautionaryAdvices
- We recommend not to use this device if you have a pacemaker or other implanted devices. Follow the advice given by your doctor, if applicable.
- Do not use this device with a defibrillator.
- Do not use this device during MRI examination.
- Never submerge the device in water or other liquids. Do not clean the device with acetone or other volatile solutions.
- Do not drop this device or subject it to strong impact.
- Do not place this device in pressure vessels or gas sterilization device.
- Do not dismantle the device, as this could cause damage or malfunctions or impede the operation of the device.
- This device is not intended for use by people (including children) with restricted physical, sensory or mental skills or a lack of experience and/or a lack of knowledge, unless they are supervised by a person who has responsibility for their safety or they receive instructions from this person on how to use the device.
- This device displays changes in the heart rhythm and blood oxygenation etc. which may have various different causes. These may be harmless, but may also be triggered by illnesses or diseases of differing degree of severity. Please consult a medical specialist if you believe you may have an illness or disease.
- Do not self-diagnose or self-medicate on the basis of this device without consulting your doctor. In particular, do not start taking any new medication or change the type and/or dosage of any existing medication without prior approval.
- The device has no alarms and will not sound if the measurement reading is too low or too high.
About Checkme
Intended Use
The Checkme Lite health monitor is intended to be used for measuring, displaying, storing and reviewing of multiple physiological parameters including ECG and pulse oxygen saturation (SpO2) in home or healthcare facilities environment.ECG is intended for use with adult.The data and results provided by this device are for pre-check screening purpose only and cannot be directly used for diagnostic or treatment.
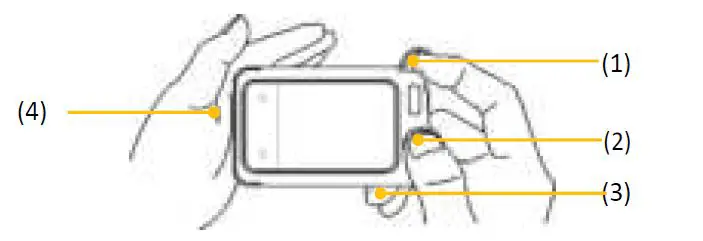
Outline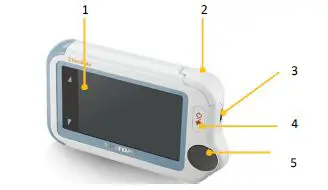
- Touch Screen
- Internal SpO2 sensor
- Micro-D connector It connects with mirco-D cable for charging.
- Home button
- When the monitor is off, press this button to power it on.
- When the monitor is on, press and hold it for 2 seconds to turn it off.
- During operation, press this button will switch to Main Screen or return to upper menu.
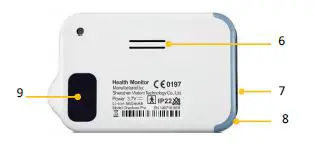
- ECG right electrode

- Speaker
- ECG left electrode
(Put it to your left palm, left abdomen or left knee.) - Neck stripe hole
- ECG back electrode
(Put right forefinger or middle finger on it.)
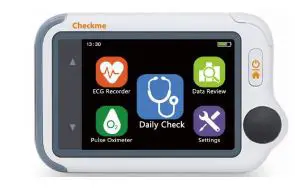
Main Screen
The Main Screen is shown as below.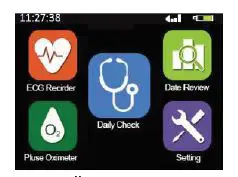 Press an icon in the Main Screen will start a measurement, activate a function, or open corresponding menu.
The device will enter Main Screen when:
- No operation is detected for 60 seconds in result screen, the device will automatically switch to Main Screen.
- Pressing the Home button in other screen interface.
You can change the sound volume by tapping the button on the left of the screen, then tap the <Volume> area. Or you can also go to the Setting menu to change it.
Symbols
| Symbol | Description |
 | Manufacturer |
| Date of manufacture | |
| SN | Serial number |
 | Indicates a medical device that is not to be disposed of as unsorted municipal waste. |
 | Follow Instructions for Use. |
| Type BF Applied Part | |
 | No alarm system |
 | MRI unsafe. Presents hazards in all MR environments as device contains strongly ferromagnetic materials. |
| IP22 | Resistant to liquid ingress |
| CE marking | |
 | Authorized representative in the European community |
 | UKCA marking |
 | Authorized Representative in the United Kingdom |
 | Non-ionizing radiation |
Getting Started
- Power On/Off
Press the Home button to power on the device. Press and hold Home button for 2 seconds to power off thedevice. - Initial Settings
The first time when the Checkme is powered on, you can set up your Checkme step by step. You can also change the settings in the <Settings> menu. - Using Checkme
- Prior to Use Before using ECG Before using Daily Check or ECG Recorder function, pay attention to the following points in order to obtain precise measurements.
- If your skin or hands are dry, moisten them before taking the measurement.
- During the measurement, do not touch your body with the hand with which you are taking the measurement.
- Please note that there must be no skin contact between your right and left hand. Otherwise, the measurement cannot be taken correctly.
- Stay still during the measurement, do not speak and move.
- If possible, take the measurement when sitting instead of standing.
Before using Oximeter
Before using Daily Check and Oximeter function, pay attention to the following points in order to obtain precise measurements.
- The finger inserted in SpO2 sensor must be clean.
- Any of the following conditions may cause inaccurate measurements, including but not limited to:
- Flickering or very bright light
- Poor blood circulation
- Low hemoglobin
- Hypotension, severe vasoconstriction, severe anemia or hypothermia
- Nail polish, artificial nails
- Any tests recently performed on you that required an injection of intravascular dyes.
- The Oximeter may not work if you have poor circulation. Rub your finger to increase circulation, or place the SpO2 sensor on another finger.
- The Oximeter measures oxygen saturation of functional hemoglobin. High levels of dysfunctional hemoglobin (caused by sickle cell anemia, carbon monoxide, etc.) could affect the accuracy of the measurements.
- The pleth waveform displayed on the device is normalized. Warnings and CautionaryAdvices
- Limit finger movement as much as possible when using the Daily Check or Oximeter, which might result in incorrect reading or analysis.
Daily Check About Daily Check
Warnings and CautionaryAdvices
To ensure better tracking of your health status, it is strongly suggested that every Daily Check measurement is made at the same time period when your body is in the relative same situation. E.g., every morning when get up, or every night before go to bed. Daily Check measurement is a function that combines the measuring of ECG (Electrocardiograph) waveform, HR (heart rate), SpO2 (blood oxygenation) and PI (Pulse Index). It takes only 20 seconds to collect your vital signs before giving results.
Using Daily Check
To start a Daily Check, follow the steps as below.
- Tap the <Daily Check> icon in the middle of the Main screen.
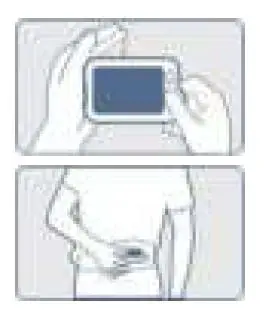
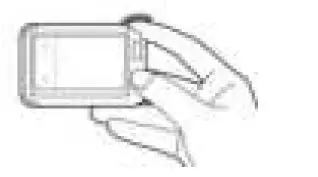
- Hold the device according to the instruction, keep the device at the same level as your heart, and keep stable posture and stay calm. Don’t exert too much pressure on the ECG electrode, which may result in EMG (electromyograph) interference. Just hold gently and ensure good contact with the ECG electrode. Do not exert pressure on the finger that put in the SpO2 sensor. Just fit it inside but gently to ensure good blood perfusion.
- Put the right forefinger into the built-in SpO2 sensor. Use the finger nail to squeeze the edge of the SpO2 sensor cover, then move in upward to the left to raise it up as shown below.
- Press the right thumb on the right electrode.
- Press the right middle finger on the back electrode.
- Press the left electrode to the left palm.
- Put the right forefinger into the built-in SpO2 sensor. Use the finger nail to squeeze the edge of the SpO2 sensor cover, then move in upward to the left to raise it up as shown below.
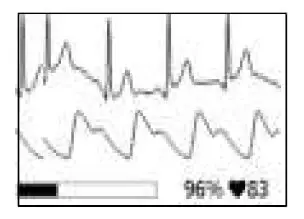
- Once the device detects stable waveform, it will automatically start the measurement. The countdown bar moves from left to right.
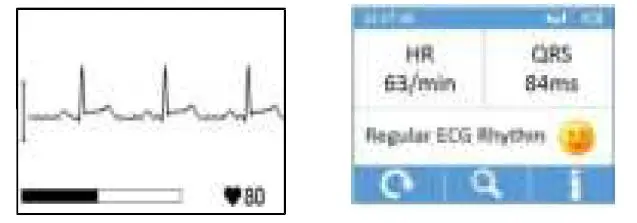
- When the bar is fully filled, the device will analysis your data, and then show the measurement result.
 ECG Recorder
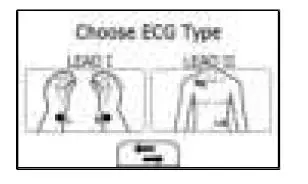
Different methods of taking the ECG measurement are available on Checkme. The ECG recorder offers two different methods to measuring ECG:
- Lead I: right hand to left hand
- Lead II: right hand to left abdomen or left knee
Measuring without cable
To start an ECG Recorder measurement without cable,
- If the device is power off, press the Home button.
- In the Main Screen, tap the <ECG Recorder> icon.
- Choose the method A or B.
- Follow the instruction according to the mode you selected.
- Press the right thumb on the right electrode;
- Press the right forefinger on the back electrode;
- For Lead I, press the left electrode to the left palm;
- For Lead II, press the left electrode to the left lowe abdomen;
Do not press the device too firmly against your skin, which may result in EMG ( electromyography ) interference. After you finish the above steps, hold the device stably and staycalm.
- Once the device detects stable waveform, it will automatically start the measurement. Thea countdown bar moves from left to right.
- When the bar if fully filled, the device will analysis your data, and then show the measurement result.
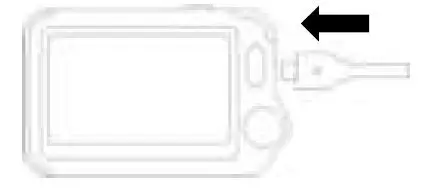
Measuring with Cable
To start an ECG Recorder measurement with cable
- If the device is power off, press the Home button.
- In the Main Screen, tap the <ECG Recorder> icon.
- Choose the method C or D.
- Follow the instructions to connect the ECG cable and place the ECG electrodes.

- Sit down or stand, stay calm;
- Palms facing up, place an electrode in the middle of right wrist;
- For method C, place another electrode in the middle of left wrist;
- For method D, place another electrode in the left lower abdomen;

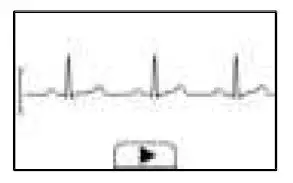
- The display will then show your ECG waveform.
 The device will monitor your ECG continuously, however no data will be saved until you press the button.
 - Press the button to start collecting your ECG data. The countdown bar moves from left to right.
- When the bar is fully filled, the device will analysis your data, and then show the measurement result.
 The device will monitor your ECG continuously, however no data will be saved until you press the button.
Oximeter
The Checkme Health Monitor measures the amount of oxygen in your blood (SpO2), your pulse rate (PR) and pulse index (PI). The oxygen saturation (SpO2) is measured and displayed as a percentage of full capacity.
Measuring without cable
To start an Oximeter measurement without cable,
- If the device is power off, press the home button.
- In the Main Screen, tap the “Pulse Oximeter” icon.
- Insert the forefinger into the built-in SpO2 sensor as shown below. Relax your forefinger and do exert pressure.

- When the device detects stable waveform, it will automatically start the measurement. The countdown bar moves from left to right.
- When the bar is fully filled, the device will analysis your data, and then show the measurement result.
Measuring with Cable (Optional)
- Connect the external SpO2 sensor to the multi-functional connector.
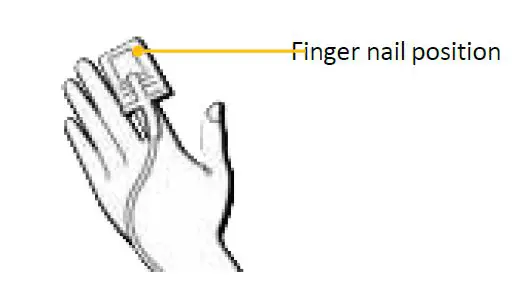
- Put your index finger or middle finger into the external SpO2 sensor. Make sure the cable is positioned along the top of the hand, and the finger nail is in the position as shown below.

- If the device is power off, press the Home button. Tap the <Pulse Oximeter> icon.
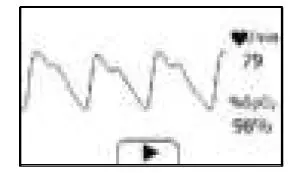
- The display will then show your PLETH waveform, SpO2 and pulse rate.
 The device will monitor your ECG continuously, however no data will be saved until you press the button
 - Press the button to start collecting your SpO2 data. The countdown bar moves from left to right.
- When the bar is fully filled, the device will analysis your data, and then show the measurement result.

 The device will monitor your ECG continuously, however no data will be saved until you press the button
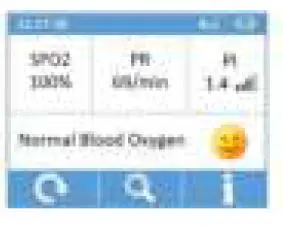
Settings
Opening Settings Menu
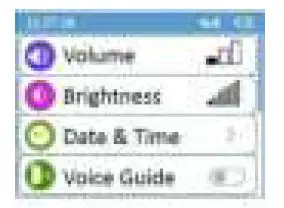
To open the Settings menu, tap the <Settings> icon to open the menu as below.
Changing Sound Volume
In the Settings menu, tap the <Volume> area to change the volume directly. Or use the quick setting by tapping the area on the left side of the screen.
Changing Brightness
In the Settings menu, tap the <Brightness> area to change the Brightness directly Or use the quick setting by tapping the area on the left side of the screen.
Setting Date & Time
- Choose <Date & Time>.
- Tap “+” or “-” button to change the date and time.
Turning on/off Voice Guide
In the Settings menu, tap the <Voice Guide> area to turn on/off voice guide directly. Or use the quick setting by tapping the area on the left side of the screen.
Choosing Language
- In the Settings menu, choose <Language>.
- Choose the language from the list.
- Press the Home Button to return to the Settings menu
Erasing Data
In the Setting menu, tap <Erase All Data>, and then <Yes>. Please be noted that all measurements saved in the device will be deleted.
Factory Reset
In the Setting menu, choose <Factory Reset>, then tap <Yes>. All measurements, user information and other settings saved in the device will be deleted, and the device will be restored to the factory default settings.
Bluetooth connection
Install the latest APP on your smartphone (support BLE Bluetooth) from App Store (iOS) or Google Play (Android). Switch on the device bluetooth in Setting-Bluetooth and run the APP, then the data will be downloaded automatically.
Review
To open the <Data Review> menu, tap the <Data Review> icon in Mainscreen.
Reviewing Daily Check
To review Daily Checkrecords,
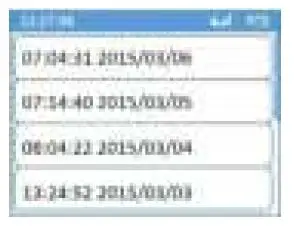
- In the <Data Review> menu, select<DailyCheck>.
- Select one record to review more information as below.
 In this menu, you can:
- Select to delete this measurement
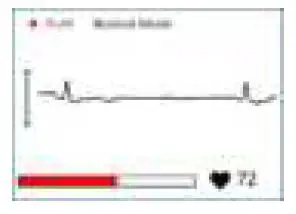
- to replay the ECG waveform as shows below
- Select to return to the Daily Check list.
Reviewing ECG Recorder
To review ECG Recorder records, in the <Data Review> menu, select <ECG Recorder>. The operations you can perform is almost the same with Daily Check.
Reviewing Oximeter
To review Oximeter records, in the <Data Review> menu, select <Oximeter>. The operations you can perform is almost the same with Daily Check.
Maintenance
Battery
This monitor is designed to operate on rechargeable Lithium-ion battery. The battery is charged automatically when the monitor is connected to a powered USB port. On-screen battery symbols indicate the battery status as follow:
- The battery is fully charged.
- The solid portion represents the remained battery energy. If the solid portion moves from left to right, then it means that the battery is being charged.
- Indicates that the battery is almost depleted and need to be charged immediately. Otherwise the device will shut down automatically.
- To charge the battery, connect the USB charging cable as shown.
- The device cannot be used for any measuremen during charging.
- Use USB charging devices comply with electrica safety standard, for example IEC 60950.
Care and Cleaning
Clean the device by carefully swabbing the device surface with a soft cloth swab with water or alcohol.
Trouble Shooting
| Problem | Possible Cause | Solution |
| The device does | 1. The battery may be low. | 1. Charge the battery and |
| not turn on. | 2. The device might be | try again. |
| damaged | 2. Please contact with your | |
| local distributor. | ||
| The ECG waveform amplitude is small | The lead you choose is not suitable for you. | Change another lead and try again. |
| ECG waveform | 1. The pressure exerted on | 1. Hold the device stably |
| drifts | the electrode is not stableor | and gently. |
| too much. | 2. Try to keep perfectlystill | |
| 2. Hand or body may be | and test again. | |
| moving. | ||
| SpO2 or pulse rate | 1. Finger may not be | 1. Remove fingerand |
| shows no value, or | insertedcorrectly. | reinsert, asdirected. |
| the number | 2. Finger or hand may be | 2. Try to keep perfectlystill |
| fluctuates | moving. | and test again. |
| “Error XX” occurred. | Software orhardware failure. | Restart the device. If the error persists, contactwith authorized service center. |
| SpO2 value is too | 1. Finger pressed toohard. | 1. Reinsert yourfinger |
| low when | 2. Finger may not be | gently andstably. |
| measured using | insertedcorrectly. | 2. Make sure your fingeris |
| integrated sensor. | in right position. |
Accessories
Warnings and Cautionary Advices
Use accessories specified in this chapter. Using other accessories may cause damage to the device or not meet the claimed specifications.
| Part Number | Description |
| 540-00192-00 | ECG cable with 2 leadwires |
| 540-00194-00 | USBcharging cable, micro D |
| 560-00198-00 | ECGelectrode, 10 pcs |
| 540-00193-00 | external SpO2 sensor(optional) |
Specifications
| Environmental | |||
| Item | Operating | Storage | |
| Temperature | 5 to 45°C | -25 to 70°C | |
| Relative humidity(noncondensing) | 10% to 95% | 10% to 95% | |
| Barometric | 700 to 1060 hPa | 700 to 1060 hPa | |
| Degree of dust & water resistance | IP22 | ||
| Physical | |||
| Size | 88×56×13 mm | ||
| Weight | 64 g (main unit) | ||
| Display | 2.4” touch screen, color,backlit | ||
| Connector | Micro-USB connector | ||
| Power Supply | |||
| Battery type | Rechargeable lithium-polymerbattery | ||
| Battery run time | Daily check: > 200 times | ||
| Charge time | Less than 2 hours to 90% | ||
| ECG | |||
| Lead type | Integrated ECG electrodes | ||
| Lead set | Lead I, lead II | ||
| Record length | 30s | ||
| Sampling | 500 Hz / 16 bit | ||
| Display Gain | 1.25 mm/mV, 2.5 mm/mV, 5 mm/mV 10 mm/mV, 20 mm/mV | ||
| Sweep speed | 25 mm/s | ||
| Bandwidth | 0.67 to 40Hz | ||
| Electrode offset potential tolerance | ±300 mV |
| HR measurement range | 30 to 250 bpm |
| Accuracy | ±2 bpm or ±2%, whichever is greater Heart rate is calculated based on average of every 5 to 30 QRS complex. |
|
Measurement summary | Heart rate, QRS duration, Rhythm analysis (Regular ECG Rhythm, High Heart Rate, Low Heart Rate, High QRS Value,. Irregular ECG Rhythm, Unable to analyze) |
| Standards | Meet standards of ISO 80601-2-61 |
| Measurement accuracy verification: The SpO2 accuracy has been verified in human experiments by comparing with arterial blood sample reference measured with a CO-oximeter. Pulse oximeter measurement are statistically distributed and about two-thirds of the measurements are expected to come within the specified accuracy range compared to CO-oximetermeasurements. | |
| SpO2 range | 70% to 100% |
| SpO2 Accuracy(Arms) | 80-100%:±2%, 70-79%:±3% |
| PR range | 30 to 250 bpm |
| PR accuracy | ±2 bpm or ±2%,whichever isgreater |
| PI range | 0.5-15 |
| Measurement summary | SpO2, PR, PI, Summary (Normal Blood Oxygen, Low Blood Oxygen, Unable to analyze) |
| Review | |
| Waveform review | Full disclosure waveform |
| Storage | 100 pcs of records |
Electromagnetic Compatibility
The device meets the requirements of EN 60601-1-2. All the accessories also meet the requirements of EN 60601-1-2 when in use with this device.
Warnings and CautionaryAdvices
- Using accessories other than those specified in this manual may result in increased electromagnetic emission or decreased electromagnetic immunity of the equipment.
- The device or its components should not be used adjacent to or stacked with other equipment.
- The device needs special precautions regarding EMC and needs to be installed and put into service according to the EMC information provided below.
- Other devices may interfere with this device even though they meet the requirements of CISPR.
- When the inputted signal is below the minimum amplitude provided in technical specifications, erroneous measurements could result.
- Portable and mobile communication equipment may affect the performance of this device.
- Other devices that have RF transmitter or source may affect this device (e.g. cell phones, PDAs, and PCs with wireless function).
| Guidance and Declaration – Electromagnetic Emissions | ||
| The Health Monitor is intended for use in the electromagnetic environment specified below. The customer or the user of the device should assure that it is used in such an environment. | ||
| Emission tests | Compliance | Electromagnetic environment – guidance |
| RF emissions CISPR 11 | Group 1 | The device uses RF energy only for its internal function. Therefore, its RF emissions are very low and are not likely to cause any interference in nearby electronicequipment. |
| RF emissions CISPR 11 | Class B | The device is suitable for use in all establishments, including domestic establishments and those directly connected to the public low-voltage power supply network that supplies buildings used for domestic purposes. |
| Harmonic emissions IEC61000-3-2 | Class A | |
| Voltage Fluctuations / Flicker Emissions IEC 61000-3-3 | Complies | |
| Guidance and Declaration – Electromagnetic Immunity | |||
| The Health Monitor is intended for use in the electromagnetic environment specified below. The customer or the user of the Health Monitor should assure that it is used in such an environment. | |||
| Immunity test | IEC60601 test level | Compliance level | Electromagnetic environment – guidance |
| Electrostatic discharge (ESD) IEC | ± 6 kV contact ± 8 kV air | ± 6 kV contact ± 8 kV air | Floors should be wood, concrete |
| 61000-4-2 | or ceramic tile. If floors are covered withsynthetic material, the relative humidity should be at least 30 %. | |||
| Electrical | fast | ± 2 kV for power | ± 2 kV for power | Mains power quality |
| transient/burst | supply lines | supply lines | should be that of a typical | |
| IEC 61000-4-4 | ± 1 kV for | ± 1 kV for | commercial or hospital | |
| input/output lines | input/output | environment. | ||
| lines | ||||
| Surge IEC 61000-4-5 | ± 1 kV line(s) to line(s) ± 2 kV line(s) to earth | ± 1 kV line(s) to line(s) ± 2 kV line(s) to earth | |
| Voltage dips, short Interruptions and Voltage variations on power supply input lines IEC 61000-4-11 | <5 % UT (>95 % dip in UT) for 0.5 cycle 40 % UT (60 % dip in UT) for 5 cycles 70 % UT (30 % dip in UT) for 25 cycles <5 % UT (>95 % dip in UT) for 5 s | <5 % UT (>95 % dip in UT) for 0.5 cycle 40 % UT (60 % dip in UT) for 5 cycles 70 % UT (30 % dip in UT) for 25 cycles <5 % UT (>95 % dip in UT) for 5 s | Mains power quality should be that of a typical commercial or hospital environment. If the user of our product requires continued operation during power mains interruptions, it is recommended that our product be poweredfrom an uninterruptiblepower supply or abattery. |
| Power frequency (50/60 HZ) magnetic field IEC 61000-4-8 | 3 A/m | 3 A/m | Power frequency magnetic fields should be at levels characteristic of a typical location in a typical commercial or hospital environment. |
| Note: UT is the AC mains voltage prior to application of the test level. | |||
| Immunity test | IEC60601 test level | Compliance level | Electromagnetic environment – guidance |
| Conduced RF | 3 Vrms 150 | 3 Vrms 150 kHz | Portable and mobile RFcommunications |
| IEC61000-4-6 | kHz to | to | equipment should be used no closer to |
| 80 MHz | 80 MHz | any part of the system, including cables, | |
| outside ISM | outside ISM | than the recommended separation | |
| bands | bands | distance calculated from the equation | |
| appropriate for the frequency of the | |||
| transmitter. Recommended separation distances: d = 1 .2 P |
| Radiated RF IEC61000-4-3 | 3 V/m 80 MHz to 2.5 GHz | 3 V/m 80 MHz to 2.5 GHz | Recommended separationdistances: 80 MHz~800 MHz: d = 1 .2 P 800MHz-2.5GHz: d = 2 .3 P Where, P is the maximum outputpower rating of the transmitter in watts(W) according to the transmitter manufacturer and d is the recommended separation distance in meters (m). Field strengths from fixed RF transmitters, as determined by an electromagnetic site survey a, shouldbe less than the compliance level in each frequency range b. Interference may occur in the vicinity of equipment marked with the following symbol: |
| Note 1: At 80 MHz to 800 MHz, the separation distance for the higher frequency range applies. Note 2: These guidelines may not apply in all situations. Electromagnetic propagation is affected by absorption and reflection from structures, objects and people. | |||
| a Field strengths from fixed transmitters, such as base stations for radio (cellular/cordless) telephones and land mobile radios, amateur radio, AM and FM radio broadcast and TV broadcast cannot be predicted theoretically with accuracy. To assess the electromagnetic environment due to fixed RF transmitters, an electromagnetic site survey should be considered. If the measured field strength in the location in which the device is used exceeds the applicable RF compliance level above, the device should be observed to verify normal operation. If abnormal performance is observed, additional measures may be necessary, such as re-orienting or relocating the device. b Over frequency range 150kHz to 80MHz. For Resp field strength should be less than 1V/m. | |||
| equipment and thedevice | |||
| The Health Monitor is intended for use in an electromagnetic environment in which radiated RF disturbances are controlled. The customer or the user of the Health Monitor can help prevent electromagnetic interference by maintaining a minimum distance between portable and mobile RF communications equipment (transmitters) and the monitor as recommended below, according to the maximum output power of the communications equipment. | |||
| Rated max. output power of transmitter(W) | Separation distance according to frequency of the transmitter (m) | ||
| 150 kHz – 80 MHz d = 1 .2 P | 80 MHz – 800 MHz d = 1 .2 P | 800 MHz – 2.5 GHz d = 2 .3 P | |
| 0.01 | 0.12 | 0.12 | 0.23 |
| 0.1 | 0.38 | 0.38 | 0.73 |
| 1 | 1.20 | 1.20 | 2.30 |
| 10 | 3.80 | 3.80 | 7.30 |
| 100 | 12.00 | 12.00 | 23.00 |
| For transmitters rated at a maximum output power not listed above, the recommended separation distance d in metres (m) can be estimated using the equation applicable to the frequency of the transmitter, where P is the maximum output power rating of the transmitter in watts (W) according to the transmitter manufacturer. Note 1: At 80 MHz and 800 MHz, the separation distance for the higher frequency range applies. Note 2: These guidelines may not apply in all situations. Electromagnetic propagation is affected by absorption and reflection from structures, objects and people. | |||


