ximiir AI07F AI Dyanamic Face Facial Recognition Biometric
Thank you for using our products, which adopt the latest biometrics solution and high-speed stable ARM processor. The product’s recognition, speed, and other performance indicators are at the industry-leading level and fully meet your efficient work requirements.
- Due to the continuous update of the product, all performance and parameters are subject to the actual product, any change without prior notice. The actual product may be inconsistent with the information, and shall not be liable for any discrepancy between the actual technical parameters and the information.
- The picture described in this document may not match the picture of the product in your hand, please refer to the actual product.
Usage environment
- Avoid installing a device in a place where strong light is shining. Strong light has an influence on face recognition, which may lead to the failure of face recognition verification.
- The operating temperature of the device is 0℃–45℃. Avoid long-term outdoor use. Long-term outdoor use will affect the normal operation of the device. If itis must be used outdoors, It is recommended to use sunshade and heat dissipation equipment in summer and heat preservation equipment in winter.
Installation Precautions
Fix the rear panel on the wall Install the device on the rear panel and tighten the screw on the bottom of the machine.
- Before installation, please make sure that the power system of the device is
turned off installation. Live installation and wiring operations can cause damage to the machine due to contact with the power cord. - In the situation that static electricity is a bit heavy, please connect a ground wire first and then connect other wires, which can protect the device from damage in static electricity.
- If do not use some ports of terminals. Please do not expose the lines that connect the unused ports. It may cause short circuit damage to equipment. At the same time, please use different colored lines to connect ports for distinguishing different ports.
- Please connect other lines before connecting the power cord, and finally power test. If it is found that the device cannot work normally after power is on, the power must be cut and check the device and all the lines.
- If the distance between the power supply and the device is far, it is strictly forbidden to use a network cable or other special wire instead of a power cord.
- When wiring the attendance device, due to abnormal wiring, the device circuit, motherboard, and fingerprint scanner are burnt out, which causes the device cannot be used normally, which is not within the scope of a warranty.
Recommended steps
- Step 1: Open the box to check the device and power on the device. Check for exceptions, set the date and time of the device, and install the device.
- Step 2: Add users and register users’ faces 、 fingerprints 、 cards 、 passwords, etc.
- Step 3:Set shift.
- Step 4:Set up shift schedules for users.
- Step 5:Download attendance records at the end of the month.
Touch the screen and a menu bar will pop up at the bottom of the screen, click ![]() to access a menu, when an admin is registered, After passing the verification of the admin’s face or card, or password then the menu can be entered
to access a menu, when an admin is registered, After passing the verification of the admin’s face or card, or password then the menu can be entered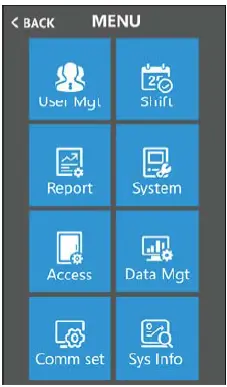
- User: Enrol user, view user list, department setting, download enrolment data
and upload enrolment data. - Shift: records warning setting, grace minimum setting, logs information.
- Report: Download attendance reports in Excel format
- System: It includes general settings, like time, language settings, and
firmware updating - Access: Set Wiegand output format, lock delay, time zone setting, and open
group setting - Data Mgt: Download records in txt format, delete data, and initialize the device
- Comm set: Set device No. , server setting, Ethernet setting
- Sys info: Query registration information and detailed information of a device.
User
The basic information of the user on the device includes face, fingerprint, card, password, and privilege. In attendance management, due to personnel changes. Therefore, the device provides add, delete, change the user, and other operations. Touch the screen and a menu bar will pop up at the bottom of the screen, ![]() click
click
>【User Mgt】, It includes adding user, user view, department setting, downloading enrolment data, and uploading enrolment data.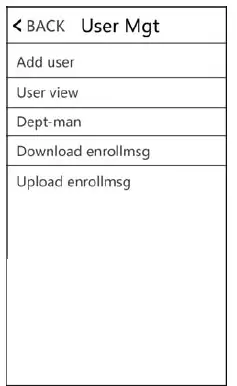
Enroll

- ID: When registering, each user can only have one unique ‘ID’.
- Name Input、edit name by T9 input method.
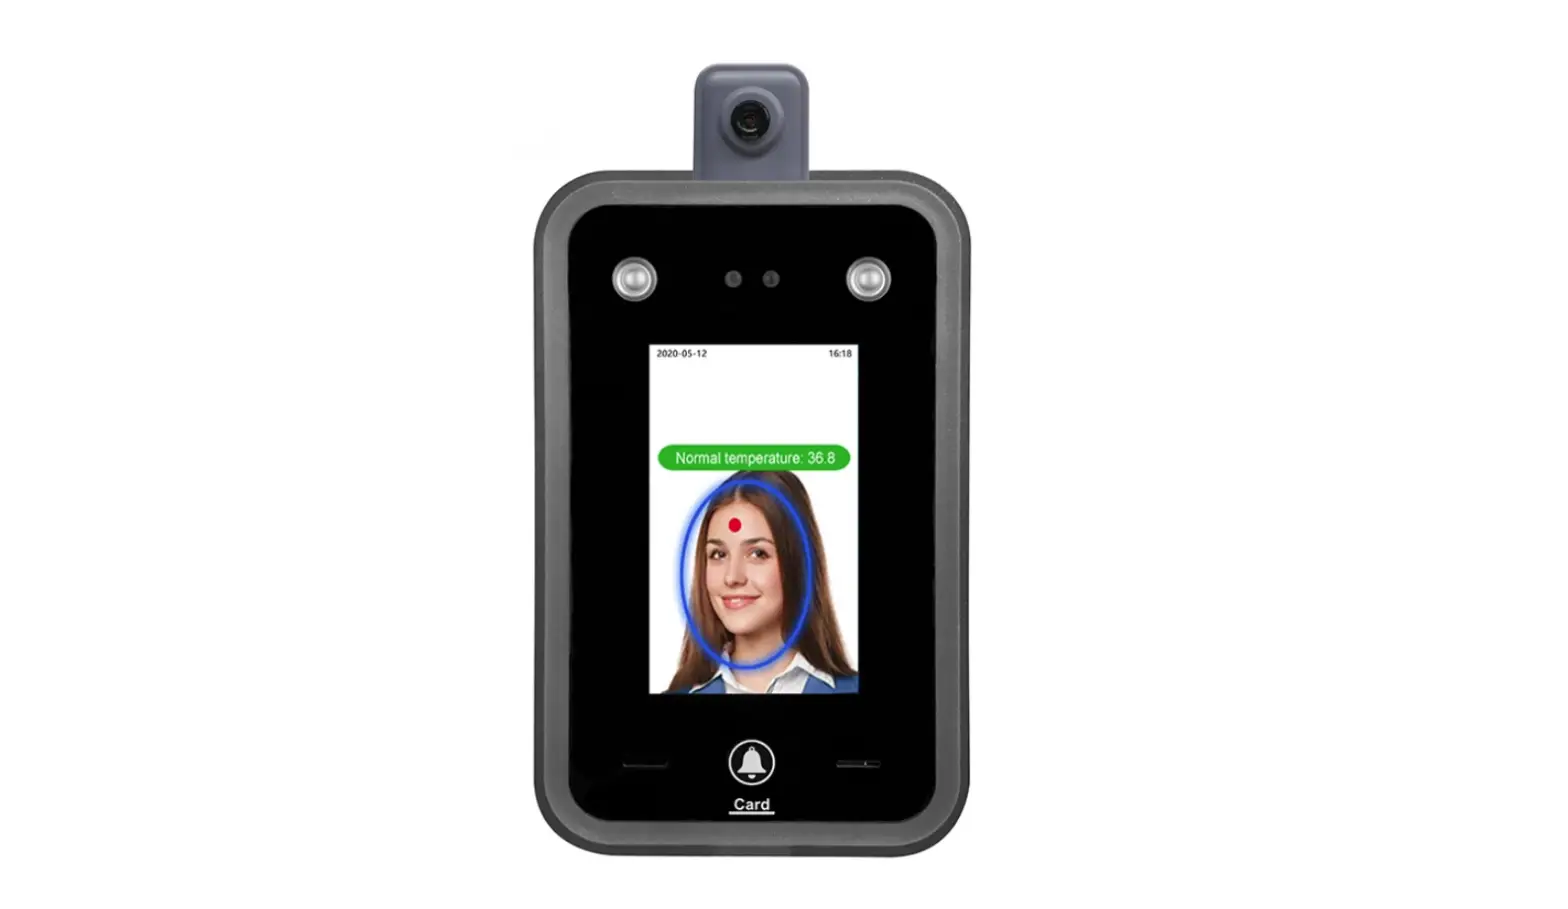
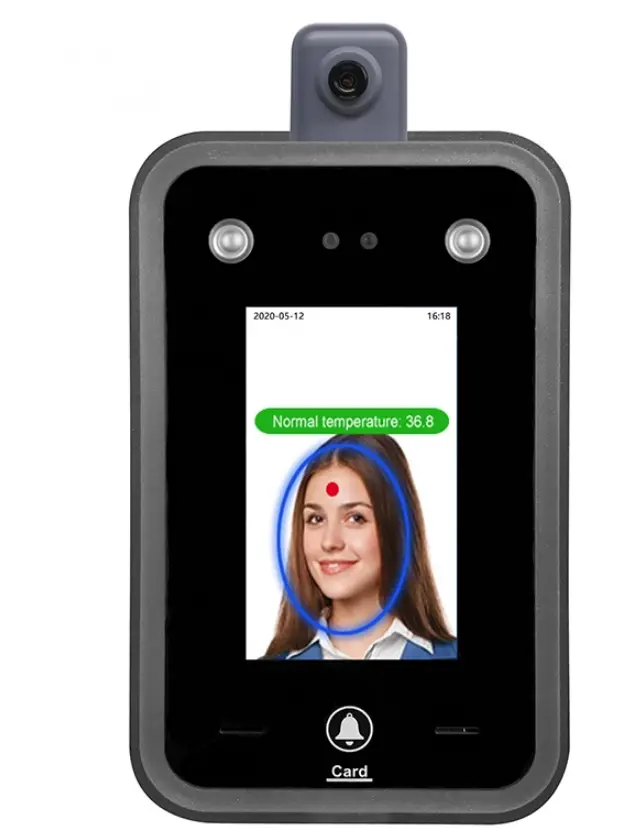
- Face: Follow the on-screen prompt for face registration.
Note: Please stand directly in front of the device, face the camera, and keep the entire face displayed in the frame, In order to maintain a good face recognition effect. The following picture is for your reference - Fingerprint: Press your finger three times to finish the enrollment
- Card: Select Reg.Card and put a card on the swipe area to register a card
- Password: An ID can only register one password. After clicking the password icon, enter the password to be set and then press ok to confirm the password again.
Remark: Verify the password by touching the screen then click ![]() then input ID-click ‘OK’-input password-click ‘OK’
then input ID-click ‘OK’-input password-click ‘OK’
User View
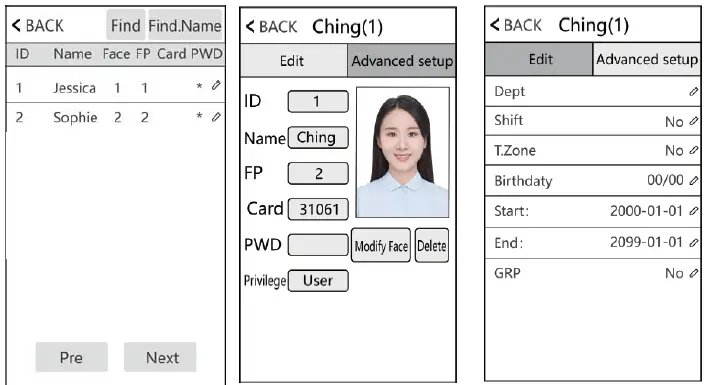
Browse all registered persons on the device, and click the corresponding user to edit its information, including name, password, dept, privilege, and access control settings; You can also change face registration information or delete this user, so you can quickly locate the user you want to edit by 【Find】 or 【Find Name】at the top of the page.
Note: For【Admin】, User and Admin and Super. user can be selected User: If there is Admin and Super. user in this device, a user is not allowed to access into menu Admin: The manager of this device. Only the admin has permission to access the menu. Super.user: Only when there is Admin in a device, then can register Super. user, and
Super. user can only operate part of the menu, such as register users
Dept.
Edit department name, up to 14 departments can be supported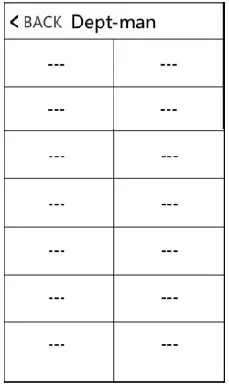
Download enrolling
Touch the screen and a menu bar will pop up at the bottom of the screen, click![]() 【User Mgt】>【Download enrollmsg】, insert U-disk in a device to download, 3 files will be exported as below:
【User Mgt】>【Download enrollmsg】, insert U-disk in a device to download, 3 files will be exported as below:
- User data file (AFP_001.dat): It can be used to synchronize users between devices, and ‘001’ represents device ID
- User’s enrolled photo(EnrollPhoto)
- User information Excel sheet(Staff): Users can edit it on PC and then upload it back to the device, please refer to the below picture:

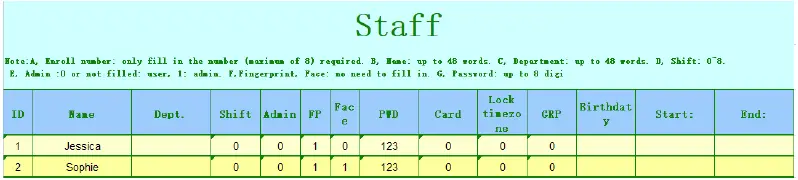
Fill in personnel information according to the prompt of the form header. As for the “Shift” item, it is the editing shift number in the time attendance setting. When completing the editing. Directly Click【Save】, and save the edited file into U-disk.
Up.Data
After editing the shift form, Touch the screen and a menu bar will pop up at the bottom of the screen, ![]() click >【User Mgt】, then insert U-disk, click【Upload enrollmsg】 and transmit the edited user information to a device. Remark: For Lock Time zone, start time, and end time, Pls refer to Chapter 9 Access
click >【User Mgt】, then insert U-disk, click【Upload enrollmsg】 and transmit the edited user information to a device. Remark: For Lock Time zone, start time, and end time, Pls refer to Chapter 9 Access
Shift
Touch the screen and a menu bar will pop up at the bottom of the screen, click![]() > 【Shift】>【Atten rule】, It includes attendance rules, shift settings, record warning settings, and log information.
> 【Shift】>【Atten rule】, It includes attendance rules, shift settings, record warning settings, and log information.
Atten rule
This chapter is used for setting shifts and attendance rules Touch the screen and a menu bar will pop up at the bottom of the screen, click ![]() 【Shift】>【Atten rules】
【Shift】>【Atten rules】
| Item | Meaning |
| Re verify | Check if users make punch repeatedly within this range if the records interval is less than this value, records won’t be stored |
| Log Warning | When resting available storage capacity is less than this value, the device will alarm |
| Save Photo | If select ‘Yes’, when the device connects to the software, captured a photo when users verify faces can be shown in the software |
| Stranger photo | If you select ‘Yes’ and enable ‘save photo’ when the device connects to the software, captured photo when strangers verify face can be shown in software |
| Default Shift | Set default shift, when you add users, they will apply this default shift |
| Excel Pwd | Set password for an attendance report |
| Late time | When the user’s late arrival time exceeds *** mins, then it is counted as late arrival. |
| Lea time | When the user’s early leave time exceeds *** mins, then it is counted as early leave. |
Shift
1) Edit shift(Single shift)Touch the screen and a menu bar will pop up at the bottom of the screen, click ![]() 【Shift】>【Edit Shift】
【Shift】>【Edit Shift】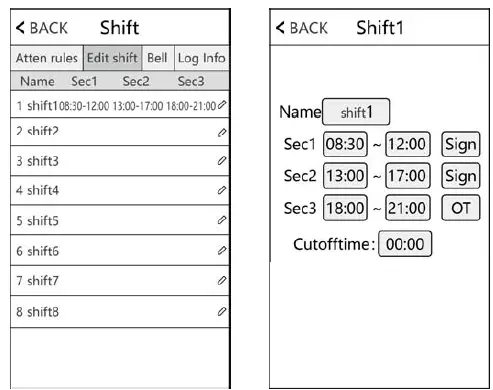
According to real work-time to edit shift, section status can be set as a sign(normal attendance) or overtime.
2) Edit Shift(Multiple shifts)
When there are multiple shifts, we recommend downloading a shifting sheet to edit shifts, editing all shifts through the shift sheet, and uploading them back to the device to avoid tedious operations on the device. Specific operations are as follows:
1. 【Download Shift】: Touch the screen and a menu bar will pop up at the bottom of the screen, click ![]() >【Shift】>【Atten rules】, then insert U-disk. Click
>【Shift】>【Atten rules】, then insert U-disk. Click
【Download Shift】, then you can download the shift arrangement in excel form, Also you can edit the form on PC. Pls refer to the below picture: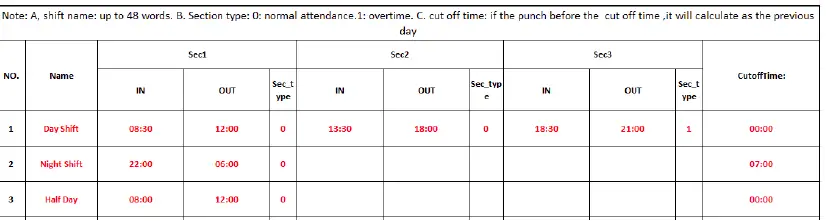
Edit shift arrangement according to the prompts of the form header. Maximum 8 shifts can be set. Click【Save】after editing and saving the file into U-disk.
Note:
- Attendance time must be in the format of the time, and attendance type must be in the format of digits. So when you handle the setting, pls pay attention that the input method is in English half-angle status. Checking Method: For example, when you input 10:30, double click this cell, then the software will automatically turn the digits into 10:30:00.
- If you set the shift of cross time, then the Clock-in before the cross-time will be counted as the record of the previous day. And shift should start after the cross-time.For example:

Cross time is set at 09:00 am. Then shift should start after 08:00, and the Clock-in record before 09:00 am on Tuesday should be counted as the record of Monday - If you don’t need to clock in at noon, combine the two sections into one. For example 08:30-12:00 13:30-17:50, it can be set to section 1: 08:30-17:50
- Time Skip setting is not allowed. For example, When you complete the setting of Section 1, you cannot skip Section 2 and get to set Section 3.

2. 【Upload shift】: After editing, insert U-disk and click【Upload Shift】, then you can upload the edited shift arrangements into the device.
Bell
Touch the screen and a menu bar will pop up at the bottom of the screen, click ![]() >【Shift】>【Bell】, Up to 24 groups of scheduled ring time. Touch the bell time to enable it.
>【Shift】>【Bell】, Up to 24 groups of scheduled ring time. Touch the bell time to enable it.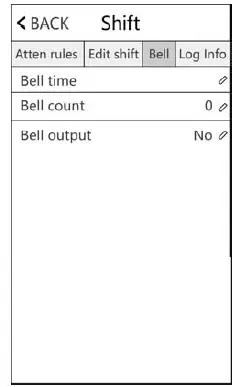
Log Info
Input the user ID and time range to query records of the corresponding user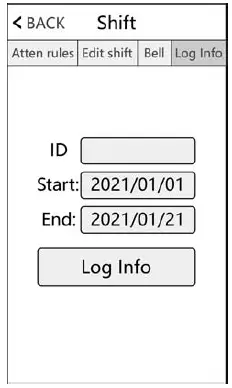
Report
Touch the screen and a menu bar will pop up at the bottom of the screen,
click ![]() >【Report】, Insert U-disk, and input the start and the end time that you need to check. Click “OK” to download the report. The report includes the original record sheet(Original Record), attendance list(Schedule), and summary sheet(Summary Report).
>【Report】, Insert U-disk, and input the start and the end time that you need to check. Click “OK” to download the report. The report includes the original record sheet(Original Record), attendance list(Schedule), and summary sheet(Summary Report).
Original Record: You can check all users’ attendance records on the sheet. Pls refer to the below picture:
Schedule: The attendance machine can automatically analyze the clock-in and clock-out data, and transmit these data in an EXCEL file to the U disk. Format as below: (Remark: Red text indicates that the attendance is abnormal, such as late, or early leave. Blue means overtime)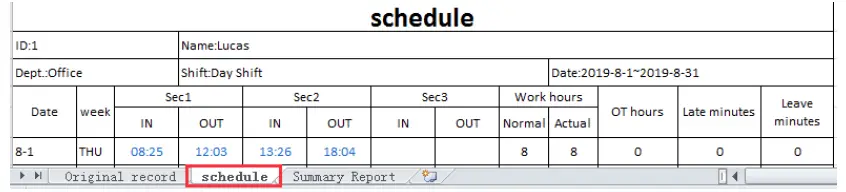
Summary Report: It is a Statistics display of employee attendance for one month
System
Touch the screen and a menu bar will pop up at the bottom of the screen, click![]() > 【System】
> 【System】
Device Setup
| Item | Meaning |
| Time | Set device time |
| Time fmt | 24H and 12H formats can be selected |
| Date format | Select different date format |
| Language | Change device displayed language |
Advanced setup
| Item | Meaning | ||
| Max Admin | Set the maximum number of device admin | ||
|
Verify Mode | FA/C/P | No matter what kind of verification method can be verified | |
| Others | Need to verify two verification methods together | ||
| Visitor QRCode | Whether enable scanning QRcode function or not. Connect device to our cloud software and generate QRCode then verify it in device | ||
| 1:N Identify | Set the threshold of face recognition | ||
| Live threshold | When enabling ‘bio-assay’, the threshold of face recognition | ||
| FP per user | Maximum number of fingerprints that can be registered per user | ||
| FP level | Set the threshold of fingerprint recognition | ||
|
Wear mask | No | The device will not detect the mask | |
| Yes | Users can wear a mask or not wear a mask to verify, if wear a mask, the threshold of face recognition is the same as the ‘mask threshold’ settings | ||
| Must | The device will detect a mask, if the user doesn’t wear a mask, | ||
| the device will not accept it | ||
| Mask threshold | When wearing a mask, the threshold of face recognition | |
| Exposure Compensation | When the device is in dark light and backlight environment, can change this value to adjust the camera | |
| Testing | Check whether the camera is normal | |
| Camera calibration | Calibrate camera | |
| Firmware upgrade | Insert U-disk (FAT32 format) to do a device firmware upgrade | |
Access
Touch the screen and a menu bar will pop up at the bottom of the screen, click ![]() > 【Access】
> 【Access】
| Item | Meaning |
| OD delay | Set the time between lock relay effective and the state of resume normal. |
| Sensor Mode | Set the type of door sensor, the default setting is ‘No’. |
| Sensor Delay | When door status is opposite to sensor mode and keeps this status for more than sensor delay, the device will alarm |
| Users | Set the number of users required to open the door. For example: set it to 2, only when 2 different users verify at the same time, the door can be opened |
| Anti pass | Anti pass function will be activated when it is set as in, out, or two way |
| Wg output | Define the content of Wiegand output, user ID and card number can be selected |
| Wg format | You can define the Wiegand port output format. The default format is 34bits, and it can be changed to 26bits |
| External Wg input | Connect external Wiegand reader |
| Tamper alarm | Set if the device alarm when the tamper button on the back side is released |
| Interlock | Set whether to open the interlock function |
| Alarm proc | It is used for responding to external detection equipment to output an alarm signal |
| Fail count | It is to set how many times the verification failure occurs, the device will alarm if set to 0, which means to disable this function |
Timezone settings
Day timezone
According to the rules and regulations of user’s entry and exit, set the daily access time to the corresponding time period. You can totally set 8 groups of day time zones, or week time zones. For example, you can set the time between 6:00 am and 8:00 am to open the door, and the time between 17:00 pm and 19:00 pm to open the door. Pls, refer to the below picture Day Timezone 1 setting. If you want to set the door to be open all day, pls refer to the below picture Day Timezone 2 setting.
Example:【Day Timezone 1】setting as below
| T.Zone1 | 06:00 | 08:00 |
| T.Zone2 | 17:00 | 19:00 |
| T.Zone3 | 00:00 | 00:00 |
| T.Zone4 | 00:00 | 00:00 |
| T.Zone5 | 00:00 | 00:00 |
Example:【Day Timezone 1】setting as below
| T.Zone1 | 00:00 | 23:59 |
| T.Zone2 | 00:00 | 00:00 |
| T.Zone3 | 00:00 | 00:00 |
| T.Zone4 | 00:00 | 00:00 |
| T.Zone5 | 00:00 | 00:00 |
Week timezone
According to the rules and regulations of user’s entry and exit, Set the passage time of each week to the corresponding day time zone. For example, the
The above-mentioned daily time zone rule(only 6:00 am to 8:00 am can open the door, and only 17:00 pm to 19:00 pm can open the door) applies from Monday to Friday, and the door can be opened all day on Saturday and Sunday. Pls refer to for Week Timezone 1:
| Week Timezone | |
| SUN | 2 |
| MON | 1 |
| TUE | 1 |
| WED | 1 |
| THU | 1 |
| FRI | 1 |
| SAT | 2 |
| Normal Open Time | |
| SUN | 1 |
| MON | 1 |
| TUE | 1 |
| WED | 1 |
| THU | 1 |
| FRI | 1 |
| SAT | 1 |
Remark: In our device, 【Week Timezone 0】is default to open the door all day. All other time zones are customizable
Normal open timezone
According to requirements, Set the passage time of each week to the corresponding day time zone. Example: If the setting is as (Figure 2), Day time 1 applies to every day, then it means the door is kept open between 6:00 am and 8:00 am and 17:00 pm to 19:00 pm every day
Open Group
Example: Set open group1 to 12, it means in the definition of user access control in the above section, it is defined that one from group 1 and another one from group 2 together to verify that can open the door
Example 1:Single one can open the door
Open group 1 1
Open group 2 0
…
Open group 5 0
In the above Settings, which means that only users belonging to group 1 have access to the door.
Example 2: Multiple users from the same group must together to verify that can open the door
Open group 1 111
Open group 2 0
…
Open group 5 0
In the above Settings, means that need 3 users belonging to group 1 must together to verify that have access to the door.
Example 3: Different users from different groups
Open group 1 12
Open group 2 0
…
Open group 5 0
In the above Settings, which means that need 2 users that one belonging to group 1 and another one belonging to group 2 must together to verify that have access to the door. Users belonging to group 1 and users belonging to group 2 do not have the right to open the door independently.
Data Mgt
Touch the screen and a menu bar will pop up at the bottom of the screen, click ![]() >【Data Mgt】, Data management consists of 6 modules: Download Glog、Download All Glog、 Clear All Enroll、Delete All Glog、Initialize Menu、Clean Manager.
>【Data Mgt】, Data management consists of 6 modules: Download Glog、Download All Glog、 Clear All Enroll、Delete All Glog、Initialize Menu、Clean Manager.
【Down Glog】:New attendance logs saved in the device can be downloaded to U-disk, and form a TXT file, eg:’GLG_001.TXT’
【Down All Glog】:All attendance logs saved in a device can be downloaded to U-disk, and form a TXT file, eg:’AGL_001.TXT’
【Clear All Enroll】:Delete all registration info of all users(including face、fingerprint、card and PWD)【Delete All Glog】:Delete all logs of all users
【Initialize Menu】:Reset device parameter settings, it won’t affect user data and records
【Clean Manager】:Clear all manager privileges on the device
Communication
Touch the screen and a menu bar will pop up at the bottom of the screen, click ![]() > 【Comm set】
> 【Comm set】
Comm set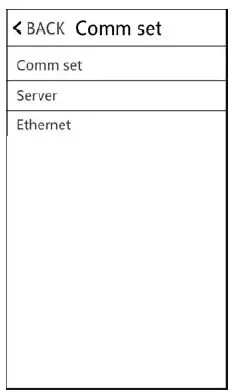
| Item | Meaning |
| Device ID | Set corresponding device No., the default device No. is 1, Please note that the number is related to the communication |
| Port No. | The default port No. is 5005, For communication connection under LAN |
| Baud rate | The default value is 9600 |
Server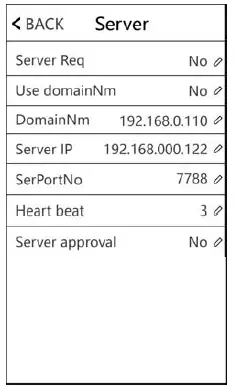
When using a WAN connection, please do the corresponding server settings
| Item | Meaning |
| Server Req | Select ‘Yes’ or ‘No’, and select ‘yes’ to enable server communication |
| Use domainNm | Select ‘Yes’ or ‘No’ |
| domain | If you select ‘Yes’ for ‘Use domain Nm’, enter the server domain name here |
| Server IP | If you select ‘No’ for ‘Use domain Nm’, enter the server IP address here |
| SerPortNo | Enter server port number |
| Heartbeat | The default value is 3s |
| Server approval | If set it to yes, only when the device connects to a server can users make punch in the device |
Ethernet
Use Ethernet to connect the device to a computer. An example is shown in the figure below: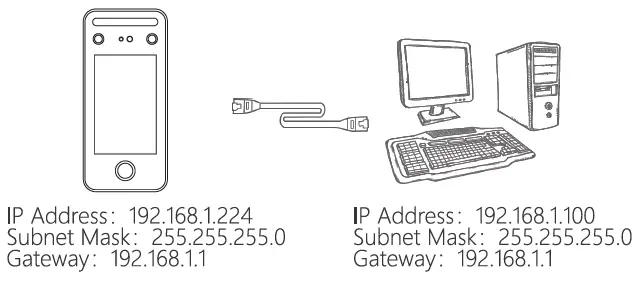
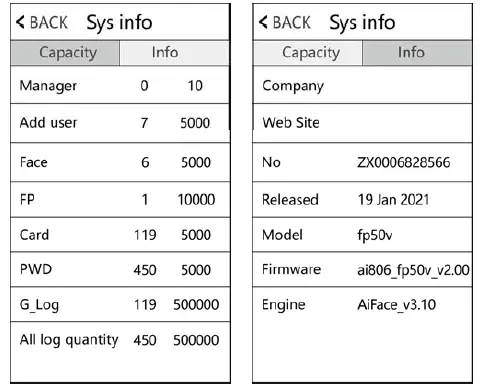
System Information
Touch the screen and a menu bar will pop up at the bottom of the screen, click ![]() > 【Sys info】, query registration information, and detailed information about the device.
> 【Sys info】, query registration information, and detailed information about the device.
Appendix1 Schematic Diagram of Access Control Wiring
- Schematic diagram of device wiring port
| +12V | +12V |
| GND | GND |
| Lock_ COM | The common end of the control lock signal |
| Lock_ NC | The normally closed end of the control lock signal |
| Lock_ NO | Normal opened end of the control lock signal |
| Button | Open signal |
| D-Sensor | Door sensor |
| Bell+ | Doorbell + |
| Bell- | Doorbell – |
| +12V | +12V |
| GND | GND |
| +12V | +12V |
| GND | GND |
| WG_IN0 | WG input 0 |
| WG_IN1 | WG input 1 |
| WG_OUT0 | WG output 0 |
| WG_OUT1 | WG output 0 |
| ALARM- | Alarm- |
| FIRE | Fire in |
| +12V | +12V |
| RS485A | RS485A |
| RS485B | RS485B |
| GND | GND |
|
TCP/IP |
TCP/IP interface |
2) Device connection diagram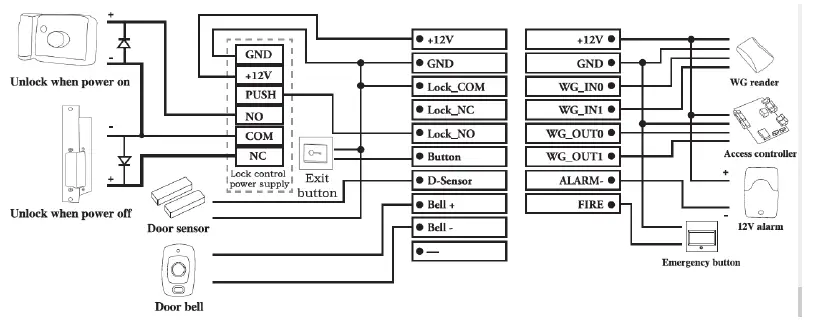
3) RS485 connection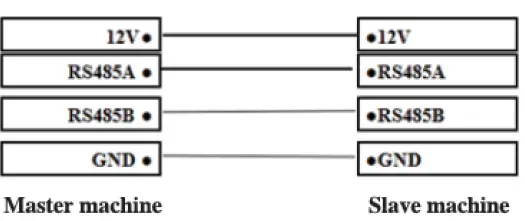
Appendix2 Input Method Introduction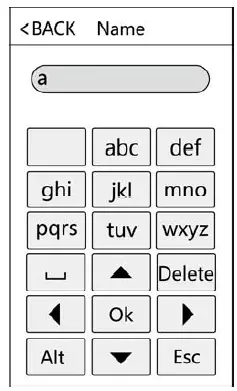
Touch ‘Alt’ to switch capital/small letter or number, after finished, touch ‘Ok’ to save it How to input punctuation: when the input method is in a capital/small letter state, touch ‘ ’ to select what you want to input. The first one is space, the second is dotandsoon


![Hikvision Ds-k1t671 Series Face Recognition Terminal [ud15607b-a] User Manual](https://static-data1.manualsee.com/1/img/170/17304/2020/12/Hikvision-DS-K1T671-Series-Face-Recognition-Terminal.jpg "Hikvision Ds-k1t671 Series Face Recognition Terminal [ud15607b-a] User Manual")


