Autel Robotics AR82060038 Dragonfish Base Station

Disclaimer
To ensure safe and successful operation of your base station, please follow the operating instructions and steps in this manual.
If the user chooses not to abide by the safety operation instructions, Autel Robotics will not be held responsible for any product damage or loss (whether direct or indirect, legal, special, accidental or economical (including but not limited to loss of profit)) during use, and will not provide warranty service. Do not use incompatible parts or modify the product in any way that does not comply with the official instructions of Autel Robotics. The safety guidelines in this manual will be updated from time to time. To ensure that you get the latest version, please visit www.autelrobotics.com
Battery safety
The Dragonfish base station is powered by lithium polymer batteries. Improper use of these batteries can be dangerous. Please ensure to follow the battery usage, charging and storage guidelines outlined in this document.
Warning
- Only use the battery and charger provided by Autel Robotics. It is prohibited to modify the battery pack and its charger, or use third-party equipment to replace it.
- The electrolyte in the battery is extremely corrosive. If the electrolyte accidentally splashes into your eyes or skin, please wash the affected area with clean water immediately and consult a doctor.
Precautions
- It is recommended to use the base stations with corresponding frequency bands that comply with local laws and regulations.
- Do not excessively bend and fold the cables during installation.
- When installing and placing the base station, make sure that the base station is level with the surface.
- Use the base station in an open environment free from radio interference. Be sure to turn off other wireless devices in the same frequency band before using it.
- Make sure that all device antennas are not blocked during use.
- Use original accessories or accessories certified by Autel Robotics. The use of non-original accessories may cause danger and compromise the system.
- Ensure that there are no foreign objects or substances (such as water, oil and other liquids, sand, etc.) inside the system.
- Do not remove any parts installed at the factory by yourself.
- When using the base station in rain or snow, please ensure that the device is safely covered to prevent damage. Also, pay careful attention when using the base station in weather conditions where there is thunder or lightning.
Introduction
The Dragonfish base station (hereinafter referred to as “base station”) is a high-precision satellite signal receiver that supports GPS, Beidou, Galileo, and GLONASS navigation systems. It has a built-in data transmission system that has been designed to operate in various applications and environments. The Dragonfish RTK base station allows for centimeter-level positioning accuracy, and provides strong anti-magnetic interference capabilities to ensure a smooth and reliable flight, even in areas near power lines and buildings.
NO | Diagram | Item Name | Qty |
| 1 | 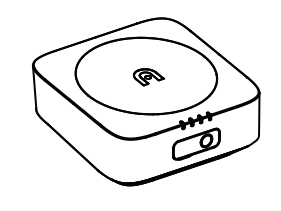 | B (sinascelusdtiantgiobnase tation cover) | 1pc |
| 2 | 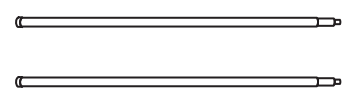 | Banatseensntation | 2pcs |
| 3 | 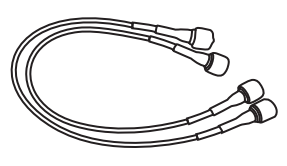 | Bcoansenesctatitniogn able | 2pcs |
| 4 |  | Btraye station | 1pc |
| 5 | 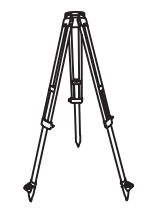 | Btraipsoedstation | 1pc |
| 6 | 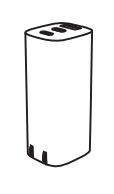 | Power Adapter | 1pc |
| 7 | 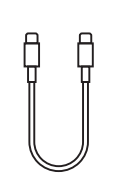 | UcaSbBleType C | 1pc |
| 8 |  | Documentation | 1pc |
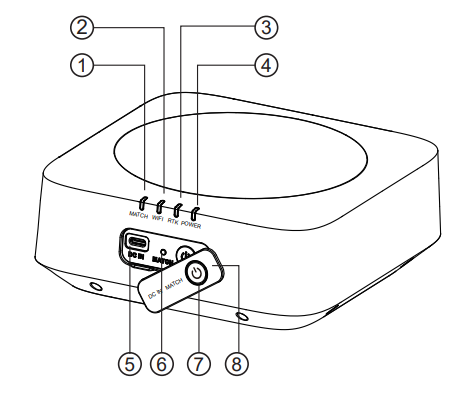
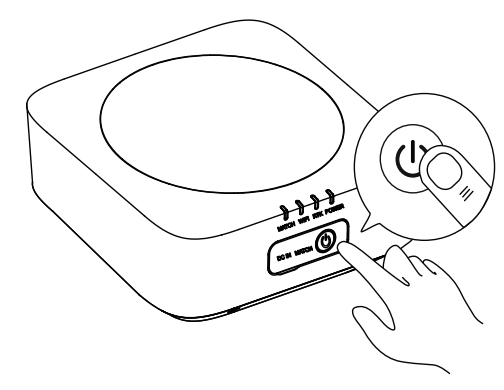
Main components of the base station body
- Linking indicator
- WiFi indicator
- RTK indicator
- Power indicator
- USB-C charging port
- Link button
- Power button
- Port cover

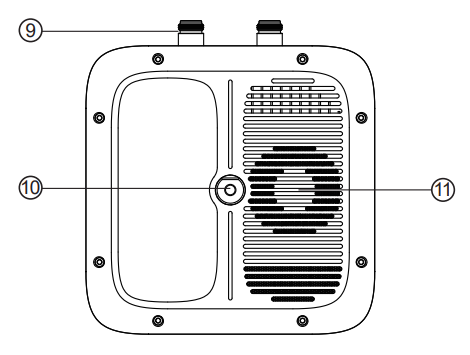
- Antenna N-type connector
- Tripod mounting hole
- Heat outlet

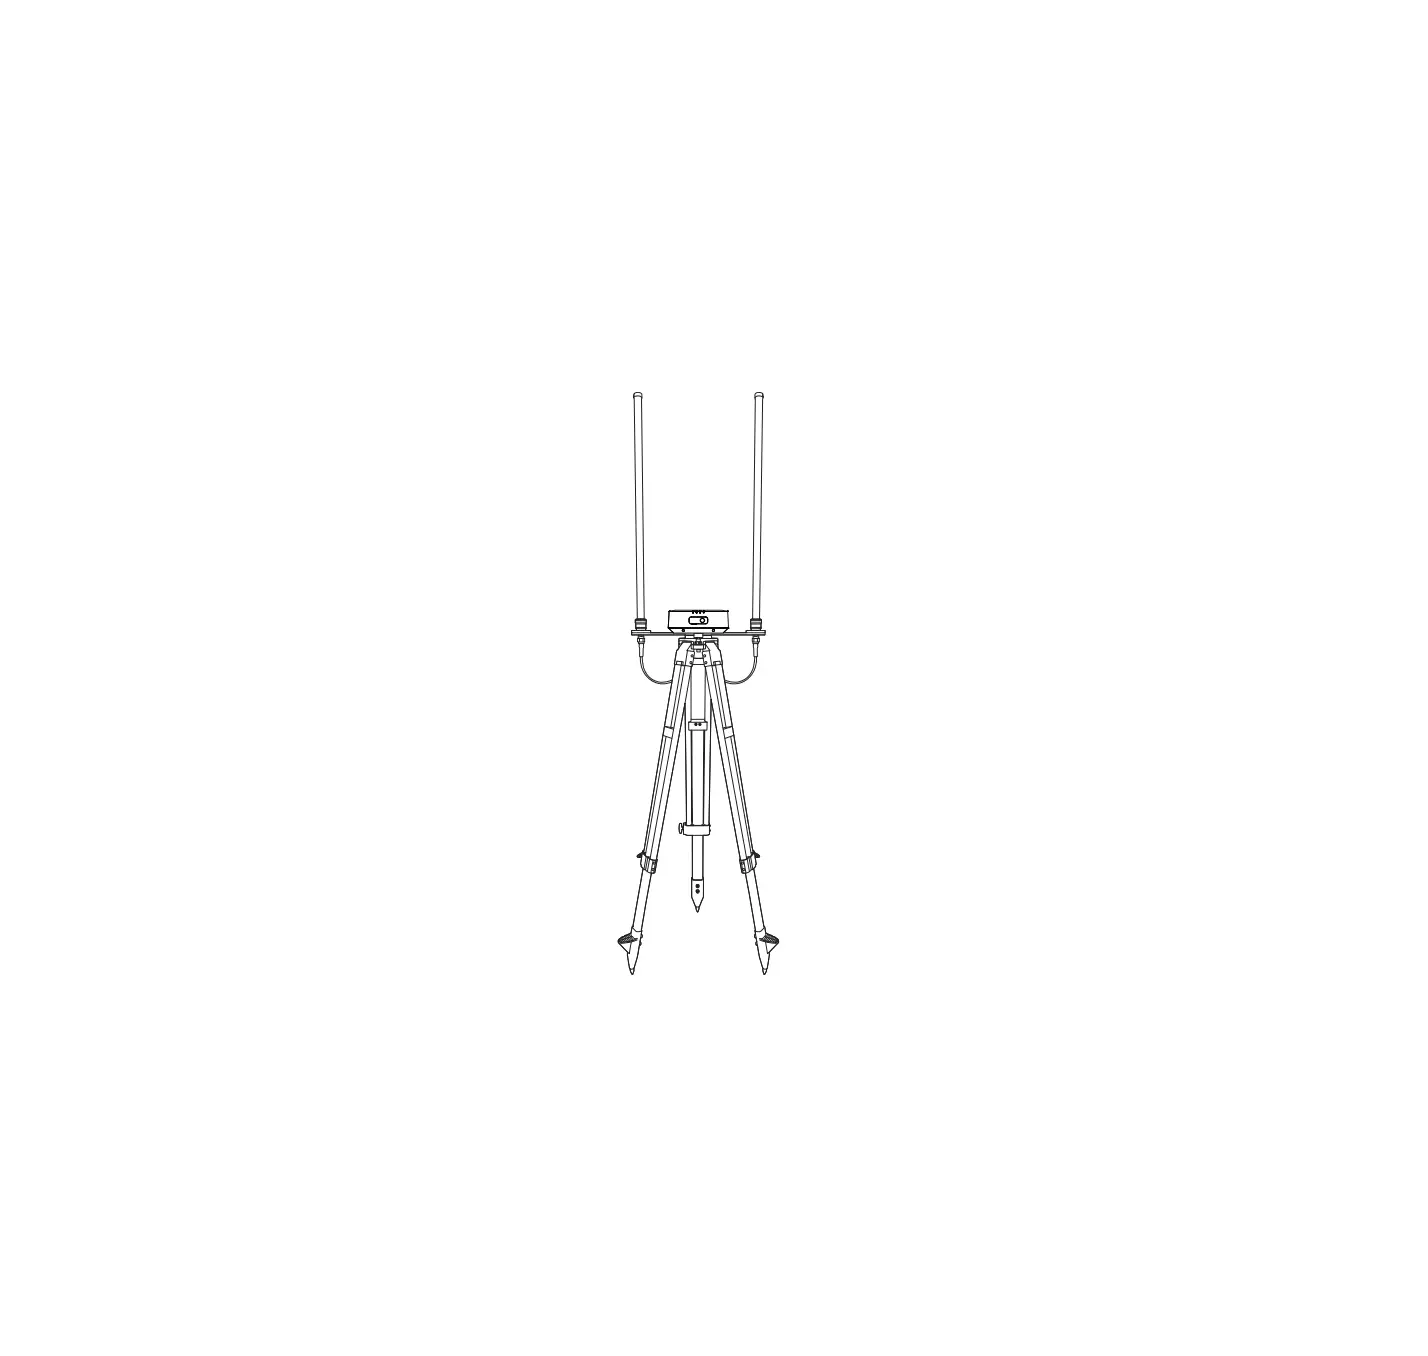
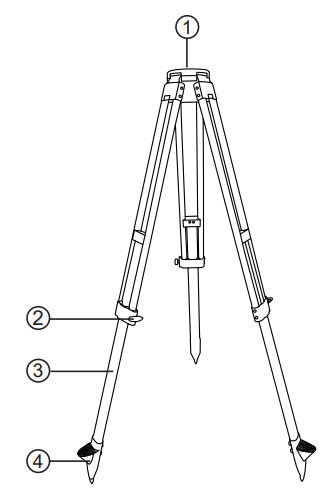
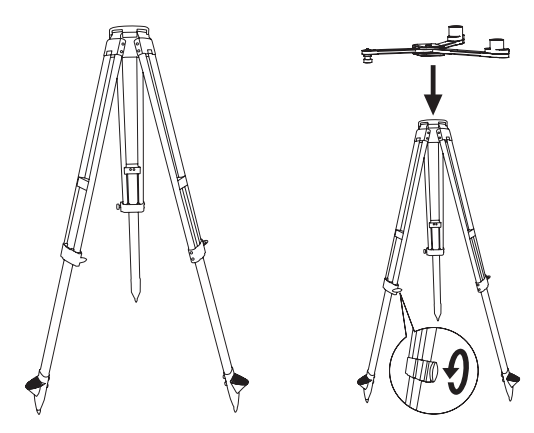
Tripod
- Mounting plate screw
- Friction control lock
- Leg column
- Foot nail

Preparation
Charging the battery
To check the battery level, short press (less than 1 second) the power button once.
| Power Indicators | Status |
| Green | Power is >60% |
| Yellow | Power is >30% |
| Red | Power is >10% |
| Red flashing slowly | Power is <10% |
Charging method
When using the base station for the first time, be sure to fully charge the battery. Please use a dedicated charger to charge the base station.
- Plug the Type-C power cord into the Type-C port of the base station. The base station will automatically enter the charging mode.
- When charging, the power indicator of the base station flashes, and the battery power is indicated by means of different colors. When connected to the charging power source, the base station power indicator light is steady green to indicate that it is fully charged.
Turning the base station on/of
Turning on
The base station has two working modes, namely normal mode and disabled RTK mode. Both can be used for different operating scenarios. Follow the instructions below to turn on the base station and enter different working modes.
- When the base station is off, press and hold the power button for 1 second to enter the normal mode.
- When the base station is off, press and hold the power button for 3 seconds to enter the disabled RTK mode. The buzzer will beep 3 times and the RTK indicator shows static red.
Turning off
Long press the power button for 1 second to turn off the base station.
RTK indicator description
| Color Indicator | Status |
| Green | Signals from >16 satellites received (good signal for flight) |
| Yellow | Signals from 6-15 satellites received (poor signal, itis recommended to adjustthe base station to an open area) |
| Rsleodwfllyashing | Signals from <6 satellites received (very poor signal, it is recommended to adjust the base station to an open area) |
| Lights off | No RTK signal (abnormal RTK functioning or base station) |
How to use the base station
Connection method
When using the normal mode, follow the instructions below.
- Base station and aircraft frequency
- Click the base station link button, and the link light will flash.
- Short press the link button in the battery compartment of the aircraft to enable the aircraft to enter the linking state. During the linking process, the linking light on the aircraft body will flash.
- Once linking is successful, the linking light on the base station will flash green quickly in 2 second intervals.
- Connecting the ground station to the base station
- Power on the base station
- Turn on the remote control and run the Autel VoyagerApp, “Settings ->Base Station”. You will be able to see the base station WiFi/hotspot, then enter the password 12345678, and wait a few seconds until the Dragonfish base station is displayed on the remote control.
- Exitthe settings interface, enterthe mission flight interface, click the gear icon in the upper right corner, enter the settings menu, click “remote control”, and turn on the “use base station connection” option.
Video transmission status indicator description
| Green light blinks slowly in 1.5 second intervals | Video transmission is not connected |
| Green light flashes very quickly in quick succession | Video linking |
| Green light flashes quickly between 2 second intervals. | Image transmission (normal connection) |
| Green light blinks for 3 seconds in 0.2 second intervals | Upgrade download data |
| Steady green light | download data Firmware upgrade |
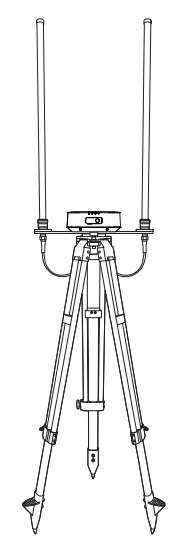
Setting up the Dragonfish base station
Choose an open area to set up the base station and allocate a mark on the ground (aligning the center of the tripod with the center of the mark point) so that the base station can be accuratelyreset after being mo
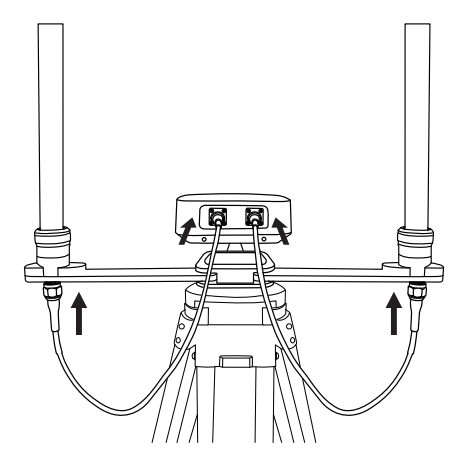
- Open up the tripod, stretch the three leg column to a suitable length, and then tighten the knob at the top to ensure that the tripod is stable.

- Install the main body of the base station to the tripod and tighten the lock nut on the main body. Ensure that the base station is level and stable.

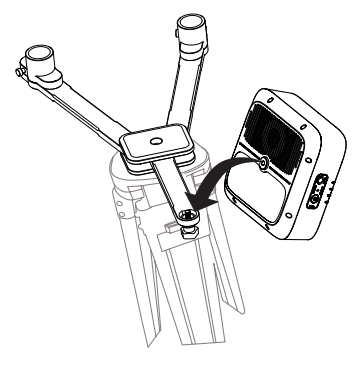
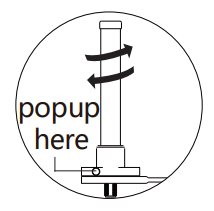
- Assemble/Disassemble the antenna.
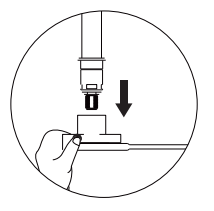
Assembly
Press button to insert the antenna

Rotate the antenna until the button pops up.Disassembly
Press and hold the button and pull out the antenna
- Install the antenna on the tripod and connect the antenna feeder to the base station antenna port.


NOTE:
After the tripod is leveled, do not change the position and angle of the tripod or base station, otherwise you may need to level it again.
Make sure that the surrounding area is open and that there are no obstacles (trees, buildings) nearby that could affect the GNSS signal.
The installation area of the base station should be at least 200m away from any high-power radio sources (such as TV stations, microwave stations, etc.), and at least 50m away from high-voltage transmission lines to avoid electromagnetic fields from affecting GNSS signals.
There should be no large area of water or objects as these can strongly interfere with the satellite signal reception, impacting the normal functioning of the base station.
During a flight mission, the base station must not be moved, otherwise it may disconnect from the aircraft, affecting normal operation.
How to use the Dragonfish base station
- Adjust the base station to a suitable height.
- Power on the base station and wait for the system to complete initialization.
- Power on the ground station and aircraft, and make sure that Autel Voyager is running.
- Enter the mission flight interface, click the gear icon in the upper right corner, enter the settings menu, click “Ground Station”, and ensure that the “Use Base Station Connection” option is turned on.
- Confirm that the base station RTK indicator is green, indicating that the base station RTK is working properly. Enter the Autel Voyager App mission flight interface, and check that “the ground station is connected to the aircraft” in the upper left status bar. Check that the RTK status in the upper right status bar is FIX, which means the aircraft has entered the RTK positioning mod
Specifications
| GNSS receiver | frequency | Simultaneous receive: GPS: L1, L2, L5 BeiDou: B1, B2, B3 GLONASS: F1, F2 Galileo: E1, E5A, E5B |
| Positioning accuracy | Single Point Horizontal: 1.5 m (RMS) Vertical: 3.0 m (RMS) RTK Horizontal: 1 cm+1ppm(RMS) Vertical: 1.5 cm+ 1 ppm(RMS) 1 ppm: For every 1 km increase in distance, the accuracy will be 1 mm less. For example, the horizontal accuracy is 1.1 cm when the receiving end is 1 km away from the base station. | |
| Positioning update rate | 1 Hz,2 Hz,5 Hz,10 Hz and 20 Hz | |
| Cold start | < 40 s | |
| Hot start | < 10 s | |
| Recapture | < 1 s | |
| Initialization reliability | > 99.9% | |
| Differential data transmission format | RTCM 2.X/3.X | |
| Communication and data storage | Data link | Image transmission, Wi-Fi |
| Image transmission Operating frequency | 902-928 MHz; 2.400-2.4835 GHz; | |
| EIRP (Equivalent radiated power) | 902-928 MHz FCC:< 30 dBm 2.400-2.4835 GHz FCC:< 30 dBm SRRC/CE/MIC:< 2 | |
| Wifi Operating frequency | 2.400-2.4835 GHz; 5.125-5.25GHz;5.650-5.755GHz; 5.725-5.850GHz | |
| EIRP (Equivalent radiated power) | 2.400-2.4835 GHz FCC:< 26 dBm SRRC/CE/MIC:< 20dBm 5.125-5.25GHz FCC/SRRC:<26dBm 5.650-5.755GHz MIC:< 20 dBm 5.725-5.850GHz SRRC/FCC:< 26 dBm;CE:< 14 dBm | |
| Communication distance | Mobile station and aircraft: 30km (FCC) Mobile station and remote control: 200m (FCC) (Unobstructed and free of interference, when the mobile station is used as a base station and the distance from the mobile station antenna to the bottom of the tripod is 2m; and when the difference in height between the remote controller and mobile station is less than 10 m, and when the remote controller is 1.2 m from ground level) | |
| Electrical characteristics | Power consumption | 7.5 W |
| Power supply | 5 to 20V DC (supports USB PD charging protocol) | |
| Battery | Type: lithium ion polymer battery Capacity: 4950 mAh Energy: 57.1 | |
| Run time | >7.5 h | |
| Size (Base station body + extension rod) | 193 mm×177 mm×73 mm | |
| Weight | 1275g | |
| Dustproof and waterproof | IP64 | |
| Operating temperature | 20°C to 50°C |
 NOTE: This content may be updated without prior notice. You can check the latest version on the official website of Autel Robotics at www.autelrobotics.com.