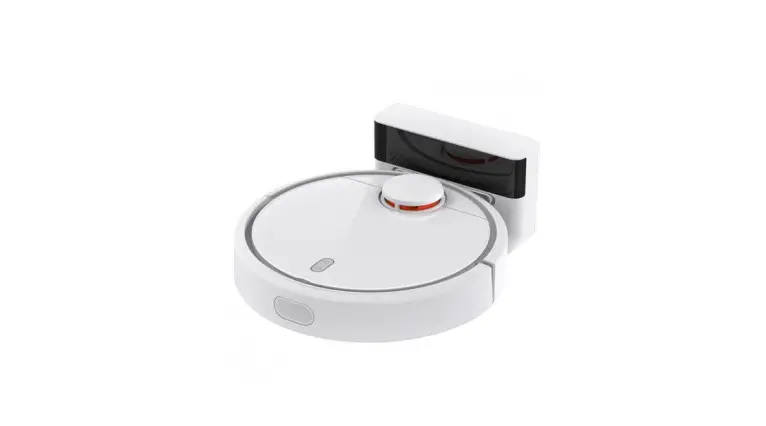
Xiaomi Intelligent Robotic Vacuum Cleaner User Manual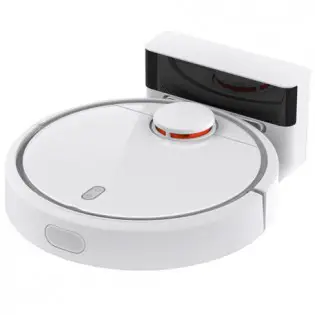
Safety instructions
When using the product, please remain vigilant and follow the following Content: Please read this instruction carefully before using the product and keep it properly.
![]() Pay attention
Pay attention
- The problems that may occur during the cleaning of the product should be eliminated as soon as possible. Pick up the power cord and small objects on the floor to avoid obstruction of the product during the cleaning process. Fold the fringe of the carpet under the carpet, and keep the hanging curtains and tablecloths away from the ground.
- If there is a suspended environment such as stairs, please test the product first to see if it can detect the edge of the suspended area without falling. A protective fence should be set at the edge of the suspended area to prevent the product from falling. It should be ensured that the protective device will not cause personal injurysuch as tumble. The critical value of the anti-drop function of the machine is above 12cm, lower than this height may cause the machine to fall.
- Please !follow the instructions in the manual to use the product. Only use accessories recommended or sold by the manufacturer.
- Make sure that the power supply voltage matches the voltage marked on the power cord.
- Before using the product, confirm that the dust box and filter net have been installed in place.
- f the charger is damaged, in order to avoid danger, it must be replaced by professionals from the manufacturer, its maintenance department or similar depatrments.
- Before cleaning and maintenance products please turn the product off the power switch, off the power switch of the product.
- Before cleaning and maintaining the product, you should unplug the plug from the power outlet in the first time.
- Before discard the product, please remove the product from the charging dock, turn off the power switch of the product, and remove the battery.
- If the product will not be used for a long time, please power off the product (turn off the power switch, unplug the power cord).
- Before discard the product, the battery of the product must be removed and with local laws and regulations.
- The product cannot be used by children under the age of 8 or people with mental disabilities. If you need to use it, please do it under the supervision and guidance of a guardian. Please do not let children ride on the product or play with the product as a toy.
- Use only indoor home environment, do not use in outdoor, commercial and industrial sites.
- Do not use the product in infants sleeping room.
- Do not use the product with a damaged charger or power sodcet. If the product cannot work normally due to falling, damage, outdoor use or water, do not use the product.To avoid injury, the product should be repaired by the manufacturer or after-sales personnel.
- Please use the product in accordance with the instructions in the manual. our company will not bet responsible for any loss and damage caused by improper use.
![]() caveat
caveat
- Only the original charging dock provided by the manufacturer is applicable. It is forbidden for the user to change the battery privately. If you suspect that the battery is damaged, please contact the manufacturer, authorized dealer or a professional in similar departments to replace it.
- It is forbidden to use the product in an environment with open flames or fragile objects.
- Don t use the product in extremely hot (above 40 °C) or cold (below 0 deg.) C) environment.
- It is for bidden to upt your hair clothes,fingers and other parts into the machine.
- It is forbidden to use the product on wet or watery ground.
- It is forbidden for the product to absorb anything that may block the product, such as stones, wastepaper, etc.
- The product is forbidden to absorb any flammable materials, such as gasoline and toner for printers or copies. It is forbidden to usethe product in the areas with flammable materials.
- It is forbidden for the product to absorb any buming items, such as cigarettes, matches, ashes and other items that may cause afire.
- It is forbidden to place objects in the suction port. Do not use the product when the suction port is blocked. Clean up the dust, lint, hair, etc. at the suction port to ensure air intake is good.
- Use the power cord carefully to avoid damage.lt isforbidden to use the power cord to drag or lift the product and product charging stand. It is forbidden to use the power cord as a handle. It is forbidden to clamp the power cord in theoorgap. It is forbidden to pull the power cord at sharp corners and corners. , and the power cord should be kept away from heat sources.
- It is forbidden to use damaged charging dock. if the charging dock is damaged, it must be repaired or replaced by professionals from the manufacturer, authorized dealer or similar department in order to avoid danger.
- It is forbidden to incinerate the product even when the product has been severely damaged. The battery of the product may explode as a result.
Instructions for disposing of batteries
If you want to discard the battery in this machine, please do not throw it away along with household garbage, but hand it over to the nearest waste battery recycling station or our branch or after-sales service center for centralized disposal.
The following description isnot for general users, but for the final disposal of the battery disposal instructions.
The chemical substances contained in the battery built into this unit will pollute the environment. Before disposing of the robot, please take out the battery in the fuselage in advance. The battery should be handed over to a professional battery collection point for centralized disposal.
Be careful! Leakage of the battery will cause human injury! If the battery leaks, make sure to avoid contact with eyes or skin. In case of accidental contact, please wash your hands and eyes with clean water immediately. If you still feel unwell, seek medical attention immediately.
![]() Remove the battery
Remove the battery
Pay attention to: The following information is only applicable when discarding this robot, not a daily operation instruction!
- Remove the battery only when the power in the battery is completely exhausted. Don’ t let the battery come in contact with metal objects.
- The steps to remove the battery are as follows:
- Let the robot run until it is completely out of power without touching the charging stand
- Turn off the robot power switch
- Remove the screws on the battery cover
- Remove the battery cover
- Pull out the connector plug of the battery and remove the battery.
Product composition/packing list
| Robot sweeper | |||
| Instruction Manual | |||
| Mop | The power adapter | ||
| battery (Instalki in the machine) | Dust box (installd in the machine) | ||
| 1 piece | |||
| Middle sweeping brush ( Installed in the machine) | 1 piece | ||
Robot sweeper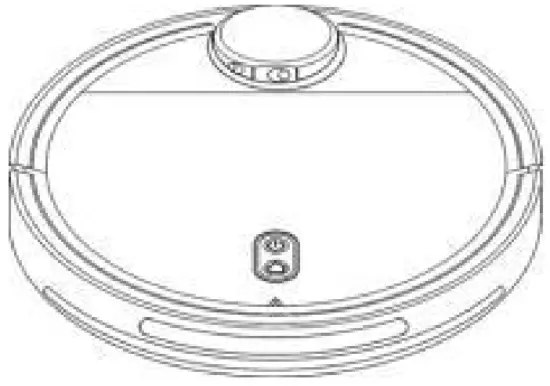
Recharge dock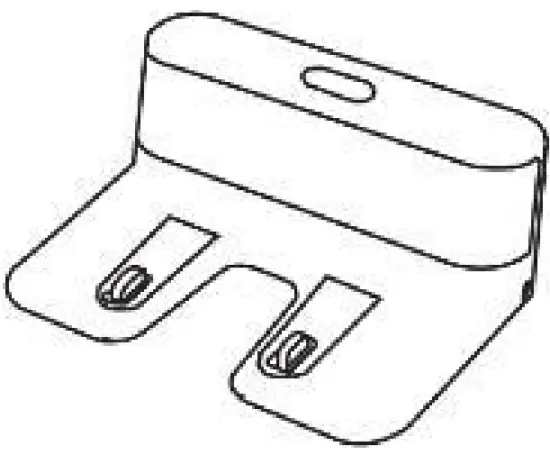
The power adapt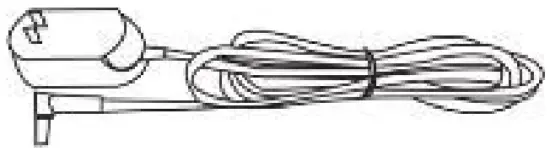
battery (Installd in the machine)
Middle sweeping brush (Installd in the machine)
side brush
Water tank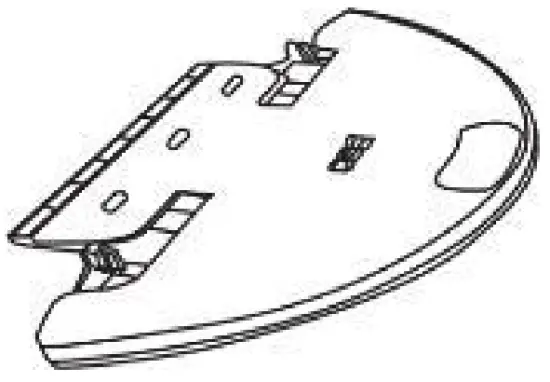
Mop
Dust box (installed in the machine)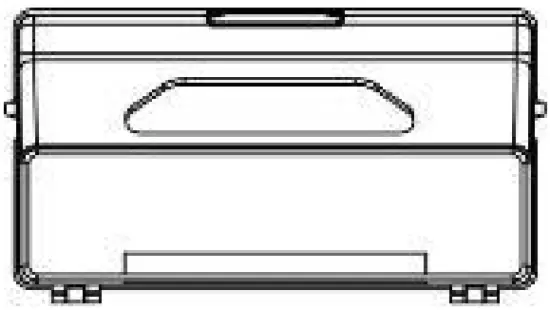
Instruction Manual
Filter screen
Front View
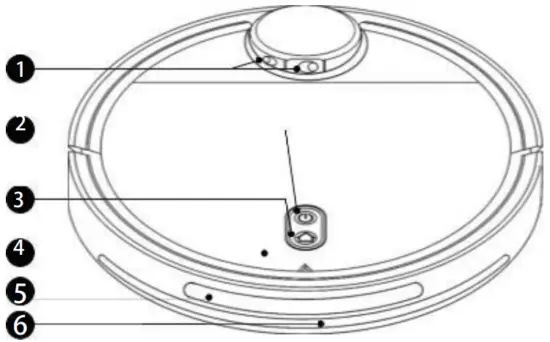
- Laser Sensor
- Start Button
- Charging Button
- Flip Lids
- Anti-Impingement sensor
- Infrared sensor
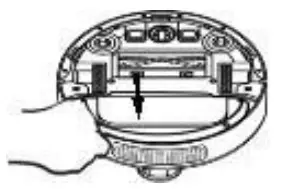
Back View
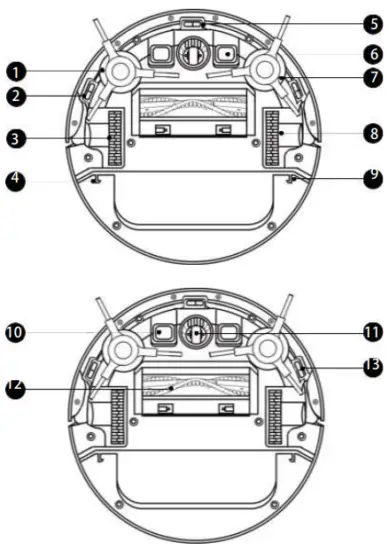
- Side brush
- Anti-droping sensor
- wheel
- Water tank installation position
- Anti-droping sensor
- Recharging Contact
- Side brush
- Wheel
- Water tank installation position
- Recharging Contact
- Cardan Wheel
- Suction port
- Anti droping sensor
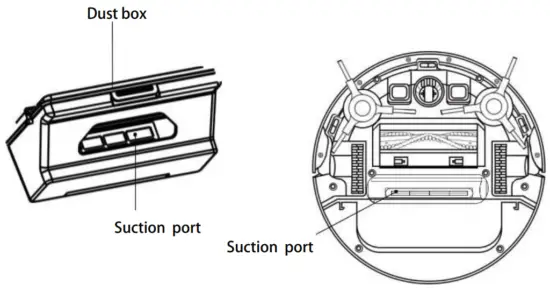
Dust box

Suction port
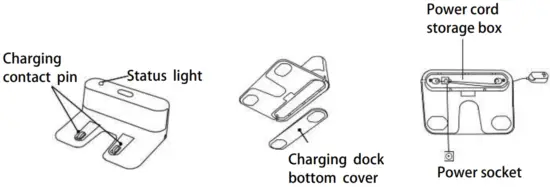
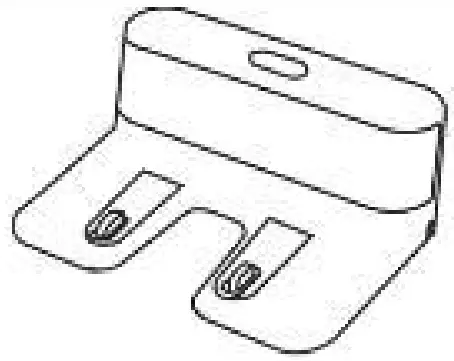
Charging dock
Product use/precautions
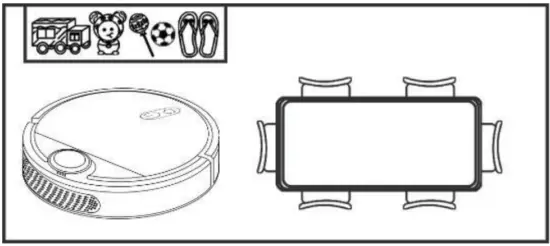
- Arrange the furniture neatly Before each use, please arrange tables and chairs and other furniture and sundries neatly, and organize the largest cleaning space.

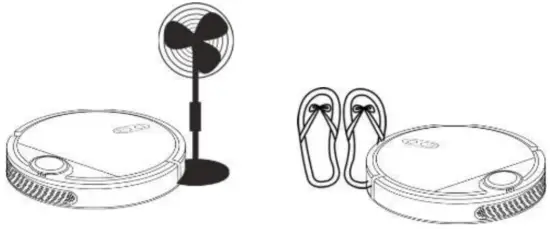
- Exclude unfriendly obstacles Remove or block slippers, floor fan base and other low objects that may affect the normal work of the intelligent sweeping robot.

- Do not use the mop function on the carpet If the carpet in the home has fringe edge, please Fold the fringe of carpet under the carpet.

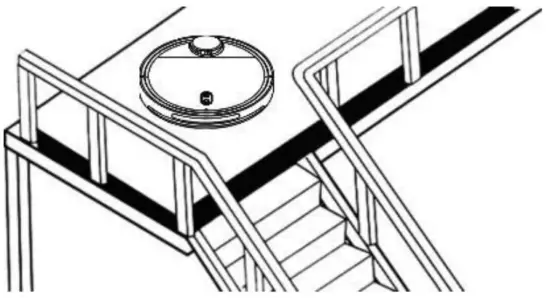
- Prevent intelligent sweeping robot from falling If the sweeper is performing tasks at the entrance of duplex stairs and the edge of steps, please place protective guardrail to ensure its safety and smooth operation.

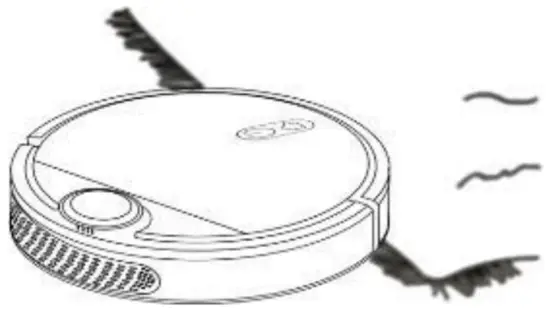
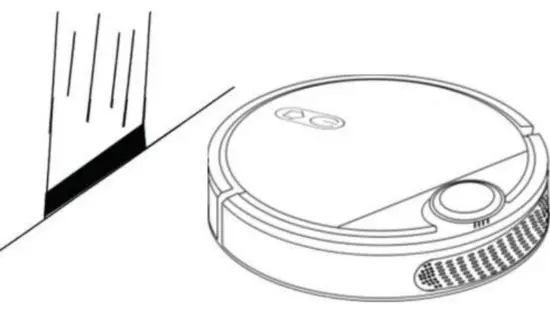
- Block objects with strong reflective surfaces
Please make sure that there is no object with strong reflective surface within 8cm from the ground; if so, please block it to avoid affecting the detection and cleaning route of the intelligent sweeping robot. (Strong light will interfere with the work of the sweeper sensor)
reminder:
When using for the first time, please pay attenion to the intelligent sweeping robot throughout the whole process to help the intelligent sweeping robot eliminate some unfriendly small problems, so that the intelligent sweeping robot can clean smoothly. When following the intelligent sweeping robot, please pay attention not to block the sweeping robot
Product use/accessory installation
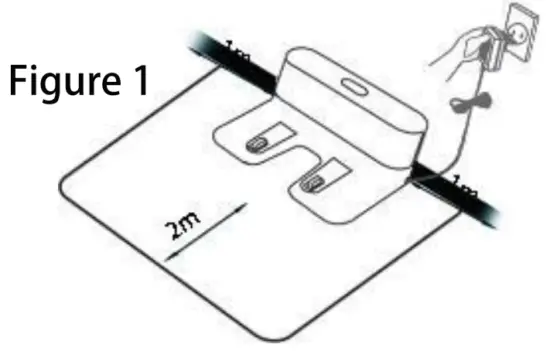
- Find a suitable location to place the charging dock
- The charging dock is placed against the wall and placed on a flat ground. Do not place objects within 0.5m from left to right and 1.5m in front of it.
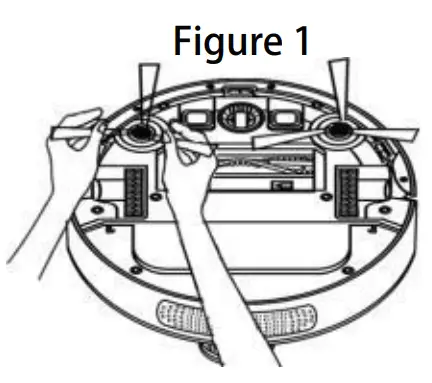
- If there is a mirror or other highly reflective objects near the charging dock, the bottom 8cm should be shielded. (See Figure 1 below)

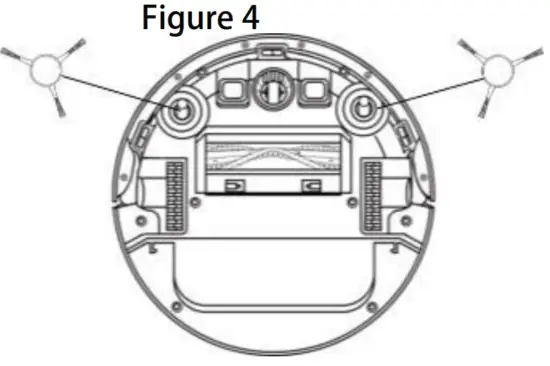
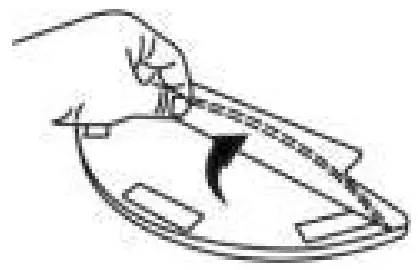
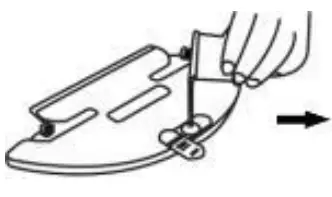
- Install the side brush correctly
- Pay attention to the raised square slot on the mounting position of the side brush is aligned with the square recessed hole on the side brush. Do not press violently when misaligned, otherwise the product may be damaged.

- Pay attention to the raised square slot on the mounting position of the side brush is aligned with the square recessed hole on the side brush. Do not press violently when misaligned, otherwise the product may be damaged.
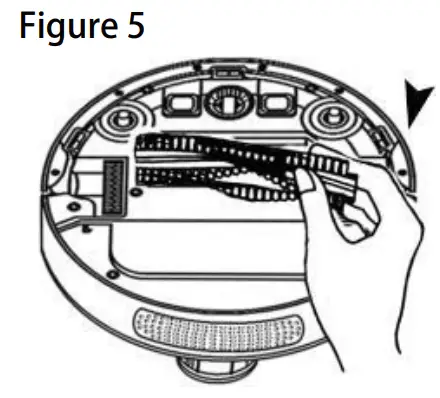
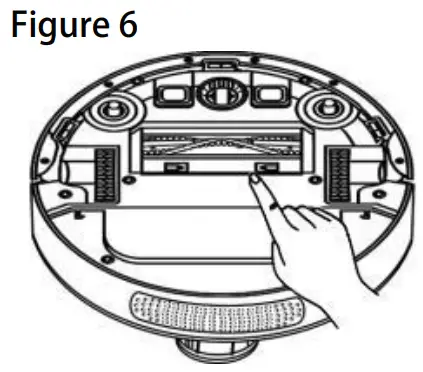
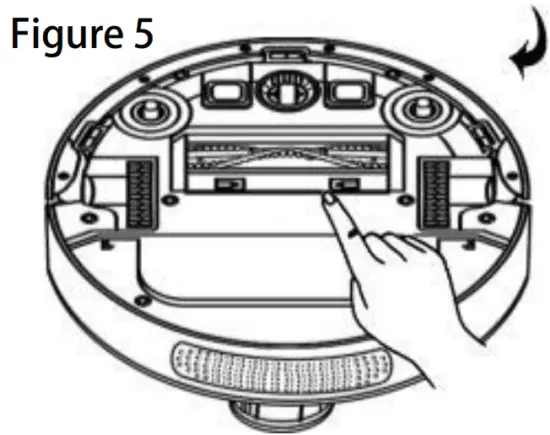
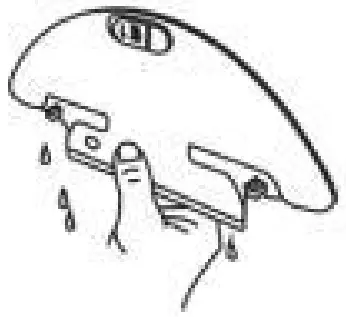
- Middle sweep brush installation
- First insert the fixed left protruding end and then place it in place to reinstall the middle brush (Figure 5).
- Press down to lock the brush cover in place (Figure 6).


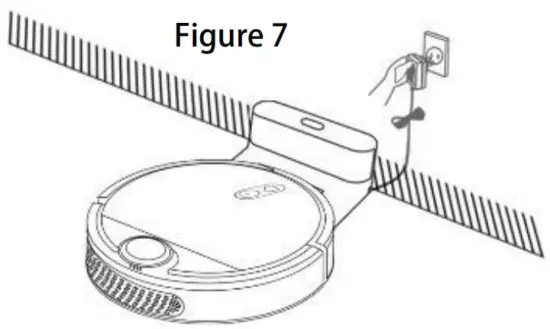
- Turn on and charge Note: Align the charging contact piece. Before charging, please wipe the contact piece with a dry cloth .
- Place the machine on the charging dock and aim it at the charging contact sheet. The power indicator on the charging base will change from on to off. The device is automatically tumed on and charging starts by default. After the device is turned on, it can be used normally (Figure 7).

Note: If the battery cannot be turned on, please place the host on the charging dock, the device will automatically turn on, and the device needs 30% power to work normally.
- Place the machine on the charging dock and aim it at the charging contact sheet. The power indicator on the charging base will change from on to off. The device is automatically tumed on and charging starts by default. After the device is turned on, it can be used normally (Figure 7).
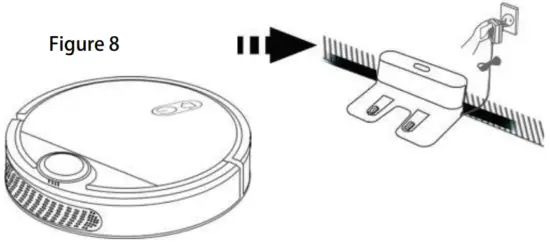
- press the
 button, the device will automatically search for the charging dock and go to charge. place the machine within one meter directly in front of the charging dock. Click the button and the device will automatically search for the charging base and proceed to charge.
- During the cleaning period, when the battery is low, the intelligent sweeper will automatically search for the chargingdock to charge;
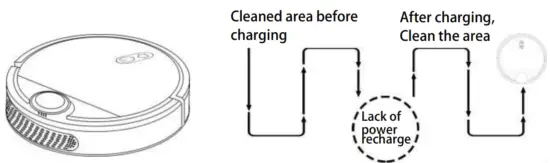
- The smart sweeper encounters obstacles and reduced battery power when searching for the rechargeable dock, and is affected by the complex environment, which may cause the smart sweeper to fail to find the rechargeable dock. Therefore, the rechargeable cdock should be placed in an open place as much as possible;
- When the smart sweeper has just finished cleaning, the temperature of the battery is generally higher. At this time, if you continue to charge, the time to fully charge will be prolonged. (See Figure 8

Operation guide
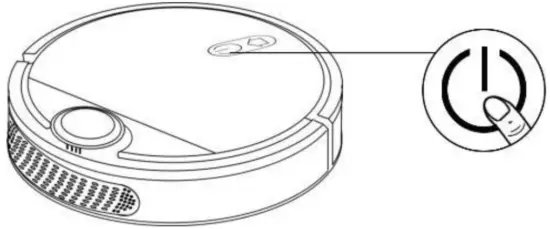
- To turn it off
Long press the” “botton for 3 seconds on the machine to start the machine. The machine makes a sound, which means the power has been turned on and the machine is in standby state. Long press “” botton for 3 seconds on the machine to turn off the machine the machine will make a sound, indicating that the power has been turned off (as shown below).
 - Cleaning/Pause
Method 1: After the power-on is completed, short press the botton”” on the main unit to start cleaning (press any key to pause during cleaning). Method 2: Click the cleaning button of the APP to start cleaning (press the pause button to pause the current cleaning).
Note:- if the power is less than 20%, the machine will not be performed. Please charge it before starting cleaning.
- When the power is less than 20% in the cleaning process, the device will automatically return to the charging dock for charging; when the power reaches 80%, it will automatically start cleaning at the break point.
- Please sort out all kinds of wires on the ground (including the power cord of the charging dock) before cleaning, so as to avoid power failure, damage of items or wires caused by

Clean way
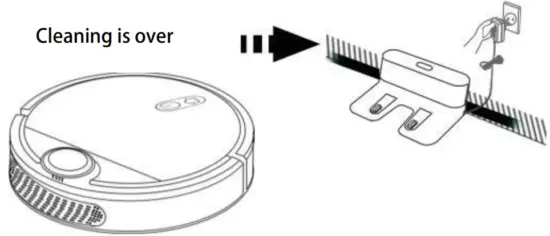
After starting, the machine will scan and generate maps and intelligent partition. In the partitio the cleaning path will be planned by first cleaning along the wall and then filling in the area to complete the cleaning of each partition one by one, which is orderly, efficient and full coverage without omission. After cleaning, the device will automatically return to the charging base for charging (see the figure below).
Note: Do not move the equipment randomly or frequently during work. After moving, please place the device near the same place. When it is restarted, the device will try to relocate its own coordinates. If the positioning is successful, it will continue to work according to the planned path. If the positioning fails, the device will abandon the previous task to rebuild the map and clean, and It may canse it fail to charge bock.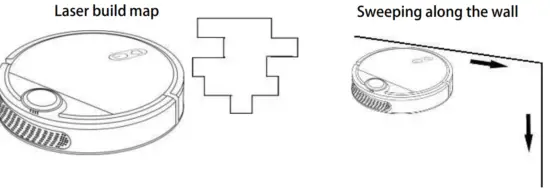

Designated cleaning
It is especially convenient when a certain area needs deep cleaning. The sweeper will come to the vicinity of a certain point on the map designated by the user, and take this point as the center to perform a 2m•2m range cleaning. When operating on the map, you can drag or click to set the target point, which is easy to operate.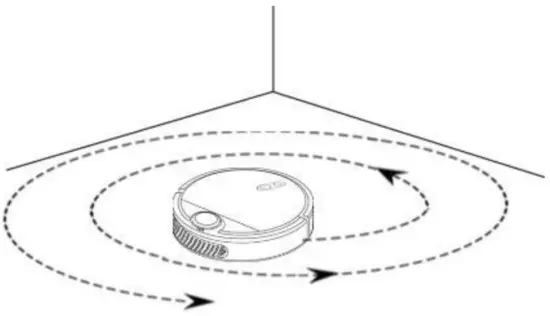
Local cleaning
When the device is offline or the mobile phone is not around, you can press and hold the recharge button for 3 seconds, and the sweeper will focus on itself and perform 2m*2m cleaning. The user can manually move to the designated location for partial cleaning.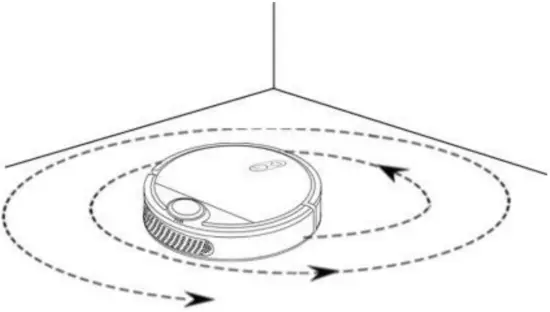
Regular cleaning
Use the APP to set the regular cleaning time, the machine will automatically start cleaning at the specified time, and automatically return to the charging dock to charge after the cleaning is completed.

Tuya APP connection
- Distribution network function/fast connection distribution network
- Turn on the sweeper, and when the sweeper prompts “enter quick connection mode’
- Download Tuya APP on your phone enter the Tuya APP, click ‘Add Device” oC4-1> Manually Add> Small Home Appliances> Robot Vacuum
- Follow the instructions of the Tuya APP, select the 2.4GHz Wi-R network off yourhome and enter the password> Next
- Click on the botton of the Tuya APP and select “Wi-Fi Quick Connect > check to confirm that the indicator light flashes quickly> Next
- The Tuya APP shows that the device is being added, confirming that the sweeper can be connected successfully
- If you fail to connect the wifi. please the ” botton and ” botton at the same time for 3 seconds.Next,please the” “botton for 3 Seconds to tum off the sweeper. After that, please retry the “1-5″step
- After the connection is successful, the connection can be restored after the network is disconnected, press the APP to clean, and the sweeper can perform cleaning
- Distribution network function/fast connection distribution network
Tuya APP schedule setting
- After the sweeper and mobile phone are connected to the network, place the sweeper at the charging station and set the APP to clean regularly. When the time is up, the sweeper will automatically perform the cleaning
Cannot perform scheduled cleaning without internet
Set up the schedule when using the Tuya APP plan. If there is no internet, it will not be able to go out according to the time.
- Pay attenfion After the sweeper and mobile phone are connected to the network, turn off the router, place the sweeper at the charging station, and set the APP to clean regularly. When the time is up, the sweeper will not perform cleaning
Cleaning and maintenance
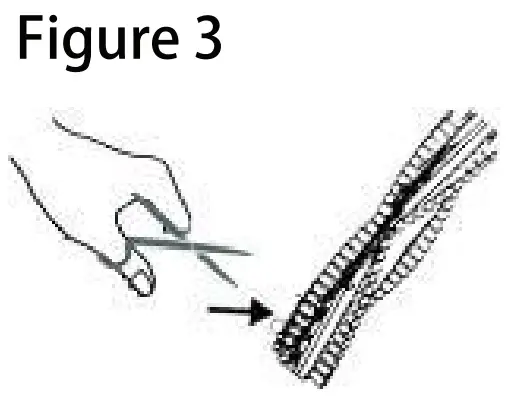
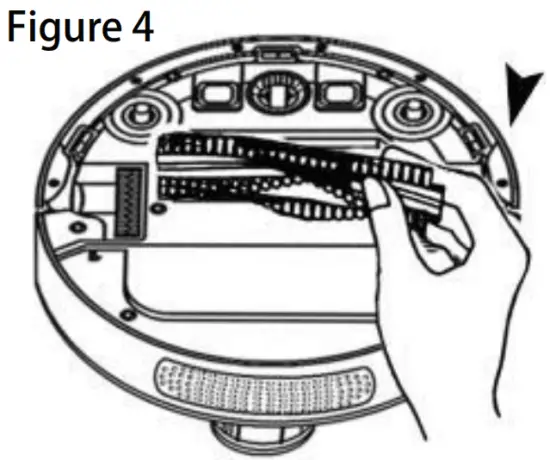
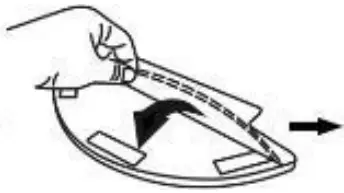
Cleaning middle brush
- As show in the figure, pull the release tab to unlock the brush cover.
- Lift the rolling brush to remove it.
- Use scissors or a knife to clean rubbish and tangled hair.
- First insert the fixed left protruding end, and then place it in place to reinstall the middle brush.
- Press down to lock the brush cover in place.
- Rotate the roller brush by hand to ensure that it is in place and rotates normally.


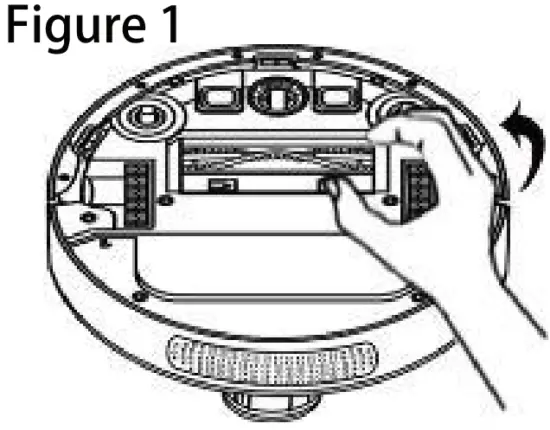
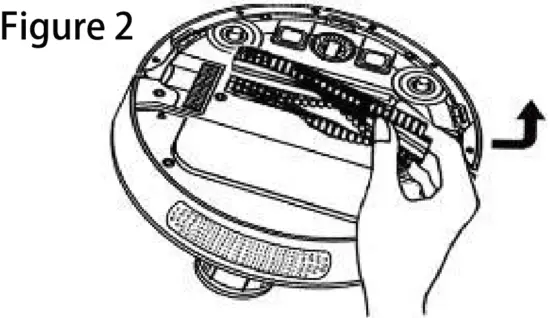
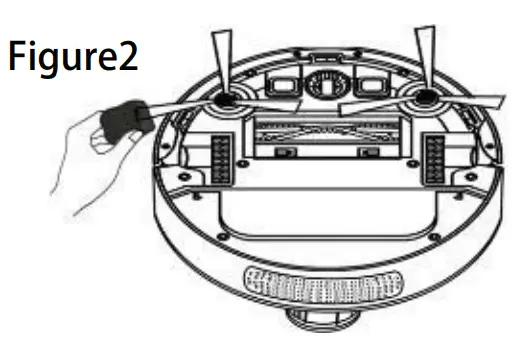
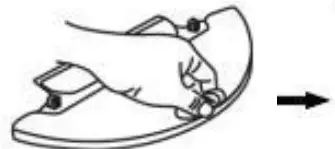
Clean side brush
Foreign objects (such as hair) are easily tangled in the side brush and may attached to dust. Make sure to clean them regularly.
- Remove the screws mth a screwdriver,Carefully relax and pull away any hair or string entangled between the main body and the side brush. (figure 1).
- Wipe the dust off the brush with a cloth dampened with warm water or lightly reform the brush. (figure 2)
 |
|
 |
|
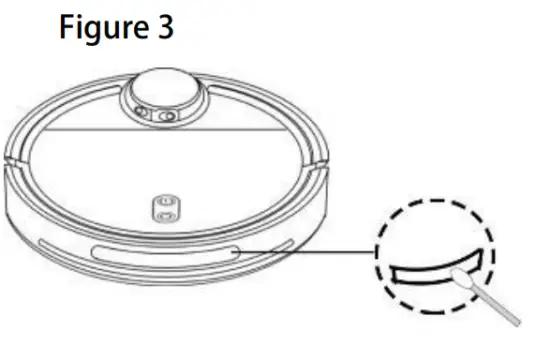
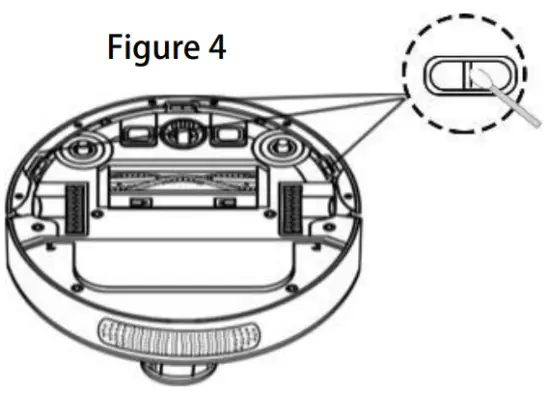
Clean the sensor
- Cleaning of anti-impingement sensors and anti-droping sensors
- Use a cotton swab or soft cloth to clean the anti-impingement sensor and the anti-droping sensor.
- The anti-impingement sensor is located in front of the smart sweeper, and the transparent window with the anti-droping sensor is located at the bottom of the smart vacuum cleaner. (Picture 3) (Picture 4)
- In order to make the smart sweeper more sensitive, please keep the transparent window of the sensor clean.


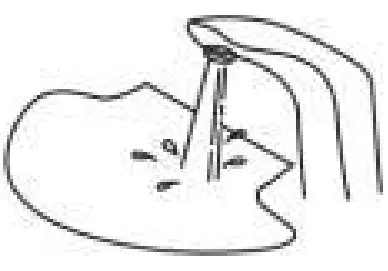
Clean the water tank
- The mopping function of the equipment only has a wiping effect, which is helpful for deep cleaning, but cannot effectively remove stubborn stains (such as dried coffee stains, etc.) and cannot completely replace manual labor.
- Please use the mopping function with caution if there is a carpet in your home. In order not to stain your carpet, please do not use the mopping function on the carpet. You can prevent the device from entering the carpet area with a water tank by setting a restricted area on the Tuya APP.
- If you need to add water to the water tank or clean the mop during the equipment work, please pause in place, lift the equipment at a small angle to remove the water tank components, reinstall the water tank after adding water or cleaning, and put the equipment back in place. When restarting, the equipment will Try to follow the planned path to continue working.
- For safety reasons, be sure to remove the water tank component of the device when charging.
- Do not use the water tank to mop the floor when no one is at home.
Remove the water tank
Remove the mop
Cleaning mop
Drain the water
Dry the water tank
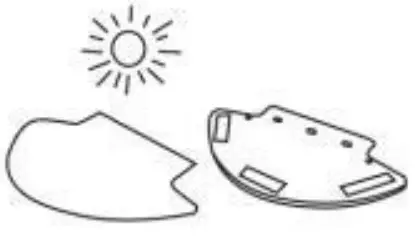
Sun-dried mop
add water
Fasten the water tank plug
Mop installed
Install the water tank on the host
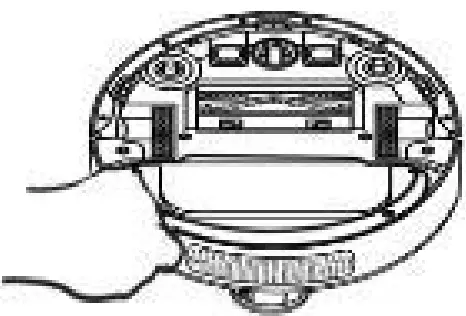

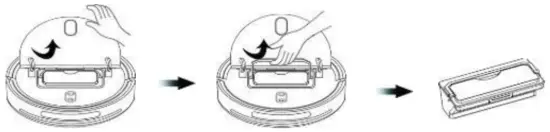
Clean the dust box
- Take out the dust box: lift the flip lids cover on the robot by hand, hold the handle and lift the dust box up. (See below).

- Put in the dust box: with the handle of the dust box, put the dust box into the machine compartment, and gently press the front of the dust box to put the handle upside down. If the dust box is not placed in place, the handle will be difficult to put down, then take out and replay. (See the picture below)

- Toggle the buckle on the front of the dust box by hand to open the dust box and take out the filter.(See the picture below)

- Toggle the buckle on the front of the dust box by hand to open the dust box and take out the filter.(See the picture below)

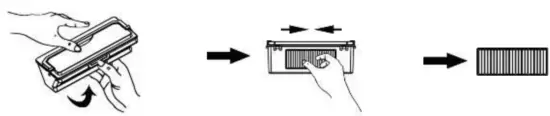
Open the lock of the dust box and take out the garbage (Figure 1 and Figure 2). To avoid spilling the garbage, please keep the dust box upward, hold the upper cover with your right hand and the transparent dust box with your left hand. To avoid clogging of the filter, please knock the fliter when pouring it out (it is recommended to clean it at least once a week). After a long period of use, remove the filter components (Figure 3): dust screen; washable filter (Figure 4) (recommended to replace a set of filter every 6-12 months To ensure a good cleaning effect of the equipment). Rinse the dust box and other filters (not frequently, it is recommended to clean monthly). be sure to wait until the dust box and filter are thoroughly dried before using (Figure 5) to ensure their service life.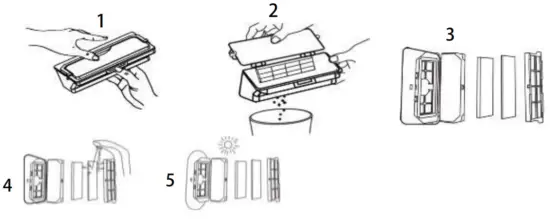
Operational test
| project | Test Case | test environment | Confirm that the keys are functioning properly | |
| Panel buttons | Power button/recharge button/fixed-point cleaning button/key combination function |
| ||
| Mapping and positioning ability |
| Ali self-built environment + IEC room
| Confirm that you can complete the full map cleaning and build the map. After the cleaning is completed, you can return to the charging station to charge. | |
| Ability along the wall |
|
|
| |
| charging mode |
| M self-built environment + IEC room
| Confirm that the sweeper can successfully return to the charging station for charging | |
| And-drop ability | Walking on a dark floor (tested with side brushes), a test table with a height of X cm cannot be dropped dudng a battery cycle | Ali test table (black table top, white floor) (platform specification length ‘ width ‘ height = 90cm • 60cm • 10cm. 10cm high is an L -shaped wall) | Confirm that the sweeper will not fall off the test table | |
| Ability to escape | 1K room layout
| IK Room
|
| |
| Working voltage |
| AS self-built environment
| Confirm that the working voltage of the sweeper meets the specifications | |
| Working hours | Definition of working hours Acceleration mode: 90 minutes +/- 10% Normal mode: 120 minutes +/- 10% Silent mode: 150 minutes +/-1096, Charging time: (battery discharged to full charge), no more than 5.5 hours | AN Office
|
| |
| Will connection |
|
| Confirm that the distribution network function is normal | |
| App schedule setting |
|
| Set up the schedule when using the Tuya APP plan. If there is no Internet, it will not be able to go out according to time | |
| Designated cleaning | Press the panel to clean at any point, and the sweeper will clean at 2m•2m, and it will not be recharged when it stops at the place after the sweep. | Any space
| Confirm that the sweeper can perform fixed-point cleaning at any position | |
| Over current protection | Main brush over current protection Side brush over current protection Wheel overcurrent protection | Any space
| The sweeper will stop working and there will be voice prompts | |
| Anti-jam protection | Front gear collision sensor anti-jamming protection | Any space During the cleaning process of the sweeper, manually press the front gear to confirm that the sweeper stops working | The sweeper will stop working and there will be voice prompts | |
| Occlusion protection | Radar is blocked and protected | Any space During the cleaning process of the sweeper, cover the radar with objects to confirm that the sweeper stops working | The sweeper will stop working and there will be voice prompts | |
| Other protection | Dust box placement protection | Remove the dust box and observe whether the sweeper has a voice prompt | The sweeper will not perform work, and there are voice prompts | |
Voice packets
| Press the %lean” button (automatic mode) When cleaning, press the ‘clean’ button or pause for other reasons | ||
| When paused, press the ‘clean’ button | ||
| Locating failed, stop cleaning | Positioning failed during cleaning | |
| Cl Cleaning completed, start docking | Cleaning has been completed. It needs to be recharged due to low power | |
| L wt battery, start docking | Cleaning has been completed. It needs to be recharged due to low power | |
| Robot can not find docking station | Recharge but can’t find the charging station | |
| Relocating, please wait a moment 1 Wheels may be stuck, please check | ||
| Please place robot on the ground | Machines are not laid flat on the grount | |
| Main swipe stuck | ||
| Side brush may be stuck please dieck | ||
| Please empty dustbin and clean its filter | ||
| Dustbin is removed, please put it back | Dust box b not installed | |
| Battery overheated, robot will be turned off | The battery is overheated | |
| A0021 | ||
| A0022 | Lidar sensor may be stuck or covered, please check | The radar is obscured or stuck |
| A0023 | ||
| A0024 | Bumper may be stuck please check | Press the’cleans (partial mode) |
| Press the ‘dean’ button (fixed-point mode | ||
| When suspended, recharge | ||
| A0028 | Low battery, please charge robot | During noncleaning, the battery is four to be insufficient |
| A0029 | Cleaning’s completed and normal rove | |
| A0030 | Fully charged | |
| A0031 | Charging completed, resume the last cleaning | Fully charged and not finished last cleaning |
| M032 | When performing certain operations, but found that the battery is too low | |
| A0033 | I am here | Fund the machine through the app |
| A0034 | Enter Quick Connect Mode | |
| A0035 A0036 | ||
| A0037 A0038 | The firmware upgrade has been completed Firmware upgrade failed | |
| A0039 | SWF connection succeeds | |
| A0040 | SWF connection failed | |
| A0041 | Setting succeeds | |
| A0042 | ||
| A0043 | Robot will be turned off Press and hold spot button to set current time as schedule | Robot will be turned off Confirm Al scheduling time Confirm the Al scheduling function |
| A0044 | ||
| A0045 | ||
| A0046 A0047 | Map is incorrect, rebuild the map | When the map needs to be rebuilt lilt the machine |
| A0048 | Locating bled, rebuild the map | Falter’ to locate, map wiN be rebuilt |
| Robot is about to reboot | The firmware upgrade is complete, ready to restart | |
| Please put robot on the docking station for system update | The machine was not at the charging station when the upgrade started | |
| Water tank is empty, please fitl it Safety module errors happened, please reboot robot | ||
| To exit the operation mode first | ||
| Start scheduled cleaning | The machine needs to be at the charging station but it isn’t Cleaning time into the schedule | |
| Schedule is set | Set Al schedule | |
| Restore original factory settings | ||
| Please calibrate cliff sensors | The anti-drop sensor is not calibrated Laser bumper stuck | |
| Battery is not working, please check | ||
| Authentication key is not found | UUID or JIMMY is null | |
| test audio: I kHz sine wave for I second | Test tone | |
| When the machine needs to be moved out of the restricted area | ||
| Please move robot out of the docking station before turn it off | When shutting down, the machine is | |
| ’tilt in the charging station | ||
Specifications / Parameters
 | ||
| Voltage | 1W | |
| Battery | lithium battery | |
| Battery capacity | 3000nWi | |
| Power | 30w | |
| Normal charging time | 3-4h | |
| Battery lifetkne | 1000 times | |
| Single working time | 110.120mIn | |
| First charging time | Sh | |
| Remote control type | Phone APP | |
| Adapter input voltage | 100.240V | |
| Charging type | Automatic charging | |
| Button type | Prees button | |
| Dust box capacity | OASL | |
| Water tank capacity | 0.18L | |
| Appearance size | 35•35•10an | |
| Model net weight | 3Kg | |
| Sensor type | Infrared sensor | |
| Navigation option | LDS laser radar navigation +Infrared sensor +gyroscope | |
| Scope of application | Wood floors, floor tiles, marble, short-haired carpet … | |
 | Input | 1W = 1A |
| Output | 19V = 1A |
Troubleshooting
| Trouble signal | Problem Cause analysis and suggested solutions |
| Error 0:chest Oh, like the dust box missing | Trigger the clean sweep when the dust box is taken out |
| Mistake 1 : Example Oh, it looks like the top radar is blocked Mistake 2: master, I need a place to start | The top Yuda is covered and placed in an open area (without any obstructions within 6’6 square meters) 1Nck up the equipment; Or the device is suspended |
| Mistake 3: master,Please wipe the bottom anti-drop sensor | The anti-fall sensor is blocked or placed in a high place |
| Mistake 4: master,Please wipe operation just before the sensor | Check that the sensor is dirty or obstructed |
| Dirt or chasing along the wall profile sensors | |
| Mistake fc master,Please rub the top of the radar cover | The upper cover anti-colfision operation sensor is cfirty or has been returned to gear |
| Mistake 9:Please clean the dust box and filter screen surface Mistake 10erm trapped, the master save me | Old edge or crash sensor is stuck The dust box is full or the filter needs to be replaced |
| Mistake 1 tats crooked, the master quickly put me right Mistake 110h risk, the main wheel seems to be stuck, come and help me Mistake 13:Alt, the main swipe seems to be stuck. Come and help me Mistake 14:0h, side brush seems stuck, come help me | The main brush is entangled or stuck Side brush is entangled or stuck The charging base is not found for recharging, or the charging base is not plugged in Unknown failure resulting in abnormal, it is recommended to restart the machine |
| Mistake 15 :Huh, the charging stand is there? | |
| Mistake 17: rm out of order. Turn it off and have a rest me Mistake 18: Master, I need to recharge | When a fault that needs to be shut down occurs, remind the user after it occurs, and then automatically shut down or Charging When the battery is extremely low and not on the charging dock, the cleaning is triggered (the battery is less than 10%) |
| Mistake 19 :Can’t shut down on the charging stand | When charging in the charging stand, the shutdown is triggered |
Warranty Card
User name:
Detailed address:
Telephone No. :
Product model:
Date of purchase
Purchase Store:
Purchase price:
Invoice number:
Warranty date:
Units for repair:
date | Maintenance records | Repairman |
FCC STATEMENT
1.This device complies with Part 15 of the FCC Rules. Operation is subject to the following two conditions:
- This device may not cause harmful interference, and
- This device must accept any interference received, including interference that may cause undesired operation.
- Changes or modifications not expressly approved by the party responsible for compliance could void the user’s authority to operate the equipment.
This equipment has been tested and found to comply with the limits for a Class B digital device, pursuant to part 15 of the FCC Rules. These limits are designed to provide reasonable protection against harmful interference in a residential installation. This equipment generates, uses and can radiate radio frequency energy and, if not installed and used in accordance with the instructions, may cause harmful interference to radio communications. However, there is no guarantee that interference will not occur in a particular installation. If this equipment does cause harmful interference to radio or television reception, which can be determined by turning the equipment off and on, the user is encouraged to try to correct the interference by one or more of the following measures:
- Reorient or relocate the receiving antenna.
- Increase the separation between the equipment and receiver.
- Connect the equipment into an outlet on a circuit different from that to which the receiver is connected.
- Consult the dealer or an experienced radio/ TV technician for help.
FCC Radiation Exposure Statement:
This equipment complies with FCC radiation exposure limits set forth for an uncontrolled environment. In order to avoid the possibility of exceeding the FCC radio frequency exposure limits, Human proximity to the antenna shall not be less than 20cm (8 inches) during normal operation.


