![]() CZ-TACG1 Network Adaptor Controller
CZ-TACG1 Network Adaptor Controller
User Manual 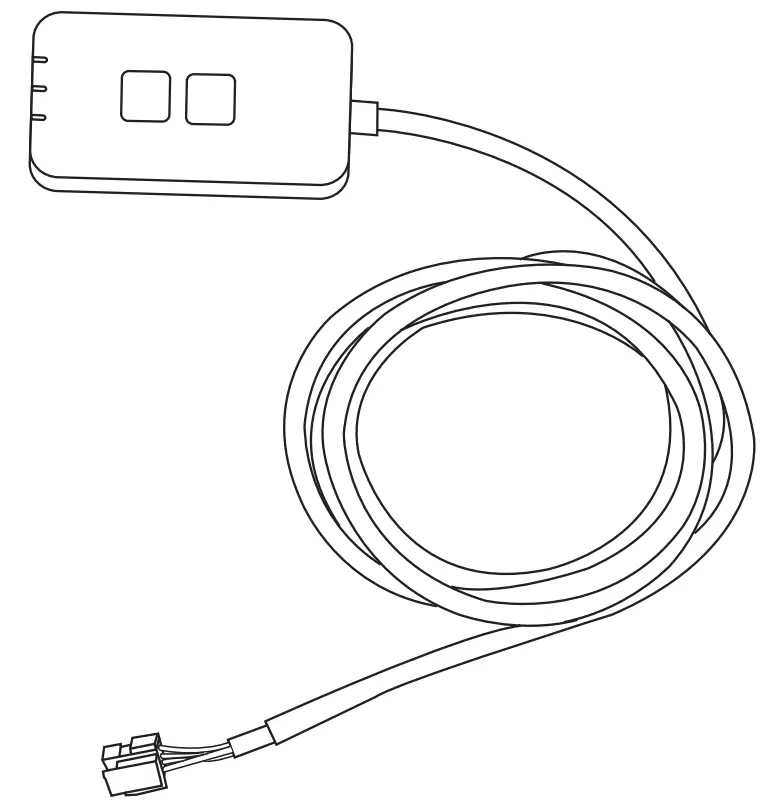 Controller (Network Adaptor)
Model No. CZ-TACG1
CZ-TACG1 Network Adaptor Controller
 Thank you for purchasing this Panasonic product.
Please read these instructions carefully before using this product, and save this manual for future use.
Safety Precautions
- Read the following “SAFETY PRECAUTIONS” carefully before installation.
- Before attempting to control / operate this air-conditioner product via wireless communication from a remote location, make sure to check the installation of the appliance and its surrounding area, and, be wary of any person(s) within the vicinity.
- Electrical work must be installed by a licensed electrician. Be sure to use the correct rating and main circuit for the model to be installed.
- The caution items stated here must be followed because these important contents are related to safety. The meaning of each indication used is as below. Incorrect installation due to ignoring of the instruction will cause harm or damage, and the seriousness is classifi ed by the following indications.
- Please provide this setup guide to the user after installation. Instruct user to keep it with the instruction manuals of the air conditioner in safe location.
![]() WARNING This indication shows the possibility of causing death or serious injury.
WARNING This indication shows the possibility of causing death or serious injury.![]() CAUTION This indication shows the possibility of causing injury or damage to properties.
CAUTION This indication shows the possibility of causing injury or damage to properties.
- The items to be followed are classifi ed by the symbols:
-
 Symbol with white background denotes item that is PROHIBITED from doing.
  Symbol with dark background denotes item that must be carried out.
![]() WARNING
WARNING
- Do not set up in places where there is a lot of steam, such as bathrooms.
– This can cause electric shock or ignition due to shorting. - Do not disassemble or modify.
– This can cause electric shock or ignition. - Do not touch with wet hands.
– This can cause electric shock or ignition due to shorting. - Do not set up in hospitals or places where electronic medical devices are located.
– Radio waves emitting from this adaptor may interfere with electronic medical devices and cause them to malfunction. - Do not set up where children can reach the adaptor.
– They may pull on it or cause themselves an injury. - Do not wipe with wet cloths or wash in water.
– This can cause electric shock or ignition.
![]() WARNING
WARNING
- This appliance is not intended for use by persons (including children) with reduced physical, sensory or mental capabilities, or lack of experience and knowledge, unless they have been given supervision or instruction concerning use of the appliance by a person responsible for their safety. Children should be supervised to ensure that they do not play with the appliance.
- Request installation only from the place of purchase or an installer.
– Not doing so may cause electric shock or ignition. - Shut off the power supply when installing this adaptor.
– Not doing so may cause electric shock. - Use only the specifi ed parts when installing the adaptor and perform the installation correctly by following the instructions.
– Not doing so may cause electric shock or ignition. - Ensure cables are installed properly so that external forces cannot affect them.
– Not doing so may cause overheating which can lead to ignition. - Stop use as soon as you notice any problems or malfunctions and shut off the electric supply to the connected appliance.
– Not doing so may cause smoke, ignition, electric shock, or burns.
– Examples of problems and malfunctions - There is a burning smell
- Water or a foreign object has gotten inside
- Immediately request repair from the place of purchase or the installer.
![]() CAUTION
CAUTION
- The adaptor is indoor use only. Do not set up outside or in unsecured locations.
– It may provide an entry point for unauthorised network access. - Do not set up in locations exposed to direct sunlight, where the temperature may exceed 45°C or go below -5°C.
– This can cause deformation. - Do not install in locations where oils are used a lot or where steam or sulphurous gases are emitted.
– This can cause loss of performance or deformation. - Before connecting wires and cables, discharge any static electricity.
– Not doing so may cause malfunction.
System Overview
![]() CAUTION
CAUTION![]() Do not stand on an unstable surface when operating or checking the adaptor.
Do not stand on an unstable surface when operating or checking the adaptor.
– This can cause injury from falls.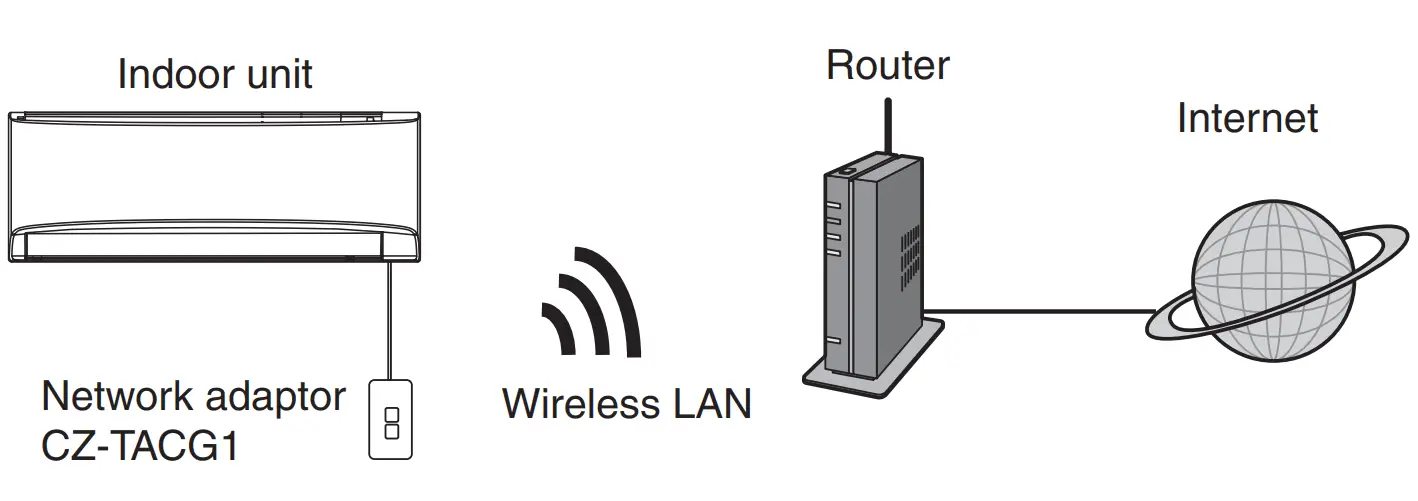
Before Installing the Adaptor
- Requires a Smartphone that is iOS/Android compatible;
- The Network adaptor (adaptor) is designed specifi cally as a terminal for the “Panasonic Comfort Cloud”;
- Do not attach the adaptor to metal as wireless performance will be adversely affected;
- The adaptor recommended to be installed outside of the indoor unit. (It needs to be accessed when connecting it or when there is a problem.);
- The Wireless LAN network coverage must include the air conditioner installation location;
- Do connect the Wireless LAN to a compatible Panasonic Air Conditioner with a connectivity interface port.
Specification
| Input Voltage | DC 12V (From air conditioner indoor unit) |
| Power consumption | Max: 660 mW |
| Size | 66 mm (H) x 36 mm (W) x 12 mm (D) |
| Weight | Approx. 85g |
| Interface | 1x Wireless LAN |
| Wireless LAN standard | IEEE 802.11 b/g/n |
| Frequency range | 2.4 GHz band |
| Encryption | WPA2-PSK (TKIP/AES) |
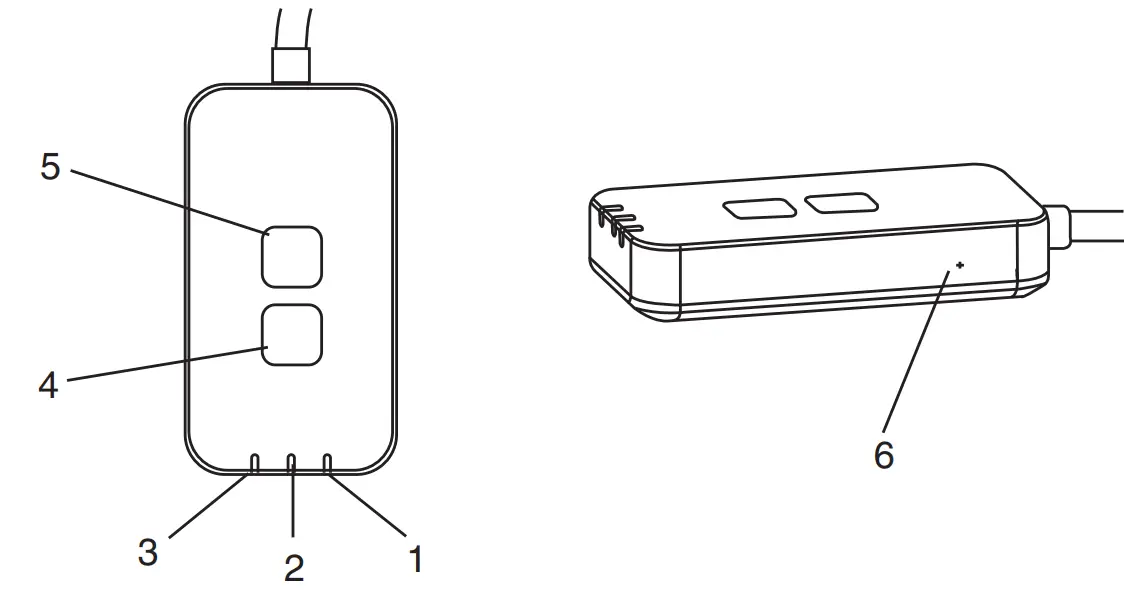
Parts Identification
| No | Item | Description |
| 1 | Power LED | Indicates that the adaptor is being supplied with power. |
| 2 | Link LED | Indicate the communication status of adaptor to the server. |
| 3 | Status LED | Indicate the communication status of adaptor to the air-conditional. Green: status without weekly timer Orange: status with weekly timer Red: Abnormality 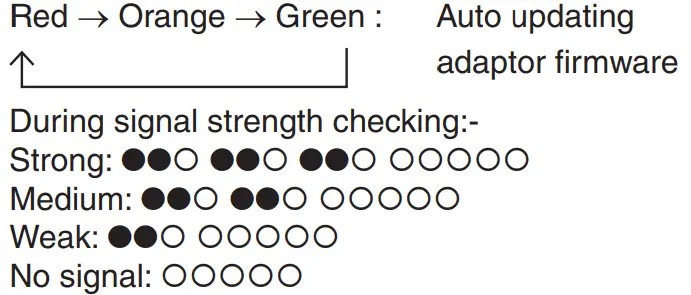 |
| 4 | Setup Switch* | Connection setup mode switching |
| 5 | Check Switch* | Signal strength checking (press and hold for 5 seconds then release) Disable LEDs display (press and hold for 10 seconds then release) |
| 6 | Reset* | Soft reset |
* The device factory reset can be done by press and hold CHECK and SETUP button for 10 seconds. After release the CHECK and SETUP button, press the reset button.
Parts
| Adaptor Unit (CZ-TACG1) |  |
| Screw for mounting (M4 x 20 – 1 piece) | 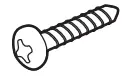 |
| Mounting cord clamp (1 piece) | 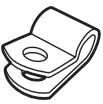 |
| Cable tie (1 piece) | 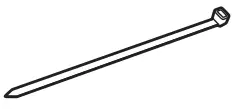 |
| Double-sided adhesive tape |  |
| Wall plug | 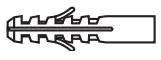 |
Adaptor Installation
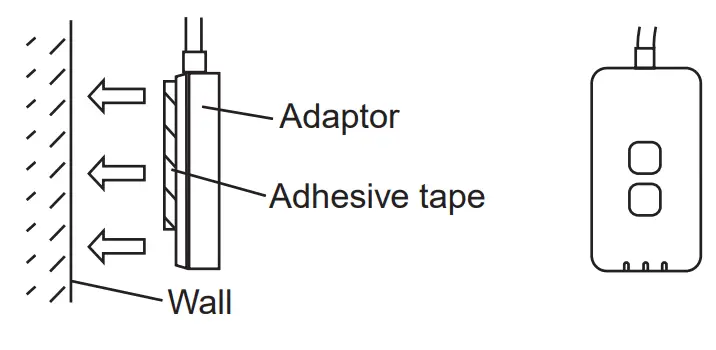
- Attach the Adaptor unit with double-sided adhesive tape on the wall near the indoor unit.
– Shut off the power supply when installing this adaptor.
– Make sure the wall is clean and free from dirt.
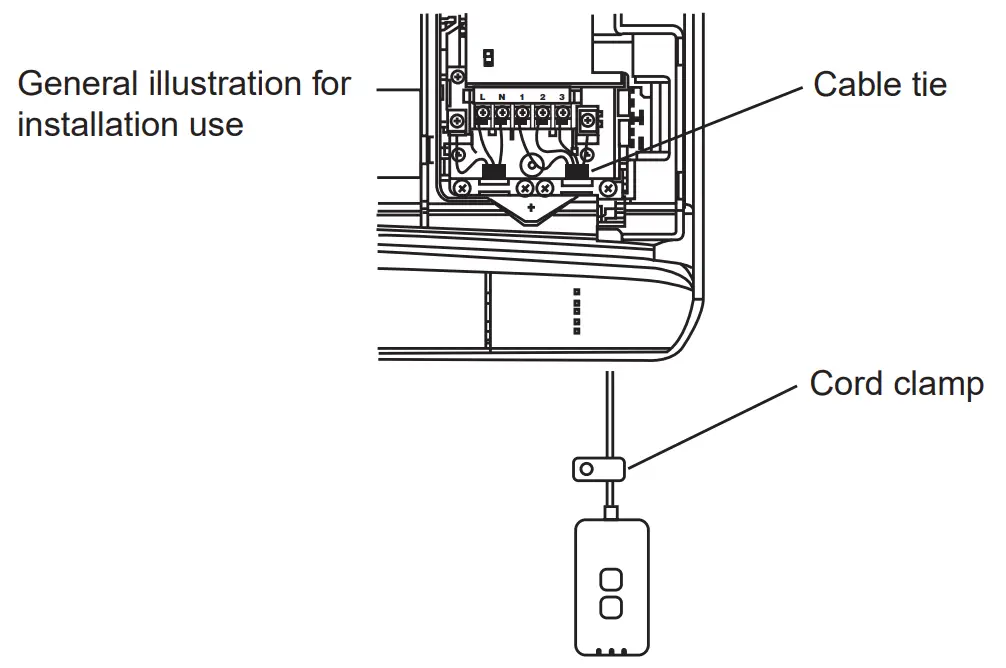
- Use the cord clamp to fix the cable to the wall.
Pull the cable around as shown in the diagram so that the external force cannot act on the connector in the adaptor. Furthermore, on the indoor unit end, use the included cable tie to fi x the cables together when necessary.
- Connect the cable to the CN-CNT connector at the indoor unit.
Take note each indoor unit CN-CNT connector location might be different.
Please consult authorized dealer.
Connecting Network
Establish network connection to the internet via Wireless mode.
- Turn on the power supply to the indoor unit.
– The Power LED lights (green).
– The Status LED blinking (green).
- Download and install the “Panasonic Comfort Cloud”.

- Follow the instruction of the app to complete the installation setup. Refer to next page.
– All LEDs lights (green).

Starting “Panasonic Comfort Cloud”
Use a Smartphone that is iOS/Android compatible.
- User interface image may change without notifi cation.
- There is no charge for using this application. However, other charges may be incurred for connection and operation.
- Updates to the service may mean there are changes to the design of the screen and display.
1. Login to the “Panasonic Comfort Cloud”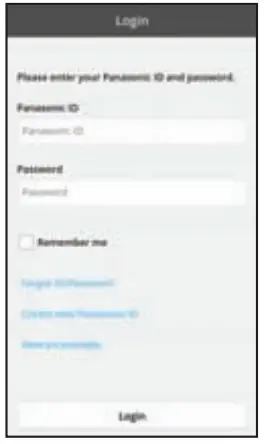 Login with your Panasonic ID and password.
Panasonic ID can be registered free from the link on the page or at the following URL.
(https://csapl.pcpf.panasonic.com/Account/Register 001)
2. Connection Guide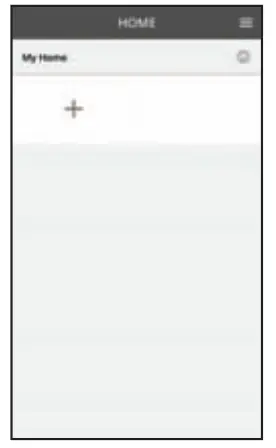 i. At My Home screen, tap “+” to add new product.
ii. Select the product that you want to add.
iii. Tap “Start” to begin the connection setup.  iv. Tap “Next” after confi rming the POWER LED of the network adaptor is ON.
v. If you are the fi rst user (administrator) to operate the air conditioner via this application, reset the network adaptor with a pin and tap “Next”.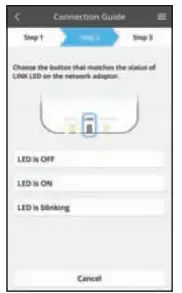 vi. Choose the button that matches the status of LINK LED on the network adaptor.
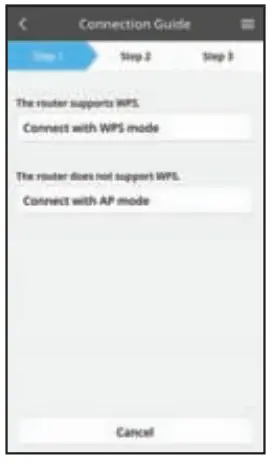 vii. Tap on the preferred connection setup mode.
– To “Connect with WPS mode”, proceed to instruction 3.1 (For router that supports WPS)
– To “Connect with AP mode”, proceed to instruction 3.2 (For router that does not support WPS)
3.1 Connect with WPS Mode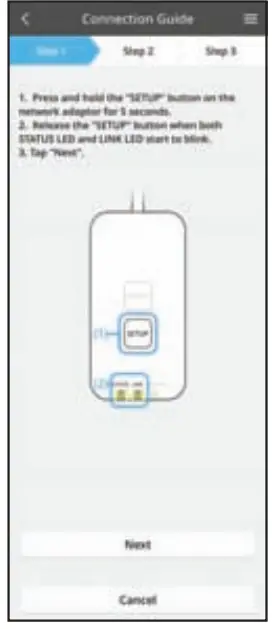 i. Press the “WPS” button on the router to establish connection.
ii. Tap “Next” after the router is ready for connection.
iii. Press and hold the “SETUP” button on the network adaptor for 5 seconds.
iv. Release the “SETUP” button when both STATUS LED and LINK LED start to blink. Tap “NEXT”.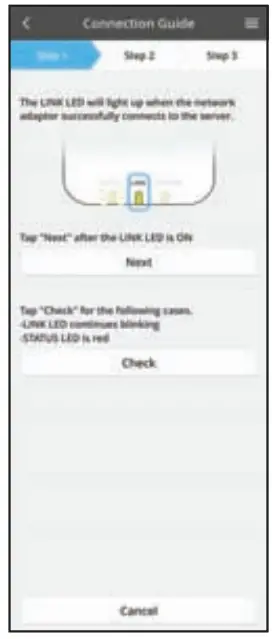 v. Wait until LINK LED is ON indicates the connection setup is complete. Tap “NEXT” and proceed to instruction 4.
3.2 Connect with AP Mode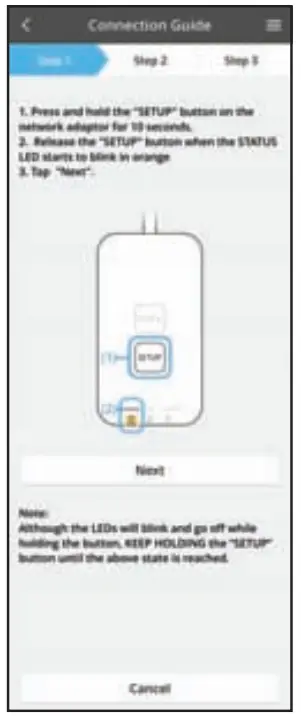 i. Press and hold the “SETUP” button on the network adaptor for 10 seconds.
ii. Release the “SETUP” button when the STATUS LED starts to blink in orange.
iii. Tap “NEXT”.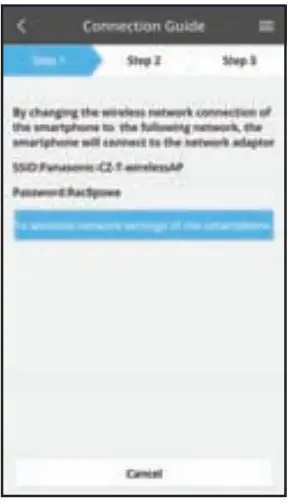 iv. Tap “To wireless network settings of the smartphone” to change the wireless network connection of the smartphone to the following network, the smartphone will connect to the network adaptor.
SSID: Panasonic-CZ-T-wirelessAP
Password: Rac8pswa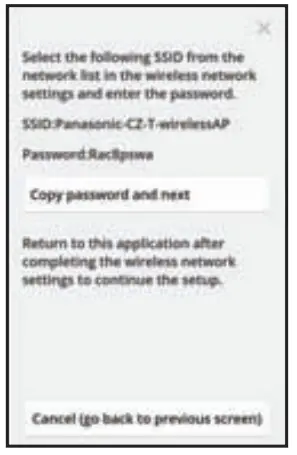 v. A window will prompt, tap “Copy password and next” to proceed to smartphone wireless network setting.
vi. Connect to “Panasonic-CZ-T-wirelessAP” network and back to the application to continue with the setup.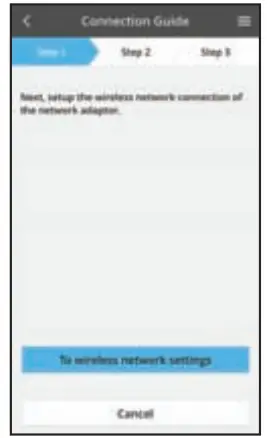 vii. Tap “To wireless network setting” to setup the wireless network connection of the network adaptor.
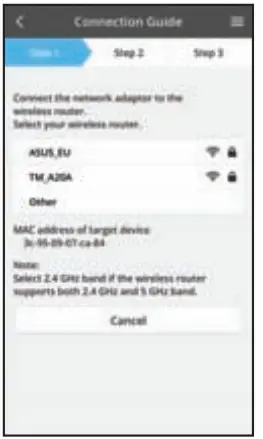 viii. Connect the network adaptor to wireless router. Select your wireless router.
ix. Enter the password of the selected wireless router.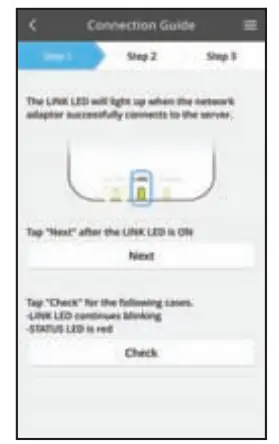 x. The LINK LED will light up when the network adaptor successfully connects to the server. Tap “NEXT” and proceed to instruction 4. * During network adaptor connecting to wireless router, STATUS LED and LINK LED will blink simultaneously.
Setup completion
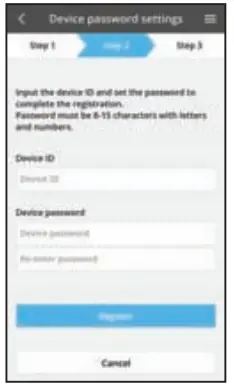 i. Input the Device ID. Device ID is written at name plate attached to the network adaptor or label attached on the packaging.
ii. Set the password for the network adaptor.
iii. Tap “Register” to complete the setup.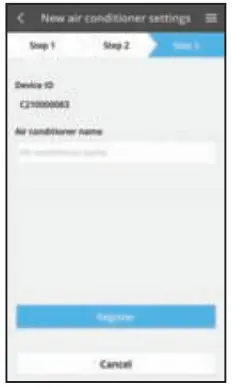 iv. You can name the air conditioner unit to help you identify it.
Use the “Panasonic Comfort Cloud”
 Login
Login
Install and launch the app
“Panasonic Comfort Cloud” (Android 4.4 and above)![]() “Panasonic Comfort Cloud” (iOS 9 and above)
“Panasonic Comfort Cloud” (iOS 9 and above)
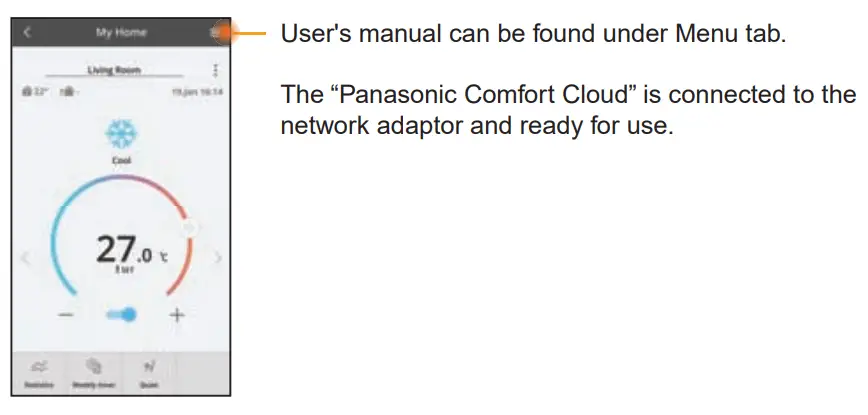
Login Page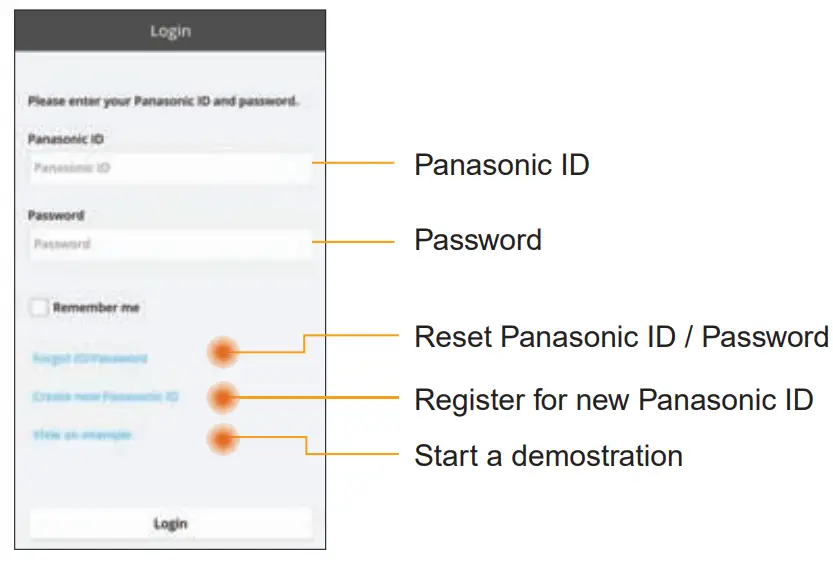 Home Screen
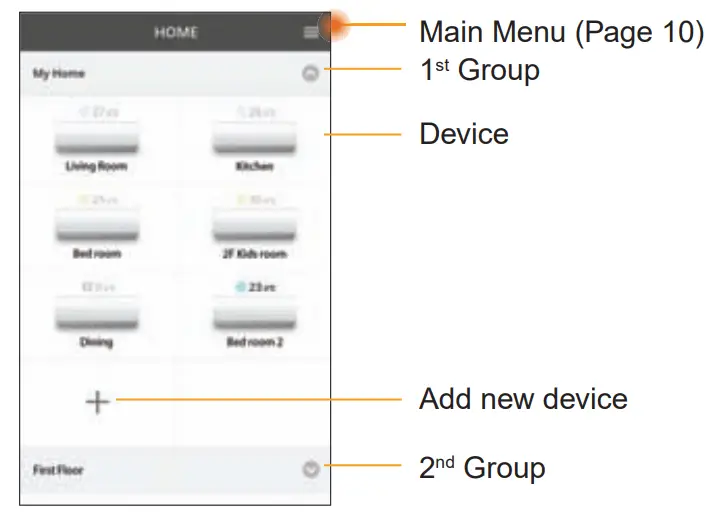 Main Menu
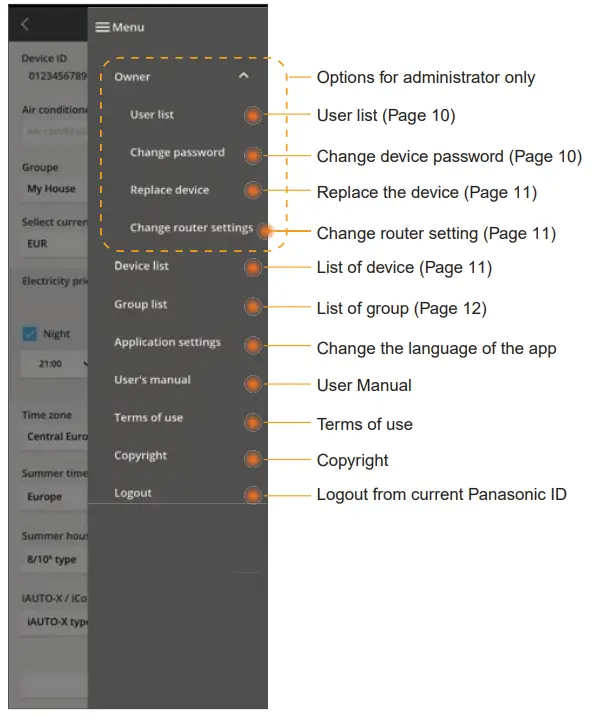 User list
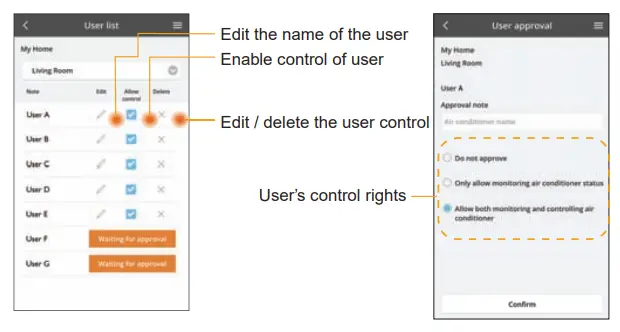 Change of device password
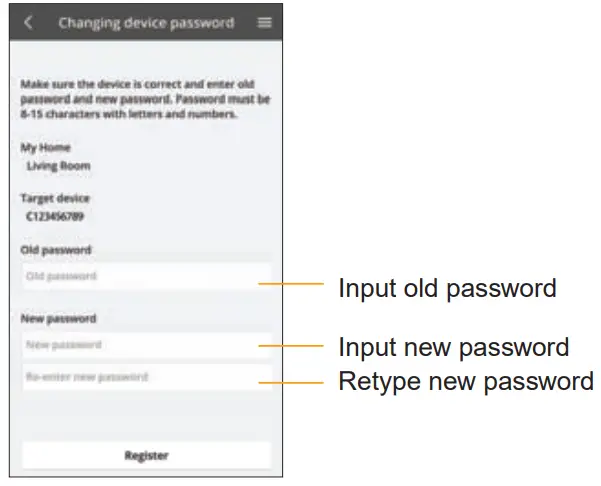 Replace the device
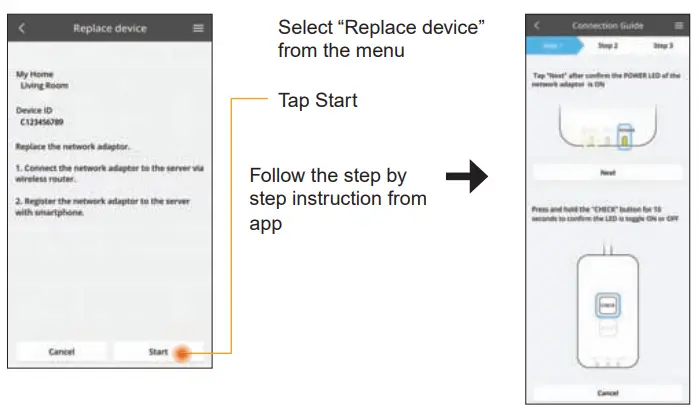 Change the router setting
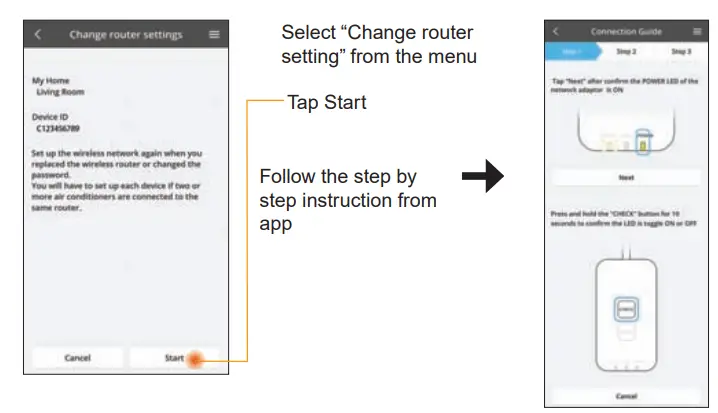 Device list
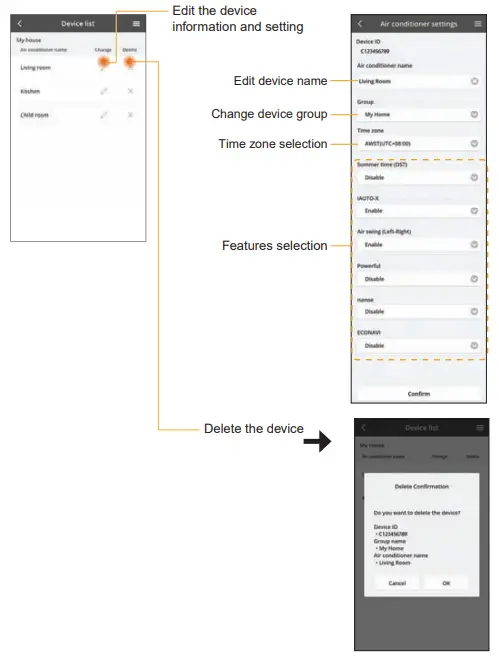 Group List
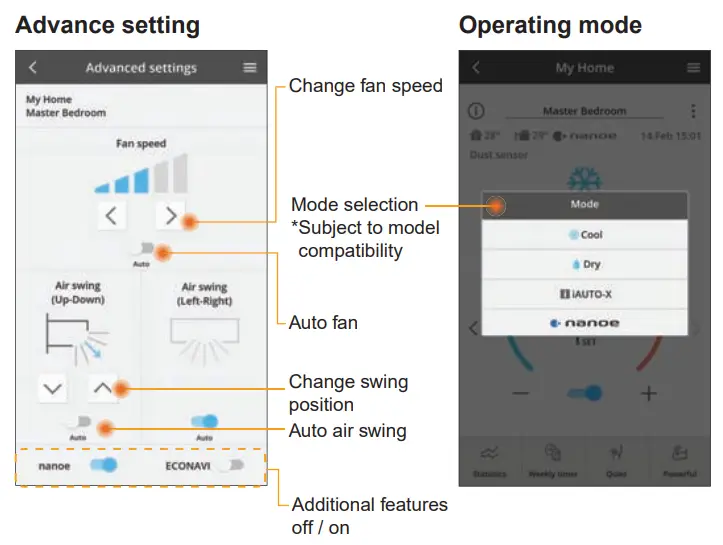
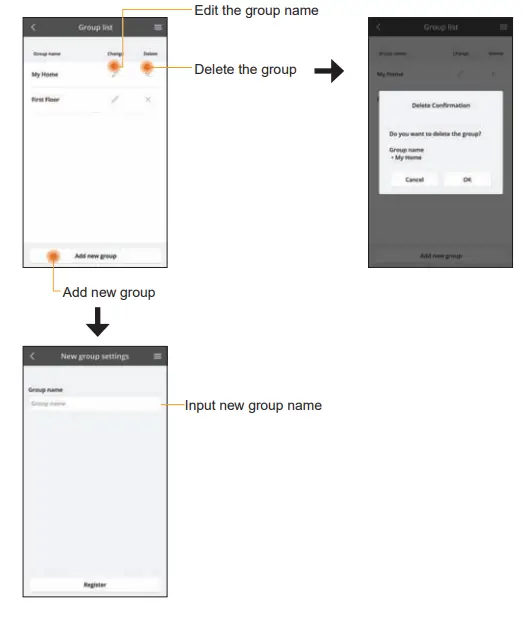 Main Device Screen
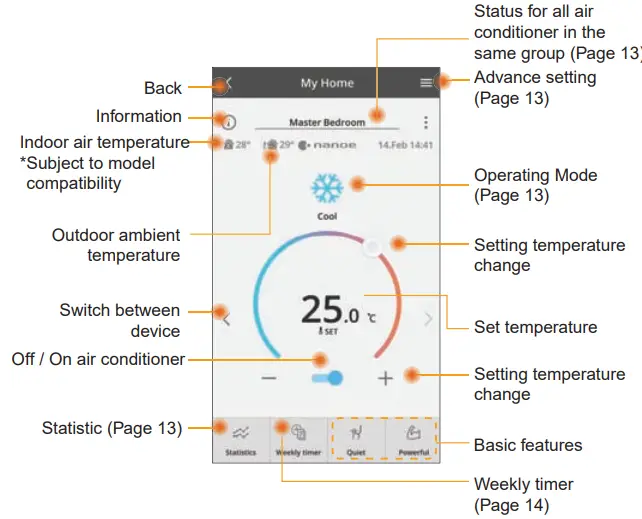 Information
 Air Conditioner Status
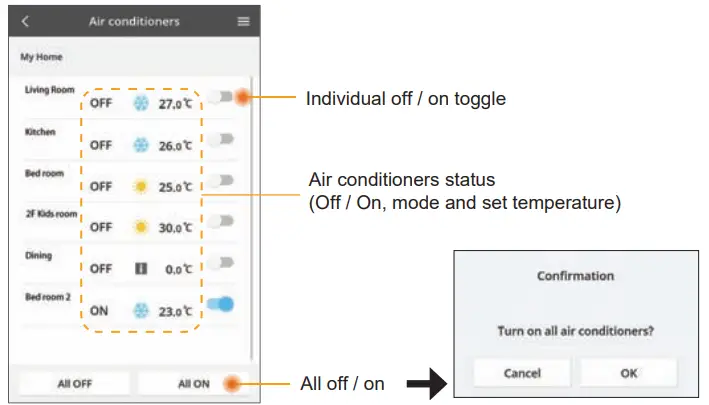
 Statistics
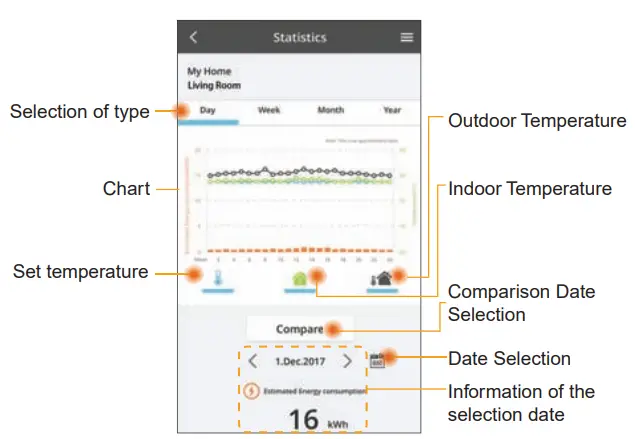 * Estimated energy consumption may not be supported by certain models.
Comparison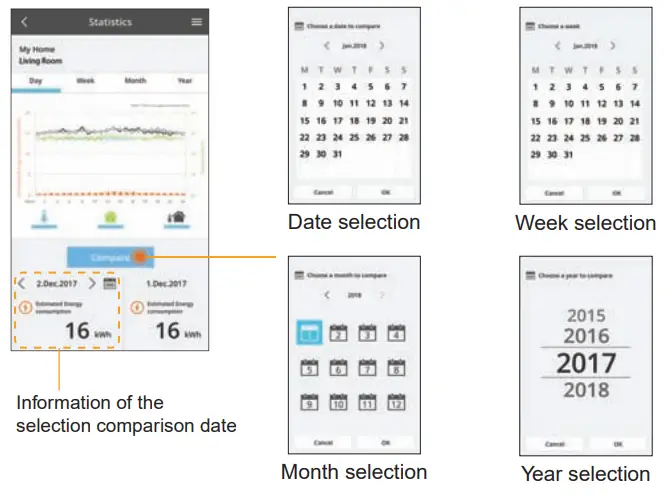 Weekly Timer
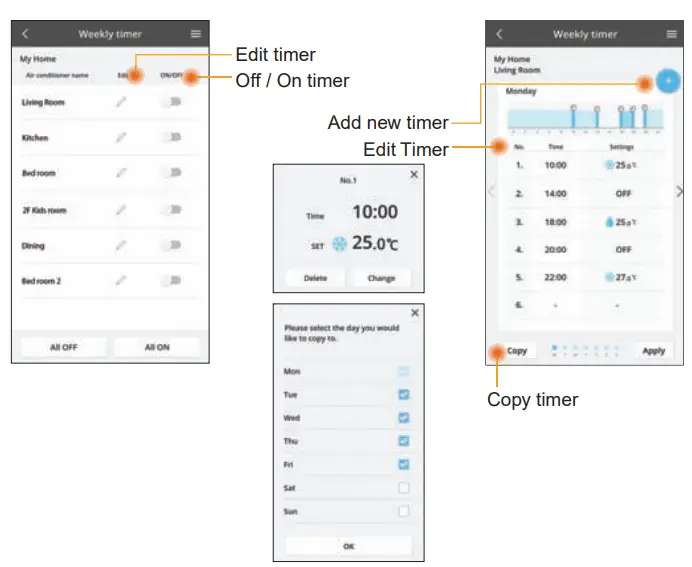 Add new timer
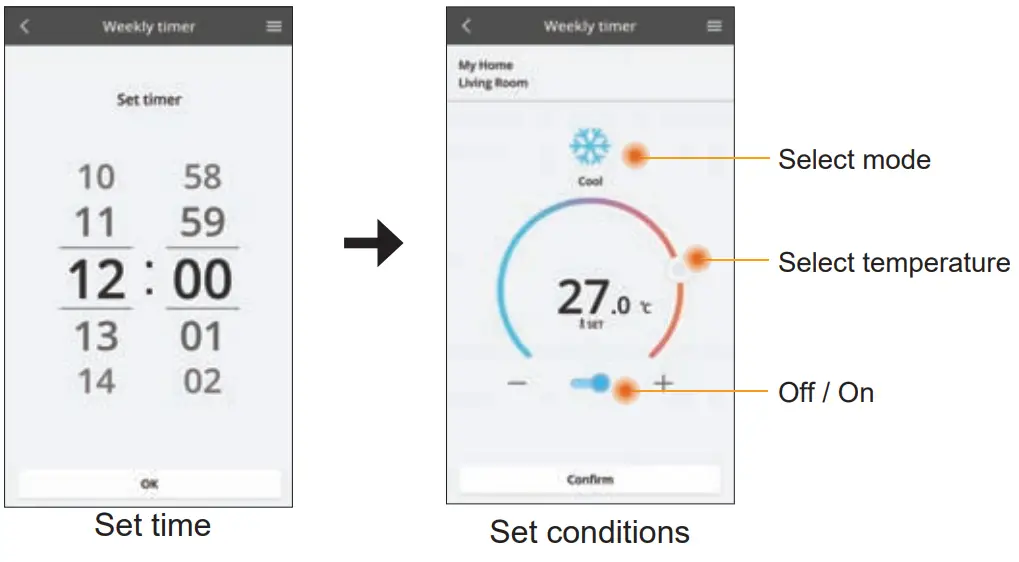
Troubleshooting
- When the power LED does not light up
(no power supply to the adaptor)
→ Check the power supply
→ Check the connection of the cable. - When the status LED does not light up (Adaptor can’t communicate with air-conditioner)
→ Check the connection of the cable. - The connection between your device and a client through wireless network cannot be established.
→ Ensure that the wireless network function is enabled.
→ Refresh the network list and select the correct SSID.
→ Check the IP address, and ensure that your client can automatically obtain an IP address.
→ Enter the correct network key (wireless network password) when you connect with AP mode. - Reset device Password
(In case you forgot the device Password)
→ Remove the device from device list and add back the device.
→ Factory reset the device and add back the device. The device factory reset can be done by press and hold CHECK and SETUP button for 10 seconds. After release the CHECK and SETUP button, press the reset button.
Information
 Information for Users on Collection and Disposal of Old Equipment
- Your product is marked with this symbol. This symbol means that electrical and electronic products shall not be mixed with unsorted household waste.
- Do not try to dismantle the system yourself: the dismantling of the product and of other parts must be done by a qualified installer in accordance with relevant local and national legislation.
- Product and waste must be treated at a specialized treatment facility for re-use, recycling and recovery.
These symbols on the products, packaging, and/or accompanying documents mean that used electrical and electronic products and batteries should not be mixed with general household waste.
For proper treatment, recovery and recycling of old products and used batteries, please take them to applicable collection points, in accordance with your national legislation and the Directives 2002/96/EC and 2006/66/EC.
By disposing of these products and batteries correctly, you will help to save valuable resources and prevent any potential negative effects on human health and the environment which could otherwise arise from inappropriate waste handling.
For more information about collection and recycling of old products and batteries, please contact your local municipality, your waste disposal service or the point of sale where you purchased the items.
Penalties may be applicable for incorrect disposal of this waste, in accordance with national legislation.
For users in the European Union
If you wish to discard electrical and electronic equipment, please contact your dealer or supplier for further information.
[Information on Disposal in other Countries outside the European Union]
These symbols are only valid in the European Union. If you wish to discard these items, please contact your local authorities or dealer and ask for the correct method of disposal.
Declaration of Conformity (DOC) Hereby, “Panasonic Corporation” declares that this product is in compliance with the essential requirements and other relevant provisions of Directive 2014/53/EU The full text of the EU declaration of conformity is available at the following internet address: http://www.ptc.panasonic.eu/
Authorized Representative: Panasonic Testing Centre, Panasonic Marketing Europe GmbH, Winsbergring 15, 22525 Hamburg, Germany Norway: There are usage restrictions within a radius of 20 km from the centre of Ny-Alesund on Svalbard.
Firmware Update Function
This product has functionality for connecting to the Panasonic firmware update server over the Internet to automatically update the device firmware to the latest version. To update the firmware, the device will do check, once per day, whether its firmware is the latest version after power up. And if an update is required, the update is applied and the device restarts automatically. Operations are not possible while the device is being restarted (which takes about 1-5 minutes).
Software License Information
This product incorporates the following software: (1) The software developed independently by or for Panasonic Corporation, (2) The software owned by third party and licensed to Panasonic Corporation, (3) The open source software under the BSD licence and/or equivalent licenses.
The software categorized as of (3) is distributed in the hope that it will be useful, but WITHOUT ANY WARRANTY, without even the implied warranty of MERCHANTABILITY or FITNESS FOR A PARTICULAR PURPOSE.
The following license terms shall be applied to Open-Sourced Components.
1. Supplicant license
Copyright (C) 2003-2016, Jouni Malinen <[email protected]> and contributors. All rights reserved.
This software may be distributed, used, and modified under the terms of BSD license:
Redistribution and use in source and binary forms, with or without modification, are permitted provided that the following conditions are met:
- Redistributions of source code must retain the above copyright notice, this list of conditions and the following disclaimer.
- Redistributions in binary form must reproduce the above copyright notice, this list of conditions and the following disclaimer in the documentation and/or other materials provided with the distribution.
- Neither the name(s) of the above-listed copyright holder(s) nor the names of its contributors may be used to endorse or promote products derived from this software without specific prior written permission.
THIS SOFTWARE IS PROVIDED BY THE COPYRIGHT HOLDERS AND CONTRIBUTORS AS IS AND ANY EXPRESS OR IMPLIED WARRANTIES, INCLUDING, BUT NOT LIMITED TO, THE IMPLIED WARRANTIES OF MERCHANTABILITY AND FITNESS FOR A PARTICULAR PURPOSE ARE DISCLAIMED. IN NO EVENT SHALL THE COPYRIGHT OWNER OR CONTRIBUTORS BE LIABLE FOR ANY DIRECT, INDIRECT, INCIDENTAL, SPECIAL, EXEMPLARY, OR CONSEQUENTIAL DAMAGES (INCLUDING, BUT NOT LIMITED TO, PROCUREMENT OF SUBSTITUTE GOODS OR SERVICES; LOSS OF USE, DATA, OR PROFITS; OR BUSINESS INTERRUPTION) HOWEVER CAUSED AND ON ANY THEORY OF LIABILITY, WHETHER IN CONTRACT, STRICT LIABILITY, OR TORT (INCLUDING NEGLIGENCE OR OTHERWISE) ARISING IN ANY WAY OUT OF THE USE OF THIS SOFTWARE, EVEN IF ADVISED OF THE POSSIBILITY OF SUCH DAMAGE.
Setting Information
| Wireless interface address (MAC) | |
| Wireless interface serial number (ID) | |
| Wireless interface code (PIN) | |
| Indoor unit model name | |
| Indoor unit serial number | |
| Outdoor unit model name | |
| Outdoor unit serial number | |
| System commissioning date | |
| Wireless interface installation date |
Installer Contact Details
| Name | |
| Telephone number |
Maximum radio-frequency power transmitted in the frequency bands
| Type of wireless | Frequency band | Max EIRP (dBm) |
| WLAN | 2412-2472 MHz | 20 dBm |
![]() Manufactured by:
Manufactured by:
Panasonic Corporation
1006 Kadoma, Kadoma City, Osaka, Japan
Importer for Europe:
Panasonic Marketing Europe GmbH
Panasonic Testing Centre
Winsbergring 15, 22525 Hamburg, Germany
Downloaded from www.Manualslib.com manuals search engine


