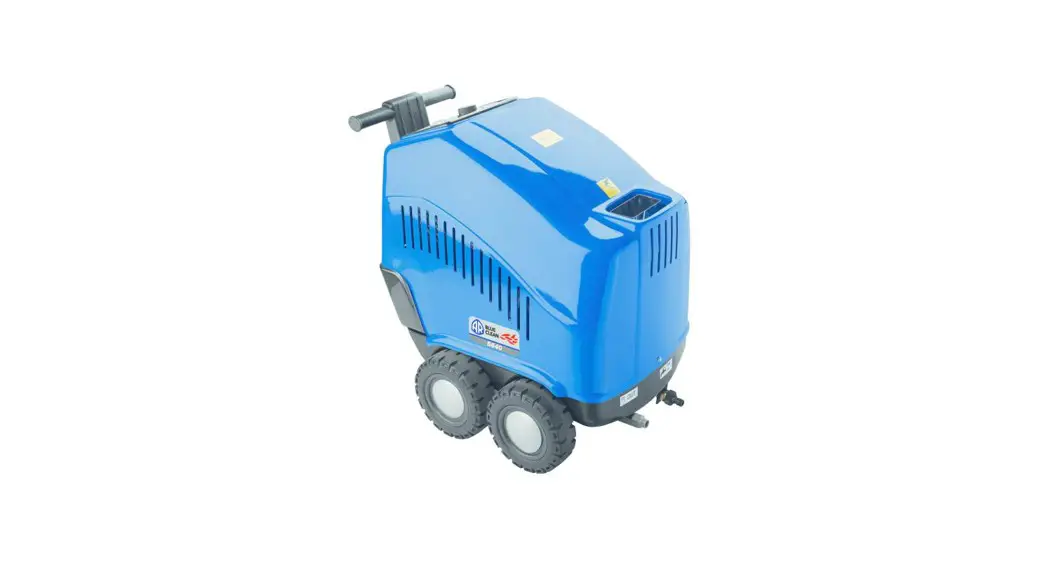
![]() HIGH PRESSURE WASHER
HIGH PRESSURE WASHER
ORIGINAL INSTRUCTIONS
5640/5670
5850/5870
![]()
Cod. 93052 Rev 03 30062021 – GJ
![]() WARNING: For your personal safety, READ and UNDERSTAND before using.
WARNING: For your personal safety, READ and UNDERSTAND before using.
SAVE THESE INSTRUCTIONS FOR FURTHER REFERENCE.
Technical Data
| Tedinical Data | Unit | 5640 | 5670 | 5850 | 5870 |
| Flow rate | l/min | 8 | 83 | 10 | 15 |
| Maximum flow rate | l/min | – | – | – | – |
| Pressure | MPa | 12 | 13 | 12 | 14 |
| Maximum pressure | MPa | 14 | 15 | 13 | 15 |
| Power | kW | 2. | 25 | 3 | 5 |
| Maximum inlet temperature | °C | 50 | 50 | 60 | 60 |
| Maximum inlet pressure | MPa | 1 | 1 | 1 | 1 |
| Gun repulsive force at maximum pressure | N | 19.40 | 21 | 24.30 | 39.30 |
| Motor insulation | Class F | Class F | Class F | Class F | |
| Motor protection | IPXS | IPXS | IPXS | IPXS | |
| Voltage | V/Hz | 230/50 | 230/50 | 230/50 | 400/50 |
| Maximum permitted &chid system impedance | Ω | 0.153 | – | – | |
| Acoustic pressure level (K = 3 dB(A)): | |||||
| LPA (EN 607C4-1) | dB(A) | 82. | 82. | 82. | 823 |
| LWA (EN 60704-1) | dB(A) | 90 | 90 | 90 | 90 |
| Appliance vibrations (K = 1.5 m/s2): | m/s2 | 2. | 2. | 2. | 2. |
| Weight | kg | 79 | 80 | 83 | 84 |
| Max. burner temperature | °C | 90 | 90 | 90 | 90 |
| Burner power | kW | 23.2 | 23.2 | 23.2 | 23.2 |
| Fuel type | diesel | diesel | diesel | diesel | |
| Fuel tank capacity | I | 8 | 8 | 8 | 8 |
| Pump oil type | SAE 30 | SAE 30 | SAE 15W-40 | SAE 15W-4 | |
| Pump oil quantity | kg | 0.080 | 0.130 | 0.260 | 0.260 |
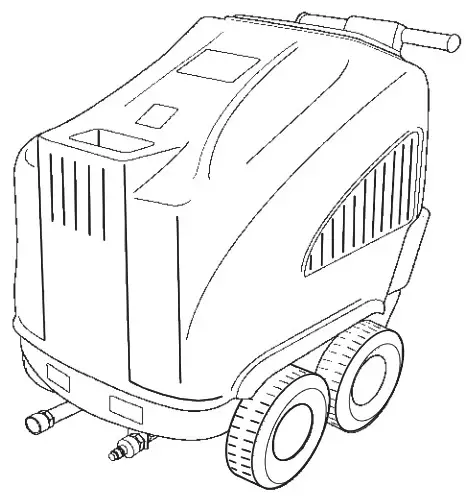
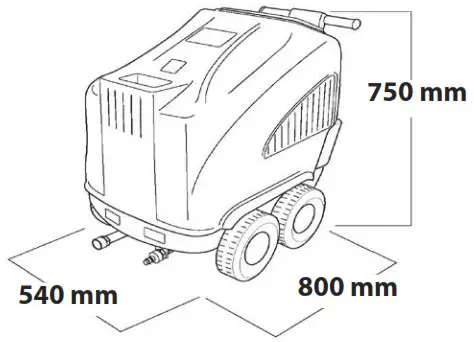
APPLIANCE DIMENSIONS
General information
The appliance is intended solely for the washing and cleaning, with hot or cold water, of surfaces capable of withstanding the mechanical effects of high pressure jet and the effects of any detergent chemicals used. Before using the appliance, make sure that the data plate is fixed to it; if the data plate is missing, do not use the appliance and notify the dealer at once. Do not leave the appliance unattended in the working area. After daily use, keep the appliance in a dry place protected from the weather.
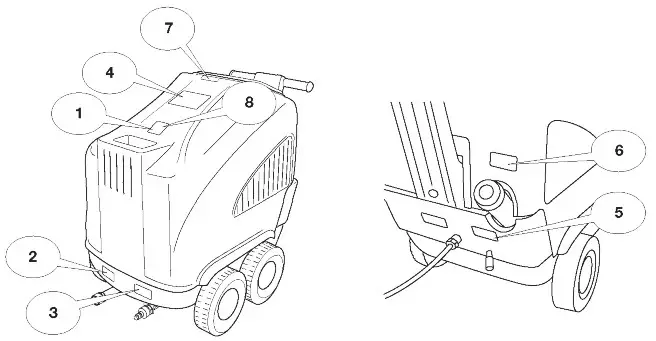
Appliance identification
Main components
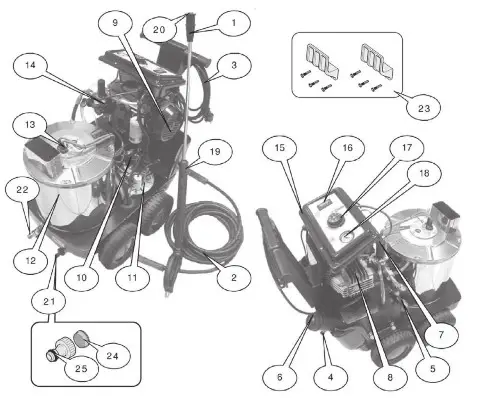
| 1. Lance 2. High pressure hose 3. Power supply cable 4. Detergent suction 5. Fuel filter 6. Fuel tank 7. Bypass valve 8. High pressure pump 9. Electric motor 10. Fuel pump 11. Burner engine 12. Boiler 13. Combustion head | 14. Pressure switch 15. Electrical panel 16. ON/OFF switch 17. Thermostat 18. Pressure gauge 19. Trigger gun 20. Nozzle 21. Water inlet 22. Water outlet 23. Lance holder bracket 24. Water filter 25. Fitting |
Safety instructions
Ensure that the appliance is supplied with water at all times. Dry running would seriously damage the appliance’s gaskets.
- The appliance is intended for professional use, i.e. for experienced people familiar with the relative technical, regulatory and legislative factors and capable of performing the operations involved in using and maintaining the appliance. This appliance is not intended for use by children, persons with impaired physical, sensory or mental capabilities, or persons without the necessary experience and knowledge.
- Electrical connections must only be made by skilled/trained staff.
- Do not disconnect the plug by pulling on the power supply cable, or move the appliance by pulling on the hose.
- Do not leave the appliance in low temperatures and protect it from frost and weather.
- Do not allow vehicles to drive over the high pressure hose.
- During operation, do not cover the appliance or place it in positions with poor ventilation.
- In the event of operation indoors an exhaust gas extractor fan must be installed.
- The ventilation grilles must not be obstructed. Do not leave the lance or any other object in the vicinity of the exhaust outlet.
- Remember that the type of gas and the high temperatures are two sources of serious danger: the operator must be properly informed to prevent burns.
- Do not leave the appliance outdoors in the rain or bad weather.
- Operators must wear protective clothing when using the appliance.
- Do not use the appliance in the rain or during thunderstorms.
- Do not leave the appliance in operation for more than 5 minutes with the trigger gun closed: the water temperature would increase fast, causing serious damage to the gaskets.
- Whenever the appliance is switched off, discharge the residual pressure from the hose by means of the trigger gun.
- Do not use fuels other than those recommended by the manufacturer.
- Suffocation hazard. Do not use the appliance indoors without sufficient ventilation. Do not inhale fumes.
 WARNING!
 - Disconnect the appliance from the electricity supply before doing any work on it.
- Do not carry out any risky procedures on the power supply cable and make sure that it is not damaged.
- Never point the high-pressure water jet at people or animals, electrical systems or the appliance itself.
- Always use clean water only. Dirty water and corrosive chemicals will damage the appliance.
- The temperature of the high pressure house outlet fitting may become as high as 80 °C.
- If an extension cable is used, make sure that the plugs have IP65 protection and that the cable complies with the specifications in the table below:
| EXTENSION LENGTH | CABLE GAUGE mm² |
| Up to 20 m | 2.5 |
| From 20 m to 50 m | 4 |
Installing the appliance
The appliance you are about to use will operate best if the following instructions are strictly complied with.
Before switching on the appliance, make sure that it is perfectly horizontal on a firm, level surface.
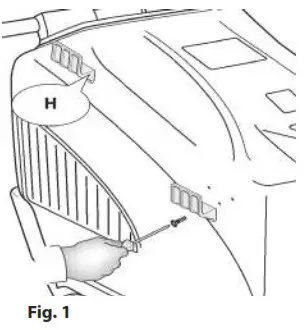
Fit the brackets H as shown in Fig. 1.
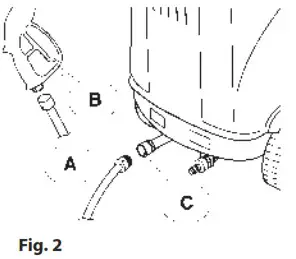
Connect one end of the high pressure hose A to the trigger gun B and the other to the oultet fitting, tightening the fixing nut C (Fig. 2).
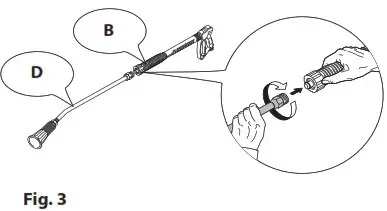
Connect the trigger gun B tothe lance D (Fig. 3).
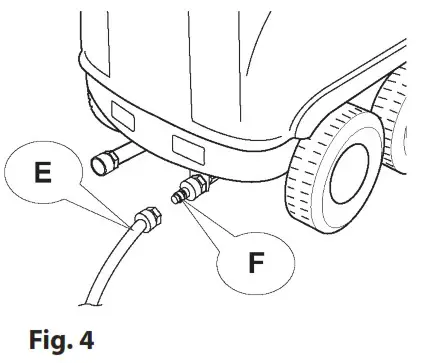
Connect the water hose E to the inlet fitting F. A reinforced hose with inside diameter of at least 10 mm must be used. The water must be sucked in at a pressure of at least 2 bar (Fig. 4).
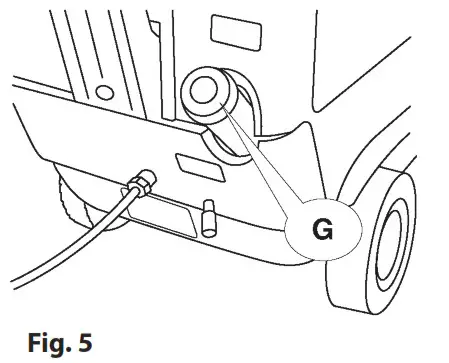
Fill the tank G with Diesel fuel (Fig. 5).
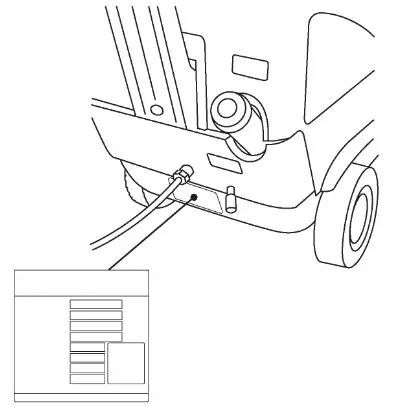
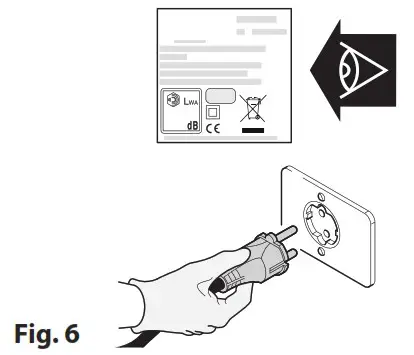
Connect the appliance to the mains electrical supply (Fig.6).![]() Warning – danger! Check that the electricity supply voltage and frequency (VHz) correspond to those specified on the data plate (Fig.6).
Warning – danger! Check that the electricity supply voltage and frequency (VHz) correspond to those specified on the data plate (Fig.6).
Starting the appliance
Once the appliance has been installed, the water tap can be turned on.
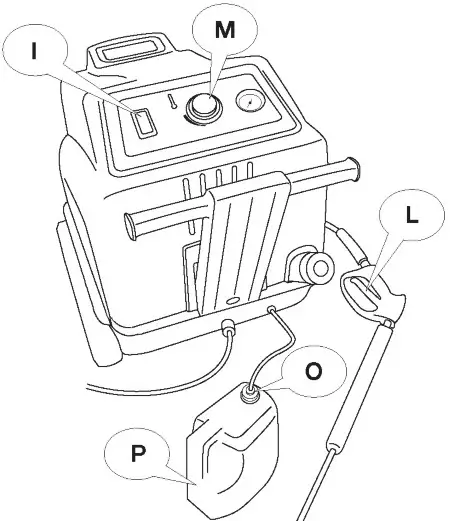
Press the gun trigger L and press the start button I for a few seconds to vent the air inside the hose. When starting the appliance for the first time, operate it without a nozzle to remove the dirt and air from the pump, then replace the nozzle.
To use water, press the gun trigger L and then the start button I: the pump starts to operate. For hot water, press the gun trigger L, followed bybutton I and then set the appropriate temperature on the thermostat M: the burner will start operating and heat the water to the temperature required (Fig. 7).
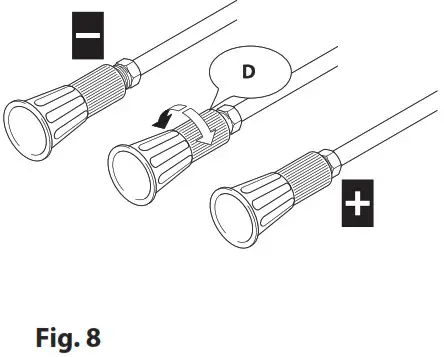
After using the appliance with hot water, before switching it off run it with cold water for a couple of minutes. The pressure is set by the manufacturer and must not be changed for any reason. To apply detergent, fit the filter O into the tank P (Fig. 7 – not supplied) and set the pressure by turning the lance D to “ ![]() “ as shown in Fig. 8.
“ as shown in Fig. 8.
At the end of the working day, discharge the residual pressure from the gun until all the water has come out of the appliance. Switch the appliance off and disconnect the plug.![]() Before switching the appliance off, always run it with cold water for a few minutes.
Before switching the appliance off, always run it with cold water for a few minutes.
Standard outfit
The appliance should always be checked on delivery. It must be supplied complete in all parts and with the following components:
- 1 (one) lance
- 1 (one) high pressure hose
- 1 (one) nozzle
- 1 (one) trigger gun
- 1 (one) fitting
Detergents
Only biodegradable liquid detergents must be used.
Electric wiring diagrams
5640 – 5650 – 5850 series
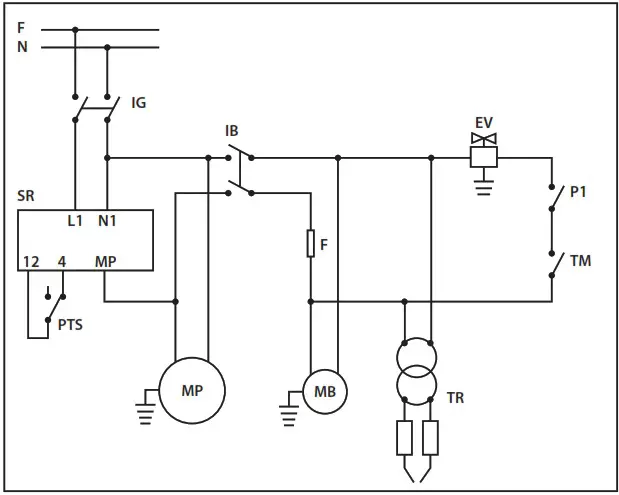
| Legend | |
| IG | Master switch |
| IB | Burner switch |
| TM | Thermostat |
| MP | Pump motor |
| MB | Burner engine |
| SR | Delay circuit board |
| TR | Transformer |
| PTS | Total stop pressure switch |
| P1 | 40 bar pressure switch |
| F | Fuse |
| EV | Solenoid valve |
5870 series
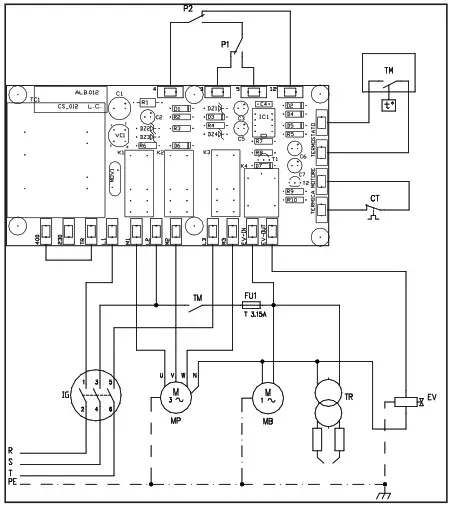
| Legend | |
| IG | Master switch |
| TM | Burner switch |
| TM (t°) | Thermostat |
| MP | Pump motor |
| MB | Burner engine |
| SE | Delay circuit board |
| TR | Transformer |
| P1 | 40 bar pressure switch |
| P2 | 15 bar pressure switch |
| FU | Fuse |
| EV | Solenoid valve |
| CT | Pump thermal protection device |
Decals
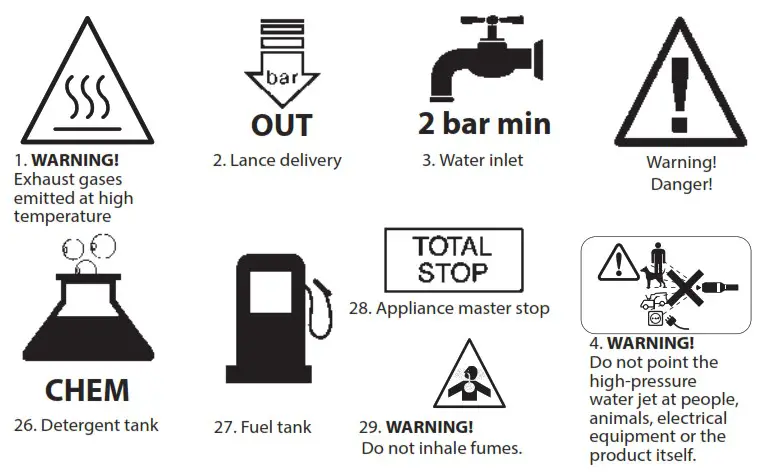
![]() WARNING! Check that the stickers/decals are always present and legible on the appliance; otherwise, apply them in the right position or replace them. Request them from the service centre.
WARNING! Check that the stickers/decals are always present and legible on the appliance; otherwise, apply them in the right position or replace them. Request them from the service centre.
Maintenance
All maintenance and repair operations must be carried out by authorised staff.
- All maintenance operations must be carried out with the appliance on a level surface. The appliance must be disconnected from the electricity and water supplies.
- Correct use and maintenance are essential to guarantee the appliance’s reliability and the best performance.
- To guarantee constant, trouble-free operation, always use only genuine spare parts.
- The appliance purchased has been tested in the factory to ensure that it operates correctly in normal conditions.
Apart from the preliminary checks, the appliance also requires regular inspections, to be performed at the following intervals:
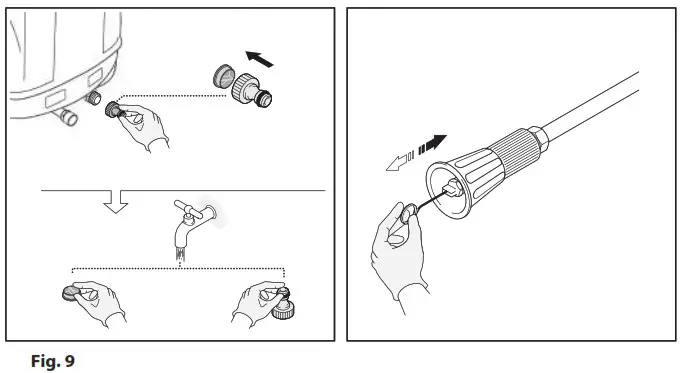
EVERY 2 WEEKS OR 50 WORKING HOURS
Clean the water inlet filter (Fig. 9). Clean the lance nozzle (Fig. 9).
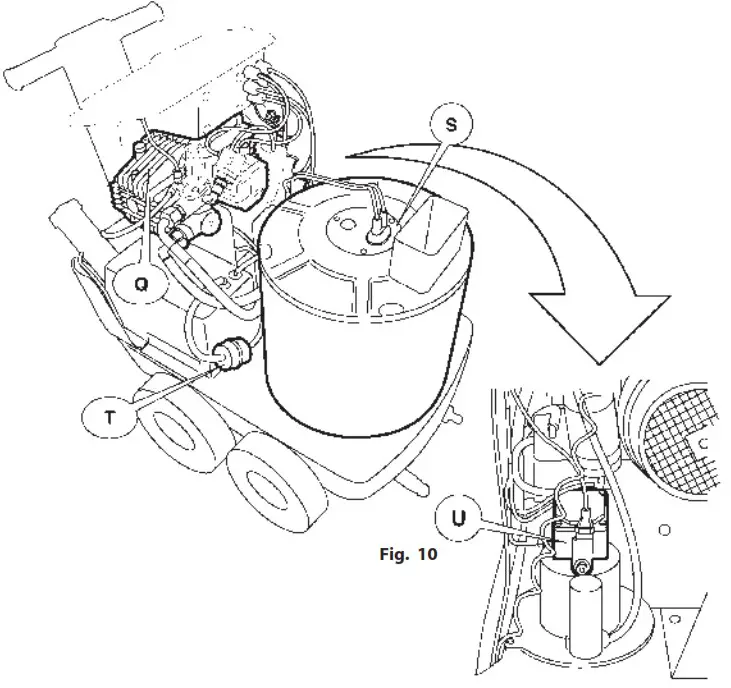
EVERY MONTH OR 100 WORKING HOURS
Clean the combustion head S (Fig. 10).
EVERY 3 MONTHS OR 200 WORKING HOURS
Top up with oil Q, change the fuel filter T and clean the fuel pump filter U (Fig. 10).
Cleaning the internal heating coil
Dilute 1 kg of descaler in a container with 5 litres of water. Turn off the tap (Fig. 11) and insert the water inlet hose and the lance, with no nozzle fitted, into the container.
Operate the appliance with cold water for 20 min. Connect the appliance to the tap and operate it using the lance with no nozzle fitted until the water which comes out is clean, then replace the nozzle.

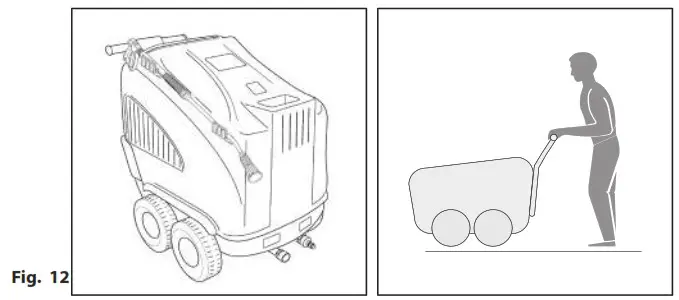
Storage and transport
Store the accessories as shown in fig. 12.
Transport the appliance as shown in fig. 12.
EC Declaration of conformity
We, Annovi Reverberi S.p.A, of Modena, Italy, declare that the following AR BLUE CLEAN appliance(s):
| Designation of appliance | High pressure washer | |||
| Model No | 5640 | 5670 | 5850 | 5870 |
| Rated power kW | 2.4 | 2.5 | 3 | 5 |
is (are) compliant with the following European directives:
2006/42/EC, 2014/35/EU, 2011/65/EU and 2015/863/EU, 2012/19/EU
2014/30/EU, 2000/14/EC (Italian Legislative Decree 262/2002)
and was (were) produced in compliance with the following norms or standardised documents: EN 60335-1; EN 60335-2-79; EN 55014-1;
EN 55014-2; EN 61000-3-2; EN 61000-3-3; EN 61000-3-11; EN 60704-1;
EN 62233; EN 50581
Name and address of the person responsible for issuing the technical file: Stefano Reverberi / AR Managing Director Via ML King, 3 – 41122 Modena, Italy
The conformity assessment procedure required by Directive 2000/14/EC has been performed in accordance with Annex V
| Model No | 5640 | 5670 | 5850 | 5870 | |||
| Measured dB (A): | sound | power | level | 89 | 89 | 89 | 89 |
| Guaranteed dB (A): | sound | power | level | 90 | 90 | 90 | 90 |
Date: 30.06.2021
MODENA (I)
Stefano Reverberi Managing Director
Troubleshooting
| PROBLEM | CAUSE | REMEDY |
| NO WATER COMES OUT | Water filter fouled Inlet valve blocked Lance nozzle obstructed | Clean or replace Check Clean |
| WEAK OR FLUCTUATING PRESSURE | Detergent valve open and sucking in air Water supply insufficient Pump sucking in air Valves worn Nozzle worn/unsuitable Gaskets worn Water temperature too high Heating coil Too much air sucked into system | Check Check the flow rate Check Replace Replace Replace Check Descale Check |
| BURNER DOES NOT LIGHT | Fuel filter fouled Fuel pump filter fouled Burner nozzle fouled Thermostat faulty Solenoid valve faulty/ blocked Electrode spark insufficient Pump motor coupling worn Electrical power insufficient/ failed Air sucked into system | Check Replace Clean or replace Replace Replace Replace Replace Check Check |
| APPLIANCE NOISY | Valves worn/fouled/ blocked Water temperature too high | Check inlet hoses Reduce temperature |
| WATER IN OIL | Oil/water ring seals worn High humidity percentage in air | Clean or replace Check |
| OIL LEAK FROM HEAD | Sealing system O-rings worn | Replace |
| MOTOR DOES NOT START WHEN SWITCH IS PRESSED | Problems with Total Stop device | Contact an Authorised Service Centre |
| MOTOR STOPS SUDDENLY | Thermal protection device tripped | Wait 2-3 minutes before restarting |
Declaration
![]() Do not dispose of electrical components together with household waste! In compliance with European Directive 2012/19/EU on waste electrical and electronic equipment (WEEE) and its implementation in accordance with national laws, end-of-life electrical components must be collected separately and consigned to an environmentally compatible recycling facility.
Do not dispose of electrical components together with household waste! In compliance with European Directive 2012/19/EU on waste electrical and electronic equipment (WEEE) and its implementation in accordance with national laws, end-of-life electrical components must be collected separately and consigned to an environmentally compatible recycling facility.
Warranty
The validity of the warranty is in accordance with the relevant legislation in the country where the product is sold (unless otherwise stated by the producer).
The warranty covers materials, construction and conformity defects during the warranty period, during which time the manufacturer will replace defective parts and repair the product if not excessively worn, or replace it.
The warranty does not cover components subject to normal wear and tear (valve, piston, water gasket, oil gasket, springs, O-rings, accessories such as the hose, gun, brushes, wheels, etc.);
The warranty does not cover defects caused by or arising from:
- improper use, misuse, negligence,
- professional use or hire, if the product was sold for domestic use,
- failure to comply with the maintenance instructions provided in this manual,
- repair by unauthorised staff or centers,
- use of non-genuine parts or accessories,
- damage caused by transport, by dirt or foreign bodies, accidents,
- storage or warehousing problems.
Proof of purchase must be submitted to obtain warranty cover. Per after-sales service, contact the store where the appliance was purchased.
Manufactured and distributed by: Annovi Reverberi S.p.A.
Via M.L. King 3
41122 Modena (Italy)
www.annovireverberi.it


