
THERMALTRONICS PHD-1500CR Patio Infrared Heater

Danger
- DANGER INDICATES AN IMMINENTLY HAZARDOUS SITUATION WHICH IF NOT AVOIDED, WILL RESULT IN DEATH OR SERIOUS INJURY.
- FAILURE TO COMPLY WITH THE PRECAUTIONS AND INSTRUCTIONS PROVIDED WITH THIS HEATER CAN RESULT IN DEATH, SERIOUS BODILY INJURY AND PROPERTY LOSS OR DAMAGE FROM HAZARDS OF FIRE, EXPLOSION, BURN, ASPHYXIATION, AND/OR CARBON MONOXIDE POISONING.
- ONLY PERSONS WHO CAN UNDERSTAND AND FOLLOW THE INSTRUCTIONS SHOULD USE OR
SERVICE THIS HEATER.
For Your Safety - DO NOT STORE OR USE GASOLINE OR OTHER FLAMMABLE VAPOR AND LIQUIDS IN THE VICINITY OF THIS OR ANY
0TH ER APPLIANCE.
Warning - NEVER LEAVE HEATER UNATTENDED
WHEN HOT OR IN USE. KEEP OUT OF REACH OF CHIL.DREN.
WARRANTY - THERMATRONICS AIMS TO PROVIDE HIGH-PERFORMANCE PRODUCTS AND QUALITY
SERVICES TO CUSTOMERS. THERMATRONICS PRODUCT INCLUDING ANY ACCESSORY IS COVERED BY A 1-YEAR WARRANTY.
SAFETY INSTRUCTION
When using this electric unit, basic safety precautions should always be followed to reduce the risk of fire, electric shock and injury to persons, including the following:
- Use this heater only as described in this manual. Any other use not recommended by the manufacturer may cause fire, electrical shock or injury to person or property and may void the warranty.
- CAUTION: Risk of Electric Shock. DO NOT open or try to repair the heater yourself.
- Always unplug the unit before assembly, dis-assembly or cleaning.
- Always use on a dry, level surface.
- Always unplug the unit when not in use, when moving from one location to another.
- To disconnect, grasp the plug and pull it from the wall outlet. DO NOT unplug by pulling on cord.
- This heater may get hot when in use. To avoid burns, DO NOT let bare skin touch hot surfaces. DO NOT place it against walls, furniture, curtains, etc.
- DO NOT operate any heater with a damaged cord or plug, after a malfunction, or if dropped or damaged in any manner.
- DO NOT operate the heater in the presence of explosive and/or flammable fumes.
- DO NOT place the heater or any parts near an open flame, cooking or other heating appliances.
- DO NOT operate if the heater housing is removed or damaged.
- A loose fit between the AC outlet and plug may cause overheating of the plug; consult a qualified electrician.
- DO NOT run cord under carpeting. DO NOT cover ccrd with throw rugs, runners, or the like. Arrange cord away from track area and where it will not be tripped over.
- DO NOT connect the heater to any power sources other than a 120V alternating current polarized outlet.
- Do NOT operate the heater with wet hands.
- Do NOT use this appliance on wet surfaces. Avoid spilling liquid on the appliance.
- DO NOT twist, kink or wrap the cord around the appliance, as this may cause the insulation to weaken and split.
- DO NOT allow children to play with any product packaging, such as plastic bags.
- Close supervision is necessary when this heater is used near children and pets.
- This appliance can be used by children aged from 8 years and above and persons with reduced physical, sensory or mental capabilities or lack of experience and knowledge if they have been given supervision or instruction concerning use of the appliance in a safe way and understand the hazards involved.
- DO NOT touch the heater’s surface when it is operating, which may burn your hands.
- Always use the heater in an upright position.
Components and specification
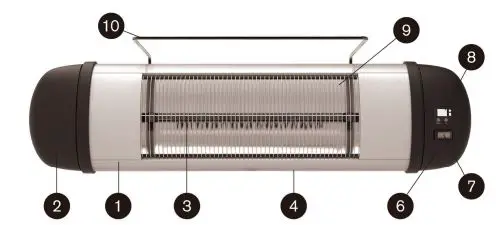
- 1. Front aluminum cover
- Left housing
- Heating tube
- Back aluminum cover
- Power cord
- Right housing
- Power button
- LCD display
- Protection grill
- Anti-coverage bracket
| Model | PHS-1500CR |
| Plug Type | US Standard |
| Input Voltage | 120V 60Hz |
| Output Power (Watts) | 500W/1000W/1500W |
| MaxTimer | 24 Hours |
| Power Cord | 68.9” |
| Heater Size | 29” X 5.4” X 9.2” |
| Standing Holder Length | 40 – 70 Inches |
| Control Method | Manual Control / Remote Control |
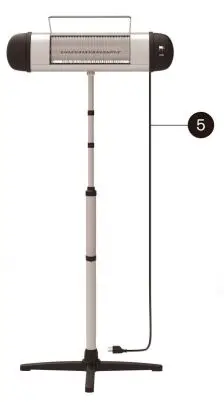
Operation
Heater Installation
ACCESSORIES INCLUDED 
Step 1:
Carefully remove the heater from the box. Check whether the heater in the box are in line with the packing list. (Please SAVE the package box for off-season storage)
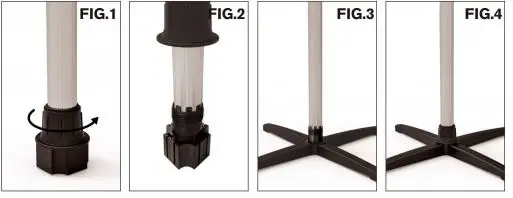
Step 2:
Loosen the nut on the standing holder, install 4 brackets into the bottoms with no bumps, tighten the nut as Fig.1-4
Step 3:
Fix L Shape Bracket and aluminum bracket with two M5*1 2 screws & M5*1 2 screws fastener as below Fig.5-6

Step 4:
Remove the M5 screws behind the heater and install the aluminum bracket to the back side of heater body as Fig.7 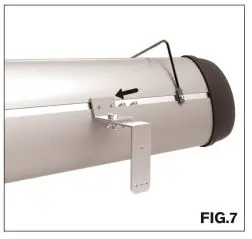
Step 5:
Use two M6*14 screws & M6*14 screws fastener to install the L Shape Bracket to the top of the stand holder as Fig.8.
Step 6:
Remove the screws behind the heater and use the screws to fix the decorative support on the back of heater body as Fig.9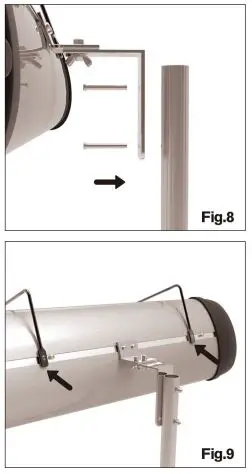 Step 7:
Loosen the nut on the top of the lever, adjust the height of the lever and tighten the nut as Fig.10-11 Heater Operation
Unplug your heater first.  Step 1:
Connect the power line and the power strip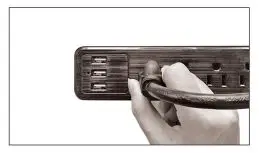
Step 2:
Press rocker switch to ”-” position Press Open/Close once, the digital screen shows P.O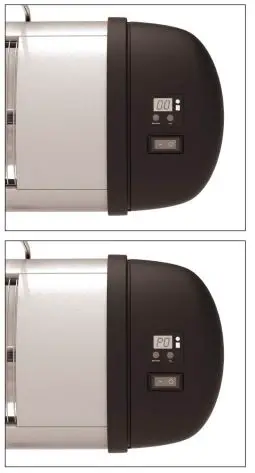 Step 3:
Press Open/Close second,the digital screen shows P.1 , the function of a file connectedo. 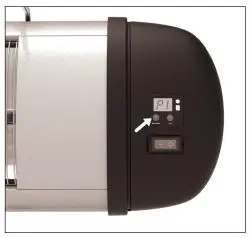 Step 4:
Press Open/Close third, the digital screen shows P.2,the function of two file connectedo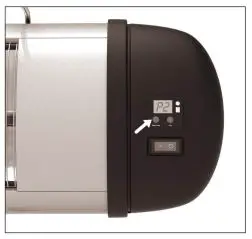
Step 5:
Press Open/Close forth, the digital screen shows P.3, the function of three file connectedo
Step 6:
After the function is on, 1-24 hours timing shutdown can be adjusted arbitrarily,the digital screen showing 0.1 indicates timing one hour,showing 0.2 indicates timing two hour.
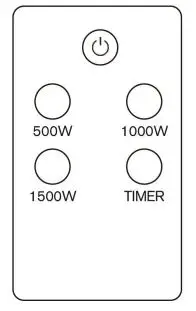
Remote Control
 On/ Off
Switches on or off the heater or stands it by.- Low Heat
After turn on the heater, you can choose low heating. - Mid Heat
After turn on the heater, you can choose moderate heating. - High Heat
After turn on the heater, you can choose high heating. - Timer Set
Switches off the heater in present time and starts stand by mode.
 On/ Off
WARNING! Forced to change the heater direction when oscillating may damage the shaking mechanism inside the heater.
Completely uncoil the cord and plug heater directly into a 11 O,._ 1 20 Volt grounded AC wall outlet. Be sure the plug fits tightly. A loose fit will cause overheating and damage the plug.
Troubleshooting
| Symptoms | Recommended Action | |
|
Power | Will not heat / No operation indicator LED | Check that power is connected and switched on
If still faulty, turn off the heater, and contact |
| When associated circuit breaker (safety, ground) is thrown or a fuse is blown. |
Turn off the heater, and contact your authorised electrical installer. | |
|
Smell | Heater smells when first used | This is caused by oil or dust left over from the manufacturing process and will stop after a short time |
| Faint smell for short periods after turning on the heater | This is normal and should stop after a short time | |
| Heater smells when turned on after periods of non-use | This is the result of build-up debris and dust in the heater, Switch the heater off and allow it to cool down and then clean before operating | |
| There is a strange burning smell after few uses. | Turn off the heater, and contact | |
|
Noise | Clinking noises when heater is turned on and after being turned off | This is expansion and contraction noises of the heaters metal components and is a normal function of the heater |
| There is a strange sounds (other than normal expansion and contraction noises) coming from the unit. |
Turn off the heater, and contact | |
| Exposure to extreme ambient conditions such as high winds / excessively cold temperatures can lower the heating performance of an outdoor installation
Unit is not installed in correct position, possibly too high or heater is too small for recommended area | ||
| Performance Poor heating performance | ||
NOTE: If the heater still does not operate, turn the power button to the ”OFF” position, disconnect the power cord from the electrical outlet, and contact our Customer Service
[email protected] for further solution. Never attempt to open or service the heater yourself, or may cause damage or personal injury.
Cleaning and Maintenance
- Unplug the appliance before cleaning.
- Do not use any chemical-based solutions for cleaning heater surfaces.
- In order to remove the dust from the protective heater grilles, use a vacuum cleaner upholstery attachment.
- Use a dry cloth to clean only external surfaces of the heater.
- Ensure the heater is completely dry before storage or reconnecting to electrical supply.
- Never immerse the heater or heater motor in water or other liquid.
- If the heater is not used for long periods, protect with a suitable cover after cleaning, then store in a dry place.
- Regular cleaning will ensure the optimum performance and appearance of the heater.
- DO NOT kink the power cord when storing or while in use.
NOTE: Dust, dirt, pet fur, etc can diminish your heaters performance and can lead to unwanted odors. For best performance clean your heater frequently, at least once per season.
ALWAYS TURN OFF AND UNPLUG THE HEATER BEFORE CLEANING.
Attention
- Always disconnect the heater from the electricity supply and allow it to cool before attempting to work on it.
- If the heater has collected dust or dirt inside the unit or around the heating element, have to unit cleaned by a qualified service agent. Do not operate the heater in this condition.
- The only maintenance required is cleaning of the external surfaces of the heater. Do not touch the heating element with bare fingers, as residue from your hand could affect the life of the lamp. If it is accidentally touched, remove the finger marks with a soft cloth moistened with mentholated spirit or alcohol.
- Do not attempt to repair or adjust any electrical or mechanical functions on this heater.
- The heater contains no user serviceable parts. Should the product suffer damage or breakdown, it must be returned to the manufacturer or its service agent.
- Damaged supply cords to be replaced by the manufacturer, service agent or similarly qualified person in order to avoid hazard.
- A disconnecting switch incorporated in the fixed wiring is to be provided.
WARRANTY
LIMITED ONE YEAR WARRANTY
Every Thermatronics product is warranted to the original purchaser only to be free from defects in material and workmanship. Subject to certain exceptions, we will replace any part on an electric power tool that is defective in material or workmanship for a period of 1 year after the date of purchase unless otherwise noted. This warranty does not apply to damage from repairs made or attempted by anyone other than Thermatronics, misuse, alterations, abuse, normal wear and tear, lack of maintenance, or accidents.
Warranty Registration is not necessary to obtain the applicable warranty on a Thermatronics product.
This warranty applies to product sold in the U.S.A. only.


