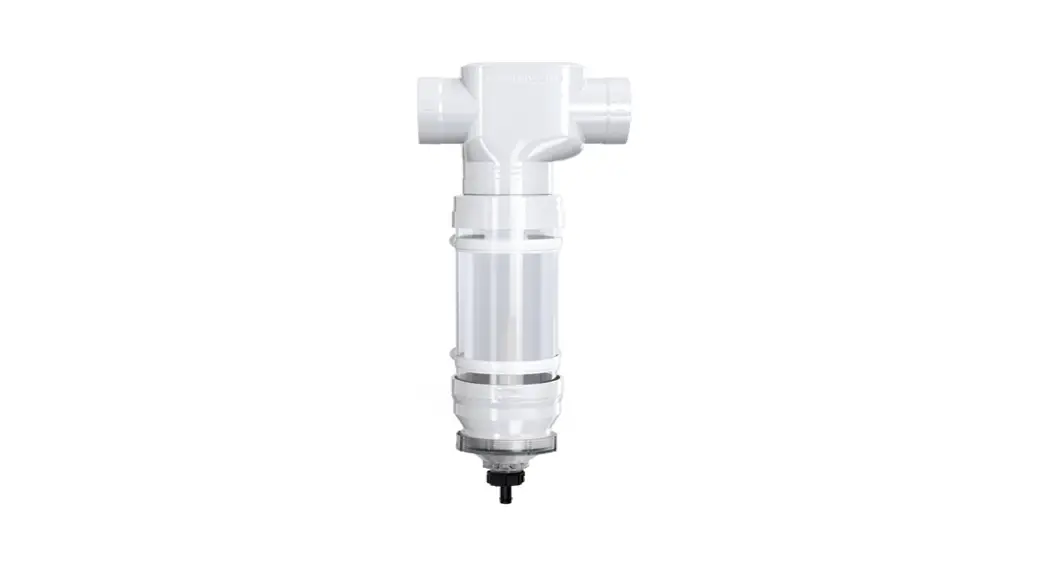
![]() WDDP12 First Flush Max with Catch All Tee
WDDP12 First Flush Max with Catch All Tee
Installation Guide RAIN HARVESTING by Blue Mountain Co
First Flush Max
w/ Catch-All Tee
Installation and Specification Guide
rainharvesting.com
PRODUCT DETAILS
Optimise the “first flush” diverted from your roof and away from your tank with the First Flush Max with Catch-All Tee.
The First Flush Max Tee’s specially designed inlet solves the problem of fast-moving dirty water “skipping” over the first flush chamber, ensuring the dirtiest water does not enter your tank.
| Code | Size | Country |
| WDDP12 | 90mm | Australia / India |
| WDDP612 | 75mm | EU |
| WDDP512 | 68mm | UK |
| WDDP312 | 80mm | South Africa |
| WDDP212 | 80mm | New Zealand |
| WDDP112 | 3″ | USA |
Installation
WHAT’S IN THE BOX?
- First Flush Max Tee
- Ball seat
- Sealing ball
- End coupling
- Plastic Filter Screen
- Flow Control Valves x 8
- Transparent, rapid release exit funnel
- Hose connector
- 90mm/3” pipe wall brackets x 2
- 90mm/3” or 100mm/4” pipe (for diversion chamber)
- Tape measure
- Marker pen
- Saw
- Solvent weld glue
- Screws
- Drill or screwdriver
To make Max Chamber:
- Max Chamber adaptor
- 100mm/4” end coupling
- 100mm/4” pipe wall brackets x 2
- 4” SCH40 – 4” SDR35 adaptor x 2 (USA only)
Your kit may include international adaptors:
- 90mm to 80mm socket adaptor x 4 (NZ only)
- 3” SCH40 – 3” SDR35 adaptor x 4 (USA only)
FIRST FLUSH MAX WITH CATCH-ALL TEE
- If you’re using the Max Chamber adaptor to create your first flush diversion chamber, you will need to determine the length of 100mm pipe you require. As a general guide, 1 metre of 100mm pipe holds 8.8 litres of water. 3 feet of 4” pipe holds 2 gallons of water. Ensure all cut edges are clean and smooth.
- If you aren’t using the Max Chamber adaptor, you will need to determine the length of 90mm (80mm or 3”) pipe required for your first flush diversion chamber. As a rough guide, 1 metre of 90mm pipe holds approximately 5.9 litres of water. 1 metre of 80mm pipe holds approximately 4.6 litres of water. 3 feet of 3” pipe holds 1.2 gallons of water. Ensure all cut edges are clean and smooth.
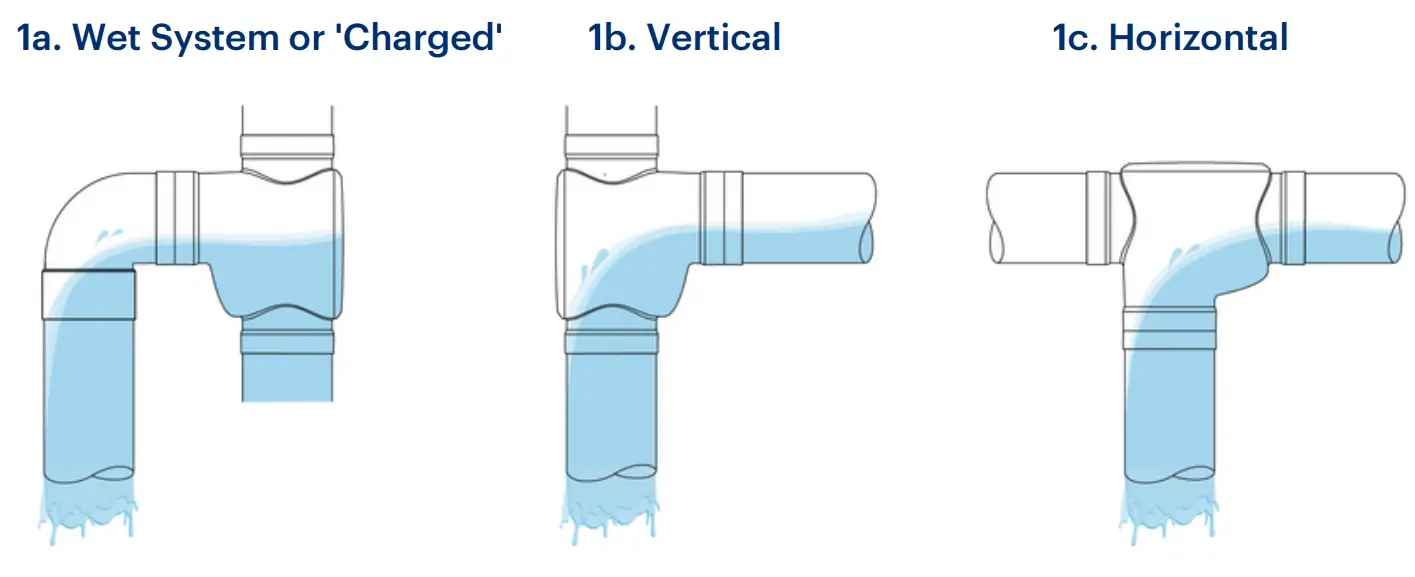
- The First Flush Max tee can be installed in the horizontal or vertical orientation to suit your installation. The outlet must be accessible for maintenance and inspection. (Refer to Figures 1a, 1b and 1c for suggested installation orientations).
Figure 1Suggested Installation Orientations
 Select the orientation of the First Flush Max tee appropriate for your chosen installation point. This will determine which socket on the First Flush Max tee will attach to your diversion chamber.
- Measure your existing downpipe and cut to create space for the First Flush Max tee. The outlet of your diverter must sit at least 150mm (6”) from the ground when fully assembled, so select your installation point and measure and cut accordingly. Ensure all cut edges are clean and smooth. Install your First Flush Max tee in place by applying solvent weld glue to the sockets and pipe. Insert the pipe into the sockets or socket adaptors at either end of the First Flush Max tee.
- Apply solvent weld glue to the threaded end coupling socket and one end of your diversion chamber pipe and insert it firmly into the end coupling. If you’re using a 90mm pipe, you will need to use the 90mm end coupling socket (and adaptors if required). If you’re using the Max Chamber adaptor, you will need to use the 100mm end coupling socket (and adaptors if required).
- Apply solvent weld glue to the Max Chamber adaptor and glue it onto the upper end of your diversion chamber. If you aren’t using the Max Chamber adaptor you can disregard this step.
- Orient the ball seat so it will fit inside the First Flush Max tee socket that will attach to your diversion chamber. If you’re using a 3” pipe for your diversion chamber, you will need to snap off the outer spacer ring from the ball seat.
- With the ball seat in place, apply solvent weld glue to the upper end of your diversion chamber into your First Flush Max tee. The upper end of your diversion chamber will be either a 90mm pipe or the Max Chamber adaptor, depending on which configuration you are using. Insert the upper end of your diversion chamber into the First Flush Max tee. If you are using the Max Chamber adaptor, make sure you align the indicator mark to point away from the mounting wall. This will ensure your First Flush unit will sit flush on the wall.
- Attach to the wall using the supplied brackets, supporting the unit until it is fully secured. The smaller brackets are for the standard diversion chamber. The larger brackets are for the Max Chamber. The upper bracket should sit directly under the First Flush Max tee where it will hold the weight of the unit.
- Place the ball inside your first flush diversion chamber through the end coupling and firmly screw the transparent, rapid-release exit funnel with O-ring onto the end coupling to ensure a good seal.
- Select the appropriate flow control washer and fit it into the hose connector with the side marked “TOP” showing. Start by using the flow control valves with the smallest gauge hole (lowest number). Try a larger gauge if experiencing blockages. Save the remaining flow control valves for possible future use. Insert the plastic filter screen in through the base of the Transparent, Rapid Release Exit Funnel and secure by attaching the hose connector and flow control valve.
 Select the orientation of the First Flush Max tee appropriate for your chosen installation point. This will determine which socket on the First Flush Max tee will attach to your diversion chamber.
POLLUTION FACTORS
The following factors can be used as a guide to determining the volume of water to be diverted.
POLLUTION FACTOR FOR THE ROOF
| MINIMAL POLLUTION | |
| DIVERT 0.5L PER M² (0.0123 GALLONS PER FT² ) Open field, no trees, no bird droppingsclean environment | DIVERT 2L PER M² (O.0491 GALLONS PER FT ) Leaves and debris, bird droppings, various animal matter, e.g. dead insects, skinks, etc. |
The above quantum are the results of preliminary testing. Individual site analysis and field testing is required to more accurately assess the quantum to be diverted in each individual case.
DIVERSION FACTOR FOR A FIRST FLUSH WATER DIVERTER
| MINIMAL POLLUTION | SUBSTANTIAL POLLUTION |
| M² (or FT² ) ROOF AREA X POLLUTION FACTOR = LITRES TO BE DIVERTED | |
| Example for a minimal polluted roof of 100m² 100m² x 0.5 = 50 litres to be diverted | Example for a heavily polluted roof of 100m² 100m² x 2 = 200 litres to be diverted |
| Example for a minimal polluted roof of 1000ft² 1000ft² x 0.0123 = 12.3 gallons to be diverted | Example for a heavily polluted roof of 1000ft² 1000ft² x 0.0491 = 49.1 gallons to be diverted |
REFERENCE CHART
With 90mm standard diverter chamber
For NZ 80mm and USA 3” attachments, please refer to the Product Specifications section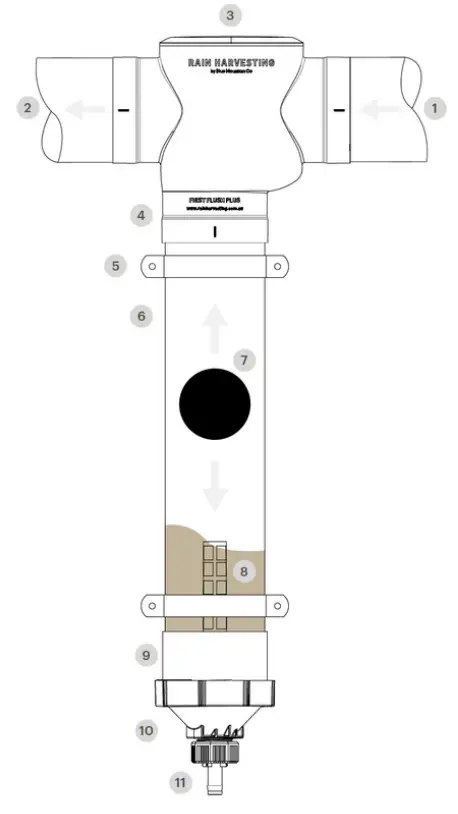 With 100mm Max Chamber
with Max Chamber upgrade parts attached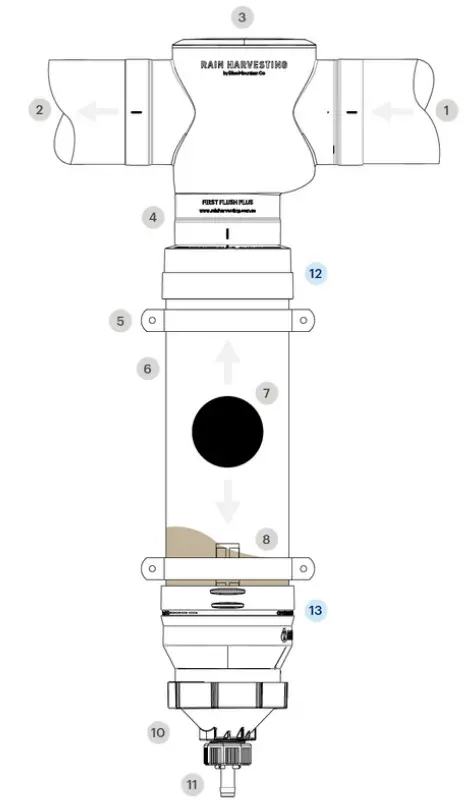
| 1 In-feed from the roof 2 To the tank 3 First Flush Max Tee 4 Ball seat 5 Wall brackets 6 Diversion chamber 7 Sealing ball | 8 Plastic Filter Screen 9 90mm End Coupling 10 Transparent, Rapid Release Exit Funnel 11 Hose Connector 12 Max Chamber Adaptor 13 100mm End Coupling |
Product Specifications
First Flush Max w/ Catch-All Tee 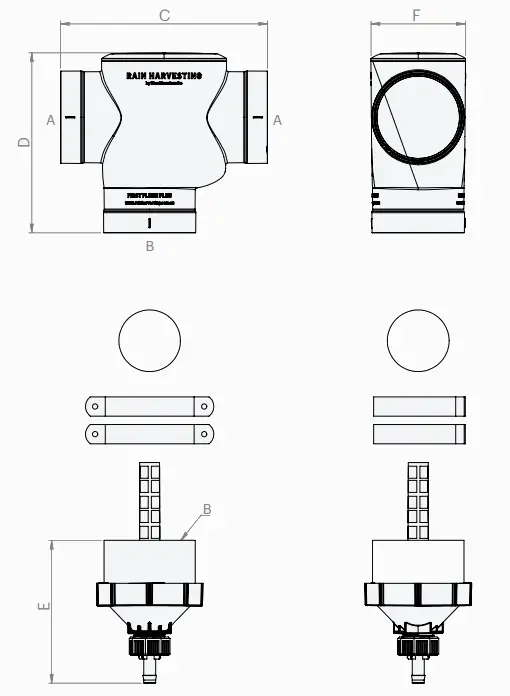 Dimensions & Pipe Fittings
| Country | Code | SETUP | A | B | C | D | E | F |
| Australia | WDDP12 | Regular | 90 F | 90 F | 215 | 187 | 148 | 98 |
| Max Chamber | 90 F | 100 F | 215 | 236 | 191 | 98 | ||
| EU | WDDP612 | Max Chamber | 75 F | 100 F | 275 | 236 | 191 | 98 |
| UK | WDDP512 | Max Chamber | 68 F | 100 F | 275 | 236 | 191 | 98 |
| South Africa | WDDP312 | Max Chamber | 80 F | 100 F | 265 | 212 | 191 | 98 |
| New Zealand | WDDP212 | Regular | 80 F | 80 F | 265 | 212 | 172 | 98 |
| Max Chamber | 80 F | 100 F | 265 | 236 | 191 | 98 | ||
| USA | WDDP112 | Regular | 3″ SCH40 F | 3″ SCH40 F | 8.46″ | 7.36″ | 5.83″ | 3.86″ |
| 3″ SDR35 F | 3″SDR35 F | 8.7″ | 7.48″ | 5.94″ | 3.86″ | |||
| Max Chamber | 3″ SCH40 F | 4″SCH40 F | 8.46″ | 9.29″ | 7.52″ | 3.86″ | ||
| 3″ SDR35 F | 4″ SDR35 F | 8.7″ | 9.41″ | 7.64″ | 3.86″ |
All dimensions are in mm unless otherwise stated.
Fitting guide:
F = Female / Socket Fitting (Pipe fits inside)
M = Male / Spigot Gitting (Pipe size, fits into a socket)
Maintenance
It is important to ensure that your first flush diverter outlet remains clear of any debris. If your outlet becomes blocked, the chamber will not empty and the first flush of water will not be diverted when it rains.
To ensure the flow of water through your diverter’s outlet, periodically unscrew the outlet to allow debris to fall out. If the diversion chamber is full of water, take care as it empties.
Remove the hose connector, flow control valve and plastic filter screen, and hose or wash the screen with clean water. Check the flow control valve for any blockages and remove and clean as necessary.
For best results and minimal maintenance, we recommend installing rain heads such as our Leaf Eater rain heads on all your downpipes to limit the volume and number of leaves and debris that reach your first flush diverter.
![]() Supported by
Supported by
RAIN HARVESTING
A common misconception about collecting rainwater is that all you need is a roof, a tank and some rain. This `tanking’ approach cannot always be relied on to deliver the volume or quality of water that you require. That is where we can help.
With some thought, your rain harvesting system can provide you with cleaner water and lots of it. Whether you’re completely reliant on tank water or wanting to keep the garden green, our simple steps will help you achieve your goal.
The Rain Harvesting approach to rainwater collection involves using tested and proven products to make quality rainwater available for use in and around your property. You don’t need much to get started and you will be surprised how easy it is to get the most out of your rainwater system.
How can we help you?
DISCLAIMER This product specification is not a complete guide to product usage. Further information is available from Rain Harvesting Pty Ltd and from the Installation and Operating Instructions. This specification sheet must be read in conjunction with the Installation and Operating Instructions and all applicable statutory requirement. Product specifications may change without notice. © Rain Harvesting Pty Ltd
rainharvesting.com
![]() For more information or to find out how we can help, just give us a call on
For more information or to find out how we can help, just give us a call on
+61 7 3248 9600
Or visit our website at
rainharvesting.com


