UVISION X1 LCD Multimedia Projector User Manual

Safety Instructions
- Read all warnings and follow all instructions.
- Do not block any ventilation openings. To ensure reliable operation of the projector and to protect from over heating, it is recommended to install the projector in a location that does not block ventilation. As an example, do not place the projector on a crowded coffee table, sofa, bed, etc. Do not put the projector in an enclosure such as a book case or a cabinet that restricts air flow.
- Avoid exposing the projector to direct sunlight or other sources of sustained heat. Do not install near any heat sources such as radiators, heat registers, stoves, or othe r devices.
- Do not use the projector near water or moisture. To reduce the risk of fire and/or electric shock, do not expose the projector to rain or moisture.
- Do not place the projector on an uneven or unstable surface. The projector may fall over, causing personal injury or projector malfunction.
- Do not look straight at the projector lens during operation. The intense light beam may damage your eyes.
- Please remove the lens cap when the projector is operating . Do not block the projection lens with any objects as this could cause objects to become heated and deformed or even cause a fire.
- Do not let objects or liquids enter the projector. They may touch dangerous voltage points and short out parts that could result in fire or electric shock.
- When moving the projector, be careful not to drop or bump the projector on anything.
- Do not place any heavy objects on the projector or connection cables.
- Do not stand the projector on end vertically. Doing so may c ause the projector to fall over, causing personal injury or projector malfunction.
- Only use attachments/accessories specified by the manufacturer.
- Do not place liquids near or on the projector. Liquids spilled into the projector may cause it to fail. If th e projector does become wet, disconnect it from the power supply and contact UVISION to have projector serviced.
- When the projector is under operation, you may sense some heated air and odor from its ventilation grill. It is a normal operation and not a de fect.
- If smoke, an abnormal noise, or a strange odor is present, immediately switch the projector off and contact UVISION. It is dangerous to continue using the projector.
- Disconnect the power cord from the AC outlet if the projector is not being used for a long period of time.
- Do not attempt to service the unit yourself. Opening or removing covers may expose you to dangerous voltages or other hazards. Please contact UVISION before you send the unit for repair.
Trademarks
UVISION and the UVISION logo are
trademarks of UVision Innovation Co., Ltd , registered in the United States and other countries.
Regulatory Notices
FCC Compliance Statement
This device complies with part 15 of the FCC rules.
Operation is subject to the following two conditions
- This device may not cause harmful interference, and
- This device must accept any interference received including interference that may cause undesired operation.
Introduction
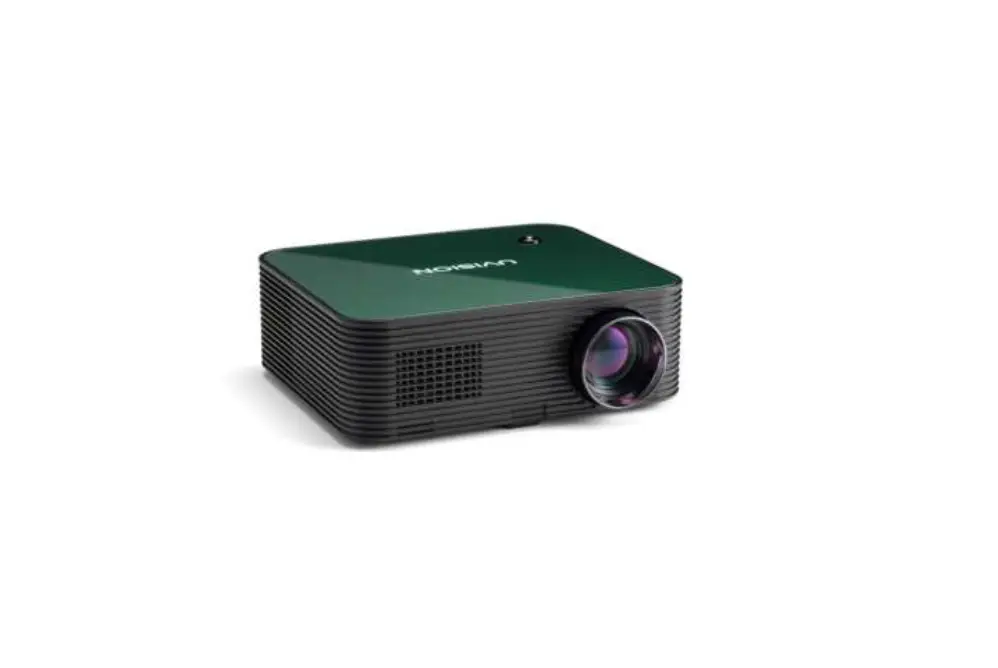
Package Contents
Your projector comes with all the items shown below. Ensure that you have all the items, and contact UVISION if anything is missing.
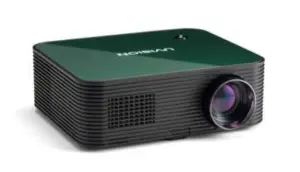
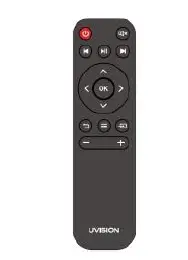
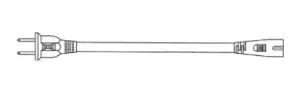
UVISION X1 Projector Remote Control Power Cord
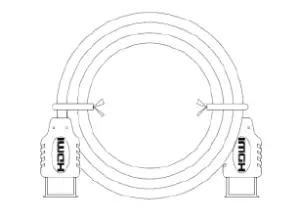

HDMI Cable User Manual
Note: The Remote Control not includes battery.
Product Overview
UVISION X1 Projector Controls and Functions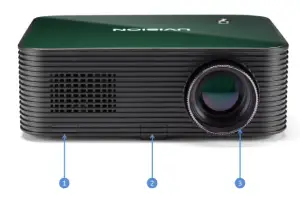
| Item | Description |
| 1 | IR Receiver for Remote Control |
| 2 | Front tilt adjustment stand |
| 3 | Focus adjust |
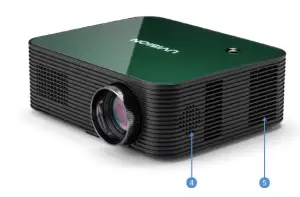
| Item | Description |
| 4 | Dual Channel Stereo Out |
| 5 | Heat dissipation air inlet |
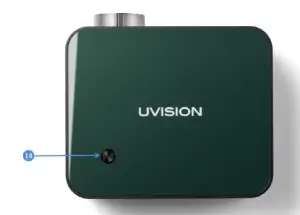
| Item | Description |
| 14 | Power Button |
Connection Ports
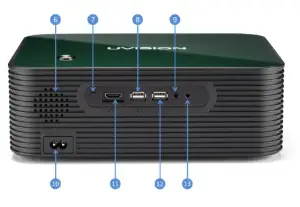
| Item | Description |
| 6 | Dual Channel Stereo Out |
| 7 | IR Receiver for Remote Control |
| 8 | USB Port |
| 9 | AV Port |
| 10 | AC Power Cord inlet |
| 11 | HDMI Port |
| 12 | USB Port |
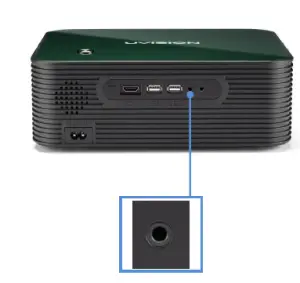
| 13 | AUX Port |
Remote Control
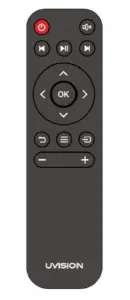
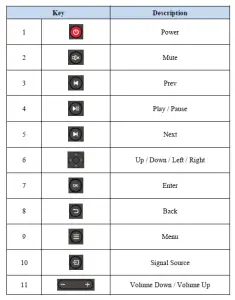
Using the UVISION X1
Turning On
Off the Projector
Turning Your Projector On
- Connect the power cord and appropriate signal cables to the projector.
- Remove the lens cap.
- Press the Power button or the Power key by remote control.
- Turn on your source (computer, DVD player, etc).
- Connect your source to the projector using the appropriate cable.
- The input source is determined by the last connected input source. (By default, the input source of the projector is set to Multimedia). Change the input source of the projector if necessary.
Note: Turn on the projector before you turn on the source (computer, DVD player, etc.). The Power button light red until pressed. After turn on the projector, button light blue.
Turning Your Projector Off
- Press the Power button or the Power key by remote control. Follow the instruction displayed on screen to properly turn off the projector.
- Press the Power button or the Power key again.
- Disconnect the power cord from the electrical outlet and the projector.
Note: The “Power key to standby any key to cancel” message will appear on the screen. The message disappears after you can press the any key to clear it.
Adjusting the Projection Image
Raising the Projector Height
Raise the projector to the desired display angle, and use the front tilt adjustment wheel to fine tune the display angle.

Lowering the Projector Height
Lower the projector, and use the front tilt adjustment wheel to fine tune the display angle.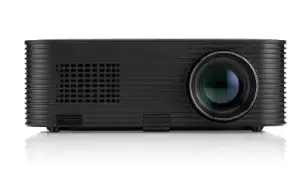
Adjusting Projection Image
Focus Rotate the Focus Ring to sharpen the Image Focus until the blurred image becomes clear.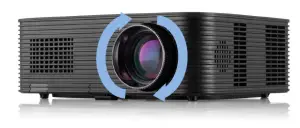
Adjusting Projection Image Size
Place UVISION X1 on a flat, stable foundation squarely in front of the projection surface.
For best results, the projection surface shall be white and flat. The distance between this
projector and the projection surface must be a minimum of 1 .1 meter (3 5 inches) and a max imum of 5.9 meters ( 200 inches).
The distance between this projector and the projection surface determines the approximate size of the image. Use the table below to determine approximately how far to place this projector from the screen based on the size o f the projected image.
| Screen size | Projection distance (m) |
| 35 inches | 1.1m |
| 60 inches | 1.8m |
| 80 inches | 2.4m |
| 100 inches | 3.0m |
| 150 inches | 4.4m |
| 200 inches | 5.9m |
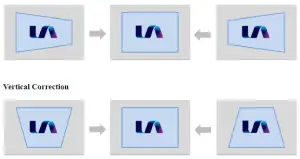
Adjusting Projection Image Keystone
The projector supports horizontal and vertical keystone correction within a degree of ±40. You can correct the horizontal or vertical keystone distortion manually until the shape is evenly rectangular.
Horizontal Correction
Signal Source choosing
Press key choose corresponding input source to connect. If there is no corresponding signal channel selection will show no signal. Step are as following: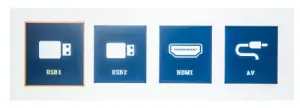
Connection to HDMI Playback Devices
This projector can be connected to various HDMI playback devices such as a TV box, TV stick, DVD player, set top box (STB), gaming console or other devices.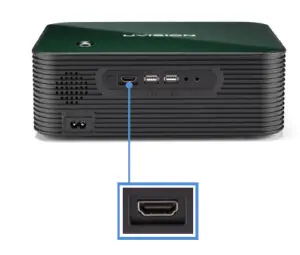
Connection to a AV Device
This projector can be connected to various AV playback devices such as a DVD player, gaming console or other devices.
Connection to External Audio Devices
This projector can also be connected to external devices, including headphones and speakers.
When connected to external speakers, the built in speaker system is disabled.
Connection to External Audio Devices
This projector can also be connected to external devices, including headphones and speakers. When connected to external speakers, the built-in speaker system is disabled.
Use Screen Mirroring
| Android: | Miracast Dongle is required. (not included) |
| iPhone: | Lightning to HDMI cable is required. (not included) |
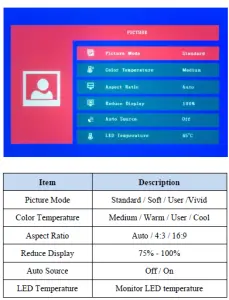
PICTURE
SOUND
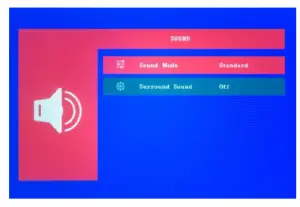
| Item | Description |
| Sound Mode | Standard / MUSIC / MOVIE / Sports / User |
| Surround Sound | Off / SRS TruSurround XT / Surround |
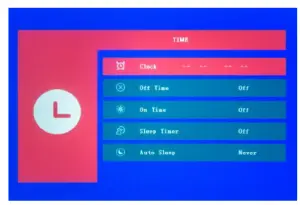
TIME

| Item | Description |
| Clock | Clock Time Setting |
| Off Time | Off / Once / Every Day Mon ~ Fri. / Sat ~ Sun. / Sunday |
| On Time | Off / Once / Every Day Mon ~ Fri. / Sat ~ Sun. / Sunday |
| Sleep Timer | Off / 10min / 20min / 30min / 60min / 90min |
| Auto Sleep | Never / 4Hours / 6Hours / 8Hours |
OPTION
| Item | Description |
| OSD Language | Select an on-screen language. |
| Keystone | Horizontal : -25 ~ 25 Vertical : -25 ~ 25 |
| Rotate | Rear / Front Front Ceiling / Rear Ceiling |
| Software Update (USB) | Press insert a USB to upgrade the firmware version. |
| Restore Factory Default | Yes / No |
| Version | 20200910 V2.1.0.4 |
Appendices
Troubleshooting
If you experience problems with your projector, see the following troubleshooting tips. If the problems persists, please contact UVISION.
| Problem | Possible Solution |
|
The remote control doesn’t work? | • Make sure the battery is already installed in the remote control. • Replace the batteries. • Make sure remote points at IR Receiver directly. • Do not cover IR Receiver. |
| Blurred image? | • Adjust focus ring and keystone. • Projection and screen/wall must be in effective distance. |
| Reversed projection image? | • Rotate to flip the projection image. |
| My USB disk or hard drive can not read? | • Make sure the fotmat of you USB disk or hard drive is FAT32 or NTFS. |
| What Should I do if I want to watch the content from Hulu, Netflix, and similar services via the projector? | • Please prepare a Fire TV Stick, Roku Stick or Chromecast, than connect it to the projector to watch the content. |
Product Specification
| Item | Specifications | |
| Display technology | LCD | |
| Light source | LED | |
| LED life | 30000 hours | |
| Optical engine | Full Sealed & Dustproof Design | |
| Resolution | 1920x1080P | |
| Brightness | 200 ANSI / 3600 lumens | |
| Contrast ratio | 5000 : 1 | |
| Throw ratio | 1.33 : 1 | |
| Throw distance | 1.1m to 5.9m | |
| Projection image size | 35 – 200 inch | |
| Projection focus | Manual focus | |
| Projection Keystone | ±40 Horizontal and Vertical | |
| Inputs | HDMI x 1 | |
| AV x 1 | ||
| USB x 2 | ||
| Outputs | AUX x 1 | |
| Speaker | 3W x 2 | |
| Remote Control | IR Remote Control | |
| Remote control batteries | 2 AAA batteries | |
| Power supply | AC 110~240V | |
| Power consumption | < 100 W | |
| Dimensions (W x H x D) | 265 x 92 x 203 mm | |
| Weight | 2200 g | |
|
Supported File Formats | Movie | MP4 / AVI / MKV / FLV / MOV / MPG / VOB / RMVB / 3GP |
| Music | MP3 / WMA / ASF / OGG / AAC / WAV | |
| Photo | JPEG / BMP / PNG | |
| Text | TXT | |


