![]()
Astera LED Technology GmbH
Stahlgruberring 36
81829 Munich
Germany
[email protected] | www.astera-led.com Users Manual
ORDER CODE: AX9
MANUAL VERSION: 1.0
DATE OF ISSUE: 08/13/2021 www.astera-led.com/AX9
PRODUCT OVERVIEW 
Side view Top view
UNBOND BLUETOOTH
Main menu: UNBOND BLUETOOTH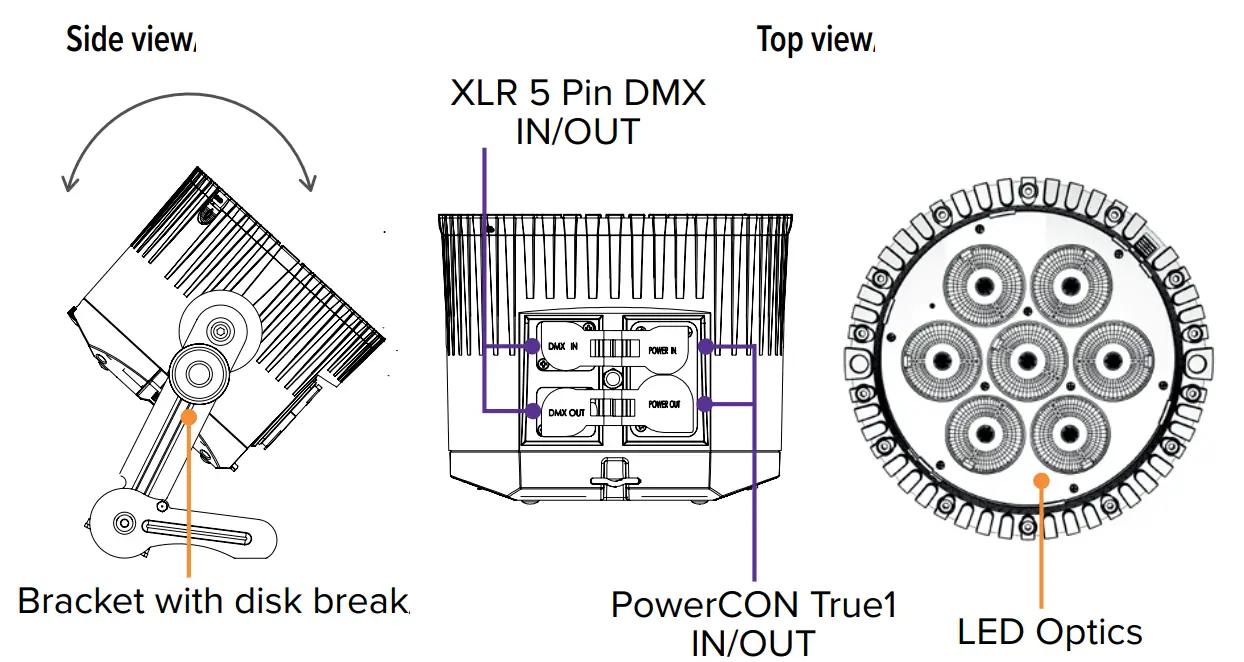
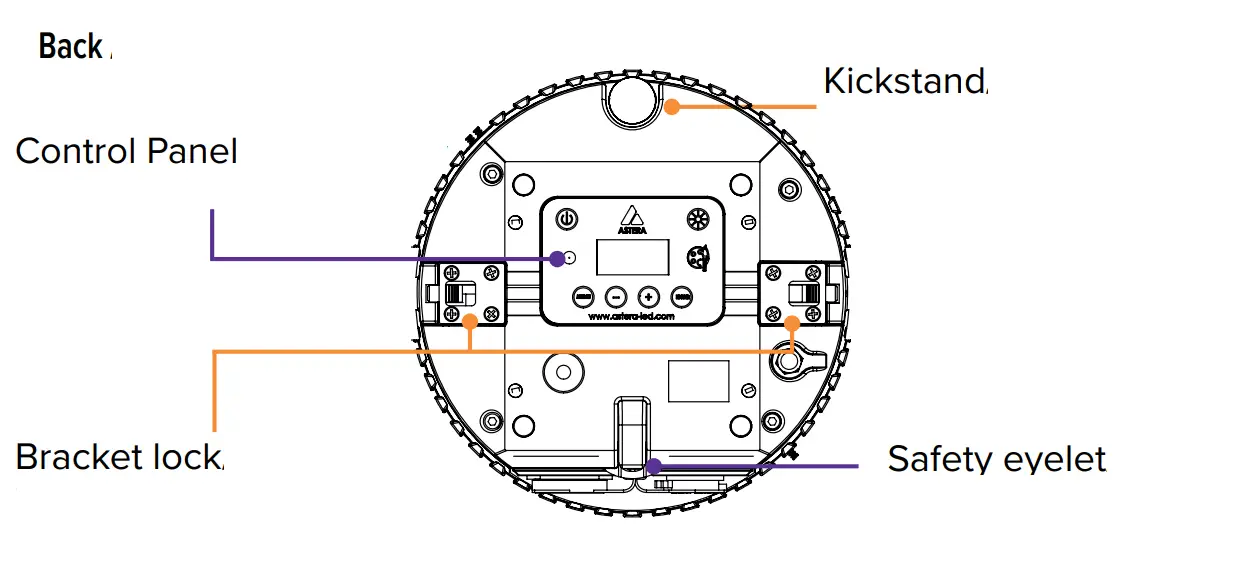
Integrated control panel
Use the menu buttons to navigate through the main menu.
Settings for color adjustment and brightness/runtime are directly accessible by two symbol buttons.
| Top navigation | Inside Main Menu |
| Main / Main Menu | Back to the previous menu |
| – Reset Settings | Scroll down |
| + Change Input Select | Scroll up |
| ENTER Set DMX Adress | Choose |
2. More Control options
IR  On/Off, Static Colors, Preprogrammed Effects
APP All settings, Complex effects, Talkback+, Updates
DMX Control from DMX consoles via CRMX or Wireless DMX
DMX ![]() Control from DMX consoles via XLR 5 Pin DMX cable
Control from DMX consoles via XLR 5 Pin DMX cable
3. Switching On/Off 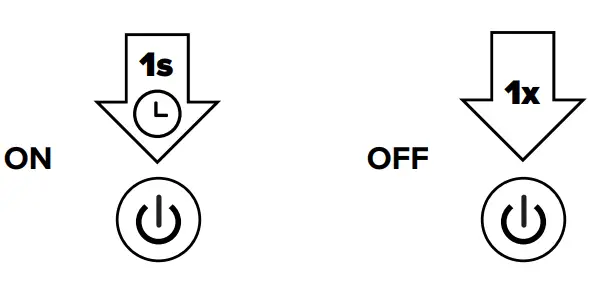
4. Connect BTB
To control your lights with the AsteraApp, first connect a Bluetooth Bridge (BTB). It forwards the AsteraApp signal to paired lights. You may use an AsteraBox as BTB or choose a light with a built-in BTB, like AX9, NYX Bulb, PixelBrick, Titan Tube BTB, Helios Tube BTB. 100%
Connect AsteraBox as BTB 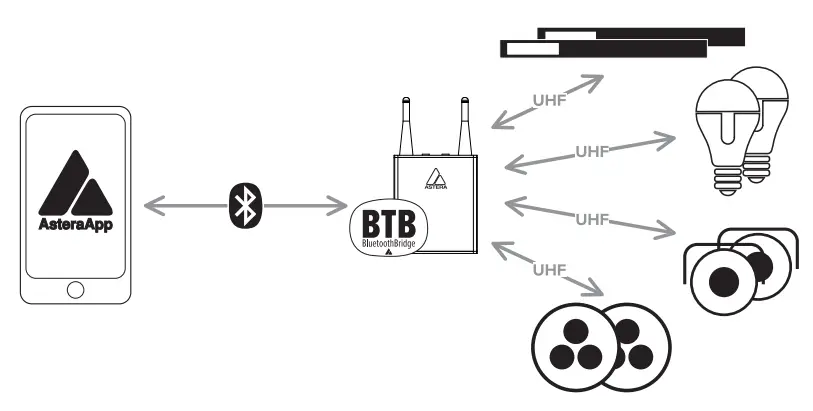
Please power on the AsteraBox. Connect the AsteraBox directly from the AsteraApp main menu by following the instructions there.
Connect light as BTB
Please note This ONLY works for Astera lights with built-in Bluetooth. For all other Astera lights, please use an AsteraBox as BTB.
Please power on the light. Hold down the power button for 3 seconds until the light flashes blue. Then press OK in the AsteraApp. The light which is connected as BTB shows a small Bluetooth Icon in the display.
2. AsteraApp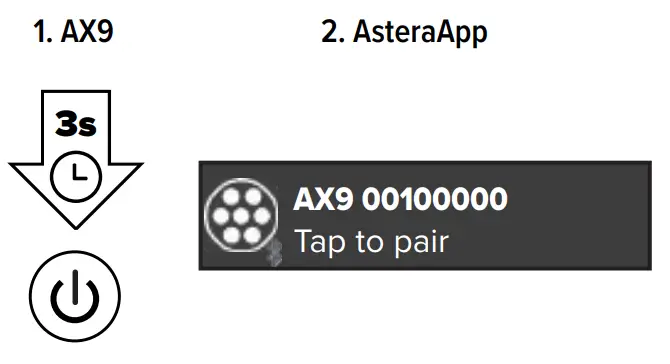 The lights‘ BTB is connected to the AsteraApp.
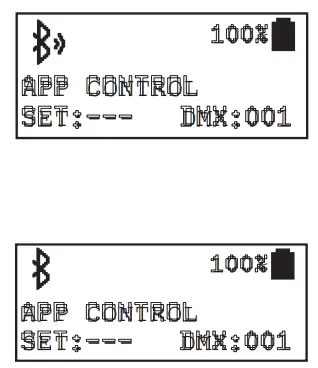 The BTB is enabled and waiting for a connection.
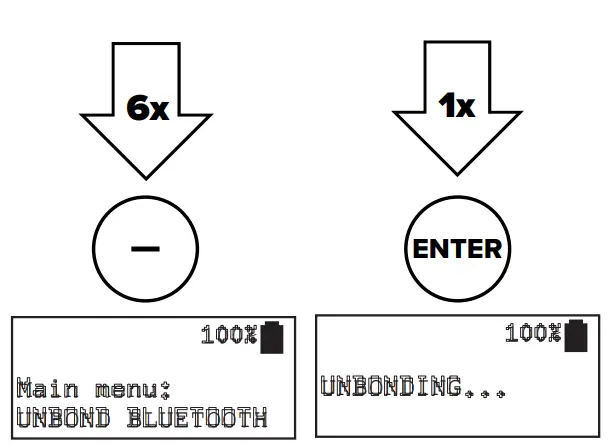
5. Pair with lights
Power on the light. Then hold down the power button for 3 seconds until the light flashes blue. Go to the “Pair with Lights” dialog in the AsteraApp.
Then press OK. 6. Linking to a CRMX transmitter
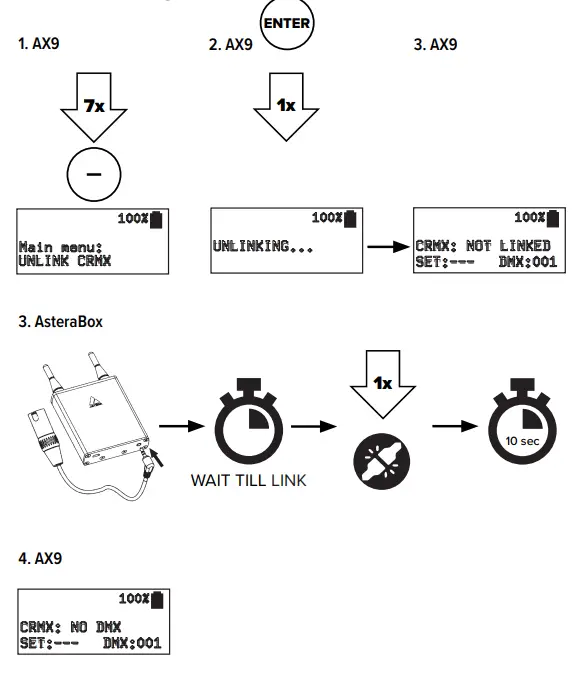
7. Reset
RESET to unlink CRMX and unbound Bluetooth. Sets „Input Select“ to „AUTO“.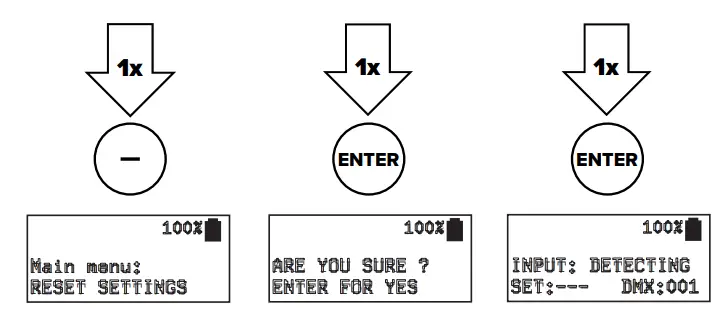 Charging
While the power cable is connected, the display shows the charging status. Charge immediately when the battery is empty. Do not store the unit when the battery is empty. The charging time is approximately 5 hours.
Rigging
The removable bracket of the AX9 has an AirlineTrack for easy mounting using TrackPins (AX-TP) and Superclamps/ GripHeads. The bracket of the AX9 also has a 3/8“-16 UNC thread as well as a 1/2“ hole at the bottom for attaching various mounting accessories. When sliding in the bracket, make sure both sides click into place.
When hanging, secure with a safety wire at the safety eyelet on the backside. Make sure the light cannot drop more than 20cm if primary mounting fails. 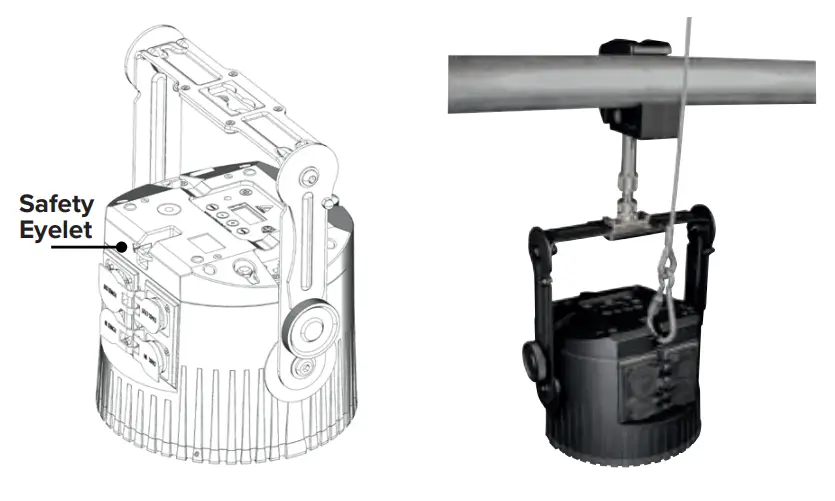
Mounting options AX9 bracke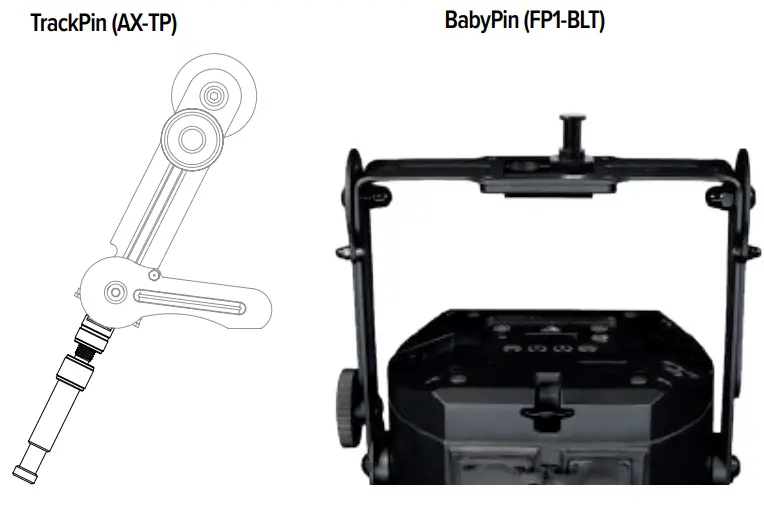
Bottom of the AX9 bracket 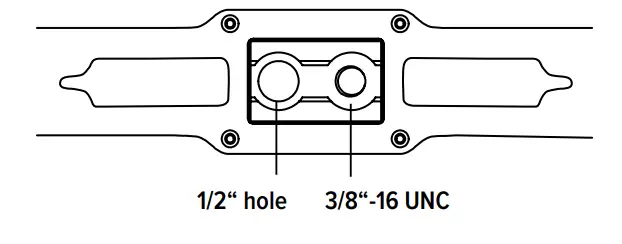
Threads 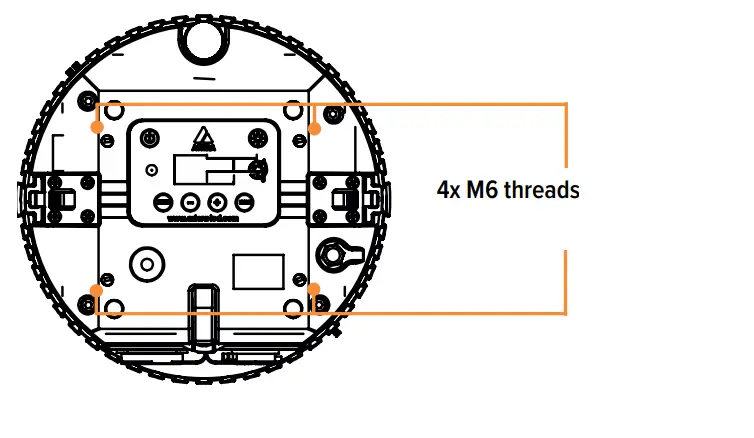
10. Bracket 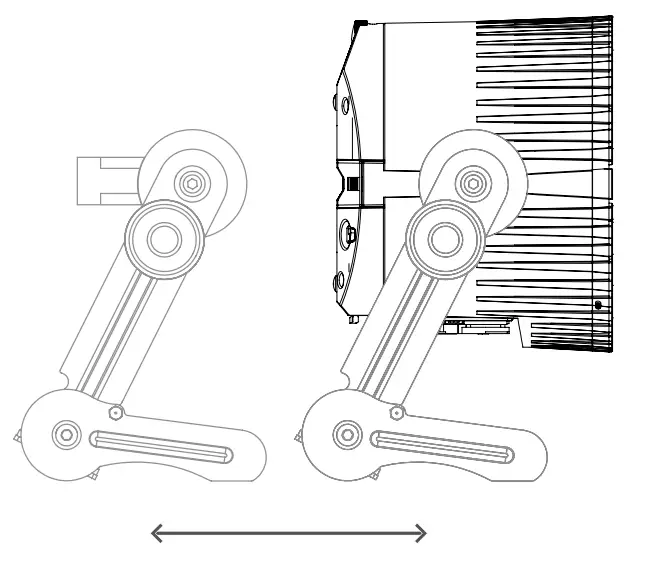
Tiltable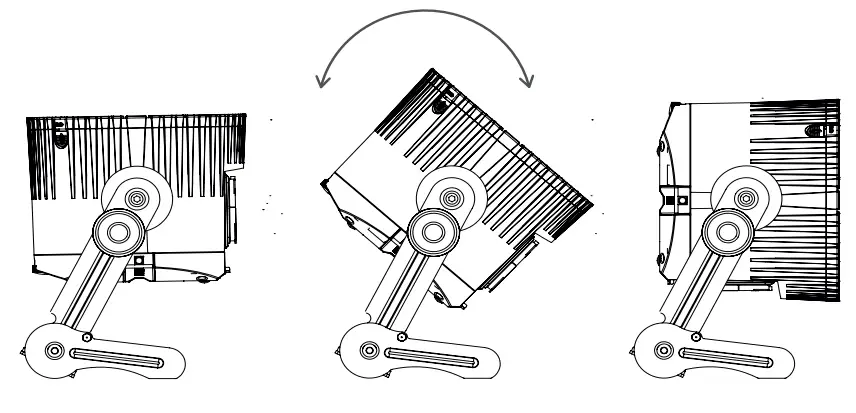
11. Kickstand
Press the button, the kickstand will jump out. Adjust the kickstand while holding the button pressed. Rotate the kickstand for fine-tuning.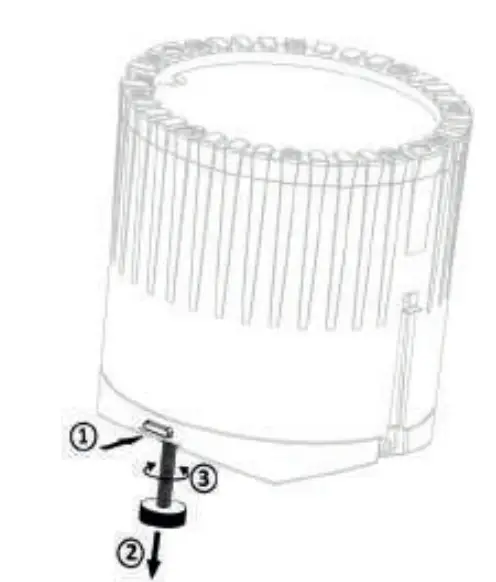
12. Filter options 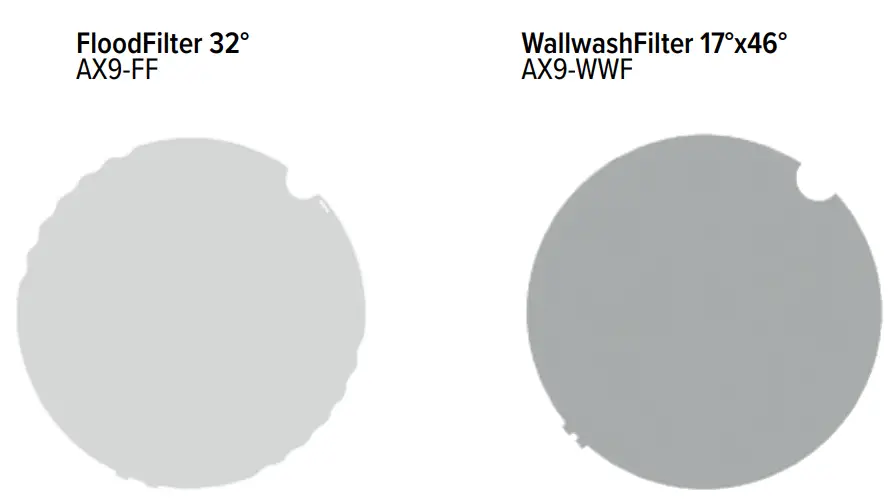
INTRODUCTION / INTENDED USE
The AX9 from ASTERA is a LED spotlight for professional use in the event and film business. The AX9 is designed for direct or indirect illumination of objects or sceneries. Due to its built-in battery, it can be quickly set up at places where traditional lights cannot be mounted easily.
Like the ASTERA
Tubes, the AX9 has the Titan LED Engine and offers excellent color and light values. The AX9 generates white or colored light and the color temperature can be adjusted in many ways. The AX9 can be controlled with the AsteraApp or with wired DMX or wireless CRMX. The device can also be controlled by the integrated display or by infrared remote control. Thanks to its built-in Bluetooth it can be used as BluetoothBridge (BTB).
The AX9 can be used standing or hanging. For this purpose, the device is equipped with a kickstand and an AirlineTrack at the bracket to attach the appropriate mounting accessories. The AX9 can be used indoors and outdoors and has an IP65 rating. Do not shake the device. Avoid brute force when installing or operating the device.
When choosing the installation spot, please make sure that the device is not exposed to extreme heat or dust. Avoid direct sunlight for a longer period of time.
The ambient temperature must be set. Keep away from direct insulation (particularly in cars) and heaters. Never use the device during thunderstorms connected to the power mains. Overvoltage could destroy the device. Always disconnect the device during thunderstorms. Make sure that the area below the installation place is blocked when rigging, derigging, or servicing the fixture. Always fix the fixture with an appropriate safety wire. Operate the device only after having become familiarized with its functions. Please consider that unauthorized modifications on the device are orbidden due to safety reasons! If this device will be operated in any way different to the one described in this manual, the product may suffer damages and void the warranty. The disclaimer includes all damages, liability, or injury resulting from failure to follow the instructions in this manual. Furthermore, any other operation may lead to dangers like shortcircuit, burns, electric shocks, crashes, etc. This device is not for household use and is not suitable for permanent installation.
SAFETY INFORMATION
Before you operate this unit read the manual carefully. Always make sure to include the manual if you pass/ rent/ sell the unit to another user. Please use your own caution when operating. This product is for professional use only. It is not for household use.
- Do not operate the unit in areas of high-temperature conditions or under direct sunlight. It will cause an abnormal function or damage the product.
- Always use a suitable safety wire when mounting the light overhead.
- Connect the safety wire only to the intended safety mount
- Always follow local safety requirements.
- Only authorized personnel may service the battery.
- Do not place in fire or heat.
- Do not use or charge the light if it is damaged.
 Avoid bumping or plunging, it may cause fire or explosion.
- Never store the battery when fully drained. Always recharge immediately when empty. Please do not charge unattended.
- Make sure to fully charge all units before storing them.
- Partially charged batteries will lose capacity.
- Fully recharge every 6 months if not used.
- The battery may only be replaced with an original spare part from Astera.
- It is recommended to charge at a temperature between 15°C and 35°C.
![]() Warning: In extreme cases, abuse or misuse of standard/rechargeable batteries can lead to:
Warning: In extreme cases, abuse or misuse of standard/rechargeable batteries can lead to:
- Explosion
- Fire development
- Heat generation or smoke and gas development.
- Do not directly look into the light.
- lt can cause harm to your eyes.
- Do not look at the LEDs with a magnifying glass or any other optical instrument that may concentrate the light output.
 Use only Astera approved accessories to diffuse or modify the light beam.
- Do not open the product housing.
 Do not apply power if the light is damaged.
- Do not submerge the light into any liquid.
- Do not replace the LED light source.
- Caution, risk of electric shock.
The AX9 shall be installed near the socket outlet which shall be easily accessible.![]() Warning: risk of electric shock – Do not open device.
Warning: risk of electric shock – Do not open device.
- The exterior surfaces of the light can become hot, up to 70°C (158°F) during normal operation.
- Ensure that accidental physical contact with the device is impossible.
- install only in ventilated locations.
 Do not cover the light.
- Allow all lights to cool before touching.
- Keep 0.3m (12in) from objects to be illuminated.
CLEANING AND MAINTAINING
![]() Caution: Liquids entering the housing of the device can cause a short circuit and damage the electronics. Do not use any cleaning agents or solvents.
Caution: Liquids entering the housing of the device can cause a short circuit and damage the electronics. Do not use any cleaning agents or solvents.![]() SECONDARY SAFETY MOUNTING
SECONDARY SAFETY MOUNTING
The AX9 must always be secured by a safety wire when used in a hanging position. If the primary suspension fails, the device must not fall more than 20cm.
TROUBLESHOOTING
| Problem | Possible cause | Solution |
| The fixture does not turn on | The battery may be empty | Connect it to the AC and try again |
| The fixture turns on and the display is on, but the LEDs do not emit light | The fixture could be set to BLACKOUT mode | Set to display black color or is operating in DMX mode and doesn’t receive a valid signal is good practice to do a RESET SETTINGS |
| The fixture is not working correctly – it does not display the color or effect chosen | The fixture may still be operating under a previous setting | It is good practice to do RESET SETTINGS between setups |
| The power cable is connected but the fixture is not charging | The battery may be fully charged | The fixture will only commence charging when its battery has a temperature of 45°C or less. Turn the fixture off and let it cool down; once cold enough, it will start charging |
DISPOSAL
- The light contains a lithium-ion battery.
- Don‘t throw the unit into the garbage at the end of its lifetime.
- Make sure to dispose of is according to your local ordinances and/or regulations, to avoid polluting the environment!
- The packaging is recyclable and can be disposed of.
MANUFACTURER DECLARATION
Hereby, Astera LED Technology GmbH declares that the type of radio equipment AX9 complies with Directive 2014/53 / EU. The full text of the EU Declaration of Conformity is available at the following Internet address: https://astera-led.com/AX9 Astera LED Technology GmbH declares that this equipment has been tested and found to comply with the limits for a Class B digital device, pursuant to part 15 of the FCC rules. These limits are designed to provide reasonable protection against harmful interference in a residential installation. This equipment generates uses and can radiate radio frequency energy and, if not installed and used in accordance with the instructions, may cause harmful interference to radio communications. However, there is no guarantee that interference will not occur in a particular installation. If this equipment does
cause harmful interference to radio or television reception, which can be determined by turning the equipment off and on, the user is encouraged to try to correct the interference by one or more of the following measures:
- Reorient or relocate the receiving antenna.
- Increase the separation between the equipment and receiver.
- Connect the equipment into an outlet on a circuit different from that to which the receiver is connected.
- Consult the dealer or an experienced radio/TV technician for help.
FCC Caution:
- Any changes or modifications not expressly approved by the party responsible for compliance could void the user‘s authority to operate this equipment.
- This transmitter must not be co-located or operating in conjunction with any other antenna or transmitter.
This device complies with Part 15 of the FCC Rules. Operation is subject to the following two conditions:
(1) This device may not cause harmful interference, and
(2) This device must accept any interference received, including interference that may cause undesired operation.
FCC RF
Radiation Exposure Statement Caution: To maintain compliance with the FCC’s RF exposure guidelines, place the product at least 20cm from nearby persons.
SPECIFICATIONS – TECHNICAL DATA
| Order Code | AX9 |
| LED Engine | Titan LED Engine |
| Colors | RGBMintAmber |
| Total LED Power | 105W |
| LED Power Draw | 70W |
| Light output — 2700k, 3200k,55001e | 2497 Im / 3008 Im / 2891 Im |
| 2 3200k 5500W | 9700 lx / 9900 lx / 9600 lx |
| Emittance ©2m- | |
| CRI(RayTLCI 3200-6500W | 296 |
| Beam Angle | 13° |
| Strobe | 0 – 25Hz |
| Pixel | 1 |
| Battery Lifetime | 70 % after 300 cycles |
| Battery Runtime | up to 20 hours |
| Charging Time (nominal) | 5 hours |
| Input Voltage | 100-24OVAC, 50/60Hz, 2.3A/115VAC —1.1A/230VAC 110W |
| Wired DMX | Yes |
| CRMX Receiver | Built-in |
| BluetoothBridge BTB | Built-in |
| Wireless Frequencies | CRMX 2.4GHz, UHF, Bluetooth |
| Range (nVyds) | 300 / 330 (3/3,3 Bluetooth) |
| Housing Material | Aluminum |
| IP Rating | IP65 |
| Ambient Temperature (‘C/’F) | 0° – 40° / 32° -104° |
| Weight (kg/lbs) | 5.66 /12.5 |
| Dimensions (mm/inches) | 175 x 222 x 256 / 6.9 x 8.7 x 101 |
RF CHARACTERISTICS
| Wireless Modules | Modulation | ERP (Transmitter) | Channel Count |
| EU: UHF—(863-870MHz) | FHSS | <25mW | 47 |
| USA: UHF (917-922.20MHz) | FHSS | <1W | 53 |
| AUS: UHF (922.30-927.50MHz) | FHSS | <25mW | 53 |
| SGP: UHF (920.50-924.50MHz) | FHSS | <25mW | 41 |
| KOR: UHF (917.9-921.5MHz) | FHSS | <25mW | 10 |
| RUS: UHF (868.75-869.12MHz) | FHSS | <25mW | 6 |
| JPN: UHF (922.80-926.40MHz) | FHSS | <40mW | 19 |
| CRMX (2402-2480MHz) | FHSS | 79 | |
| Bluetooth LE (2402-2480MHz) | FHSS | <1W | 40 |
| W’Fi (2412-2462MHz) | DSSS.OFDM | <1W | 11 |
***General allocation of frequencies for use by short-range radio applications Spectrum usage regulations:
| Frequency range In MHz* | Maximum equl- valent radiant power (ERP) | Additional parameters/frequency access and Interference mitigation techniques |
| 865 – 868 | 25 mW | Requirements for frequency access and mitigation techniques’ |
| Alternatively, a maximum duty cycle of 1% can be used. | ||
| 868,0 – | 25 mW | Requirements for frequency access and |
| 868,6 | mitigation techniques | |
| Alternatively, a maximum duty cycle2) of 1% can be used. | ||
| 868,7 – | 25 mW | Requirements for frequency access and |
| 869,2 | mitigation techniques” | |
| Alternatively, a maximum duty cycle of 0.1% can be used. | ||
| 869,40 – | 500 mW | Requirements for frequency access and |
| 869,65 | mitigation techniques | |
| Alternatively, a maximum duty cycle?’ of 10% can be used. | ||
| 869,7 — | 25 mW | Requirements for frequency access and mitigation techniques |
| 870,0 | Alternatively, a maximum duty cycle of 1% can be used. | |
| 870,0 | 25 mW | Alternatively, a maximum duty cycle of 1% can be used. |
1) The use of adjacent frequency bands within this table as a single frequency band is permitted, provided that the specific conditions for each of these adjacent frequency bands re-met. 2) „duty cycle“ means the ratio of Σ(Ton)/(Tobs) expressed as a percentage, where ‚Ton‘ is the ‚on-time‘ of a single transmitting device and ‚Tobs‘ is the observation period Ton is measured in an observation frequency band (Fobs). Unless otherwise specified in this general allocation, Tobs is a continuous period of one hour and Fobs is the applicable frequency band in this general allocation (table).
3) Frequency access and interference mitigation techniques shall be used whose performance level at least meets the essential requirements of Directive 2014/53/EU or the Radio Equipment Act (FuAG). Where relevant techniques are described in harmonized standards, the references of which have been published in the Official Journal of the European Union pursuant to Directive 2014/53/EU, or parts thereof, performance shall be ensured which is at least equivalent to those techniques.


