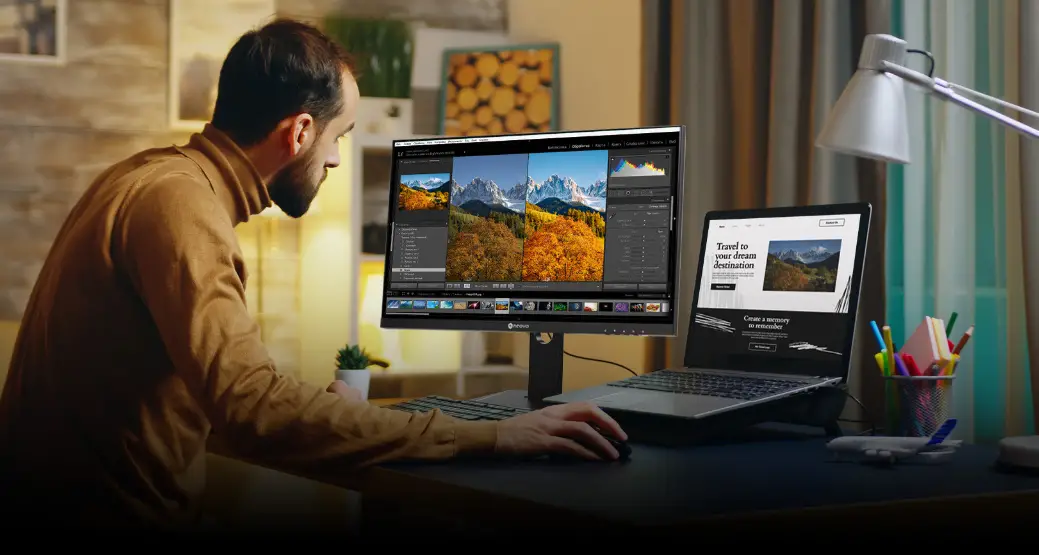
AG Neovo DW2401 24 Inch USB-C Monitor
SAFETY INFORMATION
Federal Communications Commission (FCC) Notice (U.S. Only)
This equipment has been tested and found to comply with the limits for a Class B digital device, pursuant to part 15 of the FCC Rules. These limits are designed to provide reasonable protection against harmful interference in a residential installation. This equipment generates, uses and can radiate radio frequency energy and, if not installed and used in accordance with the instructions, may cause harmful interference to radio communications. However, there is no guarantee that interference will not occur in a particular installation. If this equipment does cause harmful interference to radio or television reception, which can be determined by turning the equipment off and on, the user is encouraged to try to correct the interference by one or more of the following measures:
- Reorient or relocate the receiving antenna.
- Increase the separation between the equipment and receiver.
- Connect the equipment into an outlet on a circuit different from that to which the receiver is connected.
- Consult the dealer or an experienced radio/TV technician for help.
WEEE
Disposal of Waste Equipment by Users in Private Household in the European Union.
This symbol on the product or on its packaging indicates that this product must not be disposed of with your other household waste. Instead, it is your responsibility to dispose of your waste equipment by handing it over to a designated collection point for the recycling of waste electrical and electronic equipment. The separate collection and recycling of your waste equipment at the time of disposal will help to conserve natural resources and ensure that it is recycled in a manner that protects human health and the environment. For more information about where
you can drop off your waste equipment for recycling, please contact your local city office, your
household waste disposal service or the shop where you purchased the product.
For Private Households in the European Union. To help conserve natural resources and ensure the product is recycled in a manner that protects human health and the environment, we would like to bring your attention to the following:
- The crossed-out dustbin on the device or outer packaging indicates the product is compliant with European WEEE (Waste Electrical and Electronic Equipment) Directive
- Always dispose of the old devices separately from household waste
- Batteries should be removed beforehand and disposed separately to the right collection system
- You are responsible with regard to the deletion of personal data on old devices before disposal
- Private households can hand in their old devices free of charge
- For more information about where you can drop off your waste equipment for recycling, please contact your local city office, your household waste disposal service or the shop where you purchased the product
PRECAUTIONS
CAUTION
RISK OF ELECTRIC SHOCK DO NOT OPEN
Symbols used in this manual
- This icon indicates the existence of a potential hazard that could result in personal injury or damage to the product.
- This icon indicates important operating and servicing information.
Notice
- Read this User Manual carefully before using the LCD monitor and keep it for future reference.
- The product specifications and other information provided in this User Manual are for reference only. All information is subject to change without notice. Updated content can be downloaded from our web site at www.agneovo.com.
- To protect your rights as a consumer, do not remove any stickers from the LCD monitor. Doing so may affect the determination of the warranty period.
Cautions When Setting Up
 Do not place the LCD monitor near heat sources, such as a heater, exhaust vent, or in direct sunlight.
 Do not cover or block the ventilation holes in the housing.
 Place the LCD monitor on a stable area. Do not place the LCD monitor where it may subject to vibration or shock.
 Place the LCD monitor in a well-ventilated area.
 Do not place the LCD monitor outdoors.
 Do not place the LCD monitor in a dusty or humid environment.
 Do not spill liquid or insert sharp objects into the LCD monitor through the ventilation holes.
Doing so may cause accidental fire, electric shock or damage the LCD monitor.
Cautions When Using
 Use only the power cord supplied with the LCD monitor.
 The power outlet should be installed near the LCD monitor and be easily accessible.
 If an extension cord is used with the LCD monitor, ensure that the total current consumption plugged into the power outlet does not exceed the ampere rating.
 Do not allow anything to rest on the power cord. Do not place the LCD monitor where the power cord may be stepped on.
 If the LCD monitor will not be used for an indefinite period of time, unplug the power cord from
the power outlet. To disconnect the power cord, grasp and pull by the plug head. Do not tug on the cord; doing
so may cause fire or electric shock. Do not unplug or touch the power cord with wet hands.
WARNING: Unplug the power cord from the power outlet and refer to qualified service personnel under the following conditions:
- When the power cord is damaged.
- If the LCD monitor has been dropped or the housing has been damaged.
- If the LCD monitor emits smoke or a distinct odor.
![]() Ceiling mount or mount on any other horizontal surface overhead are not advisable.
Ceiling mount or mount on any other horizontal surface overhead are not advisable.
WARNING:Installation in contravention of the instructions may result in undesirable consequences, particularly hurting people and damaging property. Users who have already mounted the monitor on the ceiling or any other horizontal surface overhead are strongly advised to
contact AG Neovo for consultations and solutions to help ensure a most pleasurable and fulfilling monitor experience.
Cleaning and Maintenance![]() Do not attempt to service the LCD monitor yourself, refer to qualified service personnel.
Do not attempt to service the LCD monitor yourself, refer to qualified service personnel.
Opening or removing the covers may expose you to dangerous voltage or other risks.
Notice for the LCD Monitor
In order to maintain the stable luminous performance, it is recommended to use low brightness setting. Due to the lifespan of the lamp, it is normal that the brightness quality of the LCD monitor may decrease with time.
When static images are displayed for long periods of time, the image may cause an imprint on the LCD monitor. This is called image retention or burn-in.
To prevent image retention, do any of the following:
- Set the LCD monitor to turn off after a few minutes of being idle.
- Use a screen saver that has moving graphics or a blank white image.
- Switch desktop backgrounds regularly.
- Adjust the LCD monitor to low brightness settings.
- Turn off the LCD monitor when the system is not in use.
Things to do when the LCD monitor shows image retention:
- Turn off the LCD monitor for extended periods of time. It can be several hours or several days.
- Use a screen saver and run it for extended periods of time.
- Use a black and white image and run it for extended periods of time.
There are millions of micro transistors inside the LCD monitor. It is normal for a few transistors to be damaged and to produce spots. This is acceptable and is not considered a failure.
CHAPTER 1: PRODUCT DESCRIPTION
Package Contents
When unpacking, check if the following items are included in the package. If any of them is missing or damaged, contact your dealer.
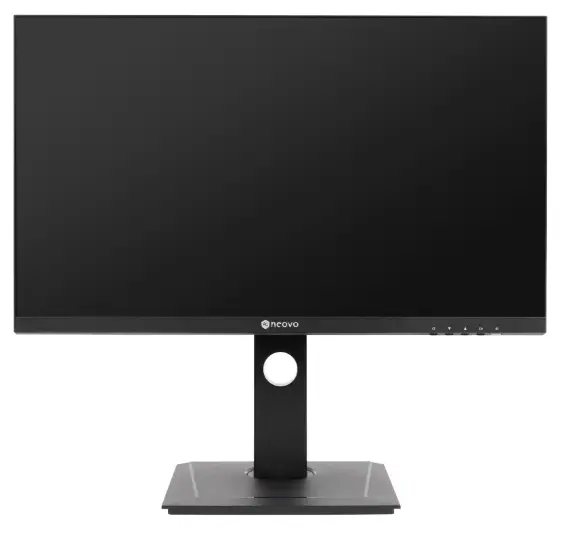
LCD Monitor
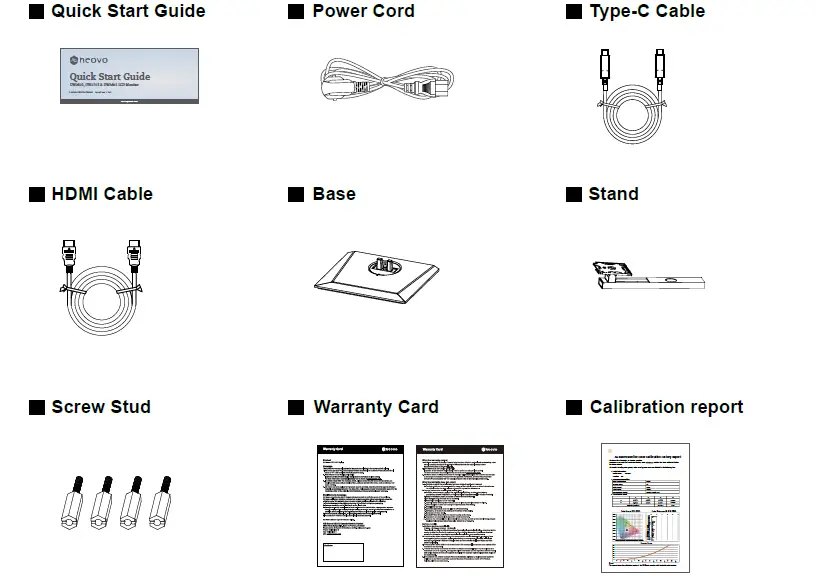
Note:
- Use only the supplied power cord.
- The above pictures are for reference only. Actual items may vary upon shipment.
Installation
Installing the Stand
- Take out the stand and base, and lock the stand with the hand screw that comes with the base.
- Insert the assembled base into the corresponding bayonet of the rear shell, and gently align the tail end perpendicular to the surface of the rear shell, so that the lock of the bracket can be buckled on the quick release button of the rear shell.
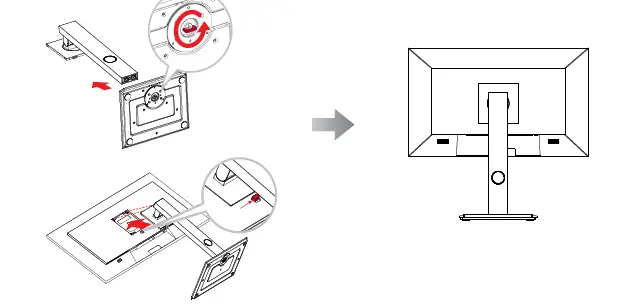
Adjusting the Tilt
The screen can be adjusted by inclining forward and backward; however, the specific adjustment depends on the specific model of the device.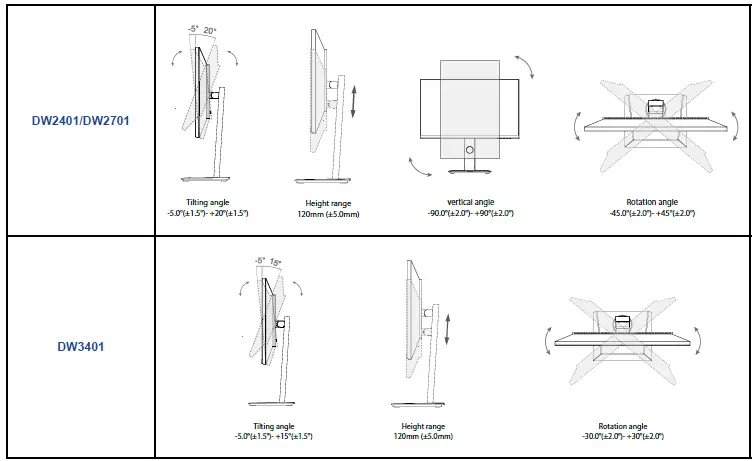
Wall Mounting
To wall mount the LCD monitor, do the following steps:
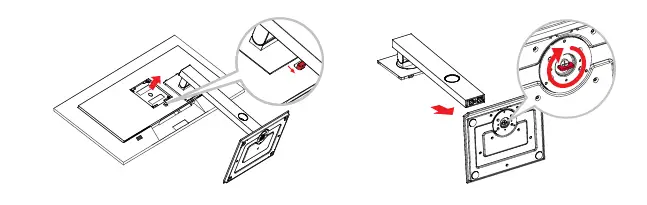
- Remove the base stand.
- Place the LCD monitor with the screen side down on a cushioned surface.
- Push the release button and detach the stand from the base mount.
- Wall mount the LCD monitor.
- First remove the 4 screws from the VESA holes. Then secure the 4 screw studs to the VESA holes.
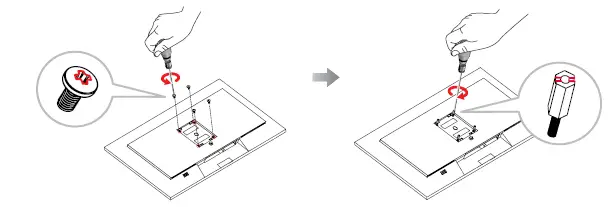
- Screw the mounting bracket to the VESA holes at the rear of the LCD display. DW2401/DW2701
- First remove the 4 screws from the VESA holes. Then secure the 4 screw studs to the VESA holes.
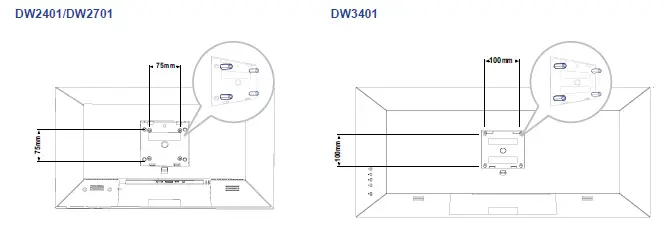
Note: Take measures to prevent the LCD monitor from falling down and lessen possible injury and damage to the monitor in case of earthquakes or other disasters.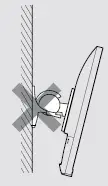
- Use the 75 x 75 mm (DW2401/DW2701) or 100 x 100 mm (DW3401) wall mount kit recommended by AG Neovo. All AG Neovo wall mount kits comply with VESA standard.
- Secure the LCD monitor on a solid wall strong enough to bear its weight.
- It is suggested to wall mount the LCD monitor without tilting it facing downward.
Overview
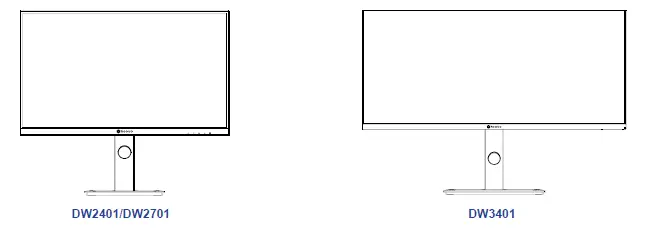
Front View
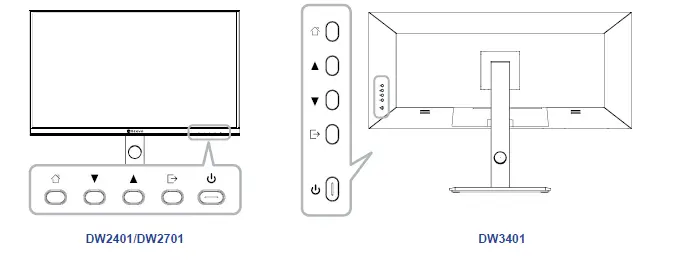
Control Panel
| Button | Description |
| Button | Pops up the menu/Backs to the previous menu (in case of main menu, exits from the whole menu). |
| Button | • When the menu is activated, press this key to select the function. • Press to move up in the menu/quickly adjust the volume. |
| Button | • When the menu opens, the value is incremented as the right function selection key. • Press to move up in the menu. • When the menu is closed, go to situational mode switch. |
| Button | • Press to move up in the menu. |
| ( ) | Power button: Powers on/off the monitor. |
| DW2401/DW2701 LED indicator light | Long bright (White LED): Normal boot state Flicker (Red LED): indicates No video source, no horizontal or vertical signal detected, or low voltage. LED off: Off mode |
| DW3401 LED indicator light | Long bright (Blue LED): Normal boot state Flicker (Red LED): indicates No video source, no horizontal or vertical signal detected, or low voltage. LED off: Off mode |
Rear View
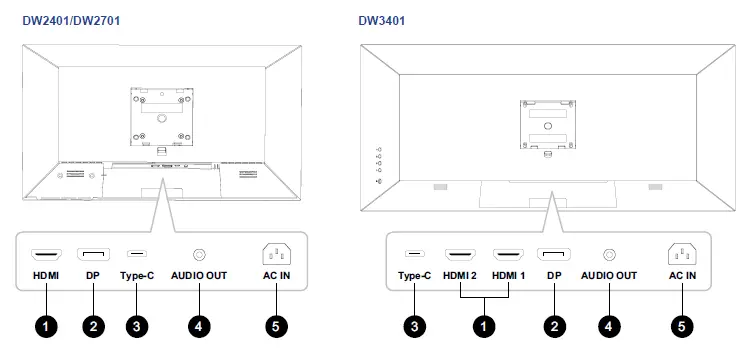
- HDMI
Connect HDMI signals input. - DP IN:
Connect DisplayPort signals input. - Type-C IN:
Connect Type-C signals input. - AUDIO OUT:
Connect audio signals output (3.5 mm Stereo Audio Jack). - AC IN:
Connect the included power cord.
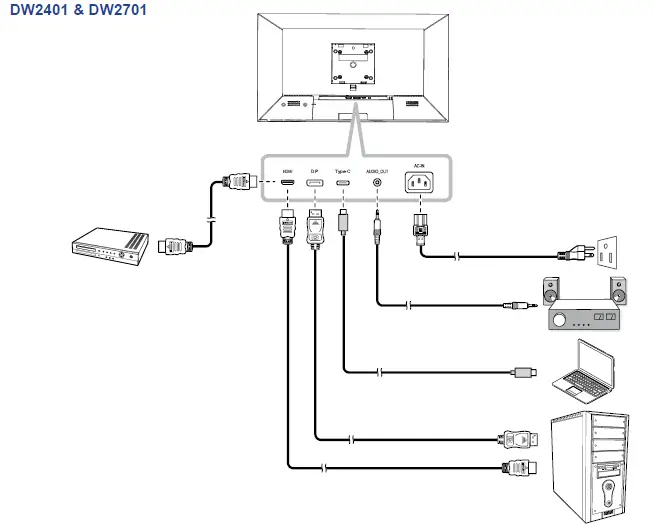
CHAPTER 2: MAKING CONNECTIONS
Making Connections
DW2401 & DW2701
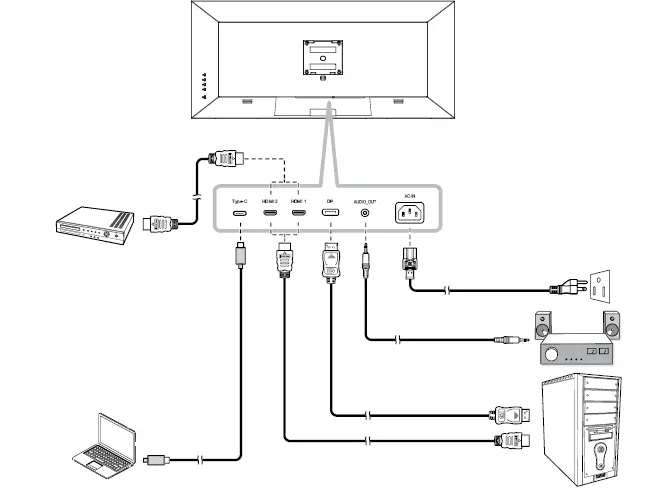
DW3401
MAKING CONNECTIONS
- When charging connected device via USB Type-C Connector, check if the device is equipped with a USB Type-C Connector that supports charging function via USB PD (Power Delivery).
- The connected device can be charged via USB Type-C connector even when the monitor is in standby mode.
- The USB power delivery is up to 65W. If the connected device required more than 65W for operation or for boot up (when the battery is drained), use the original power adapter that came with the device.
- If a separately purchased USB Type-C Cable is used, make sure the cable is certified by USB-IF and is full-feature with power delivery and video/audio/data transfer functions.
- Compatibility with all connected devices is not guaranteed due to different user environments.
| Main Menu | Submenu | Third menu | Description |
|
Picture Settings | Brightness | 0-100 | Adjust the luminance of the screen image. |
| Contrast | 0-100 | Adjust the difference between the black level and the white level. | |
|
DCR |
Off/On | Enable/Disable the DCR function. When enabled, it provides automatic adjustment of picture brightness and contrast at high speed and dynamic contrast range, such as when watching movies. | |
| Picture Mode | Standard Mode/Movie Mode/ Reading Mode/Night Mode/Care Eyes Mode/SRGB Mode/Adobe Mode | Select a predefined picture setting. | |
|
Anti Blue Light |
0-100 | Configure the blue light filter function. When enabled, it decreases the amount of blue light displayed on the screen, ensuring users a comfortable viewing experience by reducing eyestrain after long periods of use. | |
| Sharpness | 0-5 | Adjust the clarity and focus of the screen image. | |
| Gamma | Mode1/Mode2/Mode3/Mode4/ Mode5/Mode6 | Adjust the non-linear setting for picture luminance and contrast. | |
| Aspect Ratio | Wide Screen/4:3/1:1/Auto | Adjust the aspect ratio of the screen image. | |
|
Game Settings | Standard Mode | Off/On | Select On to use the default color settings. |
| RTS/RPG Mode | Off/On | Select On to set the preset color settings for RTS(Real-Time Strategy)/RPG(Role-Playing Game)games. | |
| FPS Arena Mode | Off/On | Select On to set the preset color settings for FPS(First-Person Shooter) games. | |
| MOBA Arena Mode | Off/On | Select On to set the preset color settings for MOBA(Multiplayer Online Battle Arena) games. | |
| Adaptive-Sync | Off/On | Select On to let the system to synchronize the frame rate. | |
| Shadow Balance | 0-100 | Adjust the shadow balance setting that highlights the object details in dark color. | |
| Response Time | Off/Normal/Fast/Ultrafast | Select the response time setting for motion picture movement enhancement. | |
| Dynamic Brightness | Off/Normal/Expert/Elaboration | Select the dynamic brightness setting that highlights the object details in bright color. | |
|
Color Settings | Warm | Off/On | Enable/Disable the Warm color temperature. |
| Natural | Off/On | Enable/Disable the Natural color temperature. | |
| Cool | Off/On | Enable/Disable the Cool color temperature. | |
| User1 | Off/On: Red, Green, Blue | Select On to customize the red/green/blue output for User1. | |
| User2 | Off/On: Red, Green, Blue | Select On to customize the red/green/blue output for User2. | |
| User3 | Off/On: Red, Green, Blue | Select On to customize the red/green/blue output for User3. |
| Main Menu | Submenu | Third menu | Description |
| Color Settings | Hue | Red/Green/Blue/Cyan/Magenta/ Yellow | Adjust the hue settings for the red, green, blue, cyan, magenta, or yellow color. |
| Saturation | 0-100 | Adjust the colour saturation of the screen image. | |
|
PIP/PBP | PIP/PBP Mode | Off/PIP Mode/PBP 2win 1:1/PBP 2Win 2:1/PBP 2Win 1:2 | Select PIP/PBP mode type or disable the function. |
| Sub Win2 Input | DP/HDMI/Type-C | Set the input source for the sub window. | |
| Audio source | Auto/DP/HDMI/Type-C | Set the audio source for the main window. | |
| PIP Position | Top Right/Top Left/Bottom Right/ Bottom Left | Set the sub window position. | |
| PIP Size | Small/Medium/Large | Set the sub window size. | |
| Window Swap | Off/On | Select On to swap the two windows (main source and sub source signals). | |
|
OSD Settings |
Language | English/简体中文/한국어/ یبرع/Portugues do Brasilazil/ Deutsch/Nederland/Suomi/ Français/Ελληνικά/Indonesia/ Italiano/日本語/Malaysia/Polskie/ Português/Pусский/Español/ ไทย/українська/Tiệng Việt/繁體 中文/Türkçe | Select the OSD language. |
| OSD Time Out | 0-100 | Set the length of time (in seconds) the OSD screen is displayed. When the time elapses, the OSD screen is automatically inactivated. | |
| OSD H-Position | 0-100 | Move the OSD window to the left or right of the screen. | |
| OSD V-Position | 0-100 | Move the OSD window up or down the screen. | |
| OSD transparency | 0-5 | Set the transparency of the OSD menu. | |
| Hotkey1 Setting | Brightness/Contrast/Volume/ Mute/Shadow Balance/Adaptive- Sync/Picture Mode/PIP/PBP/ Input Signal/Dynamic Brightness | Assign the function of the hot keys. | |
| Hotkey2 Setting | |||
| Hotkey3 Setting | |||
| OSD Rotation | Normal/90/180/270 | Set the OSD menu orientation. | |
|
OSD Lock |
Off/On | Select On to disable the OSD adjustments. Note: When user locks the menu, keep pressing the button for at least 10 seconds to unlock. |
| Main Menu | Submenu | Third menu | Description |
|
Other Settings | Input Signal | Auto/DP/HDMI/Type-C | Set the default input signal. |
| Volume | 0-100 | Adjust the volume level of the built-in speaker. | |
| Mute | Off/On | Turn the audio speaker on or off. | |
|
Auto Power |
Off/On | Select On: If the monitor cannot detect any input source signal, and the monitor will automatically turn off after 1 minute. At this time, even if an input source is connected , the screen will unable to be awakened. Select Off: If the monitor cannot detect any input source signal, and the display will automatically enter standby mode after 1 minute. At this time, if an input source is connected, the screen can be awakened. | |
| Rest Remind | Off/On | Select On to let a reminder message to appear after using the device for 4 hours. | |
| Reset | No/Yes | Reset all settings to the factory defaults. | |
| Information | Input Source: / Resolution:/ Mode: | View the information about the device. |
DW2401/DW2701
| Main Menu | Submenu | Third menu | Description |
|
Picture Settings | Brightness | 0-100 | Adjust the luminance of the screen image. |
| Contrast | 0-100 | Adjust the difference between the black level and the white level. | |
|
DCR |
Off/On | Enable/Disable the DCR function. When enabled, it provides automatic adjustment of picture brightness and contrast at high speed and dynamic contrast range, such as when watching movies. DCR is suitable for indoor viewing. | |
| Picture Mode | Standard Mode/Movie Mode/ Reading Mode/Night Mode/Care Eyes Mode/SRGB Mode/Adobe Mode | Select a predefined picture setting. | |
|
Anti Blue Light |
0-100 | Configure the blue light filter function. When enabled, it decreases the amount of blue light displayed on the screen, ensuring users a comfortable viewing experience by reducing eyestrain after long periods of use. | |
| Sharpness | 0-5 | Adjust the clarity and focus of the screen image. | |
| Gamma | Mode1/Mode2/Mode3/Mode4/ Mode5/Mode6 | Adjust the non-linear setting for picture luminance and contrast. | |
| Aspect Ratio | Wide Screen/4:3/1:1/Auto | Adjust the aspect ratio of the screen image. |
| Main Menu | Submenu | Third menu | Description |
|
Game Settings | Standard Mode | Off/On | Select On to use the default color settings. |
| RTS/RPG Mode | Off/On | Select On to set the preset color settings for RTS(Real-Time Strategy)/RPG(Role-Playing Game)games games. | |
| FPS Arena Mode | Off/On | Select On to set the preset color settings for FPS(First-Person Shooter) games. | |
| MOBA Arena Mode | Off/On | Select On to set the preset color settings for MOBA(Multiplayer Online Battle Arena) games. | |
| Adaptive-Sync | Off/On | Select On to let the system to synchronize the frame rate. | |
| Shadow Balance | 0-100 | Adjust the shadow balance setting that highlights the object details in dark color. | |
| Response Time | Off/Normal/Fast/Ultrafast | Select the response time setting for motion picture movement enhancement. | |
| Dynamic Brightness | Off/Normal/Expert/Elaboration | Select the dynamic brightness setting that highlights the object details in bright color. | |
| HDR | O/HDR Standard/HDR Movie/ HDR RTS/RPG/HDR FPS | Select the HDR mode. | |
|
Color Settings | Warm | Off/On | Enable/Disable the Warm color temperature. |
| Natural | Off/On | Enable/Disable the Natural color temperature. | |
| Cool | Off/On | Enable/Disable the Cool color temperature. | |
| User1 | Off/On: Red, Green, Blue | Select On to customize the red/green/blue output for User1. | |
| User2 | Off/On: Red, Green, Blue | Select On to customize the red/green/blue output for User2. | |
| User3 | Off/On: Red, Green, Blue | Select On to customize the red/green/blue output for User3. | |
| Color Settings | Hue | Red/Green/Blue/Cyan/Magenta/ Yellow | Adjust the hue settings for the red, green, blue, cyan, magenta, or yellow color. |
| Saturation | 0-100 | Adjust the colour saturation of the screen image. | |
|
PIP/PBP | PIP/PBP Mode | Off/PIP Mode/PBP 2win 1:1/PBP 2Win 2:1/PBP 2Win 1:2 | Select PIP/PBP mode type or disable the function. |
| Sub Win2 Input | DP/HDMI1/HDMI2/Type-C | Set the input source for the sub window. | |
| Audio source | Auto/DP/HDMI1/HDMI2/Type-C | Set the audio source for the main window. | |
| PIP Position | Top Right/Top Left/Bottom Right/ Bottom Left | Set the sub window position. | |
| PIP Size | Small/Medium/Large | Set the sub window size. | |
| Window Swap | Off/On | Select On to swap the two windows (main source and sub source signals). |
| Main Menu | Submenu | Third menu | Description |
|
OSD Settings |
Language | English/简体中文/한국어/ یبرع/Portugues do Brasilazil/ Deutsch/Nederland/Suomi/ Français/Ελληνικά/Indonesia/ Italiano/日本語/Malaysia/Polskie/ Português/Pусский/Español/ ไทย/українська/Tiệng Việt/繁體 中文/Türkçe |
Select the OSD language. |
| OSD Time Out | 0-100 | Set the length of time (in seconds) the OSD screen is displayed. When the time elapses, the OSD screen is automatically inactivated. | |
| OSD H-Position | 0-100 | Move the OSD window to the left or right of the screen. | |
| OSD V-Position | 0-100 | Move the OSD window up or down the screen. | |
| OSD transparency | 0-5 | Set the transparency of the OSD menu. | |
| Hotkey1 Setting | Brightness/Contrast/Volume/ Mute/Shadow Balance/ Adaptive-Sync/Picture Mode/ PIP/PBP/Input Signal/Dynamic Brightness/HDR |
Assign the function of the hot keys. | |
| Hotkey2 Setting | |||
| Hotkey3 Setting | |||
| OSD Rotation | Normal/90/180/270 | Set the OSD menu orientation. | |
|
OSD Lock |
Off/On | Select On to disable the OSD adjustments. Note: When user locks the menu, keep pressing the button for at least 10 seconds to unlock.. | |
|
Other Settings | Input Signal | DP/HDMI1/HDMI2/Type-C | Set the default input signal. |
| Volume | 0-100 | Adjust the volume level of the built-in speaker. | |
| Mute | Off/On | Turn the audio speaker on or off. | |
|
Auto Power |
Off/On | Select On: If the monitor cannot detect any input source signal, and the monitor will automatically turn off after 1 minute. At this time, even if an input source is connected the screen will unable to be awakened. Select Off: If the monitor cannot detect any input source signal, and the display will automatically enter standby mode after 1 minute. At this time, if an input source is connected, the screen can be awakened. | |
|
Rest Remind |
Off/On | Select On to let a reminder message to appear after using the device for 4 hours. Note: The pop-up notice will disappear when pressing the button or after 3 seconds. | |
| Reset | No/Yes | Reset all settings to the factory defaults. | |
| Information | Input Source: / Resolution:/ Mode: / HDR Ver: | View the information about the device. |
DW3401
CHAPTER 4: APPENDIX
Warning Messages
When any of these warning messages appear, check the following items.
| Warning Message | Cause | Solution |
 | The LCD monitor cannot detect the input source signal. | √ Check if the input source is turned ON. √ Check if the signal cable is properly connected. √ Check if any pin inside the cable connector is twisted or broken. |
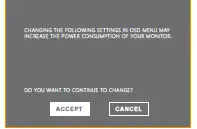 | This warning message box will only show when the menu feature setting is changed for the first time. | √ Press the ACCEPT button to continue the setting changes, or press the CANCEL button to disable the setting changes. |
| Note: The operation may vary from different product models. | ||
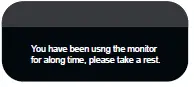 | This reminder message will appear after using the device for 4 hours. | √ The pop-up notice will disappear when pressing the button or after 3 seconds. |
Troubleshooting
| Problems | Possible Cause and Solution |
| The power indicator light is not on | • Check if the power is on. • Check if the power cord is connected. |
|
Impossible plug-and-play | • Check if the function of plug-and-play of the device is compatible with PC. • Check if the graphic card is compatible with the plug-and-play function. • Check the signal cable plug of the monitor and make sure every pin has no bending. |
| Flickering picture or picture with ripples | • There may be electrical appliances or equipment with electronic disturbance. |
| The power indicator light is on (flickering), but the monitor has no picture. |
|
| Picture with color difference (white looks not white) |
|
| USB Type-C port does not supply power |
|
| PIP mode does not work. |
|
CHAPTER 5: SPECIFICATIONS
Display Specifications
| DW2401 | DW2701 | DW3401 | ||
|
Panel | Panel | LED-Backlit TFT LCD (IPS Technology) | LED-Backlit TFT LCD (IPS Technology) | LED-Backlit TFT LCD (IPS Technology) |
| Panel Size | 23.8” | 27” | 34” | |
| Colour Gamut | sRGB 133% , NTSC 115% , DCI-P3 105% , Adobe RGB 115% | sRGB 140% , NTSC 124% , DCI-P3 113% , Adobe RGB 123% | sRGB 130% , NTSC 110% , DCI-P3 100% , Adobe RGB 110% | |
| Max. Resolution | WQHD 2560 x 1440 | WQHD 2560 x 1440 | UWQHD 3440 x 1440 | |
| Pixel Pitch | 0.206 mm | 0.233 mm | 0.233 mm | |
| Brightness | 300 cd/m2 | 350 cd/m2 | 350 cd/m2 | |
| Contrast Ratio | 1000000:1(DCR) | 1000000:1(DCR) | 1000000:1(DCR) | |
| Viewing Angle (H/V) | 178°/178° | 178°/178° | 178°/178° | |
| Display Colour | 16.7M | 16.7M | 16.7M | |
| Response Time | 5 ms | 5 ms | 5 ms | |
| Surface Treatment | Anti-Glare Treatment (Haze 25%), 3H Hard Coating | Anti-Glare Treatment (Haze25%),3H Hard Coating | Anti-Glare Treatment (Haze25%),3H Hard Coating | |
| Frequency (H/V) | H Freq. | 30 kHz-112 kHz | 30 kHz-112 kHz | 30 kHz-112 kHz |
| V Freq. | 50 Hz-76 Hz | 50 Hz-76 Hz | 50 Hz-76 Hz | |
| Input | DisplayPort | 1.2 x 1 | 1.2 x 1 | 1.2 x 1 |
| HDMI | 2.0 x 1 | 2.0 x 1 | 2.0 x 1 ; 1.4 x 1 | |
| Other Connectivity | USB | Type-C x 1 (PD 65W ) | Type-C x 1 (PD 65W ) | Type-C x 1 (PD 65W ) |
| Audio | Audio Out | Stereo Audio Jack (3.5 mm) | Stereo Audio Jack (3.5 mm) | Stereo Audio Jack (3.5 mm) |
| Internal Speakers | 2W x 2 | 2W x 2 | 2W x 2 | |
|
Power | Power Supply | Internal | Internal | Internal |
| Power Requirements | AC 100-240V, 50/60 Hz 2.0A | AC 100-240V, 50/60 Hz 2.0A | AC 100-240V, 50/60 Hz 2.5A | |
| On Mode | 17W (On) | 24W (On) | 31W (ON) | |
| Standby Mode | < 0.5W | < 0.5W | < 0.5W | |
| Off Mode | < 0.3W | < 0.3W | < 0.3W | |
| Operating Conditions | Temperature | 0°C-40°C(32°F-104°F) | 0°C-40°C (32°F-104°F) | 0°C-40°C (32°F-104°F) |
| Humidity | 10%-90% (non-condensing) | 10%-90% (non-condensing) | 10%-90% (non-condensing) | |
| Storage Conditions | Temperature | -20°C-60°C (-4°F-140°F) | -20°C-60°C (-4°F-140°F) | -20°C-60°C(-4°F-140°F) |
| Humidity | 5%-95% (non-condensing) | 5%-95% (non-condensing) | 5%-95% (non-condensing) | |
| Mounting | VESA FPMPMI | Yes (75 x 75 mm) | Yes (75 x 75 mm) | Yes (100 x 100 mm) |
|
Stand | Tilt | -5° to 20° | -5° to 20° | -5° to 15° |
| Pivot | 0° to 90° | 0° to 90° | N/A | |
| Swivel | ± 45° | ± 45° | ± 30° | |
| Height Adjustment | 0-120 mm | 0-120 mm | 0-120 mm | |
|
Dimensions | Product with Base (W x H x D) | 539.6 x 513.8 x 197.9 mm (21.2” x 20.2” x 7.8”) | 613.3 x 543.4 x 197.9 mm (24.2” x 21.4” x 7.8”) | 817.0 x 560.6 x 218.8 mm (32.2” x 22.1” x 8.6”) |
| Product w/o Base (W x H x D) | 539.6 x 324.5 x 53.3 mm (21.2” x 12.8” x 2.1”) | 613.3 x 367.3 x 57.2 mm (24.2” x 14.5” x 2.3”) | 817.0 x 362.5 x 59.8 mm (32.2” x 14.3” x 2.4”) | |
| Packaging (W x H x D) | 810.0 x 438.0 x 145.0 mm (31.9” x 17.2” x 5.7”) | 920.0 x 457.0 x 168.0 mm (36.2” x 18.0” x 6.6”) | 960.0 x 505.0 x 218.0 mm (37.8” x 19.9” x 8.6”) | |
| Weight | Product w/o Base | 3.9 kg (8.6 lb) | 4.0 kg ( 8.8 lb) | 7.6 kg ( 16.8 lb) |
| Product with Base | 5.8 kg (12.8 lb) | 6.0 kg (13.2 lb) | 11.1 kg ( 24.5 lb) | |
| Packaging | 8.5 kg ( 18.7 lb) | 8.8 kg (19.4 lb) | 14.5 kg (32.0 lb) | |
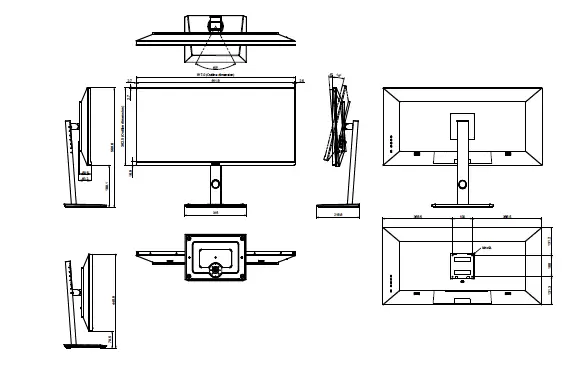
Display Dimensions
DW2401
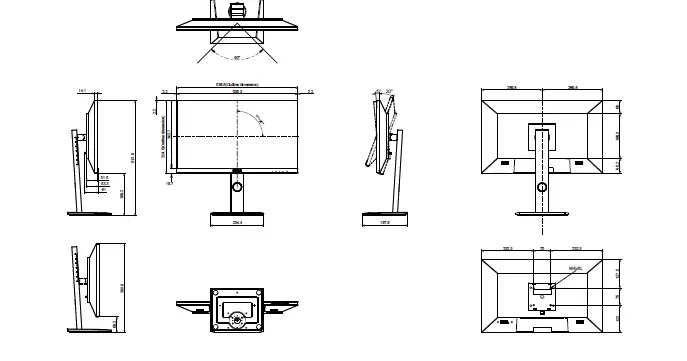
DW2701
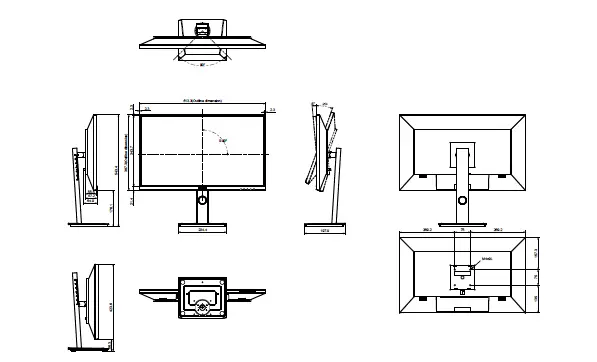
DW3401
AG Neovo
Company Address: 5F-1, No. 3-1, Park Street, Nangang District, Taipei, 11503, Taiwan.
Copyright © 2022 AG Neovo. All rights reserved.
DW2401/DW2701/DW3401 Eprel registration number: 1271777/1271774/1271773
DW2410/DW2710/DW3410_UM_V010

![Dell 24 Usb-c Monitor [p2421dc] User Manual](https://static-data1.manualsee.com/1/img/160/17294/2020/12/Dell-24-USB-C-Monitor-P2421DC.jpg "Dell 24 Usb-c Monitor [p2421dc] User Manual")


