Panasonic SR-JP185WVA-US Electric Rice Cooker

Specifications
| Model No. | SR-JP185 | |
| Power Supply / Rated Voltage | USA / Canada | AC 120V / 60Hz |
| Indonesia / Singapore (RBD) / Mongolia | AC 220V / 50Hz | |
| Singapore (DBD) | AC 230V / 50Hz | |
| Malaysia | AC 240V / 50Hz | |
| Power Consumption | Cooking | 650 W |
| Cooking (Indonesia) | 400 W | |
| Keep Warm | 61.8 W | |
| Keep Warm (Indonesia) | 58 W | |
| Porridge | 650 W | |
| Porridge (Indonesia) | 105 W | |
| Cooking Capacity | 0.54L ~ 1.8L (3 ~ 10 cups) | |
| Center Thermostat Working Temperature | 141°C ± 5°C | |
| Menu Select | Quick Cook, White Rice, Steam, Porridge | |
| Keep Warm Temperature | 65°C – 78°C | |
| Porridge Cooking Volume | 0.54L ~ 1.8L (3 ~ 10 cups) | |
| Power Cord Length | 1m | |
| Thermal Fuse Specification | 250V 15A 142°C | |
| Thermal Fuse Quantity | 2 | |
| Dimension | Height | 0.287m |
| Weight | 0.275m | |
| Length | 0.270m | |
| Product Weight | 2.9kg | |
| Accessory | Measuring Cup, Steam Basket, Rice Scoop, Porridge Spoon | |
Schematic Diagram
For 120V, 650W model.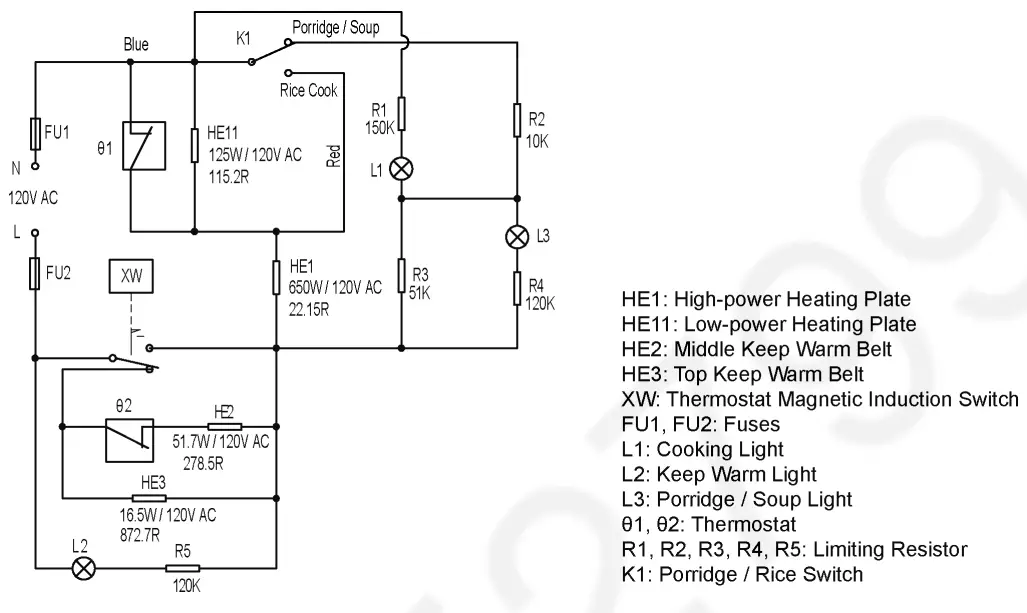
For 220V, 400W model.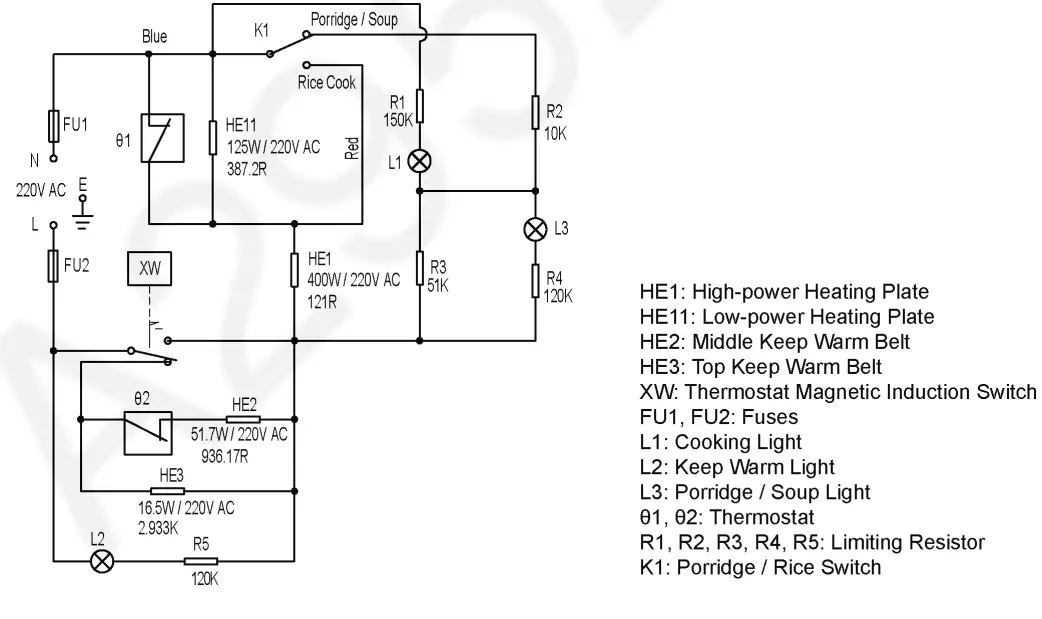
For 220V, 650W model.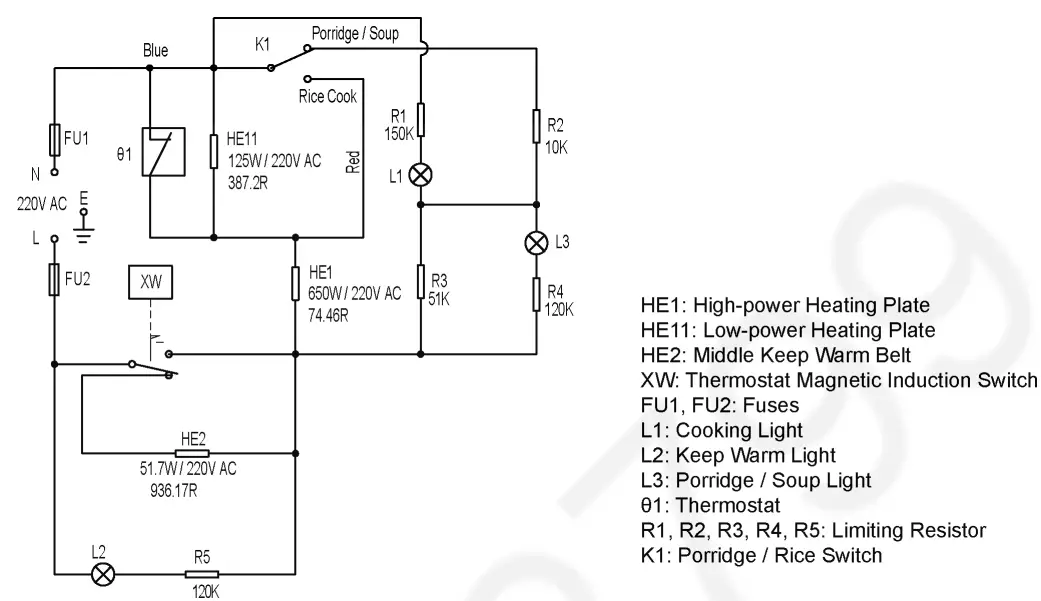
For 230V, 650W model.
For 240V, 650W model.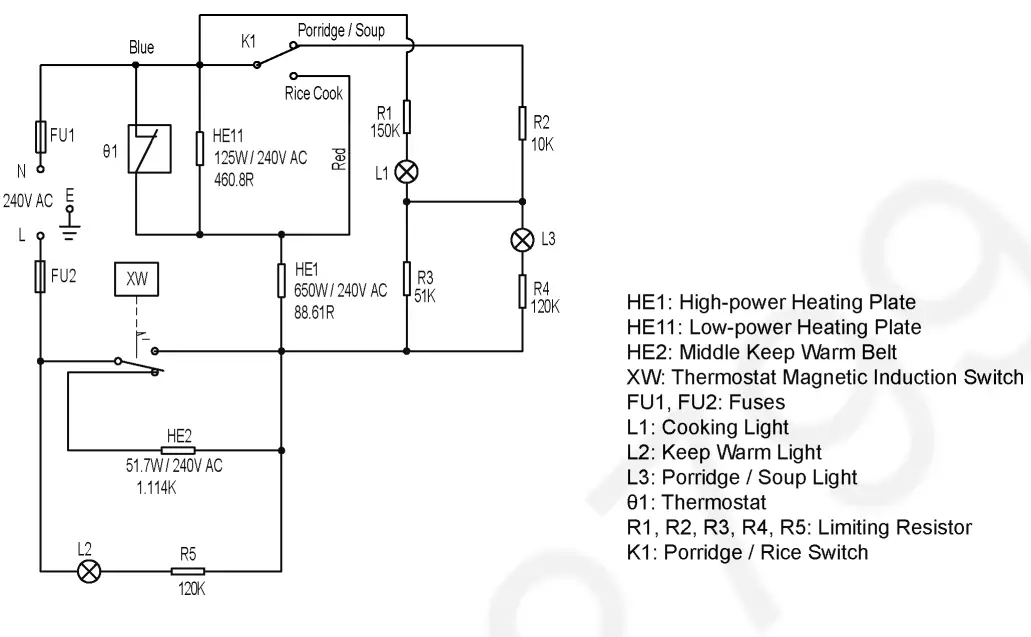
Troubleshooting Guide
When receiving the rice cooker requiring repair, please ask the customer about the malfunctions (phenomena), and if necessary, you should also check the inner pot and spill-proof moisturizing cap. Power off first before checking the related components. Check the main unit according to the troubleshooting table below.
Troubleshooting Table
Note: Mark O means the components that may malfunction.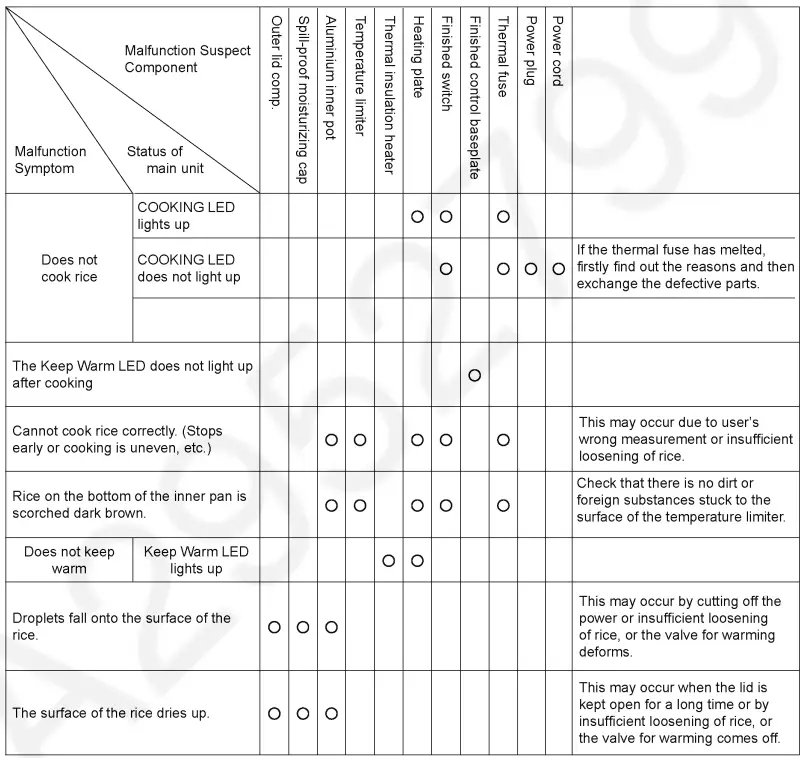
Test Method
Pre-test setting
Make sure that the inner pan set in the cooker and the power cord plugged into the wall socket.
Bubble test
- Insert the pan into the cooker’s main body, and then turn it slightly clockwise and anti-clockwise to place the pan properly on top of the cast heater.
- Pour a small quantity of water into the pan so that the bottom of the pan is immersed with water. Close the lid completely and press the switch to start cooking.
- When the water boils, the cooker will blow off steam. When you see the steam, open the lid, and press the brim of the pan to completely touch the bottom of the pan to the cast heater. Check the water bubbling condition.
See the right figures: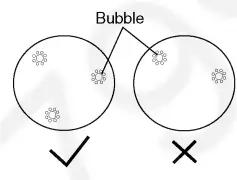
- Water bubbles appear at three areas and are distributed evenly around the circle ————- Acceptable
- Water bubbles appear are distributed unevenly and not around the circle ———————- Unacceptable
- The unacceptable result is possibly due to incomplete contact of bottom of pan and the cast heater. So, please check the heater surface for foreign material and remove them or replace the defective part (pan or cast heater).
Steaming Test
After that, place two or three sheets of tissue paper (gauze) into the pan in such a way that the sheets are spread over the bottom of the pan, then leave the cooker on without closing the lid.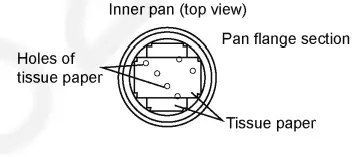
- Be sure to fully open the lid to protect the plastic parts from thermal distortion caused by steam.
- Make holes in the tissue paper (or gauze), as shown, so that it will not float up during steaming.
If the unit fails the switching timing test, check for poor contact between the inner pan and the pan sensor. If necessary, remove any dirt deposit from between them, or replace the inner pan and/or the pan sensor.
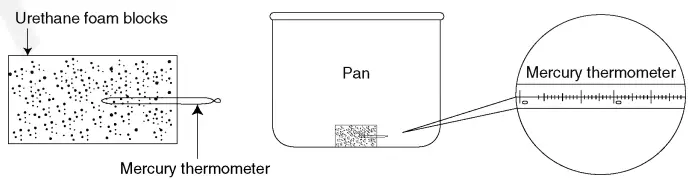
Keep Warm Test
- Place a mercury thermometer between urethane foam blocks. (Urethane foam blocks (ASN-300) and the thermometer (ASN- 150H) are supplied as spare parts.)
- Place the urethane foam blocks holding the thermometer in the center of the bottom of the pan, and allow the cooker to run in the Keep Warm process.
- More than one hour later, open the lid and read the temperature within 10 seconds.
- If it is within 65°C ~ 78°C, then considered as normal.
- If the waring temperature is out of this range, check wether there is any dirt of foreign material stuck on the pan sensor or bottom of the pan, if so, please remove them.

Disassembly and Assembly Instructions
Replacing the switch assembly.
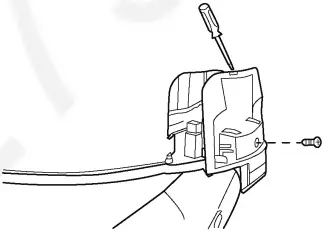
Remove the base.
- Place a rubber pad or similar thing under the rice cooker to prevent damage, and open the lid of the rice cooker, and place the bottom of the rice cooker upward, as shown in the diagram right.
- Pull out the power cord.
- Remove the fixing screws of the underframe (on the side) and those at the bottom (on the underside).
- As shown in the diagram, gently pry at the slot of the underframe edge with a slotted screwdriver, to remove the base.
- Disassemble the wires of the power socket.
Note:
- Do not remove the base by tapping it with a screwdriver, otherwise the screwdriver contacted parts will be damaged. You must use the above method.
- Upon pulling out connectors and similar things, just directly pull them outwards. Pulling them out in different directions will impose pressure on the components connected to them, to cause damages to the components.
- Upon pulling out the fastening terminals at the chuck, please press them down in the direction of the arrow, while pulling the lock catch outward. Press them down in the direction indicated by the arrow, otherwise you will not be able to pull out the terminals.
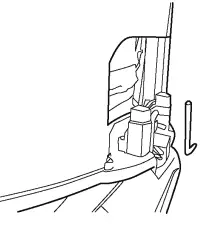
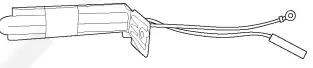
Disconnect the temperature limiter from the connecting rod.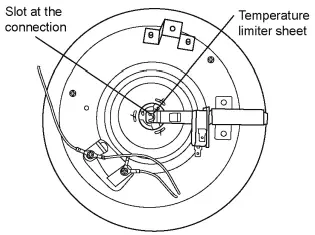
- Gently bend the sheet at the end of the temperature limiter as shown in the diagram, and fold it into the slot shape at the junction of the connecting rod.
- Separate the temperature limiter from the connecting rod slot.
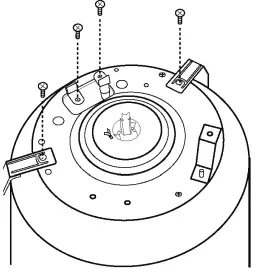
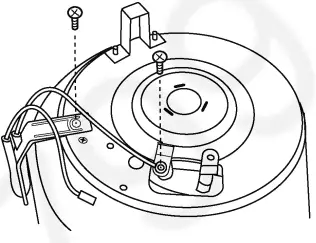
Remove the bracket
- Remove the wiring on the switch assembly.
- Remove the fixing screws (2 pcs) for the connecting rod bracket.
- Push the bracket towards the temperature limiter, to remove the bracket.
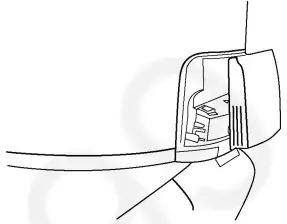
Remove the switch assembly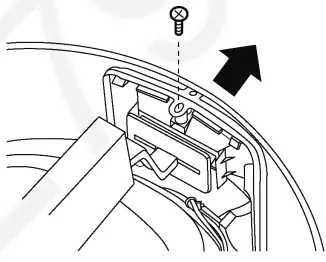
- Remove the fixing screws of the control baseplate.
- Push the control baseplate upward along the body assembly, to remove the switch assembly.
Assembly the switch assembly.
- Conduct assembly after control switch assembly replacement as per the disassembly steps in a reversed way.
Note: - For wiring, refer to Schematic Diagram on P. 4.
Replacing the outer lid
- Remove the water collecting cup

- Remove the water collecting cup directly.
- Remove the hinge cover.

- Remove the fixing screws for the hinge cover.
- Remove the hinge cover using a screwdriver, as shown in the diagram.
- Remove the outer lid.

- Take out the fixed pin for fixing the outer lid. (2 pieces)
- Gently take out the outer lid.
- Push the bracket towards the temperature limiter, to remove the bracket.
- About assembly.
- Conduct assembly after outer lid replacement as per the disassembly steps in a reversed way.
Replacing the body assembly.
- Remove the hinge cover.
- Disassemble the hinge cover by referring to Step (1-2) as shown in 5.2.
- Remove the switch assembly.
- Remove the fixing screws for the hinge cover.
- Disassemble the switch assembly by referring to Step (1-4) as shown in 5.1.
- Remove the Body Assembly.
- Use force directly upward to take out the Body Assembly
Replacing the heating plate
- Remove the base.
- Disassemble the base by referring to Step (1) as shown in 5.1.
- Remove the heating plate

- Disassemble the connection to the heating plate.
- Remove the fixing screws from the heating plate.
- Remove the heating plate from the protective frame.
- About assembly
- Conduct assembly after heating plate replacement as per the disassembly steps in a reversed way.
Note: - For wiring, refer to Schematic Diagram on P. 4.
- Please wear gloves when assembling a new heating plate, so as not to damage or containate the surface of the the heating plate.
- Conduct assembly after heating plate replacement as per the disassembly steps in a reversed way.
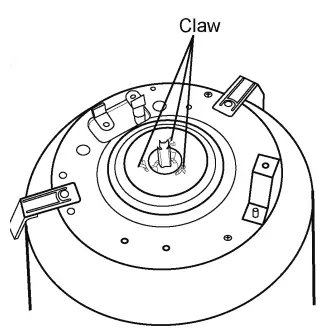
Replacing the temperature limiter.
- Remove the base.
- Disassemble the base by referring to Step (1) as shown in 5.1.
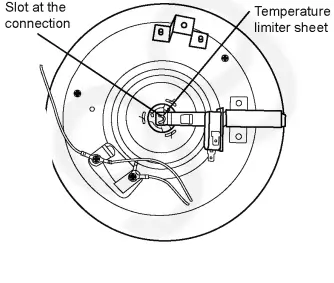
- Separate the temperature limiter from the switch assembly.

- Gently bend the sheet connected to the switch assembly as shown in the diagram, and fold it into the slot shape at the connection of the switch assembly.
- Separate the Temperature limiter from the connecting rod slot.
- Remove the Temperature limiter

- Straighten the claws (3), as shown in the diagram right and take out the temperature limiter.
Note - Do not deform the supporting spring when disassembly.
- Straighten the claws (3), as shown in the diagram right and take out the temperature limiter.
- About assembly
- Conduct assembly after temperature limiter replacement as per the disassembly steps in a reversed way.
Note: - Do not scratch the surface of the temperature limiter when assembly.
- Do not make the supporting spring tilting and deformed when assembly.
- Conduct assembly after temperature limiter replacement as per the disassembly steps in a reversed way.
Replacing the thermal fuse
- Remove the base, body assembly.
- Disassemble the base by referring to Step (1) as shown in 5.1.
- Refer to the method of replacing the body assembly to remove the body assembly.
- Disassemble the connectiong between the thermal fuse and the heating plate

- Disassemble the connection between the thermal fuse and the heating plate.
- Remove the temperature fuse holder, and take out the thermal fuse

- Remove the fixing screws from the theral fuse holder, peel off the aluminum foil tape, and remove the holder and the thermal fuse.
- Directly take out the thermal fuse.
- Reassembly
- Conduct assembly after thermal fuse replacement as per the disassembly steps in a reversed way.
Note: - Do not make temperature fuse deformed when assembling.
- Do not make temperature fuse tilting when assembling.
- Do not damage the lead, insulating sheet, etc. when mounting the thermal fuse on the holder.
- Conduct assembly after thermal fuse replacement as per the disassembly steps in a reversed way.
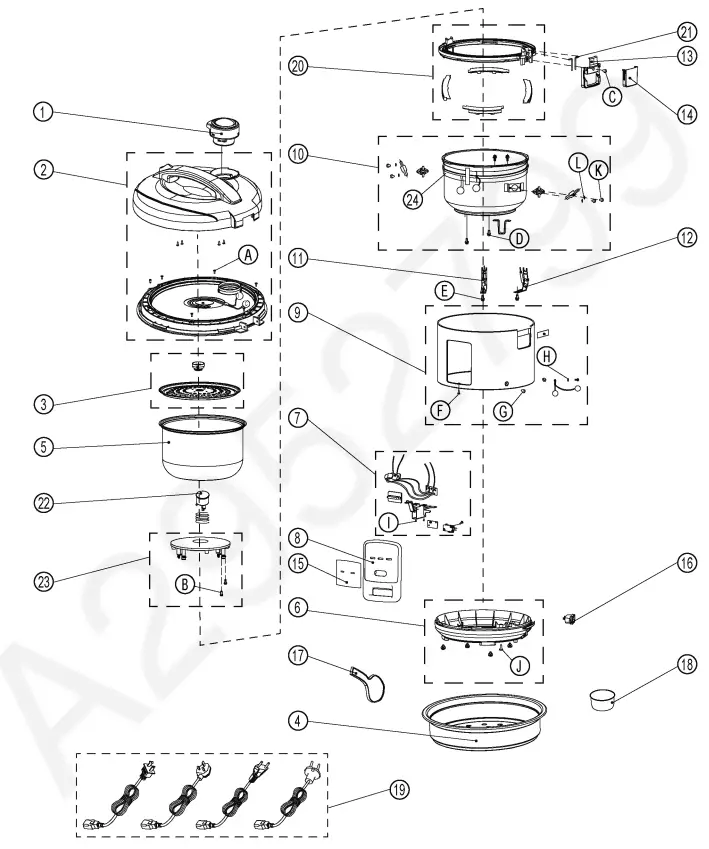
Exploded View and Replacement Parts List
Exploded View
Packing View
Replacement Part List
Important safety notice: Components identified by mark have special characteristics important for safety. When replacing any of these components, use only manufacturer’s specified parts.
Part List
| Safety | Ref. No. | Part No. | Part Name & Description | Qty | Remarks |
| 1 | 3100790040 | STEAM VALVE ASSY | 1 | SR-JP185SSK/SR-JP185WSH/SR-JP185WSK/SR-JP185WSR/ SR-JP185WSW | |
| 1 | 3100790041 | STEAM VALVE ASSY | 1 | SR-JP185SBSR/SR-JP185TSH/SR-JP185TSK | |
| 1 | 3100790061 | STEAM VALVE ASSY | 1 | SR-JP185SWVA/SR-JP185WVA | |
| 2 | 3100160299 | OUTER LID ASSY | 1 | SR-JP185SSK/SR-JP185WSH/SR-JP185WSK/SR-JP185WSW | |
| 2 | 3100160303 | OUTER LID ASSY | 1 | SR-JP185TSH/SR-JP185TSK | |
| 2 | 3100160304 | OUTER LID ASSY | 1 | SR-JP185SBSR | |
| 2 | 3100160305 | OUTER LID ASSY | 1 | SR-JP185WSR | |
| 2 | 3100160313 | OUTER LID ASSY | 1 | SR-JP185SWVA/SR-JP185WVA | |
| 3 | 2300160046 | INNER LID ASSY | 1 | ||
| 4 | 3100200031 | STEAM BASKET | 1 | ||
| 5 | 2300030739 | INNER PAN | 1 | ||
| 6 | 3100050253 | BOTTOM PLATE ASSY | 1 | SR-JP185SSK/SR-JP185WSH/SR-JP185WSK/SR-JP185WSR/ SR-JP185WSW | |
| 6 | 3100050254 | BOTTOM PLATE ASSY | 1 | SR-JP185SBSR/SR-JP185TSH/SR-JP185TSK | |
| 6 | 3100050289 | BOTTOM PLATE ASSY | 1 | SR-JP185SWVA/SR-JP185WVA | |
| 7 | 1200070226 | SWITCH LEVER ASSY | 1 | SR-JP185SBSR/SR-JP185TSH/SR-JP185TSK | |
| 7 | 1200070227 | SWITCH LEVER ASSY | 1 | SR-JP185SSK/SR-JP185WSH/SR-JP185WSK/SR-JP185WSR/ SR-JP185WSW | |
| 7 | 1200070237 | SWITCH LEVER ASSY | 1 | SR-JP185SWVA/SR-JP185WVA | |
| 8 | 3100271076 | SWITCH PANEL ASSY | 1 | SR-JP185SBSR | |
| 8 | 3100271077 | SWITCH PANEL ASSY | 1 | SR-JP185WSR | |
| 8 | 3100271078 | SWITCH PANEL ASSY | 1 | SR-JP185SSK/SR-JP185WSH/SR-JP185WSK/SR-JP185WSW | |
| 8 | 3100271079 | SWITCH PANEL ASSY | 1 | SR-JP185TSK | |
| 8 | 3100271083 | SWITCH PANEL ASSY | 1 | SR-JP185TSH | |
| 8 | 3100271093 | SWITCH PANEL ASSY | 1 | SR-JP185SWVA/SR-JP185WVA | |
| 9 | 2300131479 | BODY ASSY | 1 | SR-JP185WSH/SR-JP185WSK/SR-JP185WSW | |
| 9 | 2300131483 | BODY ASSY | 1 | SR-JP185SSK | |
| 9 | 2300131488 | BODY ASSY | 1 | SR-JP185SBSR | |
| 9 | 2300131489 | BODY ASSY | 1 | SR-JP185WSR | |
| 9 | 2300131490 | BODY ASSY | 1 | SR-JP185TSH/SR-JP185TSK | |
| 9 | 2300131500 | BODY ASSY | 1 | SR-JP185SWVA | |
| 9 | 2300131501 | BODY ASSY | 1 | SR-JP185WVA | |
| 10 | 2300150315 | PROTECTING FRAME ASSY | 1 | SR-JP185SBSR/SR-JP185WSR | |
| 10 | 2300150316 | PROTECTING FRAME ASSY | 1 | SR-JP185SSK/SR-JP185TSK/SR-JP185WSK | |
| 10 | 2300150321 | PROTECTING FRAME ASSY | 1 | SR-JP185TSH/SR-JP185WSH | |
| 10 | 2300150323 | PROTECTING FRAME ASSY | 1 | SR-JP185WSW | |
| 10 | 2300150326 | PROTECTING FRAME ASSY | 1 | SR-JP185SWVA/SR-JP185WVA | |
| 11 | 1200170042 | THERMAL FUSE A ASSY | 1 | ||
| 12 | 1200170041 | THERMAL FUSE B ASSY | 1 | ||
| 13 | 3100170041 | HINGE COVER | 1 | SR-JP185SSK/SR-JP185WSH/SR-JP185WSK/SR-JP185WSR/ SR-JP185WSW | |
| 13 | 3100170042 | HINGE COVER | 1 | SR-JP185SBSR/SR-JP185TSH/SR-JP185TSK | |
| 13 | 3100170047 | HINGE COVER | 1 | SR-JP185SWVA/SR-JP185WVA | |
| 14 | 3100180029 | DEW COLLECTOR | 1 | ||
| 15 | 5100160448 | DECORATIVE PANEL | 1 | SR-JP185SBSR/SR-JP185TSH/SR-JP185TSK | |
| 15 | 5100160458 | DECORATIVE PANEL | 1 | SR-JP185SSK/SR-JP185SWVA/SR-JP185WSH/SR-JP185WSK/ SR-JP185WSR/SR-JP185WSW/SR-JP185WVA | |
| 16 | 1200100005 | INLET | 1 | SR-JP185SWVA/SR-JP185WVA | |
| 16 | 1200100048 | INLET | 1 | ||
| 17 | 3100330012 | RICE SCOOP | 1 | ||
| 18 | 3100320003 | MEASUREMENT CUP | 1 | ||
| 19 | 1200010999 | POWER CORD ASSY | 1 | SR-JP185SSK/SR-JP185TSK/SR-JP185WSK | |
| 19 | 1200011001 | POWER CORD ASSY | 1 | SR-JP185SWVA/SR-JP185WVA | |
| 19 | 1200011003 | POWER CORD ASSY | 1 | SR-JP185WSW | |
| 19 | 1200011004 | POWER CORD ASSY | 1 | SR-JP185TSH/SR-JP185WSH | |
| 19 | 1200011011 | POWER CORD ASSY | 1 | SR-JP185SBSR/SR-JP185WSR | |
| 20 | 3100250235 | UPPER FRAME ASSY | 1 | ||
| 20 | 3100250237 | UPPER FRAME ASSY | 1 | SR-JP185SBSR/SR-JP185TSH/SR-JP185TSK | |
| 21 | 2100040063 | HINGE SHAFT | 2 | ||
| 22 | 1200150033 | THERMOSTAT | 1 | ||
| 23 | 1100000679 | CAST HEATER ASSY | 1 | SR-JP185SBSR/SR-JP185WSR | |
| 23 | 1100000680 | CAST HEATER ASSY | 1 | SR-JP185SWVA/SR-JP185WVA |
| Safety | Ref. No. | Part No. | Part Name & Description | Qty | Remarks |
| 23 | 1100000681 | CAST HEATER ASSY | 1 | SR-JP185TSH/SR-JP185WSH | |
| 23 | 1100000682 | CAST HEATER ASSY | 1 | SR-JP185SSK/SR-JP185TSK/SR-JP185WSK | |
| 23 | 1100000704 | CAST HEATER ASSY | 1 | SR-JP185WSW | |
| 24 | 1100010161 | KEEP WARM HEATER | 1 | SR-JP185SBSR/SR-JP185WSR | |
| 24 | 1100010185 | KEEP WARM HEATER | 1 | SR-JP185TSH/SR-JP185WSH | |
| 24 | 1100010193 | KEEP WARM HEATER | 1 | SR-JP185WSW | |
| 24 | 1100010181 | KEEP WARM HEATER | 1 | SR-JP185SWVA/SR-JP185WVA | |
| 24 | 1100010184 | KEEP WARM HEATER | 1 | SR-JP185SSK/SR-JP185TSK/SR-JP185WSK |
Screws
| Safety | Ref. No. | Part No. | Part Name & Description | Qty | Remarks |
| A | 2100000222 | SCREW ST4X8FT | 7 | SR-JP185SBSR (OUTER LID ASSY) | |
| A | 2100000222 | SCREW ST4X8FT | 6 | (OUTER LID ASSY) | |
| B | 2100070003 | SCREW SET M4X8 | 2 | ||
| C | 2100000222 | SCREW ST4X8FT | 1 | ||
| D | 2100000097 | SCREW M4X10 | 1 | SR-JP185SBSR/SR-JP185WSR/SR-JP185TSH/SR-JP185WSH/SR- JP185WSW/SR-JP185SSK/SR-JP185TSK/SR-JP185WSK | |
| E | 2100000390 | SCREW XTN4X8FFJ | 2 | ||
| F | 2100000207 | SCREW ST3X6C | 1 | ||
| G | 2100000299 | SCREW ST4X14FT | 1 | ||
| H | 2100030048 | WASHER 4 | 1 | SR-JP185SBSR/SR-JP185WSR/SR-JP185TSH/SR-JP185WSH/SR- JP185WSW/SR-JP185SSK/SR-JP185TSK/SR-JP185WSK | |
| I | 2100070046 | SCREW SET XTN4X8FFJ | 2 | ||
| J | 2100000391 | SCREW M4X30 | 1 | ||
| K | 2100000393 | SCREW XTN4X5FFJ | 2 | ||
| K | 2100000393 | SCREW XTN4X5FFJ | 4 | SR-JP185WSR/SR-JP185SWVA | |
| L | 2100030009 | SPRING WASHER 4 | 2 | ||
| L | 2100030009 | SPRING WASHER | 4 | SR-JP185WSR/SR-JP185SWVA |
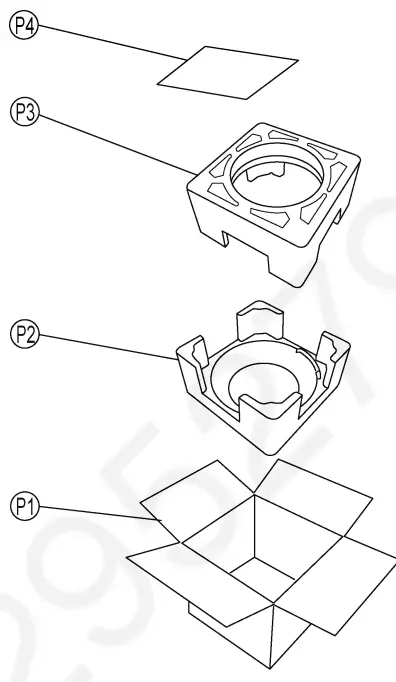
Packing List
| Safety | Ref. No. | Part No. | Part Name & Description | Qty | Remarks |
| P1 | 5000041542 | PACKING BOX | 1 | SR-JP185SBSR | |
| P1 | 5000041543 | PACKING BOX | 1 | SR-JP185WVA/SR-JP185SWVA | |
| P1 | 5000041545 | PACKING BOX | 1 | SR-JP185TSH | |
| P1 | 5000041545 | PACKING BOX | 1 | SR-JP185WSH/SR-JP185WSW | |
| P1 | 5000041574 | PACKING BOX | 1 | SR-JP185WSR/SR-JP185SSK/SR-JP185TSK/SR-JP185WSK | |
| P2 | 5400020307 | LOWER PAD | 1 | ||
| P3 | 5400020306 | UPPER PAD | 1 | ||
| P4 | 5200001448 | OPERATING INSTRUCTIONS | 1 | SR-JP185SBSR/SR-JP185WSR | |
| P4 | 5200001500 | OPERATING INSTRUCTIONS | 1 | SR-JP185TSH/SR-JP185WSH/SR-JP185WSW/SR-JP185SSK/SR- JP185TSK/SR-JP185WSK | |
| P4 | 5200001502 | OPERATING INSTRUCTIONS | 1 | SR-JP185WSW-MN | |
| P4 | 5200001501 | OPERATING INSTRUCTIONS | 1 | SR-JP185WVA/SR-JP185SWVA |


