SPIKE 78-2600-R Canam Maverick Trail

INSTALLATION INSTRUCTIONS
IMPORTANT NOTICES |
READ AND UNDERSTAND THESE INSTRUCTIONS COMPLETELY BEFORE INSTALLATION TO AVOID INJURY TO YOURSELF, DAMAGE TO THE VEHICLE OR ACCESSORY.
DEALER These instructions contain important information for future reference and must be given to the customer at time of purchase or upon completion of installation. |
Parts List (parts available with kit only and not available separately)
ITEM | PART NAME | DESCRIPTION | QTY | |
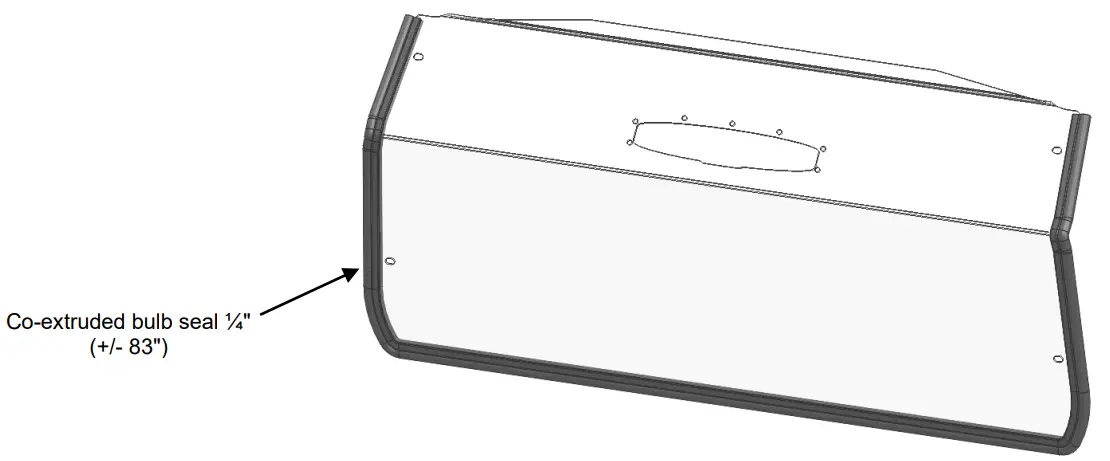
| A | Windshield | CNC windshield cut-out made of ⅛” thick GE polycarbonate or equivalent | 1 | |
| B | Vent assembly | Includes: 1 vent cover, 1 vent flap assembly, 1 rubber vent seal and 7 vent mounting screws | 1 | |
| C | Co-extruded bulb seal (¼”) | Includes: 84″ Co-extruded bulb seal (¼”) / #77-95BS [end user to cut to exact length] | 1 | |
| INSTRUCTION BAG | D | Windshield Hardware | Includes: 4 metal plate hooks, 4 phillips truss head screws M6 x 20 and 4 plastic shoulder washers M6 | 1 |
Installation
a) Find a clean flat area where you can safely lay down the windshield (Item A). Partially remove the protective film on both sides and apply the co-extruded bulb seal (Item C) using manual pressure to ensure good adhesion and cut any excess.
IMPORTANT NOTICES |
Torque specifications must be followed when tightening bolts. Over-tightening any and/or all screws will cause cracks around mounting holes which is not covered by any warranty |
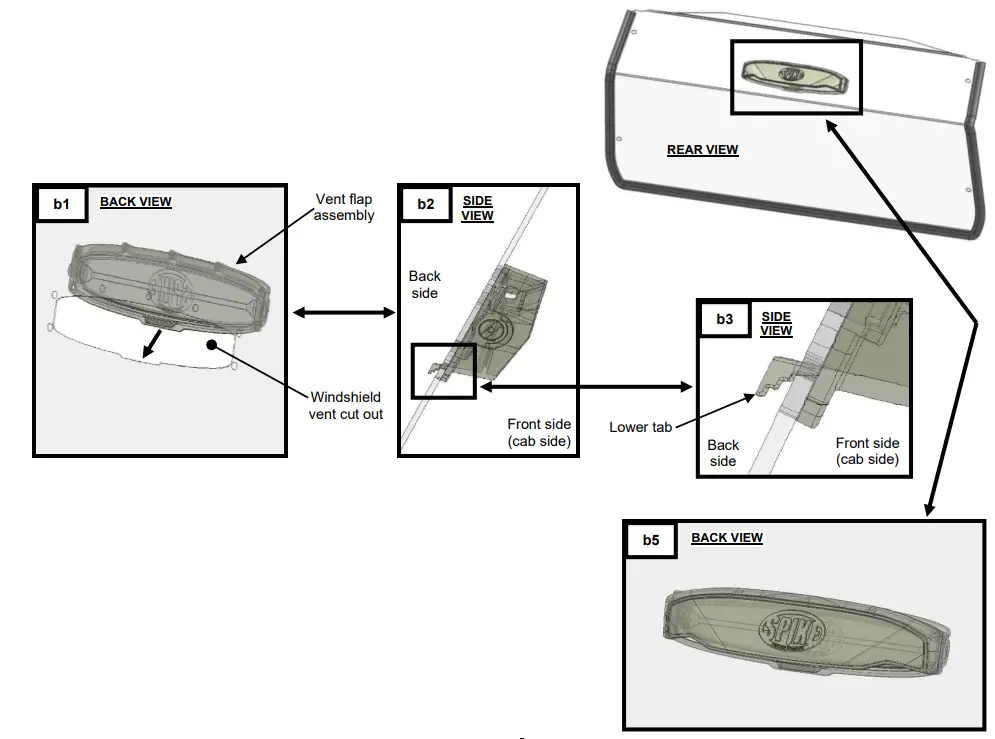
b) Vent assembly (Item B) installation: Partially remove the protective film on both sides of the windshield around the vent cutouts and follow instructions below.
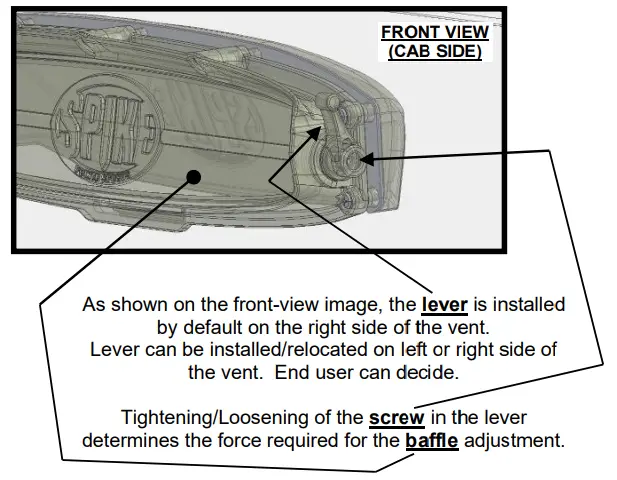
a. From the front side (cab side) of the windshield, slide the vent flap assembly (Item B) in the vent cut out as shown in image b1. Ensure the lower tab nests into the front of the windshield as shown in image b2 & b3
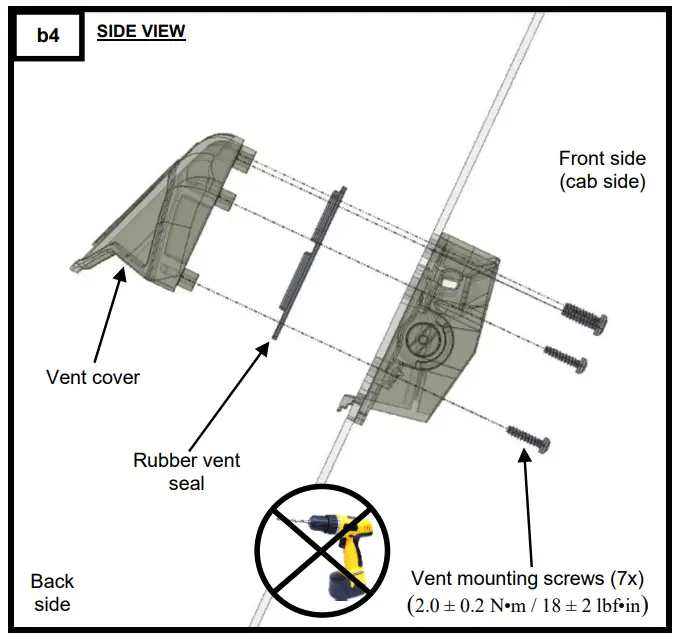
b. Install the remaining vent components (Item B) using supplied hardware as shown below in image b4 & b5
IMPORTANT NOTICES |
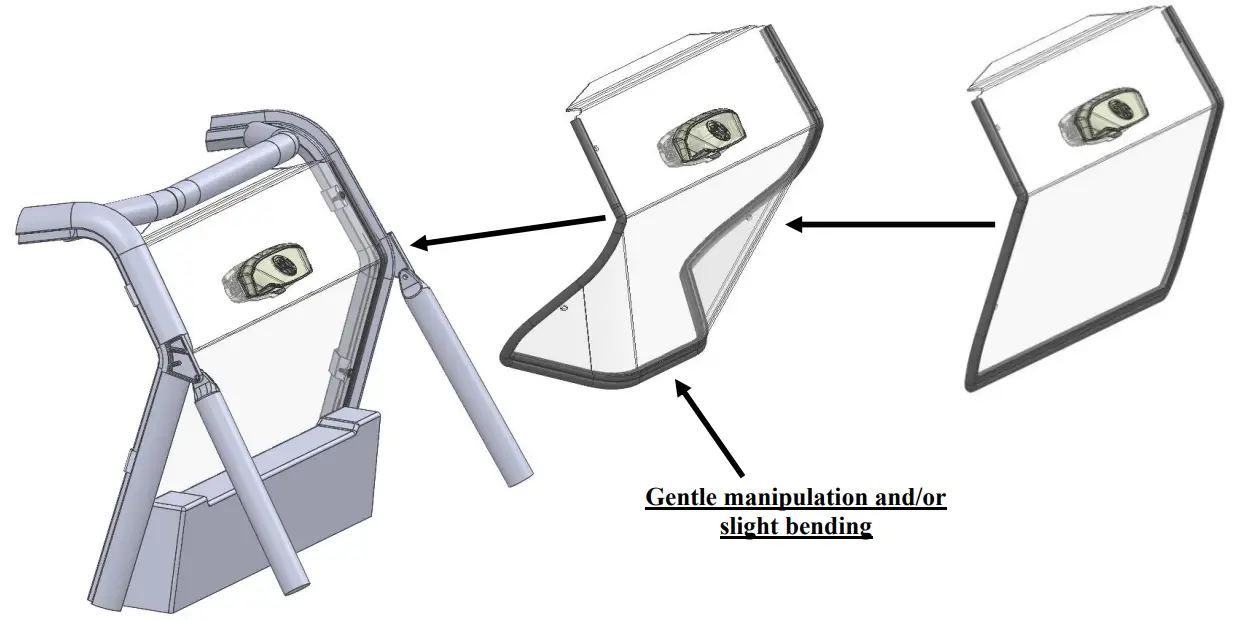
| TWO people are required to install the windshield to the roll cage. Since windshield is wider at the bottom, gentle manipulation and/or slight bending by each person will be required for windshield to slide all the way down into position Warning: Exercise extreme care during the next step in order to ensure that you do not damage the windshield or vehicle. This is a tight fit. |
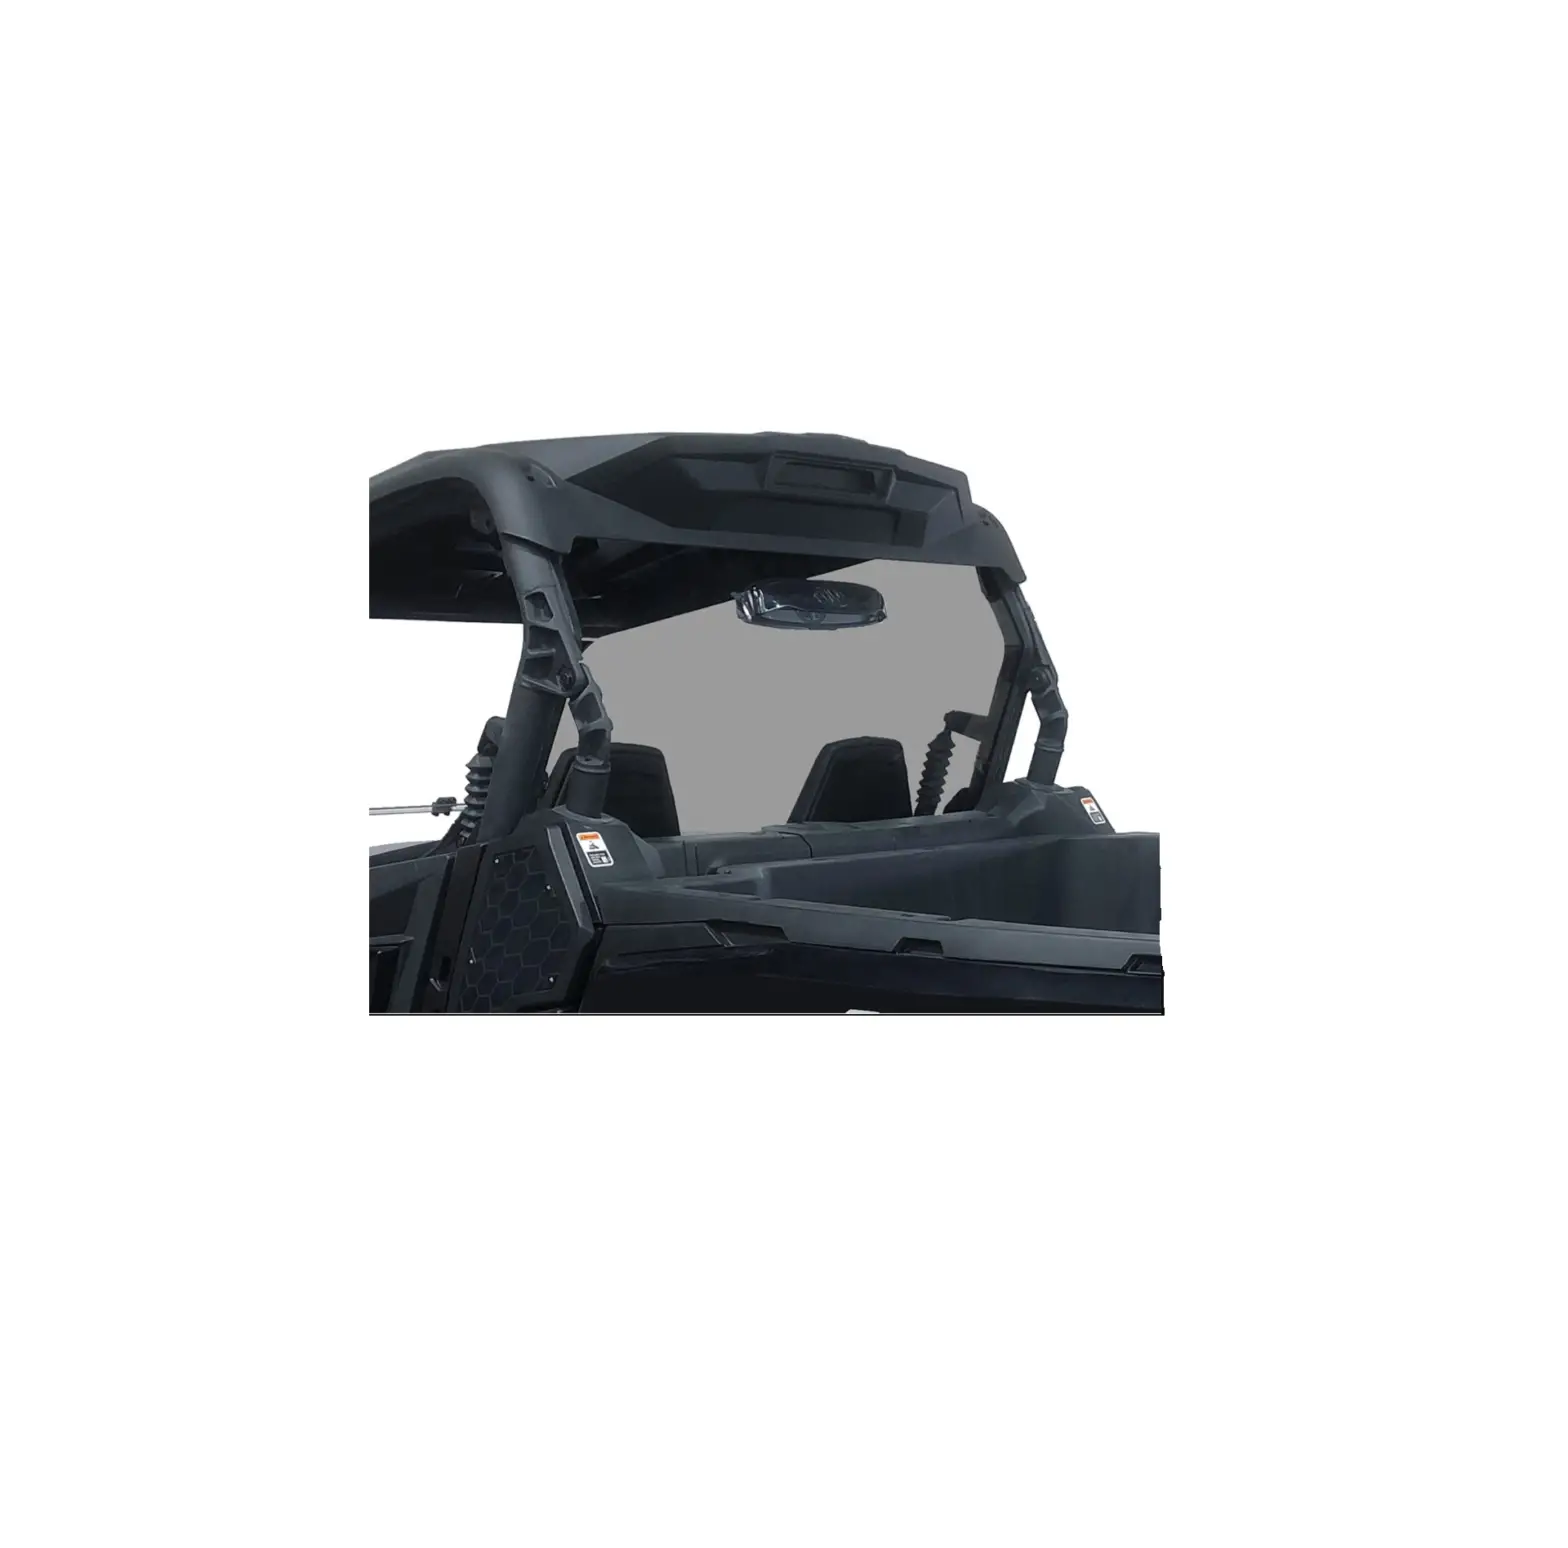
c) Install the windshield to the vehicle as shown below
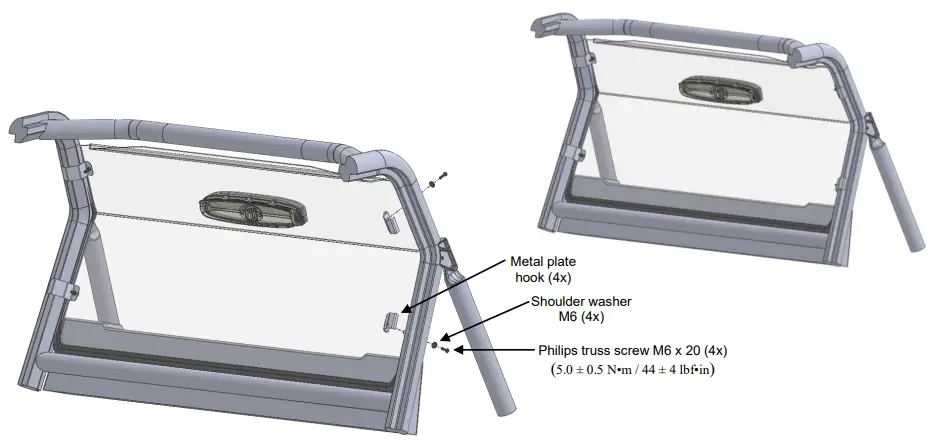
d) Install the supplied hardware (Item D) as shown below. Adjust the position of the windshield and tighten
Caution: over tightening any hardware could cause irreversible damage to the windshield.
IMPORTANT NOTICES |
| Trailerable ONLY with a FULL Front windshield AND Roof – or damage can occur! Due to extreme wind turbulence, towing on an open trailer pulled by motor home, bus or other large size vehicle at highway speeds is NOT recommended. |
CAUTION |
| Limited Towing at lower speeds (60mph or less) for shorter distances is acceptable with a FULL Front Windshield AND Roof ONLY. Prolonged towing at highway speeds on an Open trailer is NOT recommended and can cause damage that is NOT covered under Warranty. Whenever towing anytime, it is mandatory to check all windshield hardware BEFORE towing and at frequent intervals afterwards! SPIKE suggests removal of Rear Windshields if towed in any conditions that are NOT recommended – removal will also create less drag on the tow vehicle |
Maintenance and Care
Tighten all hardware after first use and periodically thereafter.
CLEANING
NOTICE: Abusive cleaning procedures by hand washing or automated washing equipment will eventually result in visual hazing, loss of light transmission and coating delamination. Compatible Cleaning Agents
MINIMIZING HAIRLINE SCRATCHES For minimizing scratches and minor abrasions, mild automobile polish can be used. Recommended products: Johnson Paste Wax, Novus Plastic Polish #1 and #2, Mirror Glaze plastic polish and Plexux1. Testing polish on a separate Lexan sample is recommended. Be sure to follow product instructions carefully |