![]()
Configuring the Supervisor and E2 to Communicate with Connect+ Mixed Sites
Instruction Manual
Configuring the Supervisor and E2 to Communicate with Connect+ Mixed Sites
A Peer network allows communication between multiple controllers to take place with one controller as the annunciator, which will send alarms for all the controllers on the network.
For Peer network and Annunciator setup, see Appendix E in the Supervisory Control Platform Controller Installation and Operation Manual P/N 026-1803. Click here to access.
- When a Site Supervisor or E3 is added to an existing E2 network, the Supervisor must be the gateway unit to Connect+ and if sending Advisories, the Supervisor must be commissioned to send them to Connect+
- The Site Supervisor or E3 must communicate over a different port than the E2, and the port must be open to Connect+ either directly or through a VPN. Contact Technical Services and your IT Administrator for assistance.
| Typical Port Configurations | ||
| Site Supervisor/E3 Port | 80, 443, 1025, | 1026 |
| E2 Port | 3001, 3004 | |
| Advisory COM Port | 1025 | |
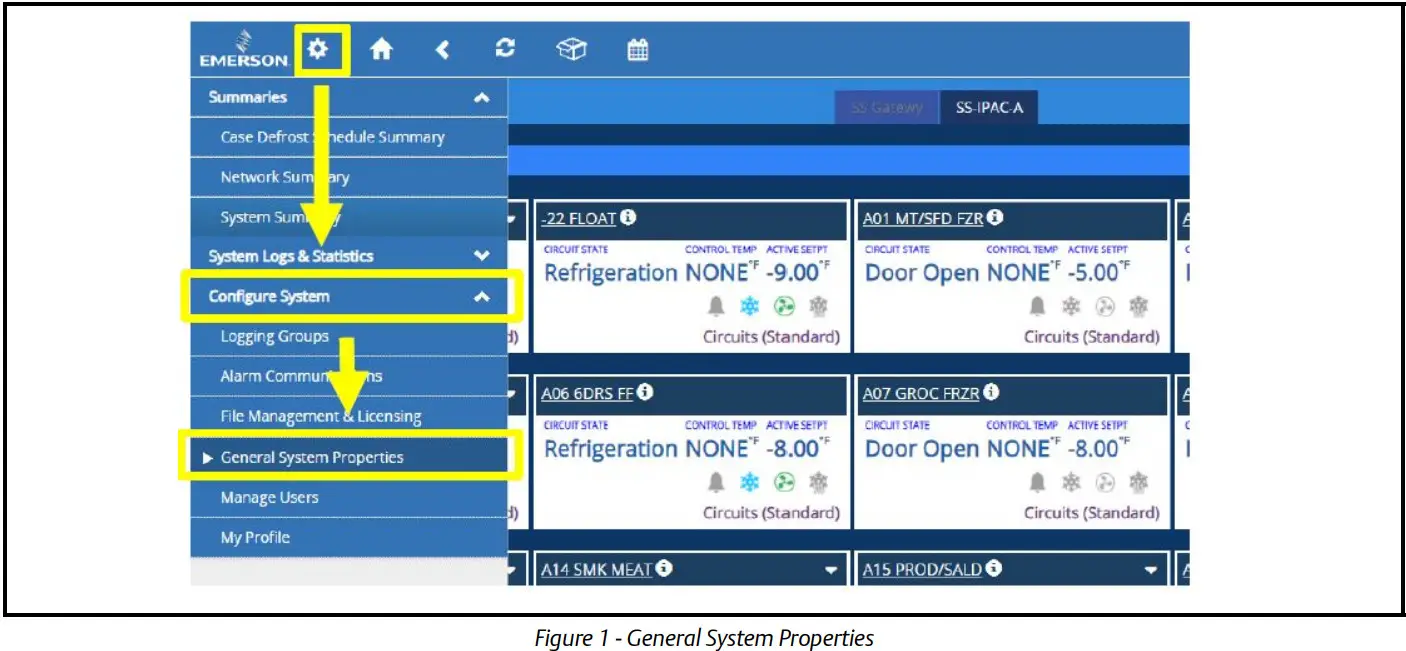
- Once connected and logged-in to the Supervisor, click the gear icon (Main Menu), Configure System, and then General System Properties. This will take you to the Network configuration settings.
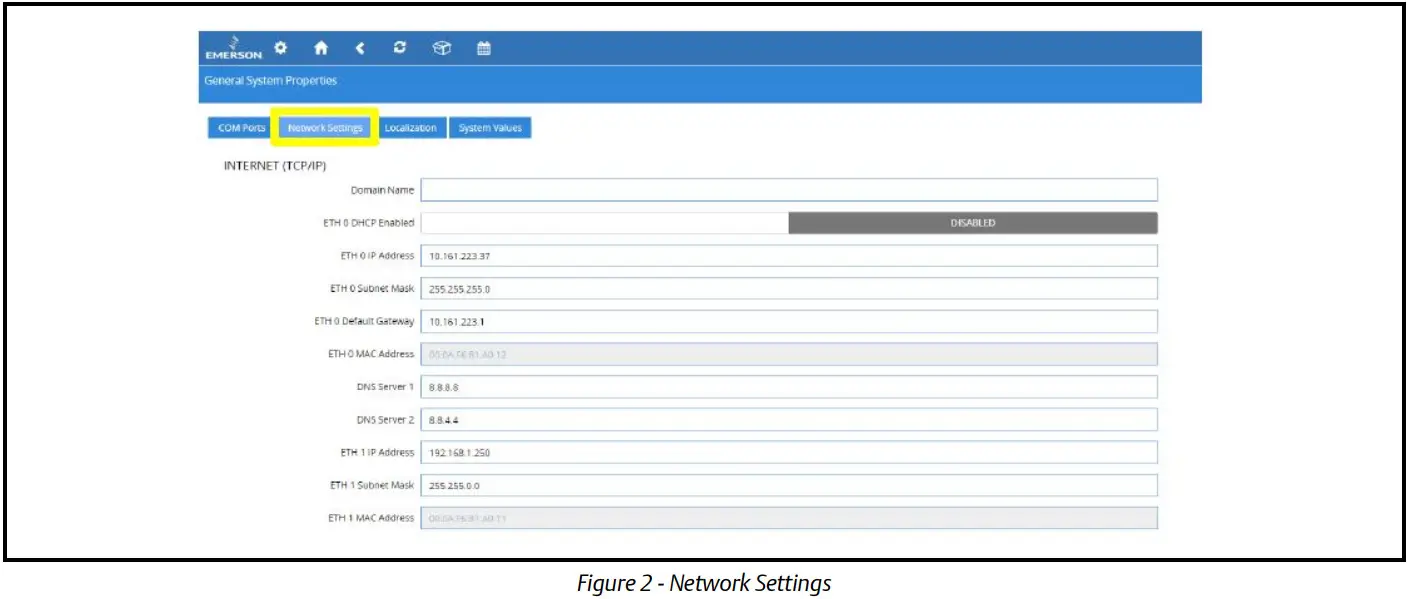
- At the Network Configuration screen, click the Network Settings tab to access the TCP/IP settings of the controller.
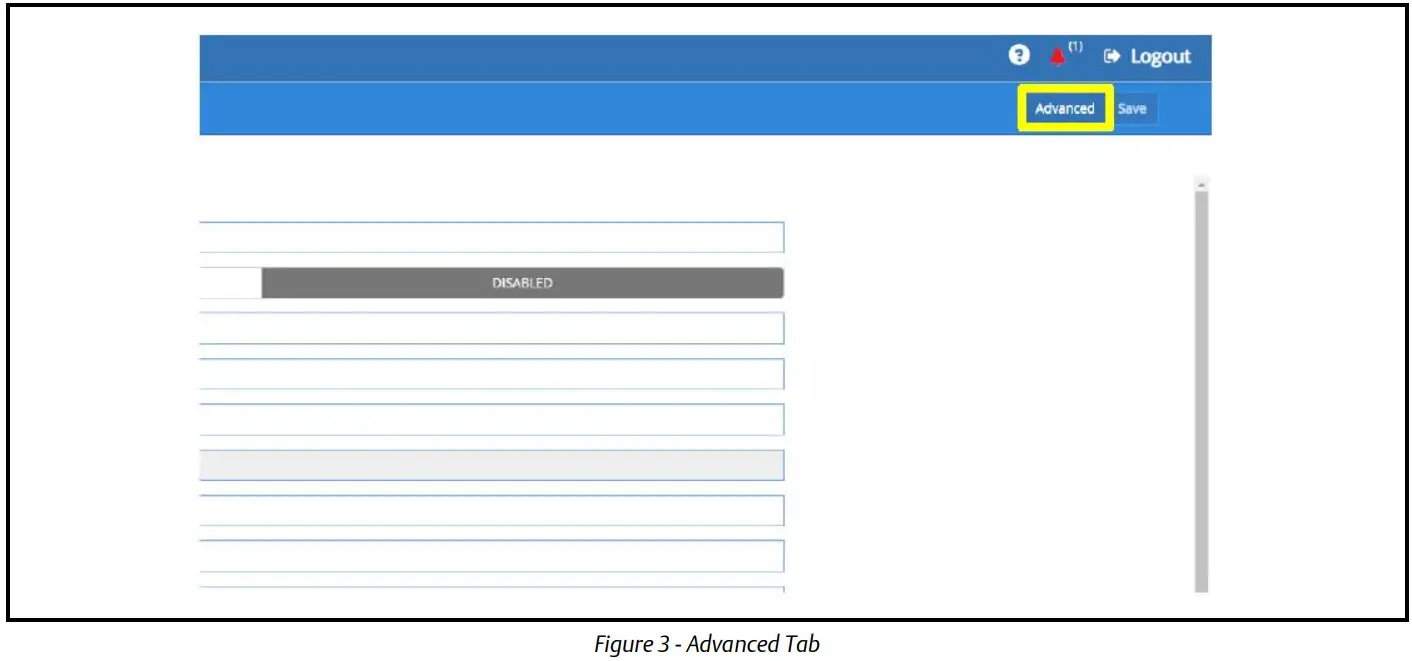
- Click the Advanced options button on the upper right corner of the screen. This will enable Advanced options.
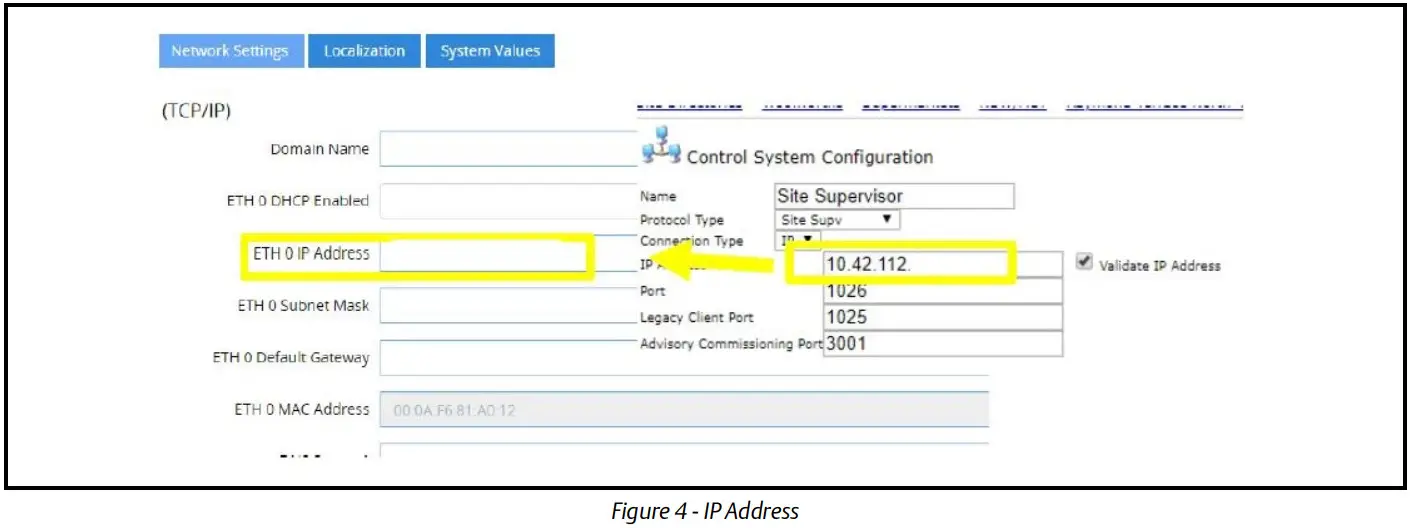
- The IP address to be used for the ETH 0 should be the same IP address used in the control system settings of the Connect + instance. The Supervisor will be the gateway controller in this setup. Contact Technical Services at [email protected] to obtain the gateway IP address to be used.
- The ETH 0 Subnet Mask and Default Gateway would be just copied from the existing E2 controllers on site. To get to the TCP/IP settings of the E2, press
 from the Home screen. Press
  three (3) times to go to the TCP/IP tab.
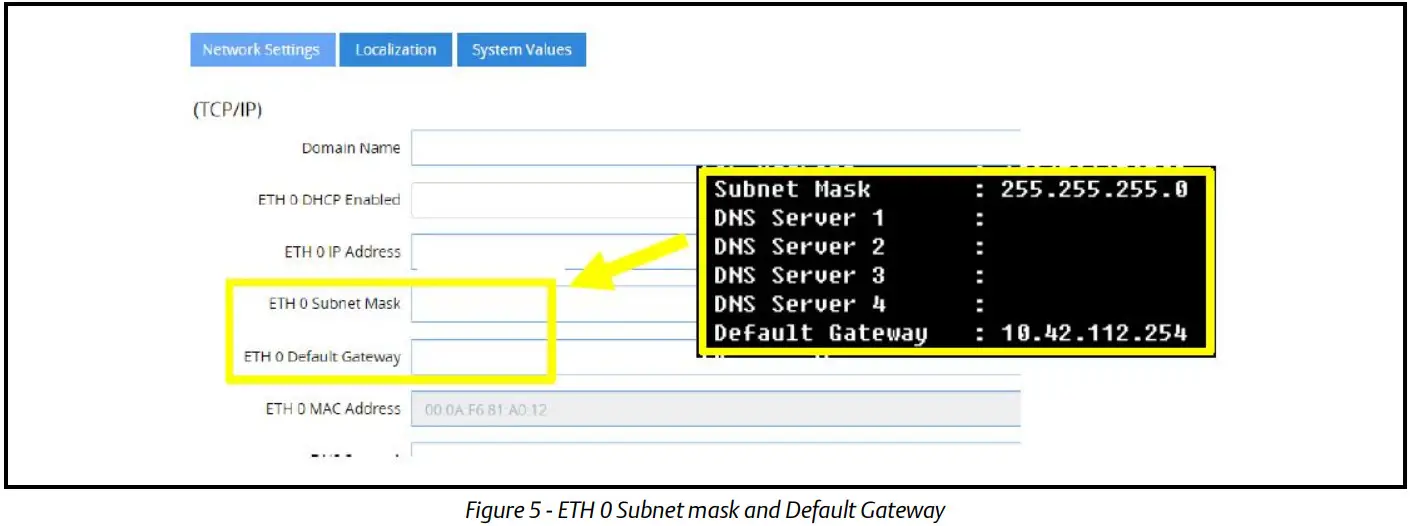
- Change the following additional settings to your default values:
Monitoring Port: 3001
Legacy Client Port: 1025
Web Port: 1026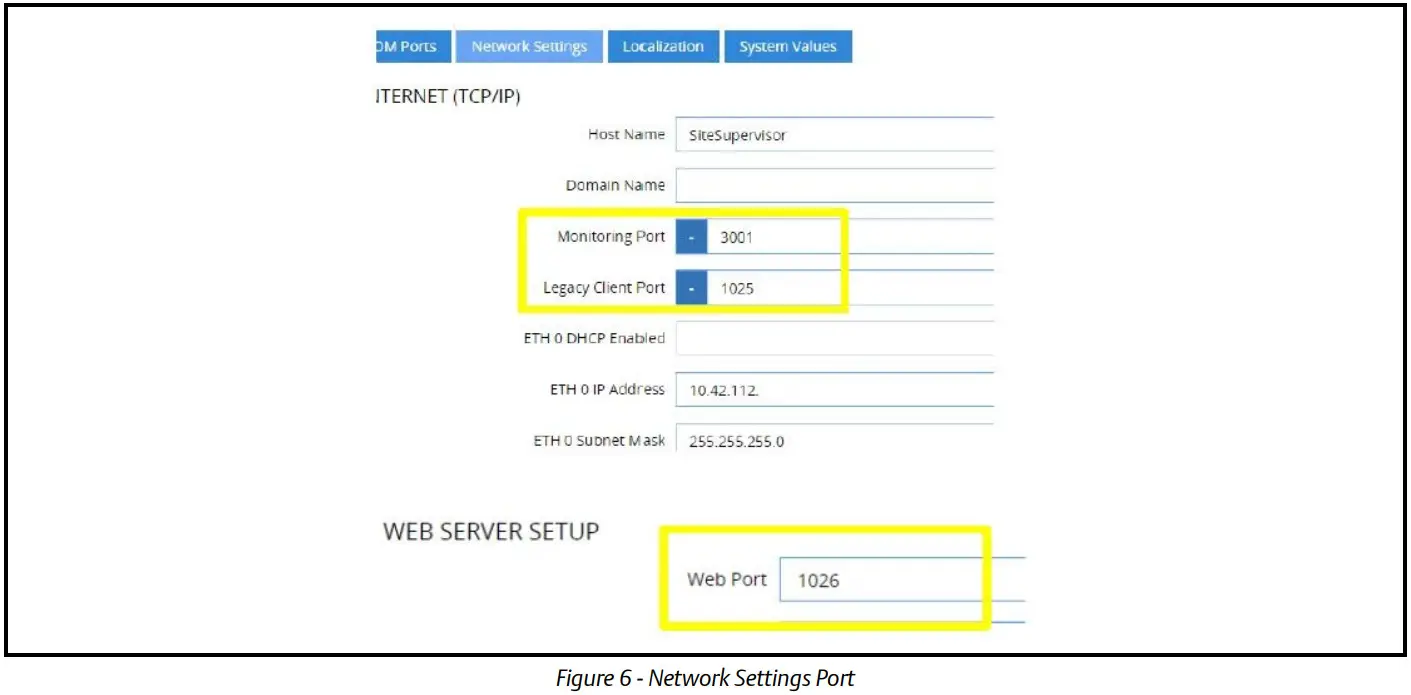
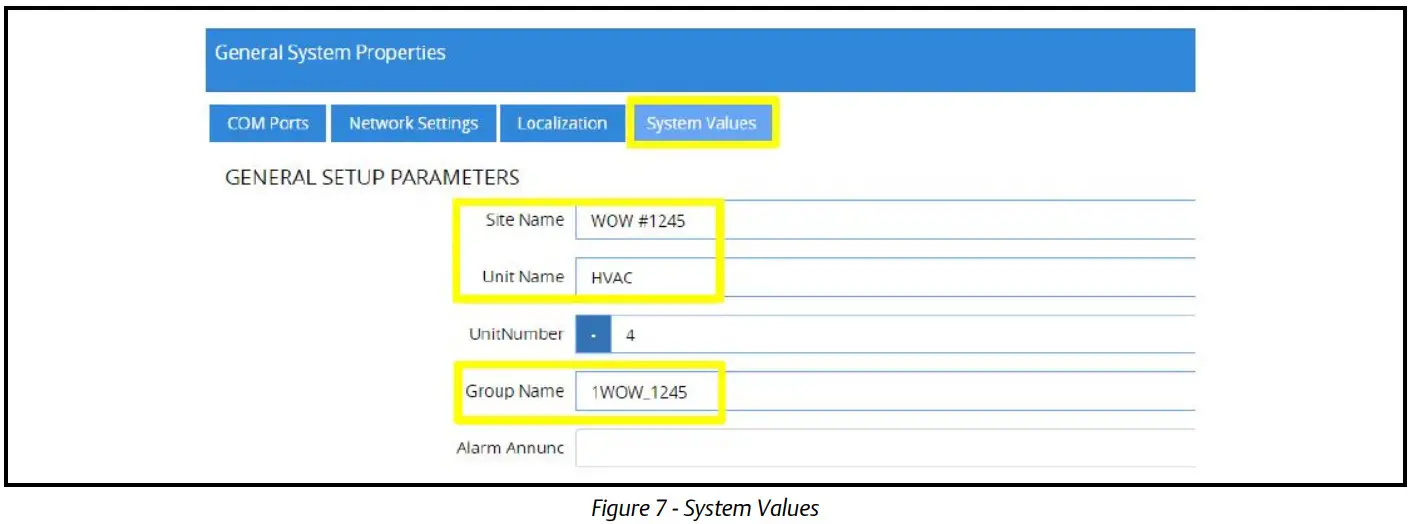
- Click the System Values tab. Configure the Site Name and Unit according to your specifications, then edit the Group Name to match the Group Name on the existing E2 controllers on site.
 To view the Group Name of the existing E2 controllers on site, press from the Home screen.
PressF2four (4) times to go to the Peer Network tab.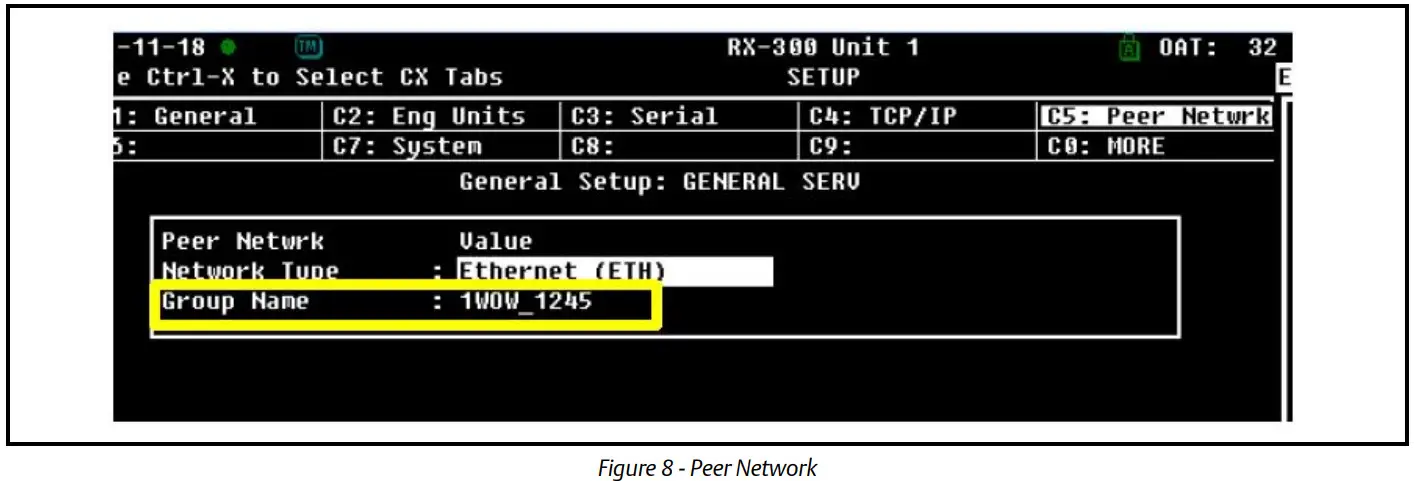
- Save the changes by clicking on the Save button on the upper right corner of the screen.

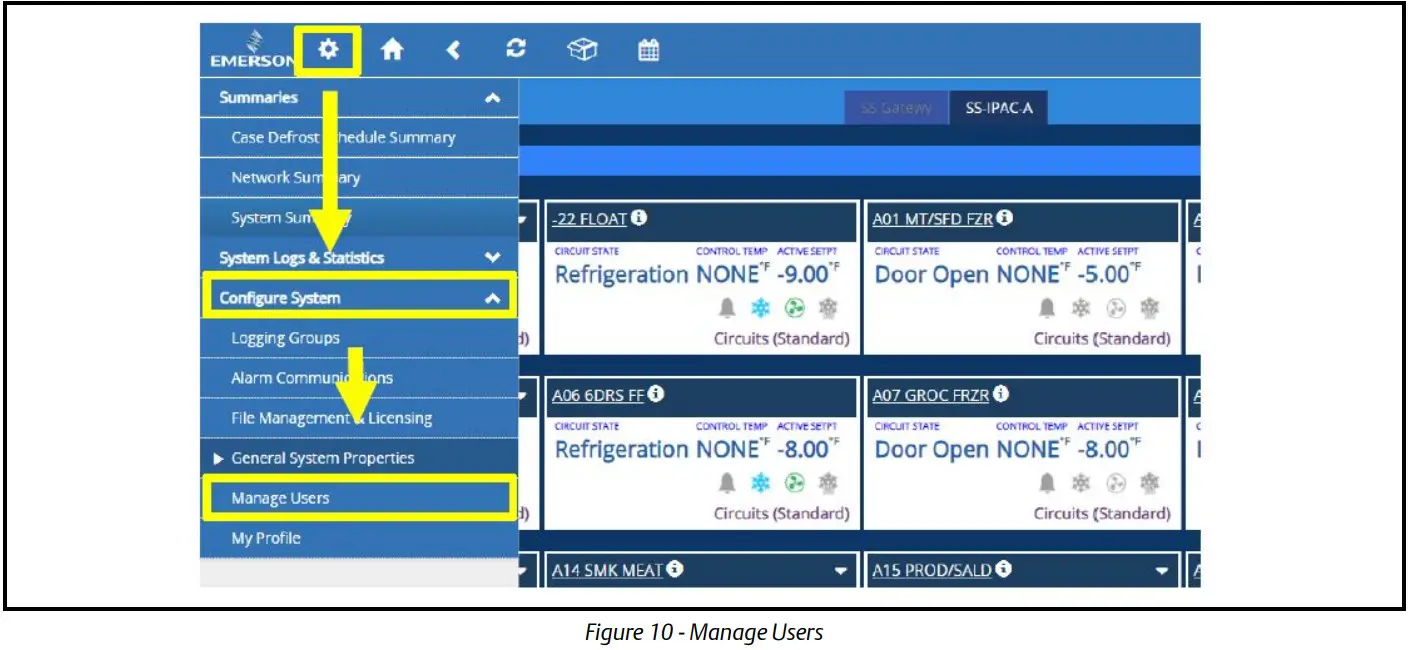
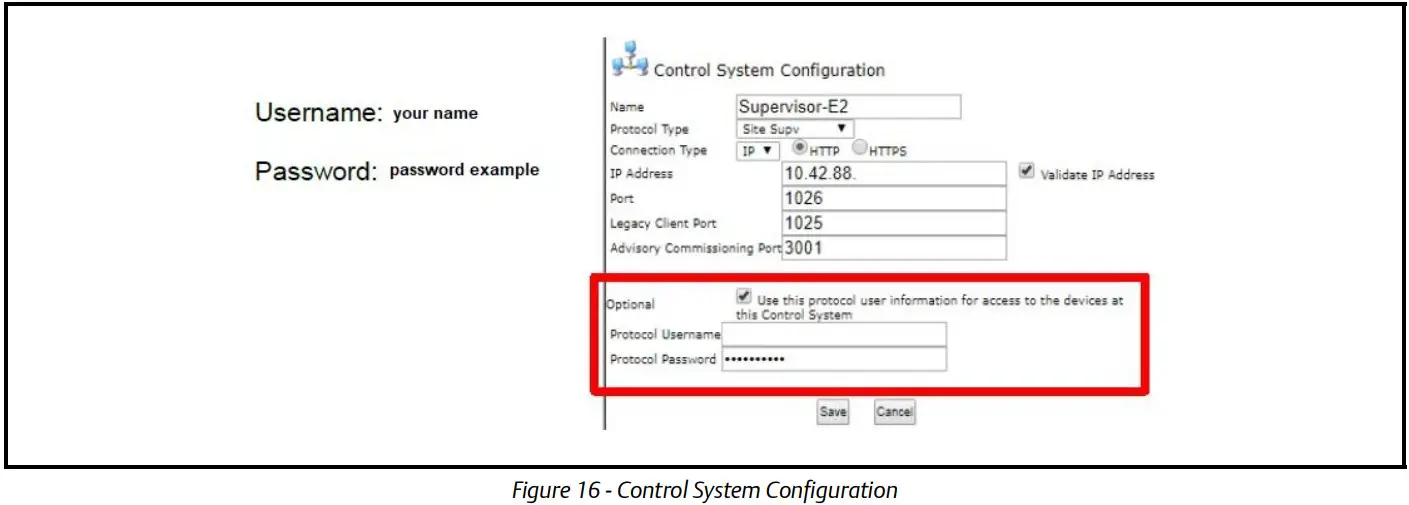
- The user credentials of both Supervisor and E2 must be modified to accommodate the login protocol of Connect +. To create a new user on the Supervisor, click the gear icon (Main Menu) button, Configure System and select Manage Users.
- Click the Create a User button. On the window that will appear, enter the information for your Username and Password. Both username and password are case-sensitive.
Username: username
Actual Name: your name
Password: Example1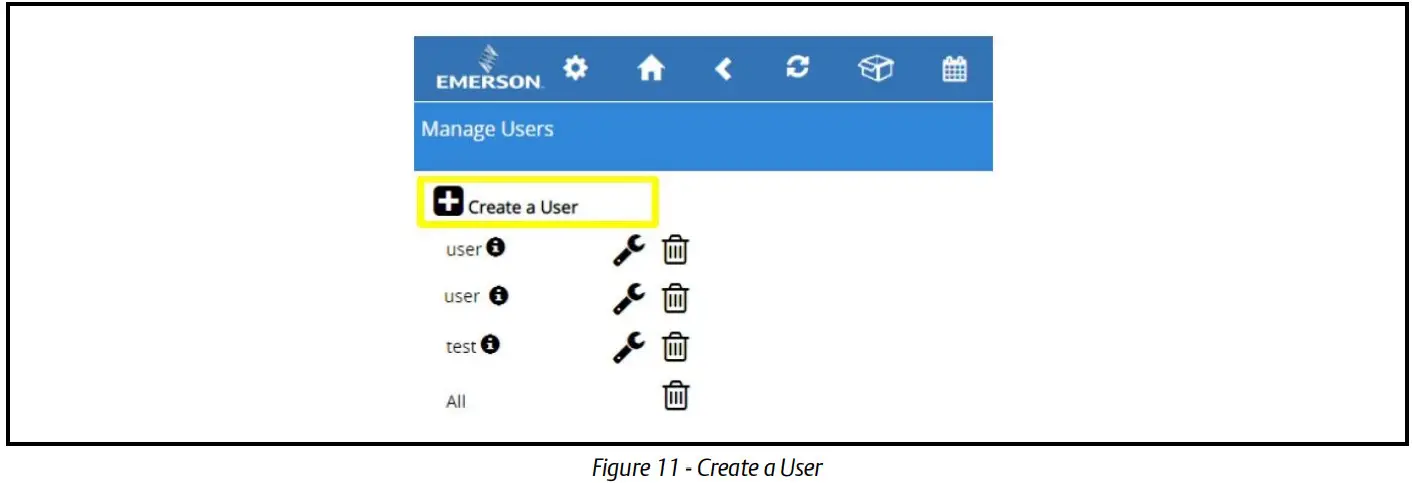 Choose the Technician role for the user account created.
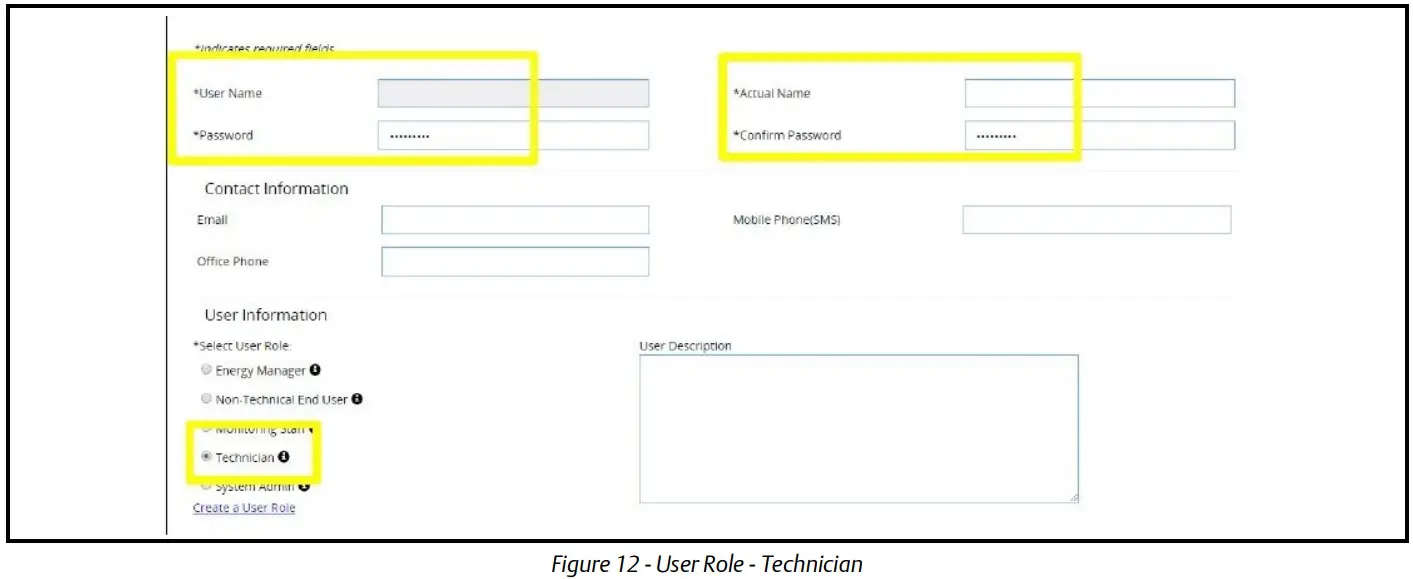
- Click the Save button in the upper right corner of the screen to save the changes.

- On the existing E2 controllers on site, additional user credentials must also be set up. To do this, press from the Home screen. This will take you to the User Access Level screen.
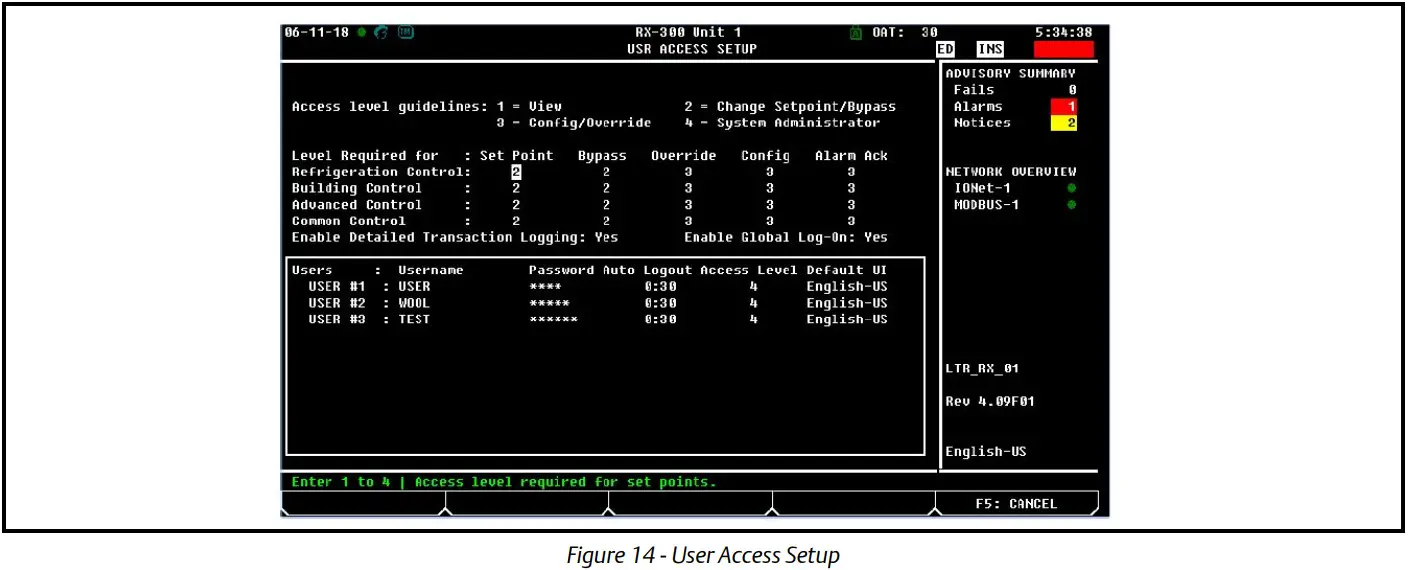
- Press the down arrow button until you are in the User List box. Press
F1to add a new User. Enter the following for the Username and Password then set the Access Level to 4. Press the button to save the settings.
Username: username
Password: Example password
Note: Perform the above steps prior to upgrading the Firmware version of the E2.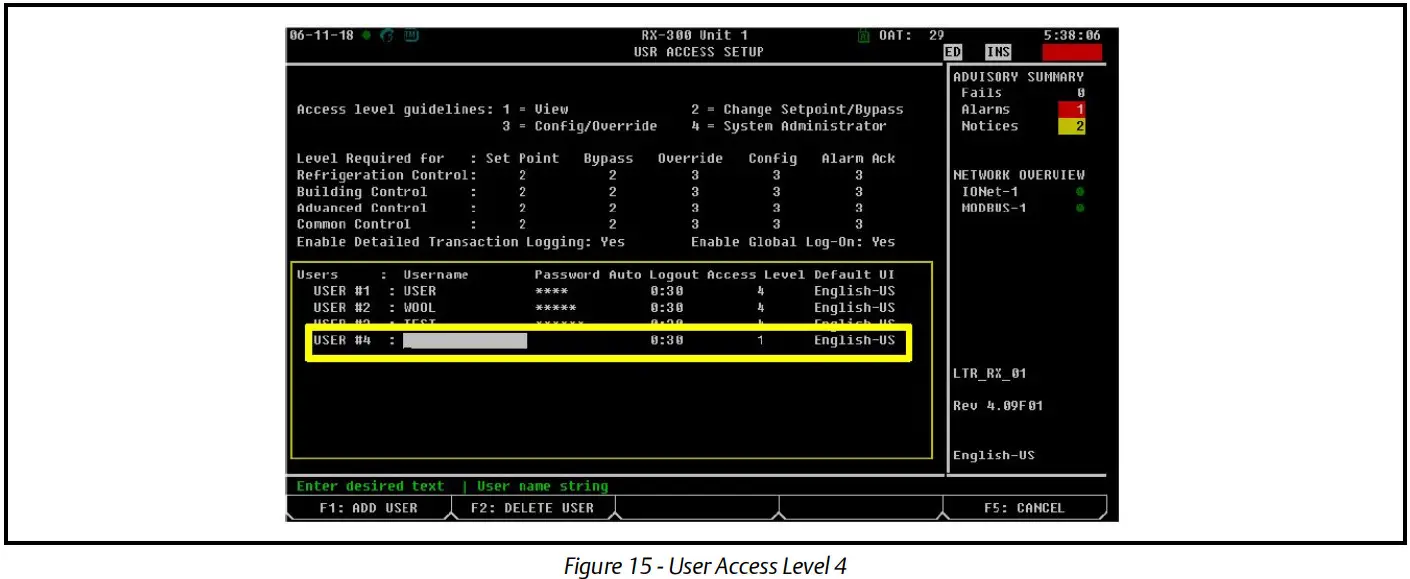
- The login credentials of the control system must be updated with the correct username and password used. Make sure the “use this protocol user information” checkbox is enabled and enter the following username and password.
- Ensure that the E2 controllers on site are running the 4.09F01 or above firmware. If the firmware is below 4.09F01, the controllers on site must be upgraded to the latest firmware. Refer to the User Guide on Basic E2E USB Operations for instructions on how to upgrade the firmware using a USB drive or Contact Emerson Technical Services using the below contact information.
Email: [email protected]
Australia number: 1 800 456 047 (option 1)
United States number: 1 770 425 2724 (option 2)
Document Part # 026-4335 Rev 1
This document may be photocopied for personal use.
Visit our website at www.climate.emerson.com for the latest technical documentation and updates.
Join Emerson Technical Support on Facebook. http://on.fb.me/WUQRnt
For Technical Support call 833-409-7505 or email [email protected]
The contents of this publication are presented for informational purposes only and they are not to be construed as warranties or guarantees, express or implied, regarding the products or services described herein or their use or applicability. Emerson reserves the right to modify the designs or specifications of such products at any time without notice. Responsibility for the proper selection, use, and maintenance of any product remains solely with the purchaser and end-user.©2021 Emerson is a trademark of Emerson Electric Co.


