GOFUTURE F80DVR 10.26 Inch Smart Screen Player
Product Overview
The F80DVR 10.26 uses two wide-angle cameras installed inside and outside the vehicle to capture images of the surrounding area and transmit them to the integrated device in real time. With the help of this system, the driver can see the obstacles and pedestrians around the vehicle intuitively, and effectively reduce the occurrence of scraping, collision, collapse and other accidents. This product can record all driving pictures to avoid accident fraud.
Product Component List
| Name | Graphic | Instructions | Number |
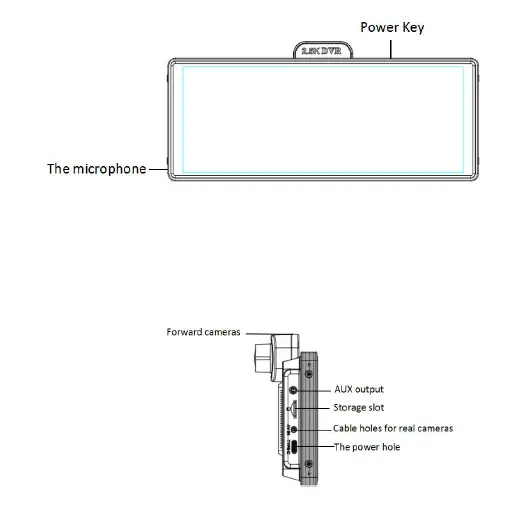
| The host |  | 10.26 -inch FHD display (1600*600) / 2 -channel camera interface/touchcontrol / Bluetooth / Wi-Fi / FM Transmitter / SD card recording /Type C interface power | 1 |
| The power cord | 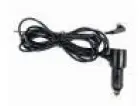 | Type C power cord/ 12V~24V / 3A current / integrated cable / cigar lighter to take power | 1 |
| Pull backcamera | 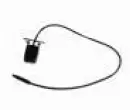 | AHD FHD (1080P)/4PIN BMW head | Optional |
| Pull the headphone extension cord |  | Pull back headphone cable / 6m /2.5mm headphone +4PIN BMW head/double shield/with reverse cable | Optional |
| Monitor base | 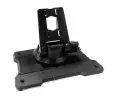 | To support the display and fix it on the center console | 1 |
| Aux audio cable | 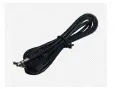 | 3.5mm three links Connect to car audio | Optional |
Product Description
| Project | Function introducti on | Performance indicators |
| System | Language | Simplified Chinese / Traditional Chinese / English / Russian / Spanish / French / Germa / Japanese /Korean/Italia/Português |
| Interface | Graphical menu operation | |
| Mode of operation | Touch | |
| Video input | Video input | 2..5K+1K channels video input |
| Video mode | Default boot recording, no missing seconds | |
| The video format | 2.5K H.264 video, 2 channels of video saved separately | |
| Video display | Real-time display | 10.26-inch HIGH-DEFINITION IPS screen, 1600 x 600 |
| The native playback | Local play, anytime to view | |
| The screen saver | Screen savers can be set to: off / 10 seconds / 30 seconds / 1 minute | |
| Reverse display | Reverse display | Automatically switches to the rear view |
| Astern line adjustment | Adjust the reversing line for various models | |
| Smart + connect | Wi-Fi | Supports Apple CarPlay and Android Auto |
| Bluetooth | Support Bluetooth music playback |
| FM | FM Transmitter support, connected to the car radio | |
| The video store | SD card | CLASS10 U1 : 32GB minimum and 256GB maximum |
| Audio part | The microphone | Support microphone recording, menu can be set to turn off |
| Voice control | Support voice control, menu can be set to turn off | |
| Power part | The power input | The voltage drop line supports 12V~24V wide voltageand has power protection circuits such as surge,overload, overvoltage, undervoltage and short circuit |
| Power consumpti on | Two-way video | Less than 10W (screen display, 2-channel camera recording) |
|
Other | The video time | Video recording duration can be set |
| Channel trigger delay | Reversing signal delay can be set | |
| camera mirroring | The camera supports mirror display, and the menu can be set |
SD Card Spesification
The quality of SD card has a great impact on the stability of video recording. To record video safely, use SD cards from major brands such as SanDisk, Kingston, Toshiba, and Samsung. Speed certification must be at least Class10.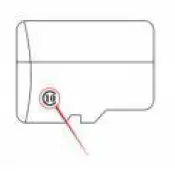
Aux audio cable connection
As shown in the figure, the aux cable connects the DVR with the aux port of the car audio:
Enter the aux line: it can emit the sound of the equipment, receive it with the original car radio, and play it
It enjoys the level of the original car through the horn of the original car. When you connect the aux cable, the display will no longer make any sound.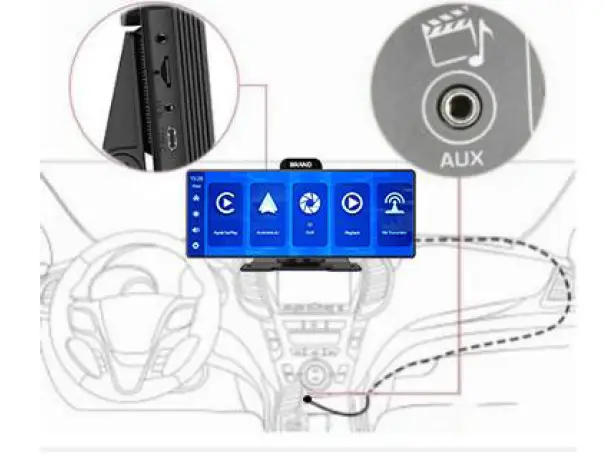
Wiring Connection
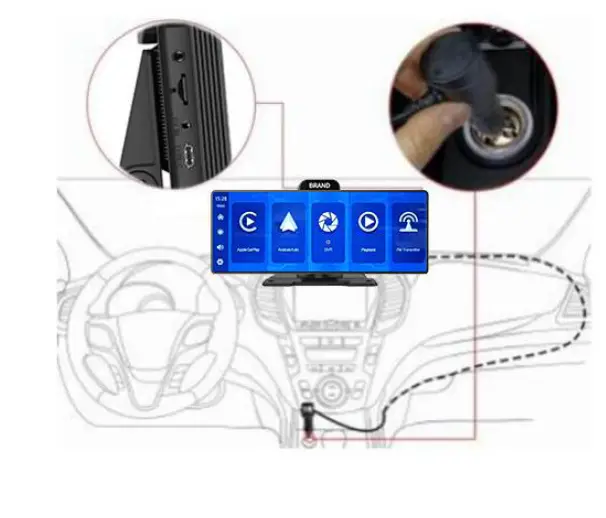
The details are as follows:
| Port | Instructions |
| Type C interface | Monitor power supply interface |
| Cigarette charger | The cigarette lighter takes power directly Note: The product comes with a cigarette charger asstandard. If you do not use our original charger, youneed to buy a compliant high-quality cigarette charger,otherwise it is easy to damage the machine or cause other injuries due to insufficient voltage and heat.and FMTransmitter function cannot work normally. |
Camera Installtion
Locate the drilling hole, find the appropriate installation position in the license plate attachment, mark it with a pen and then drill the appropriate size of the screw hole. Fix the camera to the rear of the car with screws, the reversing trigger wire (red thin wire) needs to be connected to the positive pole of the reversing light, and finally use the camera extension cable to connect to the monitor. (This is not necessary if you choose the version without the reversing camera.)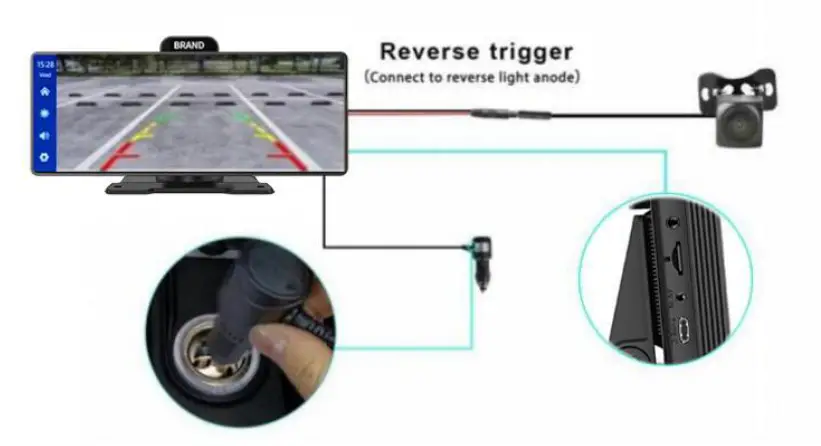
Time and Date: Displays the current time and date
Home button:Click to return to home page
Brightness button: Click to adjust screen brightness Volume buttonClick to adjust the volume
Settings button: Click to jump to the settings interface
(DVR)  (Mobile Internet)
 (Return)
Apple CarPlay: Special connector for iPhone
Android Auto: Special connector for Android mobile phone
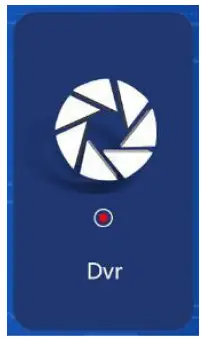
Dvr: Click to enter the video recording interface
Playback:Tap to view a video on the video screen
FM Transmitter: When turned on, the device will transmitter the sound to the original vehicle
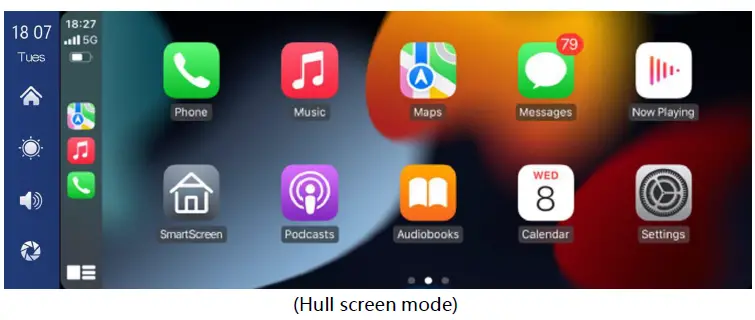
Apple Car Play

As shown in the figure, click the [Apple CarPlay] button to enter the Apple CarPlay. Turn on the Wi-Fi and Bluetooth of the mobile phone first, then as shown in the figure below, select the [Apple CarPlay] option, click the [BT Manage] option of the interface, connect Bluetooth with the phone, you can open the application. When the machine is powered on, it will try to automatically connect to the last connected phone.
(Turn off your phone’s Wi-Fi to disconnect, Apple CarPlay option only supports iPhone phones, Android phone please select [Android auto] option)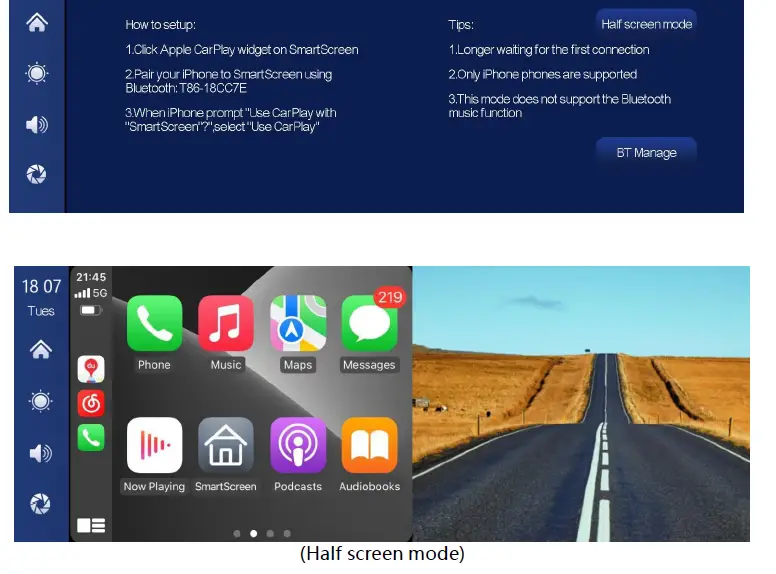
Note: In the drop-down menu of the mobile phone, you need to click to turn off Bluetooth first, and then click the Turn off WiFi button to disconnect. Just turn off the WiFi button alone, and the car will keep trying to reconnect.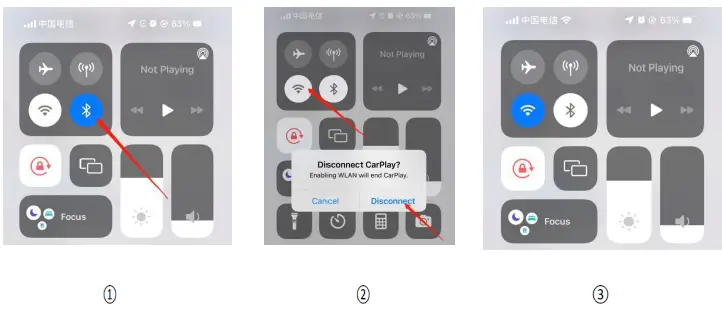
Android AUTO

As shown in the figure, click the [Android Auto] button to enter the Android auto. Turn on the Wi-Fi and Bluetooth of the mobile phone first, then as shown in the figure below, select the [Android auto] option, click the [BT Manage] option of the interface, connect Bluetooth with the phone, you can open the application. When the machine is powered on, it will try to automatically connect to the last connected phone.
(Turn off your phone’s Wi-Fi to disconnect)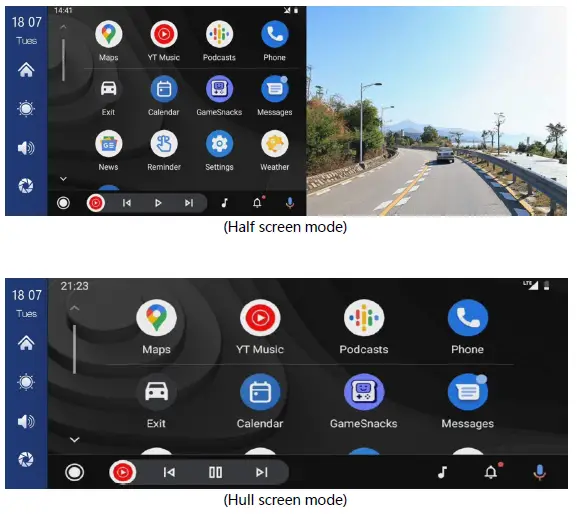
BLUETHOOTH MUSIC

You can find Bluetooth Music by clicking the button Apple CarPlay or Android Auto. Turn on Bluetooth of the mobile phone first, and select [Bluetooth Music] option. Click the [BT Manage] option on the interface to connect Bluetooth to the mobile phone and start playing music.

The buttons correspond to Last, Play / Pause and Next, respectively.
Click on the Lyrics button ![]() to display the lyrics.
to display the lyrics.
Click the ![]() button to enter the Dvr screen.
button to enter the Dvr screen.
(Some mobile music player apps do not support displaying lyrics)
DVR
As shown in the picture above, the main page will not display the camera image, you need to click the Dvr button to view the camera image. When a card is inserted, the system automatically enters the video mode, and when recorded, the small red dots in the [Driving Monitoring] button will flash.
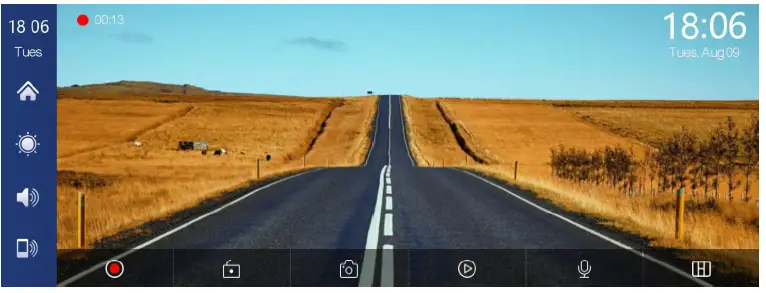
 | Start recording and click Close recording again. |
 | Lock the video for a few minutes and the data will not be deleted. |
 | Click to take a photo with one click. |
| View playback video. | |
| Turn recording sound on or off. | |
| Click to switch the camera distribution screen. |
BLUETHOOTH
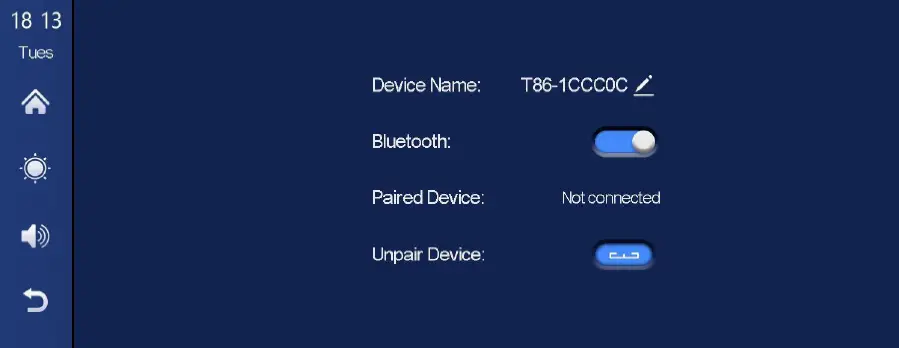
As shown in the figure above, click the Bluetooth button ![]() to switch on the device after entering the Bluetooth interface.
to switch on the device after entering the Bluetooth interface.
The page will display the device name, such as: T86-1BCC9D, and click the
Modify button  to modify the Bluetooth name of the device.
Select the device name with Bluetooth, and the remote device name of the phone will appear after successfully connecting.
At this time, you can play mobile phone music and other functions.
After connecting to Bluetooth, you can use the call function:
Click the Disconnect button ![]() to actively disconnect the Bluetooth.
to actively disconnect the Bluetooth.
Click the back button[ ] to return to the previous page.
PLAYBACK

As shown above, click the [Playback] button to enter the video playback interface.
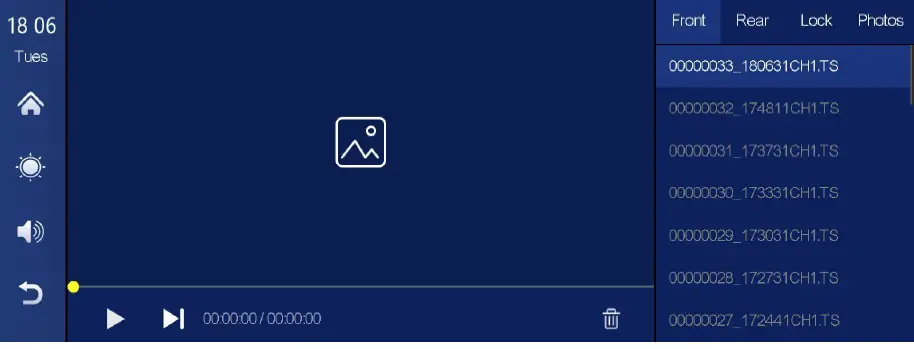 You can click any to play back the video and play the video on the right.
 [Front] cyclic video shot by the front camera.[Rear] a circular video shot by the rear camera.[Lock] Click the video saved after locking.
[Photos] Click to view the pictures taken by the one-click photo function. Click the [Delete] button to delete the material.
SETTING
As shown in the figure click the button in the lower left corner to enter the setting interface.
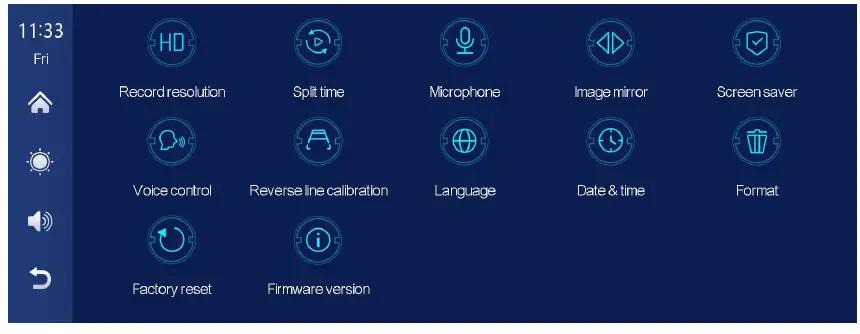
 | Click to enter the [Record resolution] settings: Resolution selection: 2.5K+1080P / 1080P+1080P/720P+720P |
|
| Click [Split time] to enter the setting of the video segmentation time: Video segmentation time is optional: 1 minutes / 3 minutes / 5 minutes. The system defaults to 3 minutes. |
|
| Click [Microphone] to enter the settings: You can choose to close or open. |
|
| Click [Image mirror] to enter the settings: You can choose to close or open. This option makes it easier for customers to install the camera flexibly. |
|
| Click [Screen saver] to enter the settings: Screen saver can be set to: off / 10 seconds / 30 seconds / 1 minute Set 1 or 5 minutes, the system will run without corresponding time, and the screen will automatically turn off. After entering the screen saver, press the power button again to light up the screen. |

| Click [Voice Control] to enter the settings: Voice control commands are: show front camera / Show rear camera / Turn on display / Turn off display / Show all cameras 5 language control commands, after opening the option, in the video interface, say the corresponding command entry, the system will perform the corresponding operation. |
 | See the instructions below. |

| Click [Screen saver] to enter the settings: Screen savers can be set to: off / 1 min / 5min When set for 1 or 5 minutes, the system operates for no corresponding time, and the screen will automatically extinguish. After entering the screensaver, then pressthepower power button to light up the screen. |
 | See the instructions below. |
 | Click [Language] to enter the settings: |
 | Click [Storage Information] to enter the menu:You can view the information of the SD card. The former item indicates the remaining available capacity, and the former item indicates the total capacity. |
 | Click on [Date & Time] to enter the settings: |
 | Click [Format] to enter the settings: |

| Click [Factory reset] to enter the Settings: Restore the factory settings, and you restore all the settings to the initial state. |
 | Click on [Firmware version] to enter the menu: This option is available in the current basic version for easy confirmation. |


VOICE CONTROLL
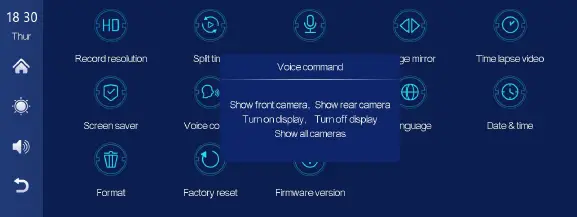
There is no need to touch the screen by hand, and the corresponding operation canbe realized only by voice command.
Opening method: setting – voice control – clicking anywhere – opening voice control- speaking command language can realize corresponding operations.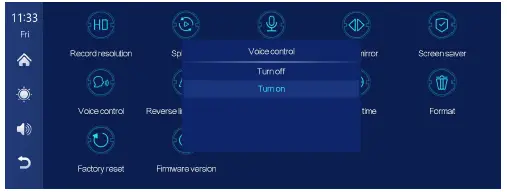
The following commands are supported: Show front camera / Show rearcamera / Turn on display / Turn off display / Show all cameras
REVERSE LINE CALLIBRATION
Click [Reverse Line Calibration] to enter the settings: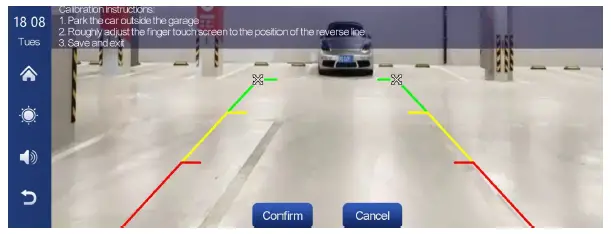
Park the car in the middle of the parking space, manually drag [ ], adjust the position of the reversing auxiliary line up, down, left and right, so that the reversing auxiliary line and the parking line are level with the ground.
After adjusting the reversing line, click [confirm] to confirm.
usting the reversing line, click [confirm] to confirm.
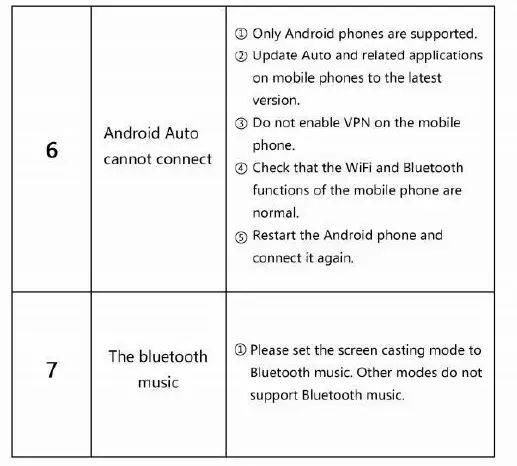
Troubleshooting
Reminder: Please ensure that there is no obstruction between the mobile phone and the device, and the Wi-Fi / Bluetooth signal communication is smooth, otherwise the product functions cannot be used smoothly.
| Item | Problem | Solution |
|
Unable to start F80 supports 12V- 24V car use, high voltage cannot be used) |
① Check whether the DC head of the cigarette lighter power cord is damaged or aging.
② Check whether the fuse of the power plug is disconnected or burned. | |
|
2 |
No touch phenomen on |
① Touch is invalid during power- on, wait for normal power-on before operation.
② Check whether the touch is damaged, do not touch the screen with sharp objects, it is easy to scratch and damage. |
|
3 |
The rear viewcamera has no image |
①Buy the manufacturers matching rear-view camera before it can be used. ② Whether the AVI N interface is inserted to the bottom. ③ Check if the camera format matches |
|
4 |
Machine heat, Jam phenomenon |
① Avoid direct sunlight or exposure to sunlight during use. The normal operating temperature of F80DVR is -20 ~70 ℃. After disconnecting the power supply, the temperature of T86will be lower than70 ℃ and work normally. |
| 5 | Carplay cannot connect | ① The first connection takes a little longer. ②Only iPhone supports Carplay. ③ Check that the WiFi and Bluetooth functions of the mobile phone are normal. ④ Enter Settings – General -Carplay vehicle, delete all records and reconnect. ⑤ Restart the iPhone and reconnect it. |
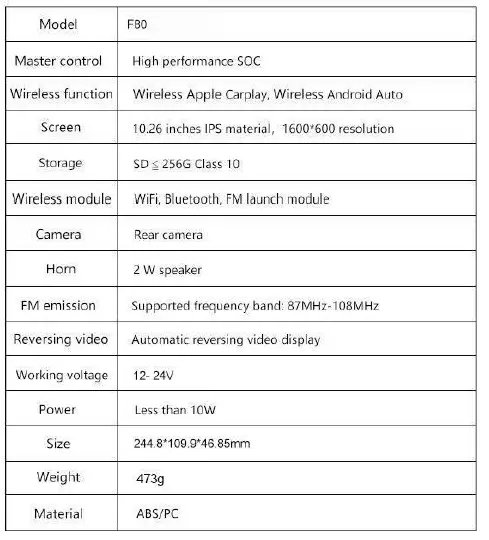
PRODUCT PARAMETERS
FCC
This device complies with part 15 of the FCC Rules. Operation is subject to the following have conditions:
- This device may not cause harmful inte1ference, and
- This device must accept any inte1ference received, including interference that may cause undesired operation.
Any changes or modifications not expressly approved by the pa1ty responsible for compliance could void the user’s authority to operate the equipment.
NOTE: This equipment has been tested and to comply with the limits for a Class B digital device, pursuant to Part 15 of the FCC Rules. These limits are designed to provide reasonable protection against harmful inte1ference in a residential installation. This equipment generates, uses and can radiate radio frequency energy and, if not installed and used in accordance with the instructions, may cause harmful inte1ference to radio communications.
However, there is no guarantee that interference will not occur in a particular installation. If this equipment does cause handful inte1ference to radio or television reception, which can be detennined by taming the equipment off and on, the user is encouraged to fly to connect the inte1ference by one or more of the following measures:
- Reorient or relocate the receiving anemias.
- lncrease the separation behaved the equipment and receiver.
- Correct the equipment into an outlet on a circuit different from that to which the receiver is co1111ected.
- Consult the dealer or an experienced radio/TV technician for help.
This equipment complies with FCC radiation exposure limit set forth for an uncontrolled environment. This equipment should be installed and operated with minimum distance 20cm between the radiator and your body.


