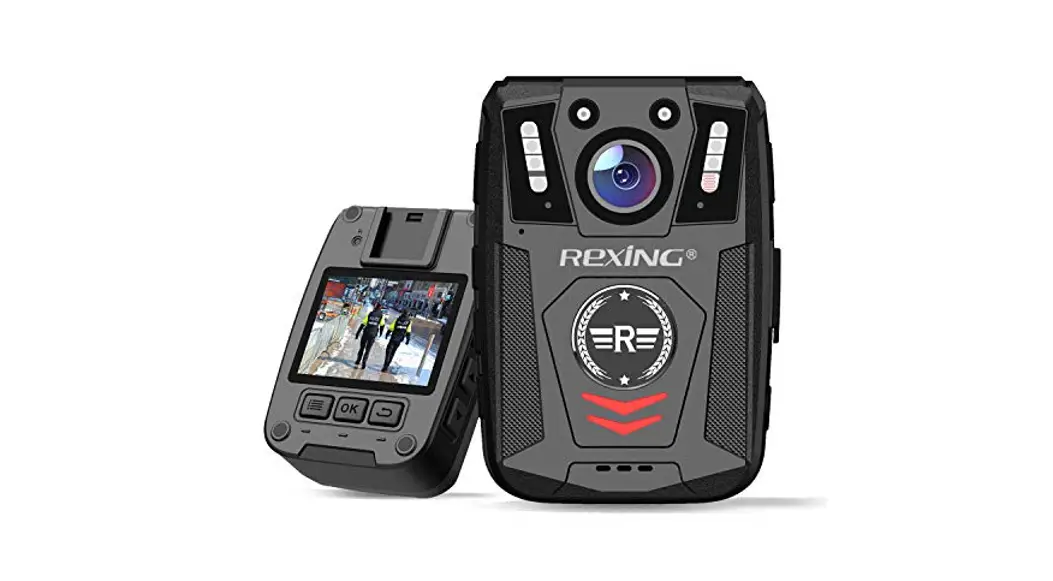
![]() ONCALL V2D
ONCALL V2D
BODY CAMERA
USER MANUAL
About this Guide
The content in this document is for information purposes and is subject to change without prior notice. We have made every effort to ensure that this User Guide is accurate and complete. However, no liability is assumed for any errors or omissions that may have occurred.
The manufacturer reserves the right to change the technical specification and accessories without prior notice.
Caution
Do not expose the battery to being placed in high temperature environment. If the battery leaks or bulges, stop using. Risk of explosion if the battery is placed by an incorrect type.
Dispose of used batteries according to the instructions.
Never replace the battery on your own. Doing so may cause damage or an explosion. Please have the dealer do it for you.
Do not put the LCD displayer or lens under the sunshine.
Note
A specific emission frequency may influence the image quality.
Please try a few times of video-taking test before you formally use this product in order to be familiar with this product. Always full charge the battery before use.
Never dismantle, crush, or pierce the product, or allow the product to short-circuit.
Please persuade for professional assistance if the product doesn’t work properly.
Before you start using this product, it is assumed that you agree to the above statement.
This camera is new generation video recorder of High
Efficiency video coding (HEVC, H.265) and low power consumption. If you record videos by using H.265 coding format, it is suggested to download Media Player Codec
Pack (check below link) to assist to play back H.265 videos on Windows Media Player.
https://www.mediaplayercodecpack.com/
Introduction
Thank you for purchasing this product. This camera is specially designed for video recording, audio recording and photo shooting. Please read the user manual before you start to use it.
Box contents
- Body Camera
- Charging Dock
- Spare battery
- USB Cable
- Wall Charger
- Standard Clip
- Large Clip
Product Overview
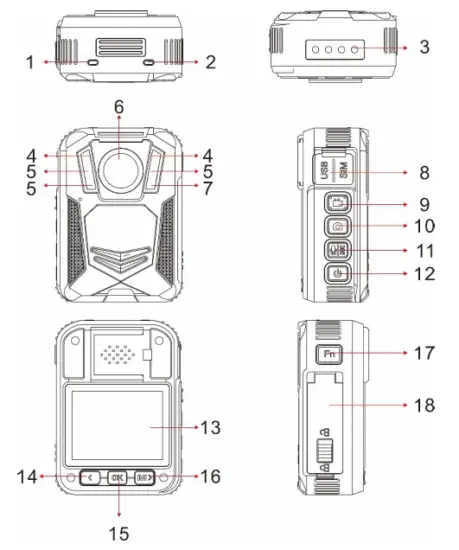
| Item | Description |
| 1. Status Indicator LED | Still Green: the camera is in standby mode (Power on but not recording) Still Red: camera is on pre-recording mode Flashing Red: camera is recording video Flashing Yellow: camera is recording audio only |
| 2. Charging Indicator LED | Red: Charging Status Green: The camera is fully charged |
| 3. Pogo Pin | Connection port to charging dock |
| 4. White light | Hold OK button to turn on/off the white light |
| 5. Infrared LED | Providing infrared light compensation in low light conditions, to help the camera record good quality video with clear face view up to 10 meters |
| 6. Lens | Capture high-resolution images/videos |
| 7. Light Sensor | Detect changes of light and turn on/off IR for low- light recording automatically |
| 8. USB port / SIM card slot | USB port is for power charging or data transmission; There is SIM card slot if camera has 4G functionality, otherwise there is no SIM card slot. |
| 9. Video Recording Button | a) In power-on mode, short press to start/stop recording b) In power-off mode, hold for 3 seconds to power on camera and execute video recording function. |
| 10.Snapshot Button / infrared light button | a) Press to take photo in standby mode or in video recording mode b) Hold to turn on/off infrared lights. |
| 11.Audio / SOS button | a) Press to start/stop audio recording b) Hold to turn on/off SOS mode (flashing lights) |
| 12. Power Button | a) Hold 3 seconds to power on/off camera b) In power-on mode, short press to turn on/off LCD .c) Short press to exit to previous interface when navigating setting or playing back files |
| 13. LCD Screen | View camera status and playback recorded files |
| 14.Scroll Up Button | a) Hold to switch 720P and 1080P resolution b) In Menu or Playback mode, short press to scroll down next page or file c) In standby or video recording mode, hold to zoom out d) In playback mode, press to rewind video |
| 15. OK Button | a) In menu set-up, short press to make a selection b) In standby mode, press to review file c) In playback mode, press to pause/resume video or audio playback d) hold to turn on/off white lights. |
| 16. Menu & Scroll Down Button | a) In standby mode, short press to enter menu set- up b) In Menu or Playback mode, short press to scroll down next page or file c) In standby or video recording mode, hold to zoom in d) In playback mode, press to fast forward video |
| 17. Fn button | a) Press to mark video/audio as importance when on video/audio recording. b) press to switch between video, photo and audio when playing back files. |
| 15. Battery door | Open it to change battery |
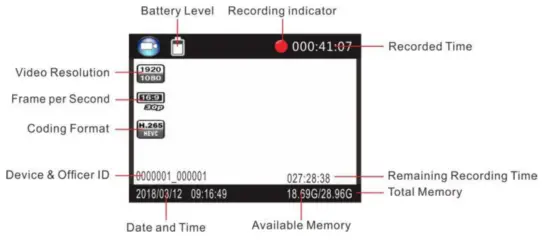
LCD Interface:
To enter the setting menu:
- Press the Menu button
Mand then enter the password. - Enter the password by the following commands:
⚫ Press the Scroll Up button to change the character to the previous letter or number.
⚫ Press the Menu button to change the character to the next letter or number.
⚫ Press the OK button to confirm and move to the next character
PS: The default password is 000000. - After selecting the last character, press the OK button to enter the setting menu.
To navigate the settings menu:
➢ Press the Scroll Down button to select the next setting or option.
➢ Press the Scroll Up button to select the previous setting or option.
➢ Press the OK button to move to confirm your selection or enter the submenu.
➢ Press the Power button to return to the previous menu.
Following is a list of the available settings and options.
| Setting | Description | Options |
| Video Resolution | The video resolution | 2560×1440 30P 2304×1296 30P 1920×1080 30P 1280×720 30P 848×480 30P |
| Coding format | The coding format of video files | H.264, H.265 |
| Quality | The quality of the video. | S. Fine, Fine, Normal |
|
Pre-record | When on, a certain time (depend on video resolution) will be combined into the recorded video before record button is pressed to start recording; When off, video start until the Record button is pressed to start recording. | Off, On |
| Post Record | The amount of the time the camera waits to stop recording video after you press the Record button. | Off, 5 sec, 1 minute, 10 minutes, 20 minutes, 35 minutes |
| Dewrap | When on, video distortion correction will be corrected, with more power consumption. | Off, On |
| Auto Record | When on, camera will start video recording once it is powered on. | Off, On |
| Loop Recording | When on, the camera will overwrite the oldest video file with the most current video file once its memory is full. This setting can be selected only when car DVR mode is on. | Off, On |
| Split Time | While recording video, the camera will automatically split its recording into files of this length. | 1 min, 3min, 5 min, 10 min, 15 min, 20 min, 30 min, 45min |
| Coding format | The coding format of video files | H.264, H.265 |
| Quality | The quality of the video. | S. Fine, Fine, Normal |
| Pre-record | When on, a certain time (depend on video resolution) will be combined into the recorded video before record button is pressed to start recording; When off, video start until the Record button is pressed to start recording. | Off, On |
| Post Record | The amount of the time the camera waits to stop recording video after you press the Record button. | Off, 5 sec, 1 minute, 10 minutes, 20 minutes, 35 minutes |
| Dewrap | When on, video distortion correction will be corrected, with more power consumption. | Off, On |
| Auto Record | When on, camera will start video recording once it is powered on. | Off, On |
| Loop Recording | When on, camera will overwrite the oldest video file with the most current video file once its memory is full. This setting can be selected only when car DVR mode is on. | Off, On |
| Split Time | While recording video, the camera will automatically split its recording into files of this length. | 1 min, 3min, 5 min, 10 min, 15 min, 20 min, 30 min, 45min |
| Photo resolution | The photo resolution | 40M (8448×4752 16:9) 30M (7304×4104 16:9) 25M (6664×3752 16:9) 20M (5984×3366 16:9) 12M (4608×2592 16:9) 5M (3008×1688 16:9) |
| Burst | The number of images captured in a row when you take a photo. | Off, 2, 3, 5, 7, 10, 15, 20, 30 |
| Self Timer | The time camera waits until taking a photo after you press Snapshot button. | Off, 5 sec, 10 sec, 20 sec, 30 sec, 1 min |
| Slides Show | When on, viewing photo file will start a slideshow where each photo will be shown for around 5 seconds. | Off, On |
| Infrared | When set to manual, you will need to hold Snapshot button to turn IR LEDs on/off. When set to Auto, these lights will activate automatically based on the light sensor’s reading. | Manual, Auto |
| Motion Detect | When on, camera will start recording when front movement is detected by the lens. | Off, On |
| Record Warning | When on, you will hear a voice confirmation when you start recording. When off, voice confirmation is disabled. | Off, On |
| Global Positioning | When GPS is on, position of video will be recorded and can be reviewed by GPS player. | Off, On |
| WiFi | WiFi mode | ON(STA); ON(AP); OFF |
| Time Zone | Adopt local time in real time zone | -12 to +12 Default 0 |
| Language | The language of the text in camera interface | English, , French, Portuguese |
| Screen Saver | The amount of the time the camera can be idle before deactivating the display to conserve power. | Off, 30 sec, 1 min, 3 min, 5 min |
| LCD Brightness | Screen lighting to view | High, Low |
| LED Light | When on, indicator LED will tell the status of the camera; When off, camera is entering covert mode | On, Off |
| Key Tone | When on, camera will play a tone each time you press a button. When off, tone is disabled. | On, Off |
| Motor | Switch of vibration indication | On, Off |
| Volume | The volume of camera speaker. This affects the loudness of video playback, audio playback, the key tone, record warning, and any other sounds played by camera. This doesn’t affect the volume of the recorded video or audio files themselves. |
0-12 Default 12 |
| Time Setup | Adjust time to real location | yyyy/mm/ddhh/mm |
| ID setting | User can set Device SN and Person SN | Alphanumeric characters |
| Password | If password is on, user needs to enter password to get access to setting and connection to PC | On, Off |
| Change Password | Password can be set or changed | Alphanumeric characters |
| Default setting | Use this to return camera to its original settings. This does not erase the memory | O (Yes), X (No) |
| FW Name | Firmware version |
Operation
5.1 Power on/off
hold Power button ![]() for 3 seconds to start up and enter standby mode; at any mode withholding the Power button
for 3 seconds to start up and enter standby mode; at any mode withholding the Power button ![]() for 3 seconds, the camera will shut down.
for 3 seconds, the camera will shut down.
PS: at standby/video recording / audio recording mode, short press the power button,![]() the screen saver can be on/off.
the screen saver can be on/off.
5.2 Audio recording
In standby mode, press the audio Recording Button ![]() for audio recording.
for audio recording.
The camera will beep, and vibrate once, and the LED indicator on the top turns yellow and flashes. Press again audio Recording Button ![]() to stop audio recording
to stop audio recording
(camera vibrates twice) and save the file.
In audio recording mode, short press Fn button to remark the file as an important file, the yellow star icon will appear at the right side of the screen.
5.3 Photo shooting
In standby mode, press the photo button![]() to take photos.
to take photos.
5.4 Video recording
In standby mode, press the video Recording Button![]() to start video recording.
to start video recording.
The camera will beep, and vibrate once, and the LED indicator on the top turns red and flashes. Press again video Recording Button![]() to stop the video recording
to stop the video recording
(camera vibrates twice) and save the file.
In video recording mode, short press Fn button to remark the file as an important file, the yellow star icon will appear at the right side on the screen.
5.5 One-button video recording
At power-off mode, hold video Recording Button![]() for three seconds for
for three seconds for
powering on the camera and start video recording immediately.
5.6 PIV (picture in video)
In video recording mode, press the photo button![]() to capture photo.
to capture photo.
5.7 Zoom
In standby or video recording mode, hold Scroll Up button and scroll down button to zoom in and out the image.
5.8 IR night vision
Under dark circumstances, infrared LED will help to record clear images or video.
In standby mode, PRESS Menu button Mto navigate. Find option
【Infrared】, PRESS OK buttonOK to enter the sub-menu: Manual & Auto, press the OK button to select.
1) Auto infrared mode:
In low light situations (1 Lux), 2 IR LEDs will be turned on automatically, the camera switches on the infrared filter lens, video image turn black and white.
Otherwise, when circumstance brightness grew up, IR LED turns off, and the image becomes colorful again.
2)Manual infrared mode:
When night vision is needed, hold the snapshot button to switch to Infrared mode, IR LEDs will be turned on, black and white image. Hold this button again to turn off IR LEDs, the image becomes colorful.
5.9 White LED
In standby or video recording mode, hold OK button to turn on/off white LED.
5.10 Playback
In standby mode, press the OK button to enter playback mode. There are Video, Photo, and Audio options. Press Fn button to select, and press OK button to confirm the selection.
- In video file playback mode, PRESS
OKbutton to pause/resume
playback; PRESS the scroll-Up button to rewind, PRESS the Scroll-down button to fast forward, then PRESS theOKbutton to play normally. You can fast forward or rewind 2x, 4x, 8x, 16x, 32x, 64x. - In photo file playback mode, hold the scroll-Up button and Scroll-down button to zoom in and out the image. Adjustable is X1.0~X10.0. In the zoom in and out the image, short press the scroll-Up button and Scroll-down button to move the image to the right or left side.
5.11 Reset
In any case, the camera is frozen, use a pin to reset and restart the camera.
The reset button is inside the USB port. Password remains the same.
5.12 Device ID/ User ID
In standby mode, PRESS the Menu button M to enter settings. Find [ID setting],
PRESS OK button OK to select, then the Device & Person SN interface will show up, 5 characters for device ID and 6 characters for person ID.
PRESS the scroll-Up button or Scroll-down button to choose a character, then PRESS the OK buttonOK to select.
5.14 USB Drive video/picture/audio files
After being connected to PC, the password interface shows up on the camera LCD, please enter the password(default password is 000000)Press the (ok) button 6 times, the camera will be recognized by the computer as a USB drive. User can go to the camera folder DCIM and can access or delete video files.
5.15 Charging
When camera batter is low, the battery icon will flash in the display, and you will hear a alert tone. When this happens, charge the camera. While the camera is charging, the indicator light turns red and will turn green after the camera is fully charged. It will take approximately 4 hours to fully charge the camera.
Charging methods:
- Use a USB cable to connect the camera’s USB port to a USB port on your
computer (powered on) or USB power adapter (connect to a power outlet) - Attach the camera to the charging dock. Use a USB cable to connect the charging dock to a USB port on your computer (powered on) or USB power adapter (connect to a power outlet). Charging dock will show red LED to indicate power is on. The camera charging indicator LED will turn green when charged. When charging spare battery, the second docking bay light will turn green from blue when charged.
5.16 WiFi App
App allows access to limited video and system settings, video files and live view through phone.
- Install the Eyescam Pro app to your phone for free from the Play Store or App Stor

- Using the camera menu toggle to WiFi and turn on, click twice to ON(AP). On the LCD screen, the wi-fi signal icon will turn green.
- Open the phone to Wi-Fi settings and connect to H22_WIFI_AP (wi-fi name). Password: 12345678
- Open the Eyescam Pro app on your phone and click Connecting Device.

*If you forget or need to change the wi-fi name or password for the body camera, connect the camera to the pc. Click MISC file and then wifi.conf. The bottom section labeled SoftAP configuration contains wifi
name (AP SSID=) and password (AP_PASSWORD). It can be changed here but keep spacing the same when replacing.
**Under 5-minute video files can be downloaded through a phone app. With the camera connected to the open app, click on Recorder File for list of video files. Click on the Edit icon in upper right of screen. Select picture or video to download. A blue dot will appear on the thumbnail.Click the word Download on the bottom left of screen. A green checkmark will appear on the files that have been downloaded. Use same procedure to delete files but press red Delete in the bottom right of screen.
***Use Reset Camera Setting if performance issues with camera. Password will default to 000000. This is the only way to access the camera if the password is forgotten. Leave wifi setting on to avoid being locked out of camera.
****WARNING: Formatting Camera Storage will delete all video files on memory card. Save files if needed before formatting.
5.17 GPS
- In-camera menu toggle to GPS and turn ON. Wait for the camera to connect to GPS before recording. The GPS icon will turn green when connected. If in a building, the camera may not connect, move outdoors for connection. Record video.
- Download and install from included CD the GPS Player 3.1.0.1 on pc. Connect the camera to PC and open the GPS player.
- On video, playback toolbar click the File Icon (next to the FFwd icon) and find and click on video file to play. Click Open and the video will start playing. Can also Click File on top toolbar and then click on Setting. Browse to find the video file location and highlight file. Click OK. Click Open on the toolbar and click the video file displayed to play.
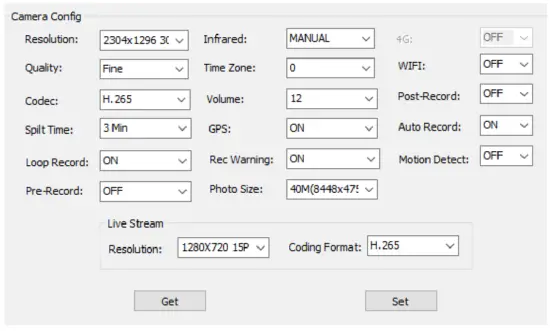
Camera setting through CAM MANAGER
Camera settings can be changed within the LCD screen menu or by docking the camera to a PC by using the software CAM MANAGER.
- Insert CD and copy the Cam Manager folder to PC.
- Plug docking station into PC with USB cable and dock camera.
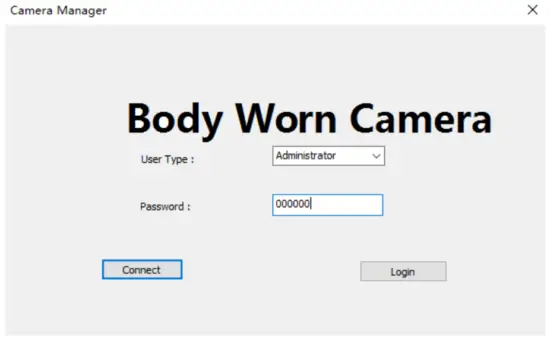
- Open Cam Manager folder that was copied to PC or from CD and select Camera Manager to open window.

- Enter a password (000000 default password), press Connect, box will show Connected, then press Login. Click OK on Success window for Settings window to open. Note, password must be turned on for Cam Manager to work.

- Click “Get” to show current camera settings. Choose a setting to adjust from the drop-down box and select desired to set. Click “Set” to save the setting. Device ID and Password can also be changed here too.
Optional H22 External Camera
Plug the camera into the USB port. The camera must have Wifi function turned off.
Turn on the camera. Use record buttons on the external camera to start and stop recording. While recording press the front audio button to mute and unmute audio.


