
![]()
TEXECOM Alarm Pro Smart Security Communicator
Installation Guide
STEP 1
Locate your alarm panel
Note that the alarm panel is not the keypad. Alarm panels are typically installed in a hidden location in the home such as a cupboard or basement. 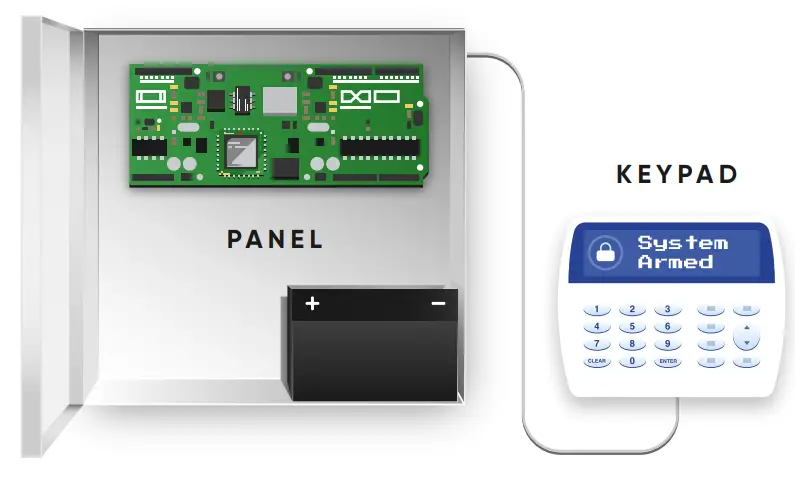
STEP 2
unbox your Alarm PRO
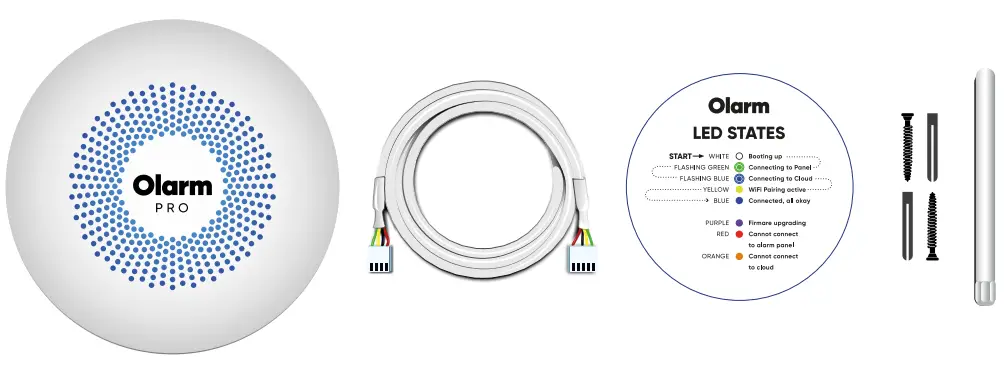
The Alarm PRO box includes the following:
- lx Alarm PRO device
- lx Connector cable
- lx Drill hole template and LED color legend
- 2x Screws and wall plugs
- lx External antenna (selected Alarm PRO models only)
STEP 3
Download the Alarm mobile app and register your device
http://www.olarm.co.za/start
Scan QR code, or navigate to your App Store on your device and search for “Alarm”.
STEP 4 – Connect your Olarm PRO device to your alarm panel
The Olarm PRO device currently supports a wide range of alarm panels including models from Paradox, Texecom, IDS & DSC. Different alarm system brands & models require varying ways that the Olarm PRO needs to be connected to them. See the reverse side of this page for how to connect each alarm brand. 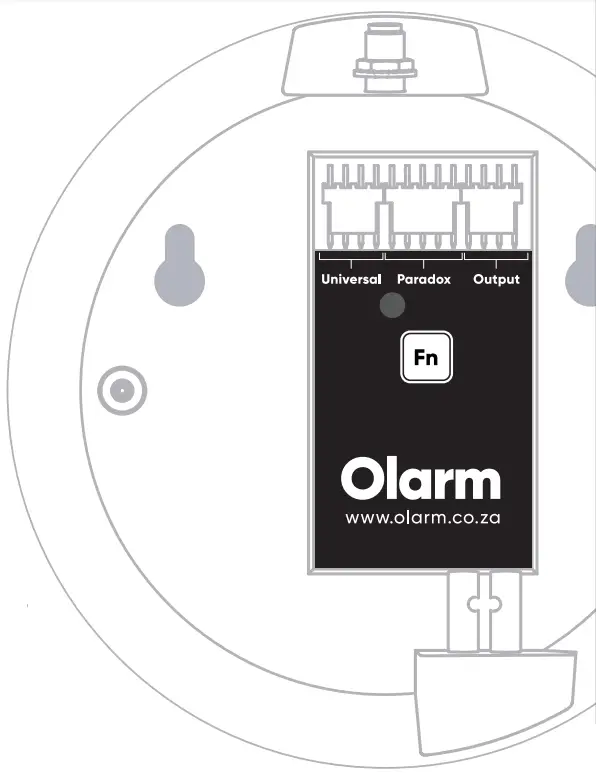
STEP 5 – Check your Olarm PRO’s status
Colour…………………… Status![]() White····················►Booting Up
White····················►Booting Up![]() Flashing Green······►Connecting to the cloud
Flashing Green······►Connecting to the cloud![]() Flashing Blue·········►Connecting to the cloud
Flashing Blue·········►Connecting to the cloud![]() Blue·······················►Connected, all okay
Blue·······················►Connected, all okay![]() Red·······················►Connecting to the alarm panel
Red·······················►Connecting to the alarm panel![]() Orange··················►Cannot connect to cloud
Orange··················►Cannot connect to cloud![]() Yellow····················►WiFi Pairing active
Yellow····················►WiFi Pairing active![]() Purple····················►Firmware upgrading – do not power the device off
Purple····················►Firmware upgrading – do not power the device off
STEP 6 – Mount your device
Mount your device using the screws and drill template provided.
We suggest mounting the Olarm PRO device on a wall or on the outside of the alarm panel. Please do NOT mount the Olarm PRO inside the alarm box or near any other radio equipment as it will reduce the signal strength and result in your device not functioning correctly.
Troubleshooting
![]() If your device LED remains flashing Green for more than 3 minutes – Please check the connection between the Olarm PRO and the alarm panel.
If your device LED remains flashing Green for more than 3 minutes – Please check the connection between the Olarm PRO and the alarm panel.![]() If your device LED is Red – Please check the connection between the Olarm PRO and the alarm panel
If your device LED is Red – Please check the connection between the Olarm PRO and the alarm panel![]() If your device LED is Orange – Please ensure that the Olarm PRO is located in an area with good Vodacom and/or MTN signal strength. If it is not, please ensure that your device is connected to Wifi using the wizard inside the Olarm opp.
If your device LED is Orange – Please ensure that the Olarm PRO is located in an area with good Vodacom and/or MTN signal strength. If it is not, please ensure that your device is connected to Wifi using the wizard inside the Olarm opp.
Ø If your device LED is not coming on – Please check the connection between the Olarm PRO and the alarm panel and that the alarm panel is connected to power.![]() If your device LED remains purple for more then 15 minutes – Please contact Olarm Support
If your device LED remains purple for more then 15 minutes – Please contact Olarm Support![]() Please note: Keypad to Panel wiring sequence may differ from Diagram. Do not change the sequence. Follow the instructions when connecting your Olarm PRO to the alarm panel.
Please note: Keypad to Panel wiring sequence may differ from Diagram. Do not change the sequence. Follow the instructions when connecting your Olarm PRO to the alarm panel.
PARADOX
Attach serial plug
Plug the 4-pin plug on the supplied cable into the port marked “SERIAL” on the alarm panel and connect the 5-pin plug to the port marked “Paradox” on the Olarm PRO.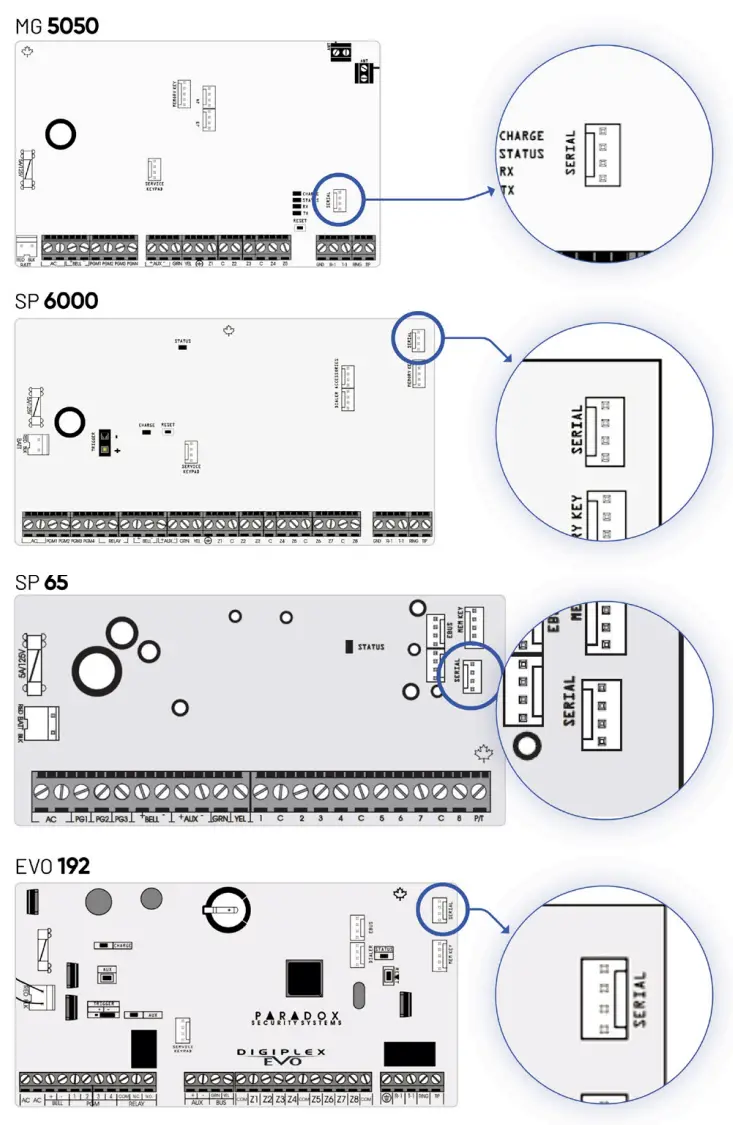 TEXECOM 1. Configure the alarm system
On the Texecom keypad, enter the commands below to link the alarm panel with the Olarm PRO device:
— Enter Engineering code
– Press – Press co) (Programming Menu) Enter CV () (Download Menu)
– Press C2) (UDL Passcode) – Enter (1 ) CS ) Ckr )
– Press 0 or 0 (depending on keypad)
– Press (I) (ComIP-3 Subnet Mask)
– Enter 0 (0) (008 = 255.255.255.0 a full list of available values can be found in INS159-11 or later)
– Press ( 7 ) (Comlp-2 Gateway IP Address)
– Enter Gateway Address: 192168000001
– Press (8) (ComIP-1 IP Address & Port)
– Enter IP address and port number: 19216800000110001 Press (5 ) (Coml Device type)
– Enter Q (device type for ComIP)
– Press Q (Programming Menu)
– Enter ( 9 ) 9 to exit
2. Connect the serial plug
Plug the 5-pin white plug on the Olarm PRO hookup cable into the port marked “COM l” on the alarm panel and the 4-pin side of the cable to the port marked “Universal /Texecom” on the Olarm PRO.
DSC (Power series only) 1. Power down the alarm panel
Disconnect both the Mains and Battery power from the alarm panel before continuing.
Connect the 4-pin connector to the Universal port on the Olarm PRO.
Cut the 5-pin plug off the cable and strip the wires so you can insert them into the alarm panel terminals.
3. Connect to the alarm panel Wire the stripped end of the cable into the alarm panel, as shown here, and connect the 4-pin plug to the Olarm PRO port marked “Universal / DSC”.
4. Turn the alarm panel back on
IDS (805 only)
-1. Power down the alarm panel
Disconnect both the Mains and Battery power from the alarm panel before continuing.
2. Cut the connector cable
Connect the 4-pin connector to the Universal port on the Olarm PRO.
Cut the 5-pin plug off the cable provided and strip the wires so you can insert them into the alarm panel terminals.
3. Connect to the alarm panel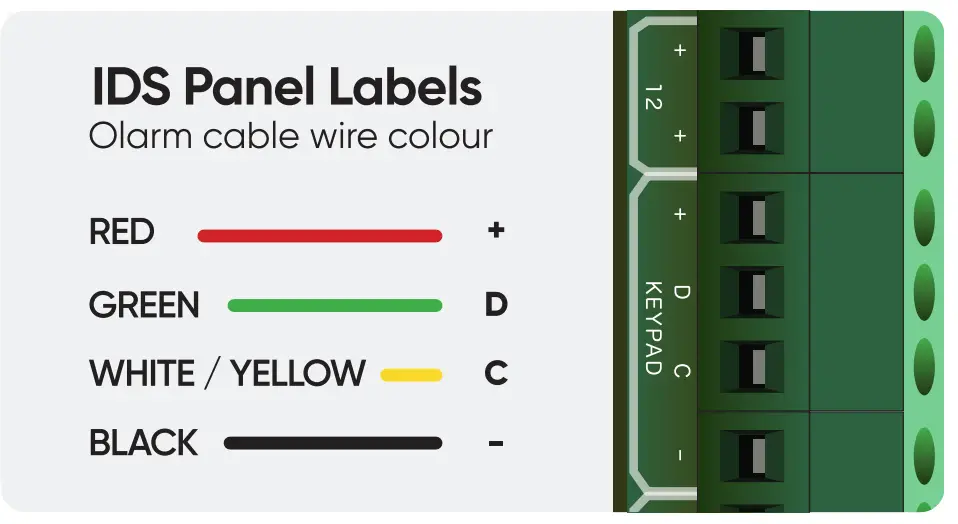 Wire the stripped end of the cable into the alarm panel, as shown here, and connect the 4-pin plug to the Olarm PRO port marked “Universal / IDS”.
4. Turn the alarm panel back on
Helpdesk – Feel free to call us on +27 210090911 or email [email protected]
www.Olarm.co.za


