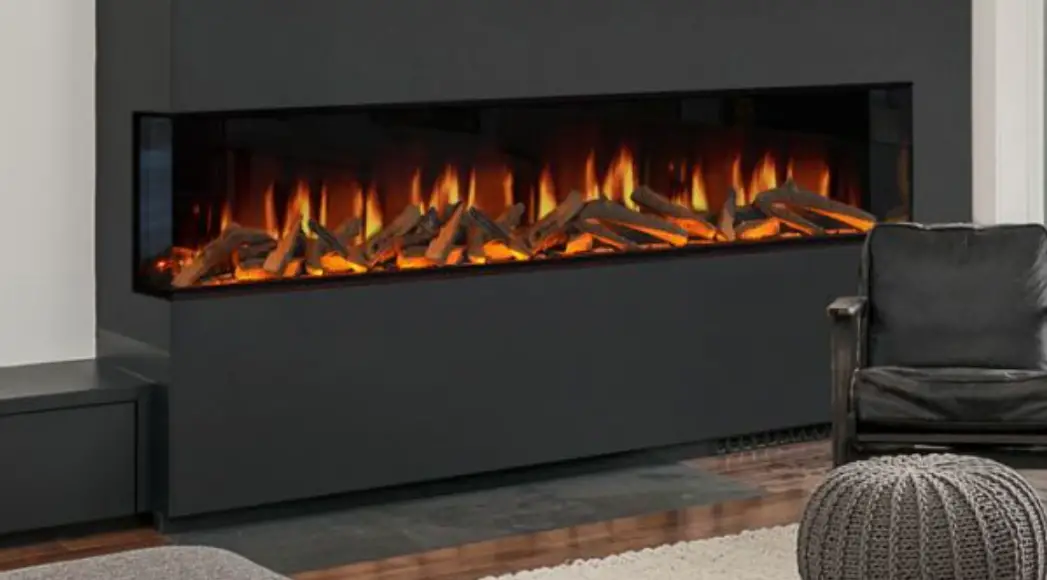
evonicfires E-Touch SUITES & STOVES
EU DIRECTIVES
All Evonic Fires products meet the requirements of the EC Directives.
These directives have been met by compliance with the following standards:
- EU 2011-65/EU 2015/863 Restriction of Hazardous Substances.
References to the relevant designated standards used:
- EN 55014-1:2006 + A1:2009 + A2:2011 Electromagnetic Compatibility.
- EN 55014-2:2015 Electromagnetic Compatibility.
- EN 61000-3-2:2014 Electromagnetic Compatibility (EMC). Limits. Limits for Harmonic Current Emissions.
- EN 61000-3-3:2013 Electromagnetic Compatibility (EMC). Limits. Limitation of
Voltage Changes, Voltage Fluctuations and Flicker. - EN 60335-1:2012 + A11:2014 Household and similar electrical appliances – Safety
- EN 60335-2-30:2009+A11:2012 Household and similar electrical appliances. Safety.
Particular requirements for room heaters
UKCA STANDARDS
All Evonic Fires products are in conformity with the relevant UK Statutory Instruments
(and their amendments).
- 2016 No. 1101 The Electrical Equipment (Safety) Regulations 2016
- 2016 No. 1091 The Electromagnetic Compatibility Regulations 2016
- 2012 No. 3032 The Restriction Of Use Of Certain Hazardous Substances In
Electrical And Electronic Equipment Regulations 2012
IMPORTANT INFORMATION AND HEALTH & SAFETY
When using electrical appliances, basic precautions should always be followed to reduce
the risk of fire, electric shock, and injury to persons, including the following:
- Read all of the instructions carefully before using the appliance, only use this appliance as described in this manual. Any other use not recommended by the manufacturer may cause injury to persons, or damage to the appliance.
- Remove all packaging and dispose of it at an appropriate recycling facility.
- When transporting or storing the appliance and power lead, keep in a dry place, away from excessive vibration and store so as to avoid damage.
- This fireplace is hot when in use. To avoid burns, do not let bare skin touch hot surfaces. The trim around the heater outlet becomes hot during heater operation.
DANGER: High temperatures may be generated under certain abnormal conditions. - Do not install this appliance immediately in front of a fixed socket outlet.
- Do not install this appliance in the immediate surroundings of a bath, shower, swimming pool or any other area where the appliance could come into contact with water or humidity, e.g. a bathroom.
- Do not use in areas where gasoline, paint, or any flammable liquids are used or stored.
- This appliance is only suitable for indoor use, do not use outdoors.
- Do not cover the appliance, or let the air inlet/outlet to be obstructed in any way as it may overheat.
- Keep the power lead away from hot surfaces and the heater outlet. Do not route the power lead in front of the appliance, or under any carpets or rugs. Do not allow the power lead to be coiled up once installed, as this can cause overheating.
- This appliance must be firmly fixed to a flat internal wall.
- A maintenance hatch must be installed into the surrounding installation to allow future access.
- Always use a certified electrician should new circuits or outlets be required. And always use properly grounded, fused and polarised outlets.
- Where the power lead passes through any masonry wall, stone surround etc. ensure that suitable rubber bushes are fitted at any possible wear points.
- If the power lead is damaged do not use the appliance until it has been replaced.
- Do not use any external switching device, timers, or extension leads. Do not connect the appliance to a circuit that is frequently switched on and off by the utility.
- In the event of a malfunction, switch off the appliance, and disconnect it from the mains power supply. Have the appliance inspected by a certified electrician before reusing.
- Do not use the appliance if it is damaged. In the event of any damage to the appliance, please contact the retailer from whom the appliance was purchased.
- Any repairs must only be performed by a certified electrician.
- Extreme caution is necessary when any heater is used by, located near children or people of reduced mobility, and whenever the unit is left operating and unattended.
- Young children should be supervised to ensure that they do not play with the appliance.
- Disconnect from the power supply before performing any cleaning, maintenance or relocation of the unit. Do not use steam cleaners, or aerosols near the appliance.
- Do not burn wood or anything else in this appliance.
- Do not strike the glass. The glass used is toughened safety glass, if broken it will shatter into small chunks which are less likely to cause injury.
- Do not drill or screw any new holes into the appliance.
| COMPONENTS FOR SUITES & STOVES | |||||||||||||||
| Name | Log Sets & Quantity | Glass Stones Clear & Amber | Chippings | Black Vermiculite | Suction Lifter | Riser | Wall Bracket | Bracket fixings | Bench | Electrical Lead | IEC Clip | Remote Control | |||
| Woodland | Silver Birch | Wall Plugs | Screws | ||||||||||||
| Aaren | 1 x Small | 1 x Small | 1 x Clear 1 x Amber | 1 x | 1 x | YES | 1 x | 5 x | 5 x | 1 x | 1 x | ||||
| Banff | 1 x Small | 1 x | 1 x | 1 x | 1 x | 1 x | |||||||||
| Bergen | 1 x Large | 1 x Large | 1 x Clear 1 x Amber | 1 x | 1 x | YES | 1 x | 5 x | 5 x | 1 x | 1 x | ||||
| Bonham 7 | 1 x Legacy 6 | 1 x Legacy 6 | OPTIONAL | 1 x | 5 x | 5 x | 1 x | 1 x | |||||||
| Bonham 9 | 1 x Legacy 10 | 1 x Legacy 10 | OPTIONAL | 1 x | 5 x | 5 x | 1 x | 1 x | |||||||
| Bonham 10 | 1 x Legacy 10 | 1 x Legacy 10 | OPTIONAL | 1 x | 5 x | 5 x | 1 x | 1 x | |||||||
| Compton 2 | 1 x Small | 1 x Small | 1 x | 1 x | YES | 1 x | 5 x | 5 x | 1 x | 1 x | |||||
| Compton 1000 | 1 x Large | 1 x Large | 1 x | 1 x | YES | 1 x | 5 x | 5 x | 1 x | 1 x | |||||
| Empire 2 | 1 x Small | 1 x Small | 1 x | 1 x | YES | 1 x | 5 x | 5 x | 1 x | 1 x | |||||
| EV8S | 1 x Small | 1 x | 1 x | 1 x | 5 x | 5 x | OPTIONAL | 1 x | 1 x | ||||||
| Gilmour 6 | 1 x Legacy 6 | 1 x Legacy 6 | OPTIONAL | 1 x | 5 x | 5 x | 1 x | 1 x | |||||||
| Gilmour 7 | 1 x Legacy 6 | 1 x Legacy 6 | OPTIONAL | 1 x | 5 x | 5 x | 1 x | 1 x | |||||||
| Gilmour 9 | 1 x Legacy 10 | 1 x Legacy 10 | OPTIONAL | 1 x | 5 x | 5 x | 1 x | 1 x | |||||||
| Gilmour 10 | 1 x Legacy 10 | 1 x Legacy 10 | OPTIONAL | 1 x | 5 x | 5 x | 1 x | 1 x | |||||||
| Halden | 1 x Tuva log set | 1 x Tuva log set | 1 x Clear 1 x Amber | 1 x | 1 x | ||||||||||
| Halmstad | 1 x Small | 1 x Small | 1 x Clear 1 x Amber | 1 x | 1 x | 1 x | 1 x | ||||||||
| Kalmar | 1 x Split Small | 1 x Split Small | 2 x Clear 2 x Amber | 4 x | YES | OPTIONAL | 1 x | 5 x | 5 x | 1 x | 1 x | ||||
| Kibo (Open) | 2 x Twig set | 2 x | 2 x | 1 x | 5 x | 5 x | 1 x | 1 x | |||||||
| Kibo (Glass) | 2 x Twig set | 2 x | 2 x | YES | 1 x | 5 x | 5 x | 1 x | 1 x | ||||||
| Midori | 1 x Small | 1 x Small | 1 x | 1 x | YES | 1 x | 5 x | 5 x | 1 x | 1 x | |||||
| Nessa | 1 x Small | 1 x Small | 1 x Clear 1 x Amber | 1 x | 1 x | YES | 1 x | 5 x | 5 x | 1 x | 1 x | ||||
| Nimbus | 1 x Small | 1 x Small | 1 x | 1 x | YES | 1 x | 5 x | 5 x | 1 x | 1 x | |||||
| Tuva | 1 x Tuva log set | 1 x Tuva log set | 1 x Clear 1 x Amber | 1 x | 1 x | ||||||||||
| Westfield | 3 x Mini | 1 x | 1 x | YES | 1 x | 5 x | 5 x | 1 x | 1 x | ||||||
INSTALLATION
MODEL DIMENSIONS
The model shown in these drawings is a Gilmour 7, however the same processes apply to all Suites.

Scan the QR code for more detailed specification drawings
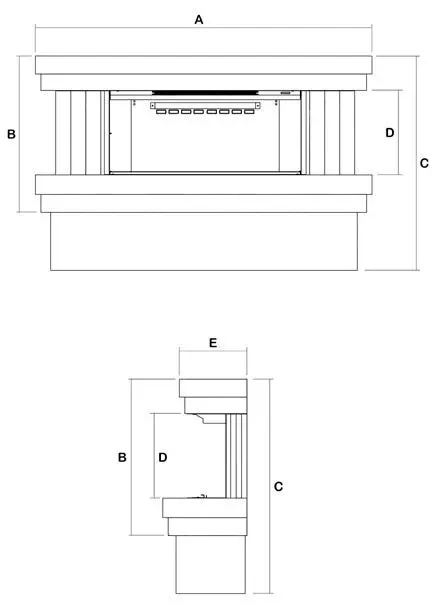
MODEL DIMESION
| Model | Width | Height | Depth | ||
| Overall unit (A) | Overall unit (B) | With Riser / Bench (C) | Opening (D) | Overall unit (E) | |
| Aaren | 845mm | 687mm | 457mm | 360mm | |
| Banff | 460mm | 670mm | 310mm | 355mm | |
| Bergen | 1475mm | 615mm | 355mm | 357mm | |
| Bonham 7 | 1120mm | 2027mm | 2285mm | 285mm | 276mm |
| Bonham 9 | 1295mm | 2027mm | 2285mm | 492mm | 276mm |
| Bonham 10 | 1475mm | 2027mm | 2285mm | 277mm | 276mm |
| Compton 2 | 1120mm | 514mm | 274mm | 310mm | |
| Compton 1000 | 1500mm | 511mm | 261mm | 355mm | |
| Empire 2 | 1120mm | 512mm | 272mm | 270mm | |
| EV8S | 860mm | 520mm | 326mm | 327mm | |
| EV8S Bench | 1370mm | 520mm | 850mm | 326mm | 405mm |
| Gilmour 6 | 1120mm | 712mm | 992mm | 455mm | 276mm |
| Gilmour 7 | 1120mm | 538mm | 818mm | 285mm | 276mm |
| Gilmour 9 | 1295mm | 745mm | 1025mm | 492mm | 276mm |
| Gilmour 10 | 1475mm | 531mm | 811mm | 277mm | 276mm |
| Halden | 488mm | 1015mm | 495mm | 416mm | |
| Halmstad | 863mm | 832mm | 460mm | 331mm | |
| Kalmar | 1475mm | 854mm | 357mm | 375mm | |
| Kibo | 1375mm | 845mm | 889mm | 495mm | 380mm |
| Midori | 527mm | 625mm | 455mm | 280mm | |
| Nessa | 1120mm | 520mm | 282mm | 360mm | |
| Nimbus | 1402mm | 522mm | 282mm | 253mm | |
| Tuva | 493mm | 1014mm | 540mm | 342mm | |
| Westfield | 860mm | 625mm | 455mm | 280mm | |
Wall Mounted Suites
| Aaren | Compton 1000 | Kalmar |
| Bergen | Empire 2 | Midori |
| Bonham 7 | Gilmour 6 | Nessa |
| Bonham 9 | Gilmour 7 | Nimbus |
| Bonham 10 | Gilmour 9 | Westfield |
| Compton 2 | Gilmour 10 |
INSTALLATION REQUIREMENTS
Before installing the appliance please read and take into account the following important requirements;
- The appliance must never be installed in front of an electrical socket.
- The appliance must not be installed anywhere that it may come into contact with water, i. e. a bathroom.
- The minimum height above the finished floor level is 300mm.
CHECKS BEFORE INSTALLATION
We recommend turning on the appliance before installation, connect the appliance to a power source using the provided electrical lead, and depress the right side of the rocker switch.
TOOLS REQUIRED
- Tape Measure
- Pencil
- Spirit Level
- Screwdriver
- PZ2 Screw Bit
- Drill Bit
- Wall Plugs (Masonry type supplied)
- Wall Screws (Masonry type supplied)
- Stud Detector (For plasterboard installations only)
- Wall Anchors (For plasterboard installations only. Not supplied)
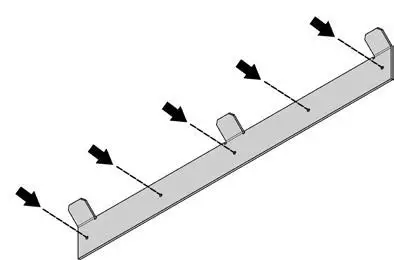
 The appliance is supplied with a wall bracket, shown above.
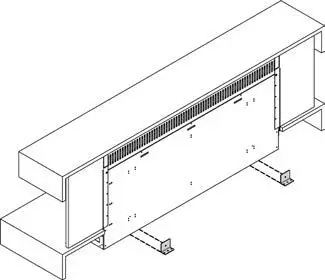
INSTALLATION STEPS
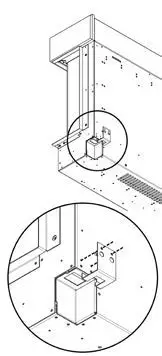
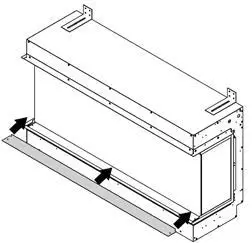
Remove the two bottom mounted transit brackets, you won’t need these for installation. Then screw on the IEC Clip to the bottom back of the case, with the two provided screws.
Determine the finished height and position that you want the appliance to be located. Then secure the wall bracket to the wall in the position you need using the wall plugs and screws provided. If you’re not securing the appliance to a masonry wall you will need to use the appropriate fixings.
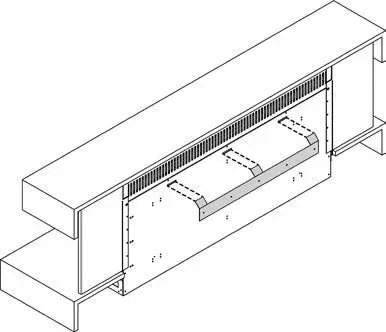
You can now hang the appliance on the wall by slotting the tabs of the wall bracket into the slots on the back of the appliance. Connect the appliance to the mains power supply and it is ready to use.
Suites with Risers & Stoves
| Banff | Gilmour 6 | Halmstad |
| Bonham 7 | Gilmour 7 | Kalmar |
| Bonham 9 | Gilmour 9 | Kibo |
| Bonham 10 | Gilmour 10 | Tuva |
| EV8S | Halden |
INSTALLATION REQUIREMENTS
Before positioning the appliance please read and take into account the following important requirements;
- The appliance must not be located anywhere that it may come into contact with water, i.e. a bathroom.
- This appliance is only suitable for indoor use, do not use outdoors.
- Keep the power lead away from hot surfaces and hot conditions, including the heater outlet.
- Do not route the power lead under any carpets or rugs.
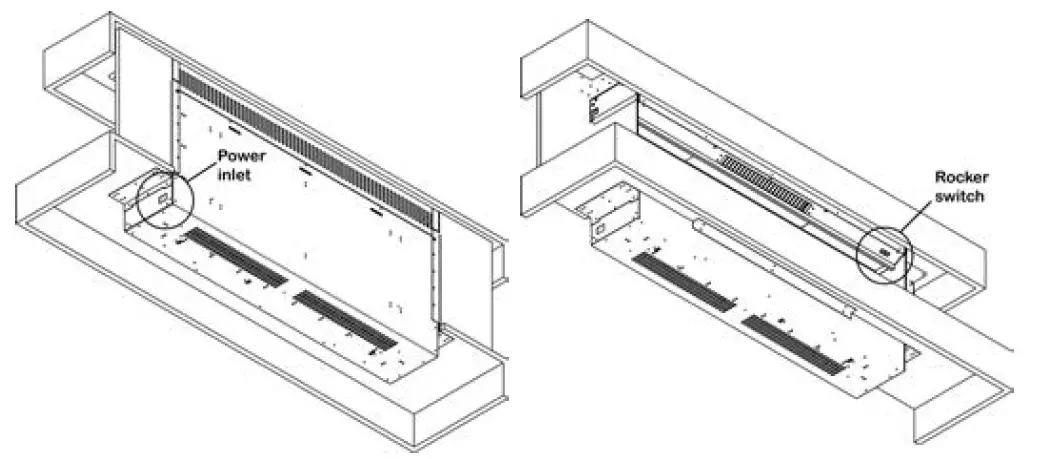
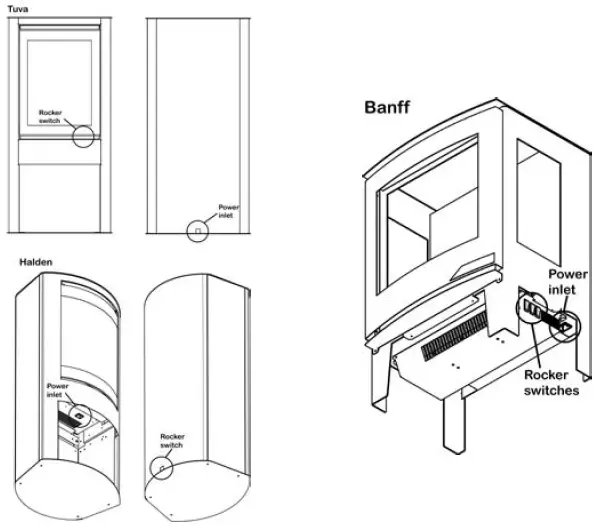
Once you have taken the above requirements into consideration you can plug in your appliance, and switch on the rocker switch.
For most models the power inlet is located at the back right, and the rocker switch is located at the front top right. Some models differ, and are shown below
LOG LAYOUTS
Suites & Stoves
LOG LAYOUTS
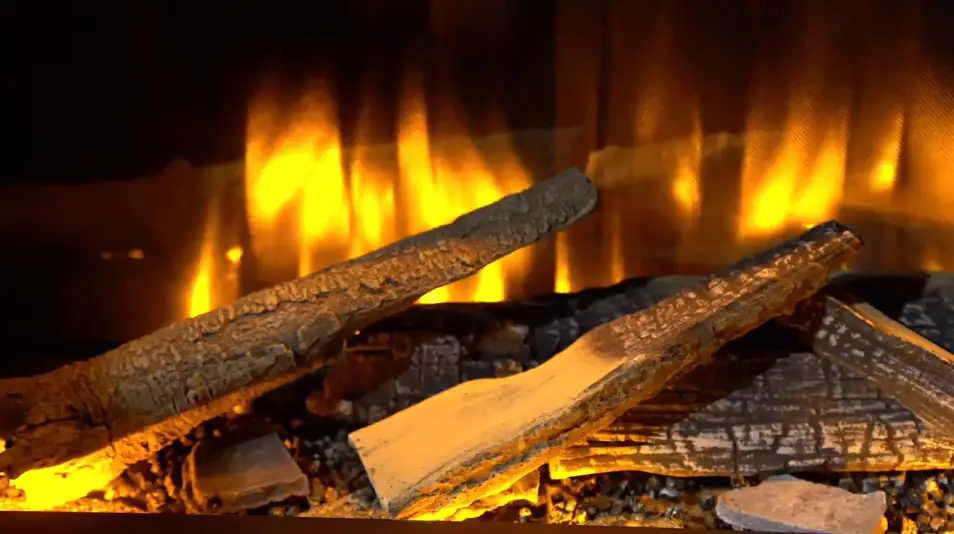
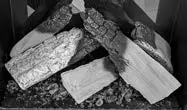
When you have your appliance installed you can set up your log set/s. If your model comes with Chippings, Glass Stones and/or Vermiculite lay this on the fuel bed first, then continue with laying out your logs. There is no right or wrong way to arrange your logs, the following images are an example of how you could lay them out.
1 x Small Woodland / Silver Birch
Aaren / Banff / Compton 2 / Empire 2 /
EV8S / Halmstad / Midori / Nessa / Nimbus
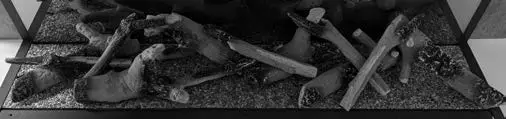
1 x Tuva Log Set
Halden / Tuva

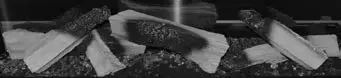
1 x Large Woodland / Silver Birch
Bergen / Compton 1000

2 x Twig Log Set
Kibo
3 x Small Log Set
Westfield

1 x Small Legacy Log Set
Bonham 7 / Gilmour 6 / Gilmour 7

1 x Large Legacy Log Set
Bonham 9 / Bonham 10 / Gilmour 9 / Gilmour 10
1 x Small Split Woodland / Silver Birch
Kalmar
FRONT AND SIDE GLASS
INSTALLATION
| Pivot Install | Slotted Install | Slide Install |
| Aaren | Banff | Halden |
| Bergen | EV8S | |
| Kalmar | Halmstad | |
| Kibo | Tuva | |
| Midori | ||
| Nessa |
PIVOT INSTALL
The pivot install of the front glass applies to the Aaren, Bergen, Kalmar, Kibo, Midori, and
Nessa. The model shown in this example is an E1030, but the same process applies to all six models.
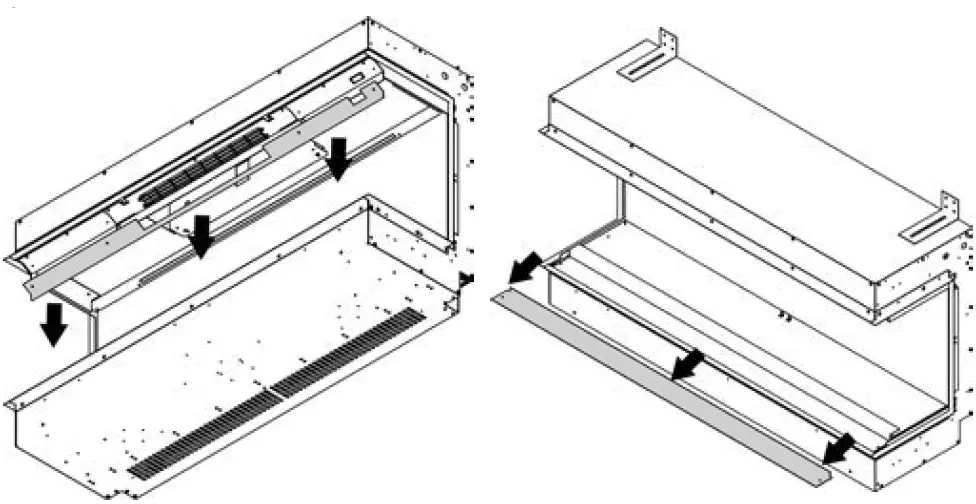
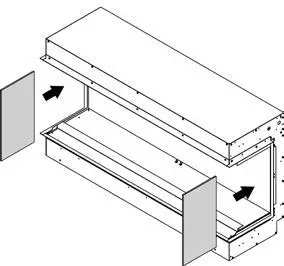
- Unscrew and remove the top and bottom glass retainer panels.

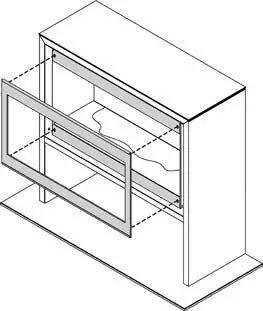
- The side glass can now be slid into the appliance. If you have a Kibo model you can skip this step and move on to step 3.

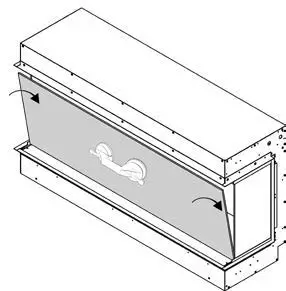
- Apply the Suction Lifter to the glass and apply the glass to the bottom edge first, then pivot into the appliance
Warning
The Suction Lifter is provide to assist in moving the glass NEVER as the sole support of the glass. Always support the glass throughout the entire
process until the glass is fully fitted. The glass is toughened safety glass and if broken will shatter into many small chunks.
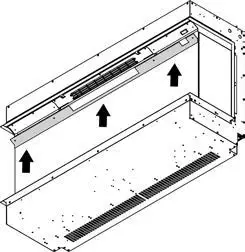
- The top and bottom glass retainers can now be replaced on the appliance.


SLOTTED INSTALL
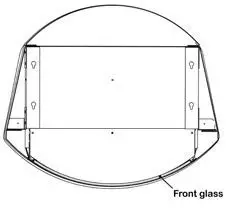
The slotted install of the front glass applies to the Banff, EV8S, Halmstad, and Tuva. The model shown in this example is the Halmstad, but the same process applies to all four models.
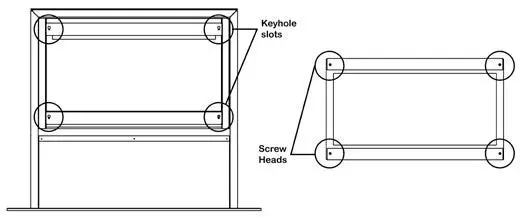
- To install the front glass first locate the four keyhole slots on the front of the appliance, and the four screws on the back of the front glass.

- Now line up the screws and screw holes and slot them into each other, then allow the glass to drop into place.
Warning
Always support the glass throughout the entire process until the glass is fully fitted. The glass is toughened safety glass and if broken will shatter into many small chunks.
SLIDE INSTALL
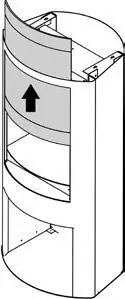
The sliding install of the front glass applies only to the Halden model.
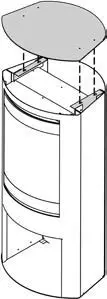
- To remove the glass from the Halden model, first slide the lid back slightly, then lift.

Warning
Always support the glass throughout the entire process until the glass is fully fitted. The glass is toughened safety glass and if broken will shatter into
many small chunks. - Now you can slide the glass vertically out of the appliance.


TROUBLESHOOTING
WARRANTY & REGISTRATION
Evoflame Only – LED Strip Replacement
Scan the QR code to be taken to a video in our maintenance series.
Please note; this video shows an old method of removing the front glass panel. Refer to page 19 of this instruction manual for the new method.
Fan Re-setting & Replacement

Scan the QR code to be taken to a video in our maintenance series.
Please note; this video shows an old method of removing the front glass panel. Refer to page 19 of this instruction manual for the new method.
Heater Access & Replacement

Scan the QR code to be taken to a video in our maintenance series.
Please note; this video shows an old method of removing the front glass panel. Refer to page 19 of this instruction manual for the new method.
E-Smart Only – E-Smart LED Replacement

Scan the QR code to be taken to a video in our maintenance series.
Please note; this video shows an old method of removing the front glass panel. Refer to page 19 of this instruction manual for the new method.
REPORT A FAULT
If you have any difficulties or problems with your appliance then please get in touch so that we can assist you. Please scan the QR code to be taken to our websites Report a Fault page, we will then be in touch with you shortly.

WARRANTY
Evonic Fires 5-year warranty – 1 year parts & labor + 4 years parts supplied.
The above warranty terms and conditions, as of 1st May 2022, are applicable for all relevant products purchased after this date. Appliances dispatched prior to this date will have an alternative warranty as set out within the Installation and User Instructions that was supplied with the product, this was usually a standard 2-year warranty.
To receive your Extended Warranty your Evonic Fires product must have been purchased from an authorized stockiest within our Retailer Network and your warranty registered with Evonic Fires through the online form – evonicfires.co.uk/register-your-product. The commencement date for the warranty period is the date of purchase.
The product must be adequately serviced and maintained. Evonic Fires provide maintenance call outs at a cost, and information on this can be obtained by contacting our head office. Please see your Evonic Installation Instructions for further information on how to service and maintain your appliance.
During your extended warranty period, only parts supplied or authorized by Evonic Fires can be used to repair your fireplace, and these spare parts can be obtained by contacting our service department at [email protected] or calling 01789 263868.
Consumable items such as glass, screens, LED’s, LED boards, filters and power supplies which are either subject to normal wear and tear or parts that require replacement in connection with normal maintenance are not covered within the extended warranty. These items are covered for the first 12 months.
To make a warranty claim, evidence must be supplied to our service department in the form of pictures, videos, or both. Failure to supply evidence to support your warranty claim may invalidate or delay the claim. Any visit by an Evonic Fires engineer will incur a service charge after the first year. We will not accept or reimburse the cost(s) of any third party who undertakes any work carried out on the product or fits parts, unless we have approved such work in advance of it being carried out.
WARRANTY EXCLUSIONS AND LIMITATIONS
The Evonic Extended Warranty does not cover:
- Damage resulting from installation and usage where the appliance has not been installed or used in accordance with the CK Fires Ltd installation and operation instructions, or if the installation does not conform to local building, fire, and safety regulations.
- Issues with mains/spur connections of power supply.
- Damage resulting from the product not being adequately maintained. (Please see your CK Fires Ltd Installation and Operating Instructions for further information on how to service and maintain your appliance).
- Damage caused by unauthorized modifications, use or repair.
- Damage or defects caused by the product being stored in a damp, unheated environment.
- Consequential loss (to the extent permitted by the law) relating to other associated products that have not been supplied by CK Fires Ltd.
- Consequential loss (to the extent permitted by law) related to decorations, furnishings, or other household assets.
- Removal and re-installation costs.
WARRANTY EXCLUSIONS AND LIMITATIONS
Repaired or replaced products are covered only for the remainder of the original warranty period. In the event of a claim being made, this must be reported to your retailer or CK Fires Ltd within 14 days of the fault occurring/being noticed. In the event of a product fault occurring during the warranty period years 2-5, CK Fires Ltd will send the appropriate component or goods necessary to rectify the fault, free of charge.
Nothing in the Extended Warranty shall make CK Fires Ltd liable for any or special, incidental, or consequential damages, injury to persons or property, or any other consequential loss beyond the consumer’s statutory rights. The liability on these issues is covered by our Terms and Conditions of Sale.
CK Fires Ltd total liability extends only to the purchase price paid for the goods, except where such a limitation is prohibited by statute. CK Fires Ltd, in the event of a warranty claim, reserves the right either to replace the goods in question or to refund the purchase price of the goods. For product sold outside the UK and Ireland, UK law will prevail.
The Evonic Fires Extended Warranty does not affect your statutory rights.
CK Fires Ltd / Evonic Fires
1, Evonic House, Clifford Park, Clifford Lane, Stratford-on-Avon, CV37 8HW
Tel: +44 (0)1789 263868
Fax: +44 (0)1789 293080
Email: [email protected]
www.evonicfires.co.uk
Follow us on:
Instagram | Facebook | Twitter | LinkedIn
@evonicfires


