![]()
INSTRUCTION MANUAL
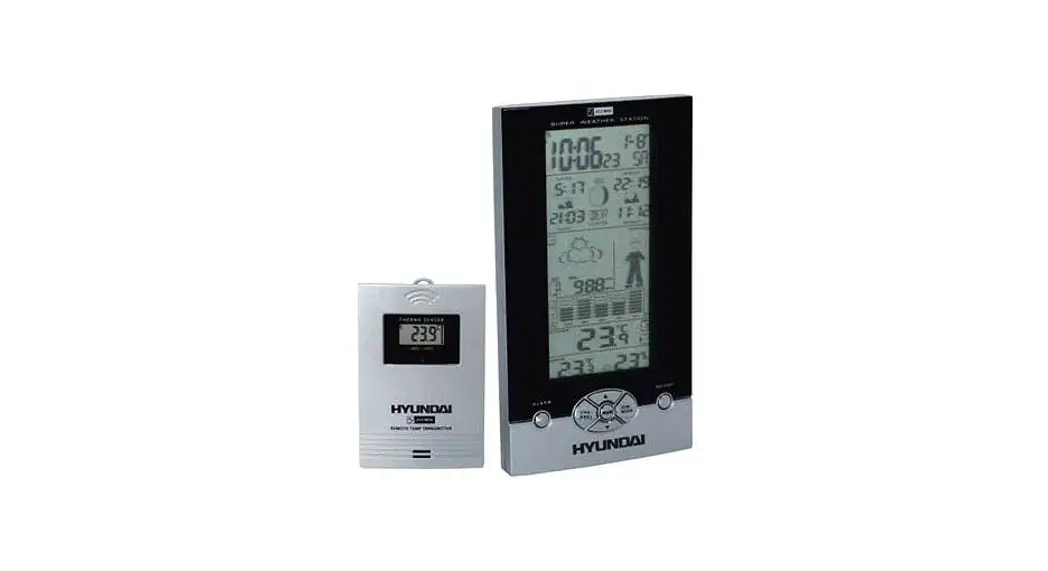
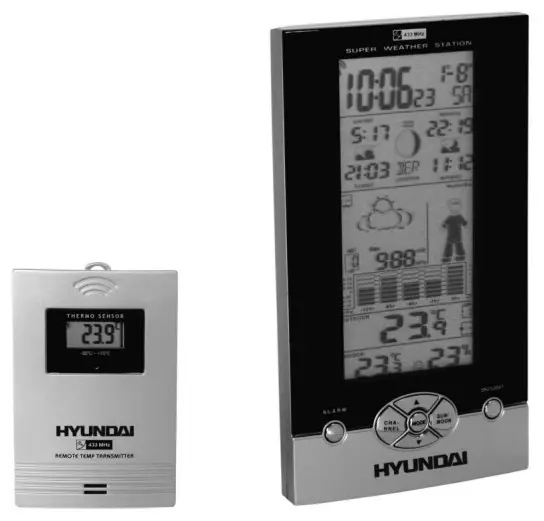
Weather station
Features:
- Radio controlled time with Manual Time Setting option
- Daily Sunrise/Sunset and Moonrise/Moonset Time Display for 24 Countries in Europe.
- Weather Forecast
- Weather Forecast with Sunny, Slightly Cloudy, Cloudy, Rainy, and Cloud Burst animation
- Weather Boy with suitable clothing in outdoor condition
- Barometric Pressure Measurement.
- Current and past 12hr Absolute and Relative Barometric Pressure reading
- Barometric Pressure Bar Chart.
- Display in Mb/hPa or inHg selectable.
- 433MHz RF Transmitting frequency.
- Maximum three selectable RF channels with wireless Thermo Sensor. (One Wireless Thermo Sensor Included)
- Transmission range: 30 meters ( open area ).
- Measurable range:
| Indoor temperature : | 0°C ~ +50°C |
| Humidity : | 20% ~ 99% |
| Outdoor temperature : | -50°C ~ +70°C |
- Max/Min Memory for Humidity, Indoor, and Outdoor Temperature.
- Low-battery indicator for Outdoor Thermo Sensor.
- Perpetual Calendar Up to the Year 2099.
- 12/24Hour time display selectable.
- 2 Alarm Function
- Moon Phase Display
- Day of week in 8 Languages Selectable.
- Wall Mount or Table Stand Selectable.
- Battery:
Main Unit: DC 1.5 V AA size x 3 pcs
Thermo Sensor Unit: DC 1.5 V AA size x 2 pcs
– Size :
Main Unit: 220 x 120 x 30 mm
Thermo Sensor Unit: 95 x 60 x 28 mm
Main Unit Appearance
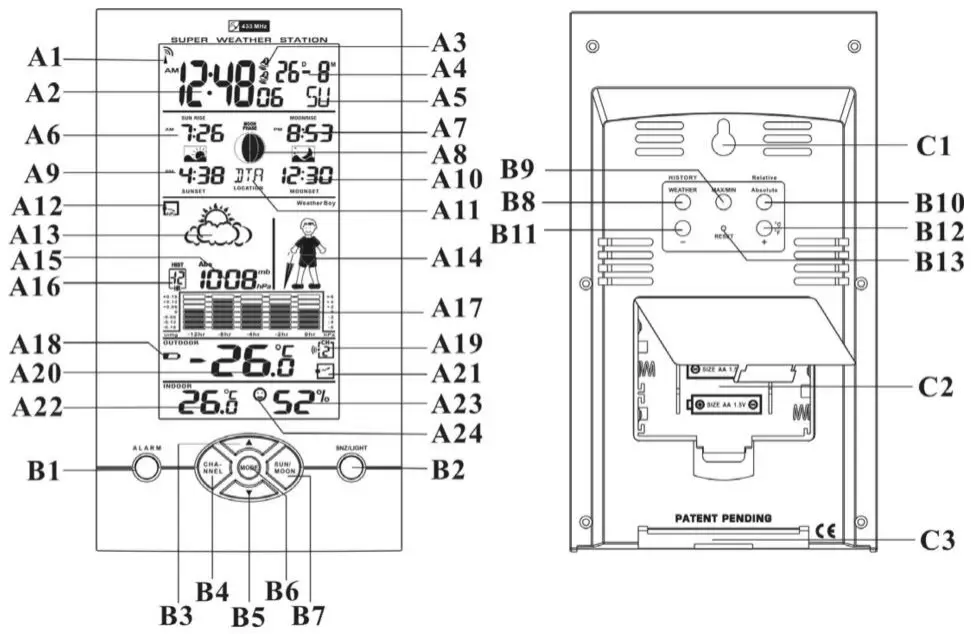
Part A- LCD
| A1: Radio Control Icon | A2: Radio Controlled Time |
| A3: Alarm On/Off Icon | A4: Date & Month |
| A5: Week | A6: Sunrise Time |
| A7: Moonrise Time | A8: Moon phase |
| A9: Sunset time | A10: Moonset Time |
| A11: Selected Country/City | A12: Barometric Pressure Trend |
| A13: Weather Forecast | A14: Weather Boy |
| A15: Absolute/ Relative Barometric Pressure Reading | A17: Barometric Pressure Bar Graph |
| A16: Past Hour(Pressure History) A18: Low Battery Icon | A19: Selected Channel |
| A20: Outdoor Temperature | A21: Outdoor Temperature Trend. |
| A22: Indoor Temperature | A23: Indoor Humidity |
| A24: Comfort Icon. |
Part B- Button
| B1: “ALARM” Button | B2: “SNOOZE/LIGHT” Button |
| B3: ”▲(UP)” Button | B4: “CHANNEL” Button |
| B5: “▼(DOWN)” Button | B6: “MODE” Button |
| B7: “SUN/MOON” Button | B8: “HISTORY/ WEATHER” Button |
| B9: “MAX/MIN” Button | B10: “Absolute /Relative” Button |
| B11: “-” Button | B12: “+ /°C/ °F”Button |
| B13: “RESET” Button |
Part C- Structure
C1: Wall Mount Hole
C3:. Stand
C2: Battery Compartment
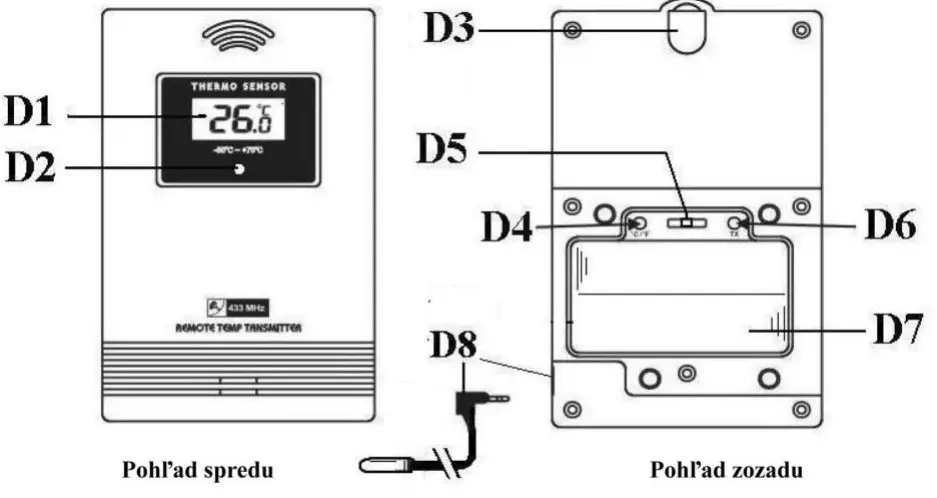
Thermo Sensor Unit Appearance
 jednotka teplotneho senzoru
| D1: Outdoor Temperature | D2: Transmission Indication LED |
| D3: Wall Mount Hole | D4: °C/°F” button |
| D5: “Channel Selecting Switch” | D6: “TX” button |
| D7: Battery Compartment | D8: Temperature Probe Plug & Jack |
Set-Up:
Insert batteries.
Use a pin to press the RESET (B12) button
Weather Forecast Function:
After the Batteries are inserted or holding the “WEATHER” button (B8) for 3 seconds, Weather Icon (A13) blinks. Enter the current weather condition by pressing “+“ (B12) or “-“ (B11) buttons. Press the “WEATHER” button (B8) to confirm the setting. The weather forecast may not be accurate if the current weather condition entered is not correct.
The current weather status should be entered again if the altitude of the weather station is changed. ( Barometric pressure is lower at a higher altitude location. Therefore, altitude change will affect the weather forecast). The weather station will start the first forecast at 6 hours after the current weather status is entered Totally 5 different weather conditions in the weather forecast.
 | means Sunny. |
 | means Slightly Cloudy. |
 | means Cloudy. |
 | means Rainy |
 | means Cloudburst. |
![]() ” is shown if the weather forecast is Rainy or Cloudburst and outdoor temperature (any channel) is under 0°C.
” is shown if the weather forecast is Rainy or Cloudburst and outdoor temperature (any channel) is under 0°C.
If there is any inconsistency in the weather forecast between the Local Weather Station and this unit, the Local Weather Station’s forecast should prevail. We will not be held responsible for any trouble that may come up due to wrong forecasting from this unit.
The trend pointer (LCD A12) indicates the trend of the barometric pressure
| indicates the barometric pressure trend is increasing. | |
| indicates the barometric pressure trend is steady | |
| indicates the barometric pressure trend is decreasing. |
Barometric Pressure Reading
Press the “Absolute/Relative” button (B10) to select the Absolute or Relative pressure display. “Abs” is shown for Absolute pressure, and “Rel” is shown for Relative pressure. Absolute pressure is the actual pressure measured by the Main Unit. Relative pressure can be adjusted to sea level pressure by holding the “Absolute/Relative” button (B10) for 3 seconds. Press the “ +“ (B12) or “-“ (B11) key to adjust, and press the “Absolute/Relative” button (B10) to confirm. Check the Local Weather Station for Sea Level pressure. Press the “ HISTORY” button (B8) to view the past 12 hours’ of Barometric Pressure history. The hour is indicated on LCD-A16. – – –
Press the “HISTORY” button (B)![]()
Press the “ HISTORY” button (B8) to view the past 12-hour Barometric Pressure history.
The hour is indicated on the LCD.
0 HR = Current Barometric Pressure Reading
-1HR = Barometric Pressure Reading in 1 hour ago
-2HR = Barometric Pressure Reading in 2 hours ago ……..etc
Hold the “+” button (B12) for three seconds to select the unit for Barometric Pressure Meter in inHg or MB / hPa.
Barometric Pressure Trend Bar Chart.
The Barometric Pressure Reading at –2hr, -4hr, -8hr, and –12hr is recorded and shown on Barometric Pressure Bar Graph (A17). The Graph is displayed in both hPa and inHg.
Weather Boy.
Weather Boy (A14) shows different clothing under different weather conditions and Outdoor temperatures (according to the lowest channel). This is to remind you to wear suitable clothes or take an umbrella with you before go to the outdoor area.
If there is no Thermo Sensor is registered in the main unit, the LCD shows :
Thermometer:
Press the “°C / °F” button (B12) to select Temperature to be displayed in Celsius mode or Fahrenheit mode. If the temperature is out of the measurable range, LL.L ( beyond the minimum temperature) or HH.H (beyond the maximum temperature) will be shown on the LCD. – –
Maximum/Minimum Temperature/Humidity recording function:
Press the “MAX/MIN” button (B9) to show the maximum or minimum of indoor and outdoor temperature “ – ” is shown on the LCD if maximum Temperature/Humidity is shown. “ ” is shown on the LCD if minimum Temperature/Humidity is shown. – Hold the “MAX/MIN” button (B9) for 3 seconds to clear the recorded maximum and minimum reading.
Outdoor Thermo Sensor Unit Registration Procedure:
- The main unit automatically starts receiving a transmission from the Outdoor Thermo Sensor after the
- Weather condition setting. Outdoor temperature digits (A20) blink.
- Insert the batteries in the Thermo Sensor Unit. The sensor unit automatically transmits temperature to the main unit. ( Battery compartment (D5) of thermo sensor is located behind the back cover, unscrews to open.)
- For having more than one external transmitter (Maximum3), select the Channel, CH1, CH2 or CH3 to ensure each sensor is transmitting at a different channel before inserting batteries. The Channel select switch (D4) is at the back of the thermo sensor unit.
- Press the “ TX “ button (D7) on the thermo sensor unit to transmit the temperature to the main unit manually. The main unit gives a “beep” sound if it received the temperature.
Display Outdoor Temperature :
Press the “ CHANNEL” button (B4) to view the 3 Channels’ temperatures. The sequence is shown as follows:
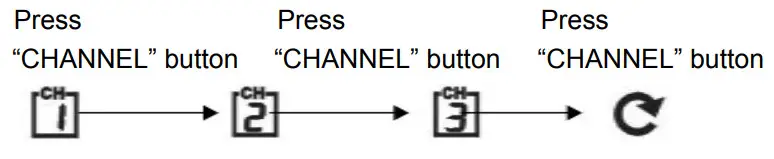 Display the three channels alternatively
- Hold the “ CHANNEL” (B4) button for 3 seconds to cancel the unused channel. It will automatically register a new channel again if a new channel is received.
- If there is no temperature displayed in the existing channel ( “ – – . –“ is displayed on the LCD ), hold the “CHANNEL” button (B4) for 3 seconds to cancel that channel and receive the channel again (“Beep” sound can be heard.) Then, press “ TX “ button (D7) on the thermo sensor unit to transmit a signal to the main unit manually
- The trend pointer displayed (A21) indicates the trend of the outdoor temperature
| indicates the outdoor temperature is increasing. | |
| indicates the outdoor temperature is steady | |
| indicates the outdoor temperature is decreasing |
Press “ °C /°F” button (D6), on the Thermo Sensor unit, to select the Temperature to be displayed in Celsius mode or Fahrenheit mode.
The use of 1.5m cord Temperature Probe:
- Insert the probe plug (D9) on the right-hand side of the Thermo Sensor Unit.
- Put the metal casing outside and leave the Thermo Sensor Unit in an indoor area to avoid freezing up the battery when the outdoor temperature is below -20 °C.
- Always use the temperature probe to sense the temperature when the temperature is between the following range: -50 °C ~ 0°C and +50°C ~ + 70°C
Radio Controlled Clock:
- At 2 minutes after the batteries are inserted, the clock automatically starts scanning the DCF time signal
 flashes indicate now is receiving DCF signal
- turns on indicate signal received successfully If reception fails, scanning stops disappearing on the LCD ) and repeats again at the next hour.
- Totally four reception will be tried after starting. Each reception takes about 10 minutes.
- The clock automatically scans the time signal at 3.00 a.m. every day to maintain accurate timing.
- If reception fails, scanning stops on the LCD disappear ) and repeats again at 4.00 a.m. 5.00 a.m., and 6.00 a.m.
- The clock can be set to scan the time signal manually by holding the “▼” button (B5) for 3 seconds. If receptions fail, scanning stops. on the LCD disappear ).
- Hold the “▼” button (B5) for 3 seconds or enter Time Setting to stop scanning the DCF time signal.
- Buttons will not function while scanning for DCF time signals unless they are well received or stopped manually.
- “DST” is shown on the LCD if it is in Daylight Saving Time Mode
Manual Time Setting:
- Hold the “ MODE” button (B6) for 3 seconds to enter Clock/Calendar setting Mode.
- Press “▲” (B3) or “▼” (B5) buttons to adjust the setting and press the “MODE/SET” button (B6) to confirm each setting.
- The setting sequence is shown as follows:
- Hour, Minutes, Second, Year, Month, Day, Day-of-week language, Country, City, and Time Zone.
8 languages can be selected in Day-of-week, they are German, English, Russian, Denmark, Dutch, Italian Spanish, and French,. The languages and their selected abbreviations for each day of the week are shown in the following table.
| Language | Sunday | Monday | Tuesday | Wednesday | Thursday | Friday | Saturday |
| German, GE | SO | MO | DI | MI | DO | FR | SA |
| English, EN | SU | MO | TU | WE | TH | FR | SA |
| Russian, RU | BC | NH | BT | CP | HT | NT | CY |
| Denmark, DA | SO | MA | TI | ON | TO | FR | LO |
| Dutch, NE | ZO | MA | DI | WO | DO | VR | ZA |
| Italian, IT | DO | LU | MA | ME | GI | VE | SA |
| Spanish, ES | DO | LU | MA | MI | JU | VI | SA |
| French, FR | DI | LU | MA | ME | JE | VE | SA |
- The Time zone is used for the countries that can receive the DCF time signal but the time zone is different from German time.
- When the country time is faster than the German time for 1 hr, the zone should be set to +1.
- Then the clock will automatically set 1 hour faster from the signal time received.
- The time setting mode will automatically exit in 15 seconds without any adjustment.
12/24 Hour Display mode:
Press the “▲” button (B3) to select 12 or 24 hours mode.
2 Daily Alarm Function:
- Press the “ MODE” button (B6) to select to view:
- Time Alarm Time1 (
 Shown on the LCD) Alarm Time 2 ( Shown on the LCD)
 - When viewing Alarm Time 1 or Alarm Time 2, hold the “MODE/SET” button (B1) for 3 seconds to enter that Alarm Time setting. Press “▲” (B3) or “▼” (B5) buttons to adjust the alarm time.
- Press the “MODE” button (B6) to confirm each setting.
- When viewing Alarm Time 1 or Alarm Time 2, press the “ALARM” (B1) button to switch that alarm on or off. If it is on, or is shown on the LCD.
- Press the “SNOOZE” (B2) button when alarmed. The alarm will snooze for 5 minutes, then it alarms again. This snooze function can be enabled for a maximum 7 times.
- Press the “MODE” (B6), “ALARM” (B1), “▲” (B3) or “▼” (B5) button to stop the snooze alarm.
Sunrise/Sunset and Moonrise/Moonset Time Display Function:
- After setting the Calendar, Local Country, and City in the Time Setting Mode, the Main Unit calculates the Sunrise/Sunset and Moonrise/Moonset. The Sunrise/Sunset and Moonrise/ Moonset time digits blink during the calculation.
- Press the “SUN/MOON” button (B7) to display the Sun Hours of the selected day.
- Hold the “SUN/MOON” button for (B7) 3 seconds to enter Sunrise/Sunset and Moonrise/Moonset
- Time Quick Checking Mode. Location digits (A11) blink
- Enter “Country”, “City”, “Year”, “Month” and “Day” which you would like to check
- Press “▲” (B3) or “▼” (B5) button to adjust and press the “SUN/MOON” button (B7) to confirm the setting.
- The Sunrise/Sunset and Moonrise/Moonset time digits blink during the calculation. After Calculation, Sunrise/Sunset and Moonrise/Moonset time is shown.
- The location digits (A11) keep blinking to indicate the Main Unit is still in Quick Checking Mode. Press the “SUN/MOON” button (B7), or after 15 seconds, to return to normal mode.
- If a moonrise or moonset occurs at next day, then“MOONRISE +1” or “MOONSET +1” will be displayed If there is no moonrise or moonset occur on someday,
 will be displayed on the LCD The Sunrise/Sunset and Moonrise/Moonset time display is just for reference only. For exact Sunrise/Sunset and Moonrise/Moonset time, please refer to your Local Weather Station.
Moon Phase Display
The Moon Phase (A8) of each day is shown on the LCD. 
| A: New Moon | B: Waxing Crescent C: First Quarter | |
| D: Waxing Gibbous | E: Full Moon | F: Waning Gibbous |
| G: Last Quarter | H: Waning Crescent |
Low batteries indicator:
Low battery icon “ “ (A18) appears at the outdoor temperature row in a particular channel indicating the external transmitter of the channel in low battery status. The batteries should be replaced.
Countries and Cities
There are 24 countries can be chosen from the Time Setting Mode. They are listed in the following table.
| Germany | GF.R | La Corogna Leon Las Palmas Madrid Malaga Palma de Mallorca Salamanca Sevilla Valencia Zaragossa | LAC LEO | Manchester Plymouth | MAN PI Y | Enschede Groningen Den Haag Rotterdam | ENS | I .iege | I IF. |
| Aachen Berlin Dusseldorf Dresden Erfurt Frankfurt Flensburg Freiburg Hannover Bremen Hamburg Rostock Stralsund Koeln Kiel Kassel Leipzig M uenchen Magdeurg Nuemberg Regensburg Stuttgart Saarbruecken Schwerin | AAC BER DUS DRE ERF FRA FLE FRE HAN BRE HAM ROS STR KOE KIE KAS LEI MUE MAG NUE REG STU SAA SCH | GRO DHA ROT | Switzerland, Liechtenstein | SWI | |||||
| LPA MAD MAL PDM SAL SEV VAL ZAR | Hungary | HUN | |||||||
| Budapest | MID | Basel Bern Chur Geneva Locamo Lucerne St Moritz St Gallen Sion Vaduz luerich | BAS BER CHU GEN LOC LUC MOR GAL 510 VAD 71IF | ||||||
| Croatia | CRO | Porttmal | POR | ||||||
| Zagreb | / AG | Evora Coimbra Faro Leiria Lisbon Porto | EVO COI FAR LEI LIS POR | ||||||
| nab’ | ITA | ||||||||
| Ancona Bari Bologna Cagliari Catania Firenze Foggia Genova Lecce Messina Milano Napoli Palermo Parma Perugia Torino Trieste Venezia Verona Ventimiglia | ANC BAI BOL CAG CAT FIR FOG GEN LEC M ES MIL NAP PAL PAR PER TOR TRI VEN VER VTG | ||||||||
| France | FRA BES BIA BOR BRE CHE LYO MAR MON MET NAN NIC ORL PAR PER LIL ROU STR TOIL | ||||||||
| Besancon Biarritz Bordeaux Brest Cherbourg Lyon Marseille Monaco Metz Nantes Nice Orleans Paris Perpignan Lille Rouen Strasbourg Toulouse | Poland | POI, | |||||||
| Gdansk Krakow Poznan Szczecin Warsaw | GDA KRA POZ SZC WAR | ||||||||
| Czech Republic | (‘ZR | ||||||||
| Pm?) te | PR A | ||||||||
| Russia | PAIS__ PET | ||||||||
| St Petersburg | |||||||||
| Sweden | SWF | ||||||||
| Gothenburg Stockholm | GOT STO SIR | ||||||||
| Slovakia | |||||||||
| Rratislave | RR A | ||||||||
| Slovenia | SI .0 | ||||||||
| Danmark | DAN | 1 Liliana | I III | ||||||
| Alborg Arhus Copenhagen Odense | ALB ARH COP ODE | Yugoslavia | VI IG | ||||||
| Belgrade | RF.R | ||||||||
| Ireland | ‘RI, | Austria | AI IS | ||||||
| Finland | FIN | Dublin | DUB | Graz Innsbruck Linz Salzburg | GRA INN LIN SAL VIE | ||||
| Spain-Andorra | ESP | Helsinki | I I El. | I am Hamburg | 1,I1X | ||||
| Alicante Andorra Badajoz Barcelona Bilbao Cadix Cordoba Ibiza | ALI AND BAD BAR BIL CAD COR IR! | Great Britain | GB | Luxembourg | LI IX | ||||
| Aberdeen Belfast Birmingham Bristol Edinburgh Glasgow I andon | ABD I3EL BIR BRI EDI GLA ION | Norway | NOR | ||||||
| Bergen Oslo Stavanger | BER OSL STA NET | Vienna | |||||||
| Belgium | RM. | ||||||||
| Antwerpen Brugges Bruxelles Charleroi | ANT BRU BRL (‘HA | ||||||||
| Netherlands | |||||||||
| Amsterdam Eindhoven | AM S FIN |
NOTES:
We reserve the right to make technical changes without notice in the interest of improvement.
WARNING: Do not use this product near water, in wet areas to avoid fire or injury of electric current. Always turn off the product when you don’t use it or before a revision. There aren’t any parts in this appliance that are reparable by consumers. Always appeal to a qualified authorized service. The product is under dangerous tension.
Disposal of used electrical & electronic equipment
The meaning of the symbol on the product, its accessory, or packaging indicates that this product shall not be treated as household waste. Please, dispose of this equipment at your applicable collection point for the recycling of electrical & electronic equipment waste. In the European Union and Other European countries, there are separate collection systems for used electrical and electronic products. By ensuring the correct disposal of this product, you will help prevent potentially hazardous to the environment and to human health, which could otherwise be caused by unsuitable waste handling of this product. The recycling of materials will help conserve natural resources. Please do not, therefore, dispose of your old electrical and electronic equipment with your household waste. For more detailed information about recycling this product, please contact your local city office, your household waste disposal service, or the shop where you purchased the product.
HP Tronic Ústí nad Labem s.r.o. is registered by Asekol s.r.o. under number AK-051447.
HP Tronic Ústí nad Labem s.r.o. is registered by Sewa under number EZ 0000213.
CE DECLARATION OF CONFORMITY
The manufacturer (authorized representative):
HP TRONIC Zlín, spol. s r.o., Prštné-Kútiky 637, 760 01 Zlín, Company Identification No.: 499 73 053
hereby declares that the hereinafter described product:
Radio-controlled weather station Hyundai WS 1806 BOY conforms to the Government Decree (hereinafter referred to as the “GD”) No. 18/2003 Coll. that is in accordance with the Electromagnetic Compatibility (EMC) Directive 89/336/EEC concerning the electromagnetic compatibility (EMC).
It is in conformance with the GD No. 17/2003 Coll. that is in accordance with the Electrical
Safety Directive
73/23/EEC.
It is in conformance with the provisions of the GD No. 426/2000 Coll. that is in accordance with the R&TTE Directive 1999/5/EEC concerning radio and telecommunication equipment.
The following technical regulations have been applied in evaluating the conformance:
| Electrical Safety: | ČSN EN 60950-1:2003 |
| EMC: | EN 55022:1998 EN 55024:1998 |
| R&TTE: | ETSI EN 301 489-1 v 1.4.1 (2002) ETSI EN 301 489-3 v 1.4.1 (2002) |
Testing Report No. 3319/06 according to the applicable technical regulations has been issued by an accredited testing laboratory pursuant to ČSN EN ISO/IEC 17025, No. 1004.3.
Testing Reports No. KSZ2005080200BC and KSZ2004134655LC02 according to the applicable technical regulations have been issued for Ke Mei Ou Laboratory.
Declaration issuance date and venue: 24. April 2006, Zlín
Manufacturer’s stamp