Genie 39626T Smart Garage Door Opener
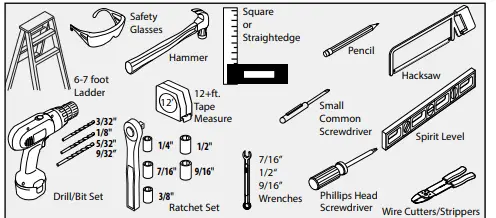
RECOMMENDED TOOLS
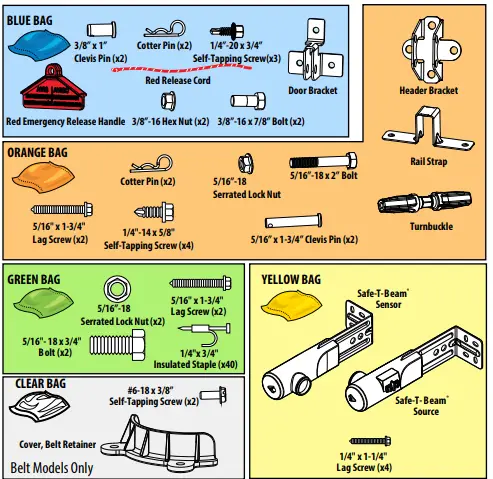
HARDWARE BAGS
PARTS INCLUDED
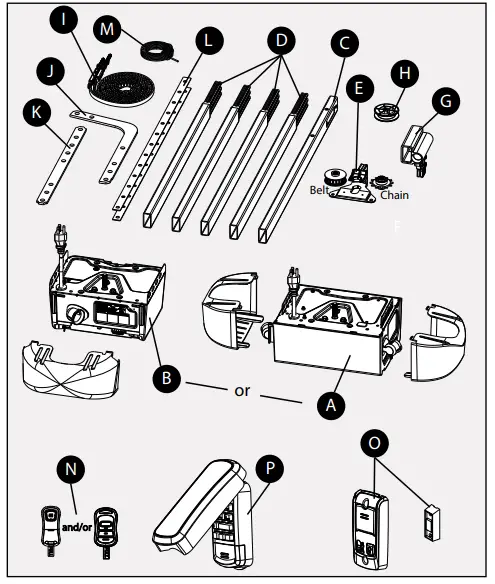
PARTS LIST
- A = 2 Light Powerhead & Lenses
- B = 1 Light Powerhead & Lens
- C = Header Rail Section
- D = Rail Sections (x4)
- E = Sprocket Support Assembly
- G = Carriage Assembly
- H = Idler Pulley
- I = Chain or Belt Assembly
- J = Curved Door Arm
- K = Straight Door Arm
- L = Mounting Straps (x2)
- M = 90ft. Wire Spool
- N = Remote
- O = Wall Control: (Console or Standard Button)
- P = Wireless Keypad(Select Models Only
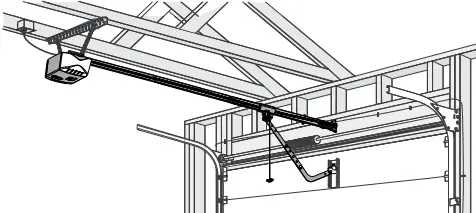
Chain/Belt Drive Models
PRE-INSTALLATION CONSIDERATIONS
- This opener includes parts and supplies needed for installation in most garages and on most garage doors. There are many variations of garages and garage doors. A few additional parts and supplies may be needed for installation in your garage and to your garage door. While going over these instructions, please note the additional items you may need. For help finding a local Genie®
- Professional Dealer, refer to the dealer locater at www.GenieCompany.com or call Customer Service at 1-800-35-GENIE.
- There are a few specific areas which might require extra materials. Measure the height of your door. For doors taller than 7′ and up to 8′ in height, you will need a Rail Extension Kit for the door to fully open.
- See section 4 – The header above the garage door where torsion springs are used–does it extend far enough above the spring(s) to allow mounting of the header bracket? If not, or if you can’t tell–you will probably need a piece of 2″ x 6″ lumber to span across wall studs.
- See section 6 – The area overhead where the powerhead will be mounted–if you have a finished ceiling, you will need a piece of perforated angle which can span across beams of trusses.
- See section 9 – Is there wood along the door tracks near the floor where the Safe-T-Beam® can be most easily mounted, or will you need fasteners or some other material for mounting to the track itself? Will you need extension brackets or wooden blocks to extend the Safe-T-Beam far enough off the wall to see past any door hardware?
- Is there an electrical outlet within approximately 3′ of the point where the opener will be? If not, you need to contact a licensed electrician.
- Check the condition of your door and all its associated hardware: Tracks, springs, hinges, rollers. Is anything loose or appear to be worn? If so, call a trained professional for an evaluation and repairs. DO NOT ATTEMPT TO ADJUST SPRINGS OR THEIR ATTACHED PARTS!
- Operate the door manually. Does it move freely and smoothly? Check the balance of the door by manually lifting it halfway open and release. It should stay put or move very slowly. If not, call a service person for repairs.
- Remove all ropes and remove or disable all locks connected to the garage door before installing opener. It is also recommended that T-handles be removed. It is recommended that closed loop lifting handles with no protruding parts remain.
ASSEMBLY AND INSTALLATION VIDEO
INSTALLATION INSTRUCTIONS
POTENTIAL HAZARDS
Overhead doors are large, heavy objects that move with the help of springs under high tension and electric motors. Since moving objects, springs under tension, and electric motors can cause injuries, your safety and the safety of others depends on you reading the information in this installation poster. If you have questions or do not understand the information presented, call The Genie Company (1-800-35-Genie). In this section, and those that follow, the words Danger, Warning and Caution are used to emphasize important safety information.
- Indicates an imminently hazardous situation which, if not avoided, will result in death or serious injury.
- Indicates a potentially hazardous situation which, if not avoided, could result in death or serious injury.
- Indicates a potentially hazardous situation which, if not avoided, may result in injury or property damage
WARNING
TO REDUCE THE RISK OF SEVERE INJURY OR DEATH
- DO NOT install opener on an improperly balanced door. An improperly balanced door could cause severe injury.
- Repairs and adjustments to cables, spring assembly, and other hardware must be made by a trained service person using proper tools and instructions.
- Remove all ropes and remove or disable all locks connected to the garage door before installing opener.
- Where possible, install door opener 7 feet or more above the floor. For products having an emergency release, mount the emergency release within reach, but at least 6 feet above the floor and avoiding contact with vehicles to avoid accidental release.
- DO NOT connect the opener to the source of power until instructed to do so.
- Locate the wall console button: A) Within sight of door. B) At a minimum height of 5 feet so small children cannot reach it. C) Away from all moving parts of the door.
- Install the entrapment WARNING label next to the wall button or console. Install red emergency release handle on the emergency release cord.
- The opener must reverse when the door contacts a 1-1/2 inch high object on the floor at the center of the doorway. This is about the size of a 2″ x 4″ board laid flat.
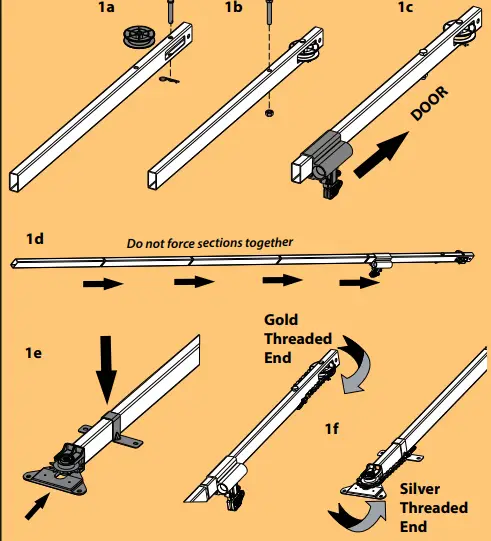
ASSEMBLING/INSTALLING RAIL
- Align pulley in rail slot and insert clevis pin through header rail hole and idler pulley. Secure with a cotter pin.
- Insert 5/16”-18 x 2” bolt into header rail and secure with nut.
- Slide carriage assembly onto header rail section. Note “door” arrow will point toward the idler pulley.
- Insert rail sections together by hand as shown. Assembled length is approximately 9’3”.
- Insert sprocket support assembly into last rail section and place rail strap onto rail.
- Route chain/belt assembly gold threaded shaft around idler pulley and silver threaded end around the sprocket.

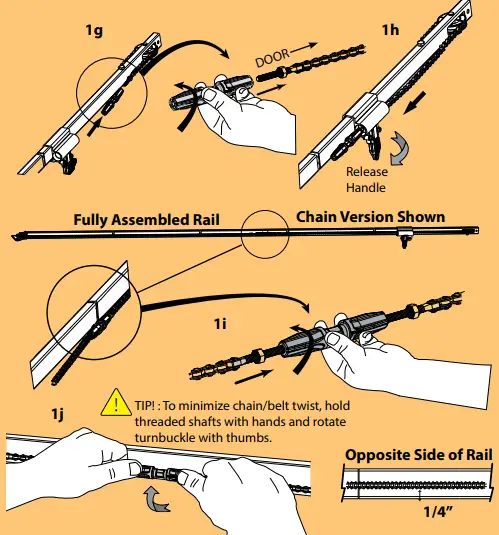
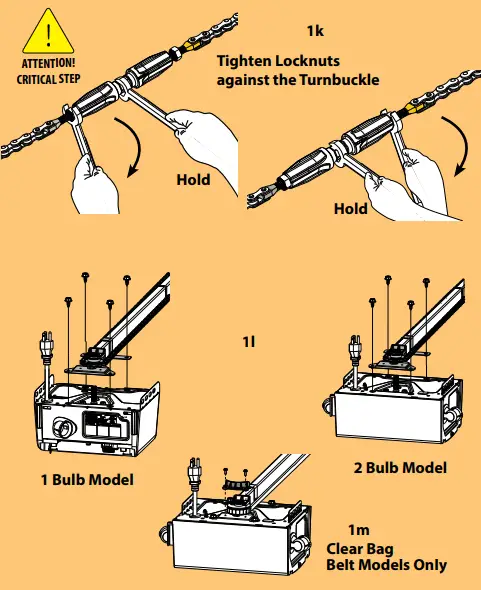
- Install the turnbuckle with “door” end arrow onto the gold threaded end by rotating counter-clockwise one full turn.
- Disengage the carriage assembly by rotating the release handle downward and insert the turnbuckle through the carriage as shown. Ensure chain/belt is not twisted or bound.
- Continue routing the chain/belt assembly until turnbuckle is near the middle of the rail. Insert silver threaded shaft into the turnbuckle and rotate turnbuckle counter-clockwise one full turn.
- Hold the chain/belt and rotate the turnbuckle with thumbs counter-clockwise until chain/belt is tensioned properly. Measure chain/belt tension on opposite side of rail until 1/4” from bottom of rail.
- Once proper tension has been established, hold turnbuckle in place with a 7/16” or adjustable wrench. Tighten both tension nuts with a 7/16” wrench.
- Lower the drive sprocket over the spline shaft on top of the powerhead. Align rail strap and sprocket support with holes in powerhead. Fully tighten 1/4”-14 x 5/8” self tapping screws. Do not overtighten.
- Install belt retainer using #6 x 3/8” self tapping screws.(Clear parts bag, Belt models only).

- Once proper tension has been established, hold turnbuckle in place with a 7/16” or adjustable wrench.
- Tighten both tension nuts with a 7/16” wrench.
- Lower the drive sprocket over the spline shaft on top of the powerhead. Align rail strap and sprocket support with holes in powerhead. Fully tighten 1/4”-14 x 5/8” self tapping screws. Do not overtighten.
- Install belt retainer using #6 x 3/8” self tapping screws.(Clear parts bag, Belt models only

MOUNTING RAIL BRACKET ON HEADER
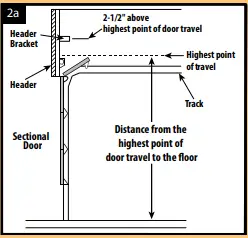
- Determine “highest point of door travel”:
- Get on a ladder to the side of your garage door.
- Have someone lift the door open slowly.
- As the door is raised, and the highest point where the door extends above the door tracks—that is the highest point of door travel.
- For sectional doors this is typically where the top door roller exits the curved portion of the track onto the horizontal section as the door is raised.

- With a tape measure, determine the distance from the highest point of door travel to the floor.
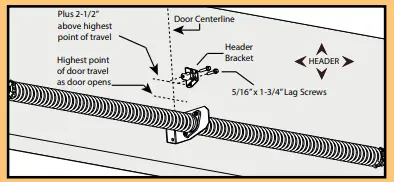
- Place a mark on the header at the highest point of door travel, preferably at the center of the door (measured side to side).
- Position the header bracket above the highest point of travel:

- 2-1/2″ above highest point of door travel.
- Drill 5/32″ pilot holes in header and secure bracket with 5/16″ x 1-3/4″ lag screws.
ATTACHING RAIL TO BRACKET
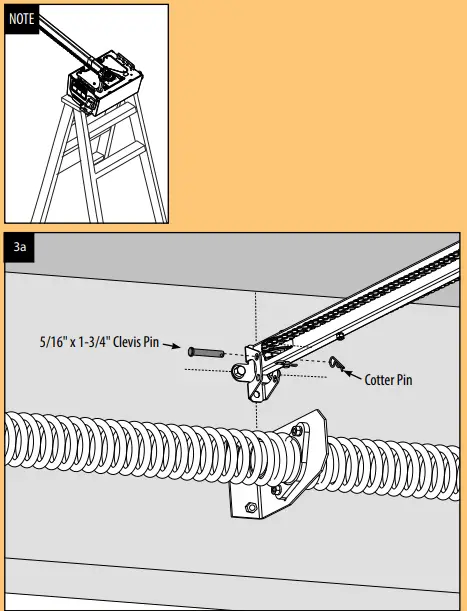
- Elevate powerhead assembly and position header rail section (C) inside bracket.
- Align holes in rail with upper holes in bracket.
- Slide clevis pin through holes in rail and bracket and secure with cotter pin.
- Slide carriage near the powerhead now to prevent damage to the door for step 6a.

ATTACHING POWERHEAD TO CEILING (GREEN BAG)
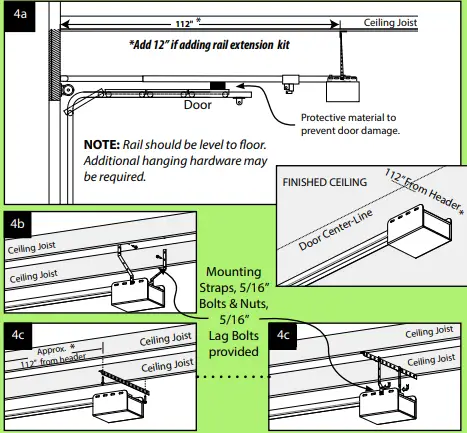
- If possible, lift and support powerhead while a second person fully opens the door. Insert a 2 x 4 board, cardboard or towel between door and rail to protect door. Measure and mark the door centerline. Position powerhead over the centerline of door and allow it to rest on board. Otherwise, measure and mark ceiling 112″ * back from the header, aligned with the centerline of the door.
- Method A-For open ceilings with exposed joist, drill 5/32” pilot holes and secure included mounting straps to joist using 5/16” x 1-3/4” lag screws. Raise powerhead unit so that there is sufficient clearance between door and rail. Cut and/or bend mounting straps as needed to align with the powerhead and to level the rail. Secure powerhead to mounting straps using 5/16”-18 x 3/4” bolts and nuts. Ensure powerhead is centered with the door and remove the 2 x 4 board and/or other protective material.
- Method B-For finished or unfinished ceilings, attach perforated angle (not supplied) to joists using 5/16” x 1-3/4” lag screws and secure mounting straps to the perforated angle with 5/16″-18 bolts and nuts (not supplied). Raise powerhead so that there is sufficient clearance between door and rail. Cut and/or bend mounting straps as needed to align with the powerhead and to level the rail. Secure powerhead to mounting straps using 5/16”-18 x 3/4” bolts and nuts. Ensure powerhead is centered with the door and remove the 2 x 4 board and/or other protective material.
- Close the Door.

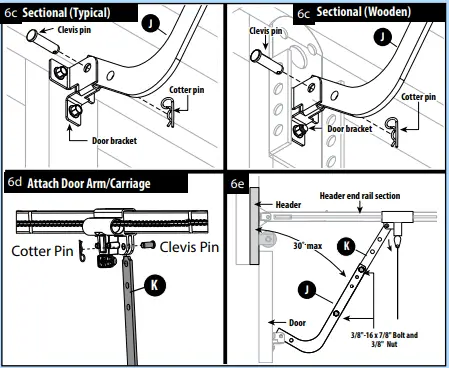
ATTACHING DOOR BRACKET DOOR (BLUE BAG)
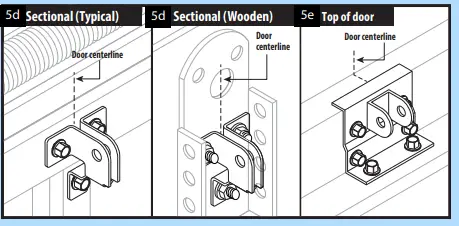
Sectional Door (Typical):
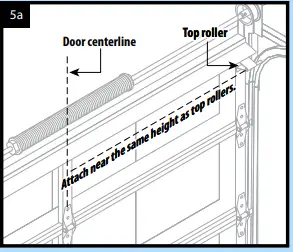
- Center bracket on door. Attach near the same height as top rollers.
- Using bracket, mark holes on door.
- Drill 1/8″ pilot holes partially through the door.
- Secure with 1/4″ – 20 x 3/4″ selfdrilling screws.
- Some garage door manufacturers provide door brackets that CAN be used with your Genie Door Arms.

Sectional Door (Wooden):
- Center bracket on door. Attach near the same height as top rollers.
- Using bracket, mark holes on door or frame.
- Drill 9/32″ holes completely through the door.
- Fasten bracket with 1/4″ x 2″ carriage bolts and nuts (not provided).

ATTACHING DOOR ARM TO DOOR BRACKET & CARRIAGE (BLUE BAG)
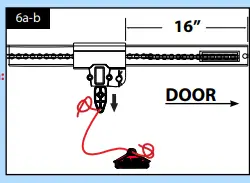
- Secure cord to the red emergency release handle and carriage release.
- Pull the emergency release cord to disengage the carriage and move it toward the door, about 16″ from the header. Check and adjust chain/belt tension at this tiime (see not below)
- Sectional Doors typically accept curved door arm (J). Install the curved door arm inside the door bracket using 3/8” x 1” clevis and cotter pins. In some cases, just the straight door arm (K) may be used if the door bracket is mounted on the top edge of the door. (FIG. 5e)
- Attach straight door arm to carriage using 3/8” x 1” clevis and cotter pins.
- With the door closed, attach the curved and straight door arms together using 3/8″-16 x 7/8″ bolts and nuts. Space the fasteners as far apart as possible.


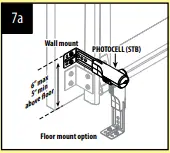
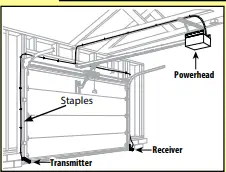
INSTALLING SAFE-T-BEAM®
- Position Safe-T-Beam ® (STB) Transmitter and Receiver on each side of garage door 5″-6″ above floor. Face the lenses towards each other.
- Mark bracket mounting holes; drill 3/32″ pilot holes and secure with (4) 1/4″ x 1-1/4″ lag screws (provided) into wood.

- If mounting into concrete or block, other fasteners are required and are available at leading retail stores.
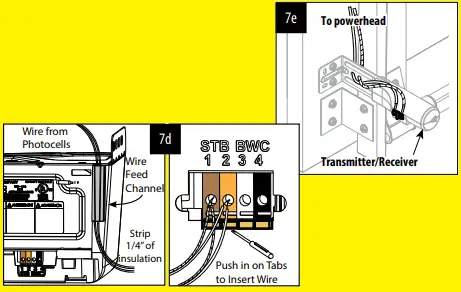
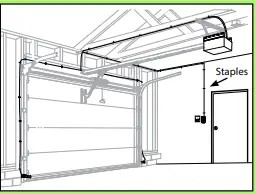
- Use garage pre-wiring if available. Otherwise, route 2 lengths of supplied wire from powerhead, along the ceiling, across the header and down both sides of the door, to each sensor. Secure the wire to the ceiling and walls using the insulated staples in the green bag.
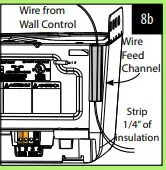
- On the powerhead: insert both wires down through the control wire channel. Remove 1/4″ insulation from both sets of white and striped wire.

- Twist two striped wires together. Using a small at head screwdriver, press in the orange tab at terminal 1 and insert the wires. Twist the two white wires together and insert into terminal
- Ensure the wires are in their terminal, adjust as necessary.
- At each sensor, remove 1/4″ insulation from the white and striped wires and secure in each terminal. Ensure the wires are secure at each terminal; adjust as necessary.

INSTALLING WALL CONSOLE
- Use garage pre-wiring if available.
- Otherwise, route supplied wire from powerhead to the desired location for the wall control. Secure wire with insulated staples (green bag).

- On the powerhead: insert wire downthrough the control wire channel. Remove 1/4″ insulation from white and striped wire.

- Using a small at head screwdriver, press in the orange tab and insert the white wire in terminal 3 and the striped wire in terminal 4.
- Ensure the wires are secure in each terminal; adjust as necessary.
- At the wall console end of the wire, remove 1/4″ insulation from the white and striped wires and secure the white wire to the “W” terminal and the striped wire to the “B/W” terminal as shown.
- Ensure the wires are secure at each terminal; adjust as necessary.
- Mark the wall console mounting holes, drill 3/32″ pilot holes and mount with #6 x 1-1/4″ screws. If mounting to drywall, anchors will be required (not provided).
- Post the “ENTRAPMENT WARNING LABEL” (Included in the
- Operation and Maintenance Manual) next to the wall console.
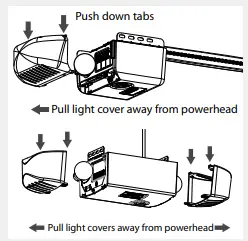
LIGHT AND LENS ASSEMBLY
- Install light bulbs into powerhead light socket(s).
- Insert lower lens tabs into slots in motor cover on powerhead.
- Snap upper lens tabs into place. It may be necessary to squeeze tabs down slightly to align tabs with slots at top of opener frame

CONNECTING POWER
For Grounded Outlet connection:
Plug in the power cord to standard 115 VAC outlet. Coil excess cord and tape or twist tie it to top of the powerhead.
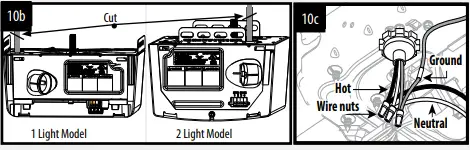
For Permanent Wiring by an Electrician:
- Cut existing power cord OUTSIDE CHASSIS.
- The wire connections must be made INSIDE CHASSIS and there must be at least 6″ of new power supply line wire INSIDE CHASSIS.
FAQS
Can I convert my Genie garage door opener to Wi-Fi?
If you are buying a new garage door opener or replacing an old one, now is the time to get a Smart Connected WiFi garage door opener.
Are all Genie garage door openers compatible?
Genie (All are compatible except some manufactured in 2011 and 2013): We have many customers that own a Genie garage door opener as the vast majority are compatible with LT3/LT3X
Where is the smart Learn button on Genie garage door opener?
The button is usually next to the area where the floppy antenna is connected to the motor head.
How do I convert my garage door opener to smart?
On most garage door opener control boards, you’ll find a terminal for a push button or wall control panel.
How do I know if my Genie garage door opener is Wi-Fi compatible?
Wi-Fi connectivity comes standard with the following Genie garage door openers: Connected ProSeries Model 2128, Reliag ProSeries Model 3120, and Connected ProSeries Model 4124.
What is the life expectancy of a Genie garage door opener?
Even if they last longer than you expect, they’re not going to deliver the same performance after 10 years, even with routine maintenance. Typically, electric garage door openers have a lifespan of 10 to 15 years.
Is Genie better than LiftMaster?
We believe that LiftMaster is the winner, as it offers excellent innovative features, in-garage delivery, and a better warranty than Genie. Still, Genie’s Safe-T-Beam, Aladdin Connect® features, and Genie Sense™ Technology are all excellent reasons to choose it over LiftMaster.
How long does a Genie garage door last?
Most garage door openers last an average of 10-15 years, though many Genie garage door openers last longer!
What color is the Learn button on Genie garage door opener?
Press and hold the PROGRAM button on your Genie garage door opener’s powerhead until the round blue LED is ON. Release the button. The long purple LED will begin flashing
Does every garage door opener have a Learn button?
Most standard garage door remotes today use rolling code technology and a learn button on the garage door opener motor.
Why won’t my garage door learn my remote?
If you replace the batteries and your garage door won’t respond to the remote signal, the remote and door sensor signal might be interrupted by an obstruction.
Can you automate an existing garage door?
Canopy doors are not designed to be motorised, but if the door is modern and/or runs smoothly, it can be motorised with the addition of a bow-arm device, although this will increase the cos
Is a smart garage door opener worth it?
If you want to upgrade your home’s technology and security, a smart home garage door opener is your answer
Can I convert my garage door opener on to myQ?
Getting connected to myQ is simple! Download the free myQ App, and purchase either a Chamberlain Smart Garage Hub,
Is there an app for Genie garage door opener?
Our Aladdin Connect RetroFit Kit and Wi-Fi Enabled Garage Door Openers work with the Aladdin Connect app to give you the latest technology for your home.


