![]() Quick Start Guide
Quick Start Guide
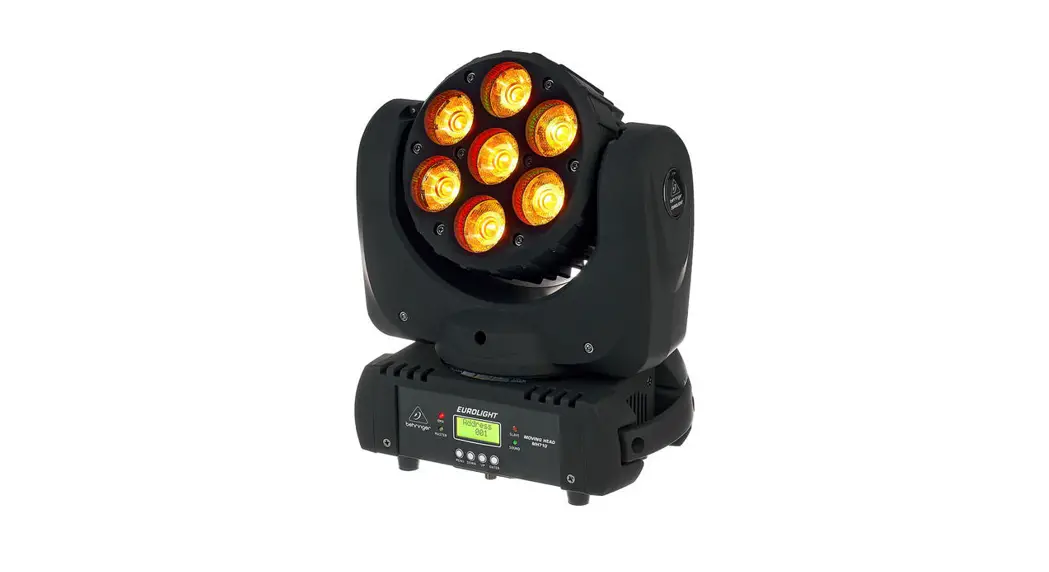
 EUROLIGHT
MOVING HEAD MH710
Compact Moving Head Wash Lighting Effect with RGBW LEDs
Important Safety Instructions
![]() Terminals marked with this symbol carry an electrical current of sufficient magnitude to constitute a risk of electric shock. Use only high-quality professional speaker cables with ¼” TS or twist-locking plugs pre-installed. All other installation or modifications should be performed only by qualified personnel.
Terminals marked with this symbol carry an electrical current of sufficient magnitude to constitute a risk of electric shock. Use only high-quality professional speaker cables with ¼” TS or twist-locking plugs pre-installed. All other installation or modifications should be performed only by qualified personnel.![]() This symbol, wherever it appears, alerts you to the presence of uninsulated dangerous voltage inside the enclosure – voltage that may be sufficient to constitute a risk of shock.
This symbol, wherever it appears, alerts you to the presence of uninsulated dangerous voltage inside the enclosure – voltage that may be sufficient to constitute a risk of shock.![]() This symbol, wherever it appears, alerts you to important operating and maintenance instructions in the accompanying literature. Please read the manual.
This symbol, wherever it appears, alerts you to important operating and maintenance instructions in the accompanying literature. Please read the manual.![]() Caution To reduce the risk of electric shock, do not remove the top cover (or the rear section). No user-serviceable parts inside. Refer servicing to qualified personnel.
Caution To reduce the risk of electric shock, do not remove the top cover (or the rear section). No user-serviceable parts inside. Refer servicing to qualified personnel.![]() Caution To reduce the risk of fire or electric shock, do not expose this appliance to rain and moisture. The apparatus shall not be exposed to dripping or splashing liquids and no objects filled with liquids, such as vases, shall be placed on the apparatus.
Caution To reduce the risk of fire or electric shock, do not expose this appliance to rain and moisture. The apparatus shall not be exposed to dripping or splashing liquids and no objects filled with liquids, such as vases, shall be placed on the apparatus.![]() Caution These service instructions are for use by qualified service personnel only. To reduce the risk of electric shock do not perform any servicing other than that contained in the operation instructions. Repairs have to be performed by qualified service personnel.
Caution These service instructions are for use by qualified service personnel only. To reduce the risk of electric shock do not perform any servicing other than that contained in the operation instructions. Repairs have to be performed by qualified service personnel.
- Read these instructions.
- Keep these instructions.
- Heed all warnings.
- Follow all instructions.
- Do not use this apparatus near water.
- Clean only with a dry cloth.
- Do not block any ventilation openings. Install in accordance with the manufacturer’s instructions.
- Do not install near any heat sources such as radiators, heat registers, stoves, or other apparatus (including amplifiers) that produce heat.
- Do not defeat the safety purpose of the polarized or grounding-type plug. A polarized plug has two blades with one wider than the other. A grounding-type plug has two blades and a third grounding prong. The wide blade or the third prong are provided for your safety. If the provided plug does not fit into your outlet, consult an electrician for the replacement of the obsolete outlet.
- Protect the power cord from being walked on or pinched particularly at plugs, convenience receptacles, and the point where they exit from the apparatus.
- Use only attachments/accessories specified by the manufacturer.

- Use only with the cart, stand, tripod, bracket, or table specified by the manufacturer, or sold with the apparatus. When a cart is used, use caution when moving the cart/ apparatus combination to avoid injury from tip-over.
- Unplug this apparatus during lightning storms or when unused for long periods of time.
- Refer all servicing to qualified service personnel. Servicing is required when the apparatus has been damaged in any way, such as power supply cord or plug is damaged, liquid has been spilled or objects have fallen into the apparatus, the apparatus has been exposed to rain or moisture, does not operate normally, or has been dropped.
- The apparatus shall be connected to a MAINS socket outlet with a protective earthing connection.
- Where the MAINS plug or an appliance coupler is used as the disconnect device, the disconnect device shall remain readily operable.

- Correct disposal of this product: This symbol indicates that this product must not be disposed of with household waste, according to the WEEE Directive (2012/19/EU) and your national law. This product should be taken to a collection center licensed for the recycling of waste electrical and electronic equipment (EEE). The mishandling of this type of waste could have a possible negative impact on the environment and human health due to potentially hazardous substances that are generally associated with EEE. At the same time, your cooperation in the correct disposal of this product will contribute to the efficient use of natural resources. For more information about where you can take your waste equipment for recycling, please contact your local city office, or your household waste collection service.
- Do not install in a confined space, such as a book case or similar unit.
- Do not place naked flame sources, such as lighted candles, on the apparatus.
- Please keep the environmental aspects of battery disposal in mind. Batteries must be disposed-of at a battery collection point.
- Use this apparatus in tropical and/or moderate climates.
LEGAL DISCLAIMER
Music Tribe accepts no liability for any loss which may be suffered by any person who relies either wholly or in part upon any description, photograph, or statement contained herein. Technical specifications, appearances and other information are subject to change without notice. All trademarks are the property of their respective owners. Midas, Klark Teknik, Lab Gruppen, Lake, Tannoy, Turbosound, TC Electronic, TC Helicon, Behringer, Bugera, Auratone and Coolaudio are trademarks or registered trademarks of Music Tribe Global Brands Ltd. © Music Tribe Global Brands Ltd. 2020 All rights reserved.
LIMITED WARRANTY
For the applicable warranty terms and conditions and additional information regarding Music Tribe’s Limited Warranty, please see complete details online at musictribe.com/warranty.
![]() Additional Safety Instructions
Additional Safety Instructions
- When opening the package, take all the accessories out, and place the device on a table for inspection. First check whether the accessories are complete, then inspect the device carefully for any damage. If there is any damage, please contact your dealer as soon as possible.
- AC Power: Check that the local power supply is accordance with the requirements of the rated voltage of the device.
- The device is only suitable for an indoor working environment. It should be kept in a dry environment, and away from any moisture, overheating or dust. Do not allow the device to come into contact with water, moisture, or other liquids, in order to prevent or reduce the risk of electric shock or fire.
- Please do not install the device directly onto, or close to, combustible surfaces or materials.
- Personnel who install, operate and maintain the device must be professionally licensed and authorized to do so.
- If the device appears to be malfunctioning, stop using the device immediately. Do not try to repair the device, but contact the nearest authorized technical assistance center. If parts are damaged, always use identical authorized replacement parts.
- Do not touch any electrical wiring in the process of operation, to prevent the risk of electric shock.
- Make sure the device is used in a working environment temperature, that does not exceed 40ºC or below – 20ºC.
- In normal operation, the highest temperature of the device housing may reach 80ºC, please do not touch.
- The device should only be used in a grounded power system, and the ground wire must connect with the ground wire of the power supply system. The ground/earth sign of the device should be connected to the installing fixtures.
- Do not use the device if there is damage to the power cord insulation, and also do not run the power cord so it overlaps other wires in your system.
- When not in use or when cleaning the device, please disconnect the power cord to the device.
- There are no user-serviceable components inside the device. Before operation of the device, please make sure the device is secure and all assembly screws and fittings are fitted. If the device outer case is open or loose, the device must not be used.
- Regular checks must be conducted by qualified personnel to ensure that the system remains in a secure and stable condition.
- Make sure that, where the product is suspended, the area underneath the product is free of human traffic. Do not suspend the product in areas which can be entered or used by members of the public.
Secondary Safeties
All lighting units installed in theatres, studios or other places of work and entertainment shall, in addition to the principle load bearing means of suspension, be provided with an independent, properly rated, and securely attached secondary safety. The additional safety device must be mounted in a way that the lighting unit is caught by the safety device without any drop and swing in the event that the primary suspension fails.
Product Care and Cleaning
Please pay attention to the following points when using and inspecting this product:
- All screws and components of the installed product must be tightly connected and not rusty or damaged
- The outer casing, lens, fixing parts and installation location (such as ceiling, hanger, truss, etc.) cannot be deformed
- The power cord must not be damaged
The installation and use of the product must be carried out by trained professional technicians and must be protected against potential safety hazards.
![]() WARNING: Please unplug the power cord before doing product maintenance!
WARNING: Please unplug the power cord before doing product maintenance!
Before disconnecting the device or starting maintenance work, make sure that the device is disconnected. It is very important to keep the device clean and clean. If it is kept clean, this not only keeps the output at the maximum brightness, but it also prolongs its service life. Use high-quality professional glass cleaner and clean with a soft rag. Under no circumstances should alcohol or chemical solvents be used. The interior of the device and the fan should be cleaned at least quarterly using a vacuum cleaner.
Display
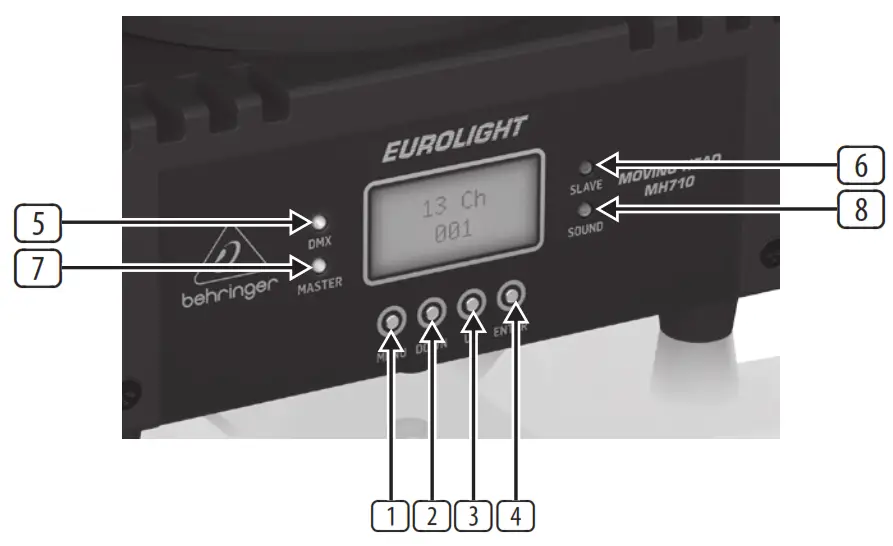
| Item | No. | Function | Description |
| Button: | 1 | MENU | Activates main menu and toggles between menu items. Closes an open submenu without saving |
| 2 | DOWN | Decreases the displayed value by one/Navigate function | |
| 3 | UP | Increases the displayed value by one/Navigate function | |
| 4 | ENTER | Enter selected function/Confirm and save | |
| LED: | 5 | DMX | LED turns on when detects console signal, enter in DMX mode |
| 6 | SLAVE | LED turns on when in SLAVE1/2/3/4/5 mode | |
| 7 | MASTER | LED turns on when in MASTER mode | |
| 8 | SOUND | LED turns on when in SOUND control mode |
Display Functions:
Press the MENU button to access menu options, keep pressing MENU to toggle menu items. Press the ENTER button to access desired functions and the display will flash, then use the UP/DOWN buttons to navigate and select the desire setting. Press ENTER to save and confirm, or press MENU to go back without saving.
The main functions are as follows: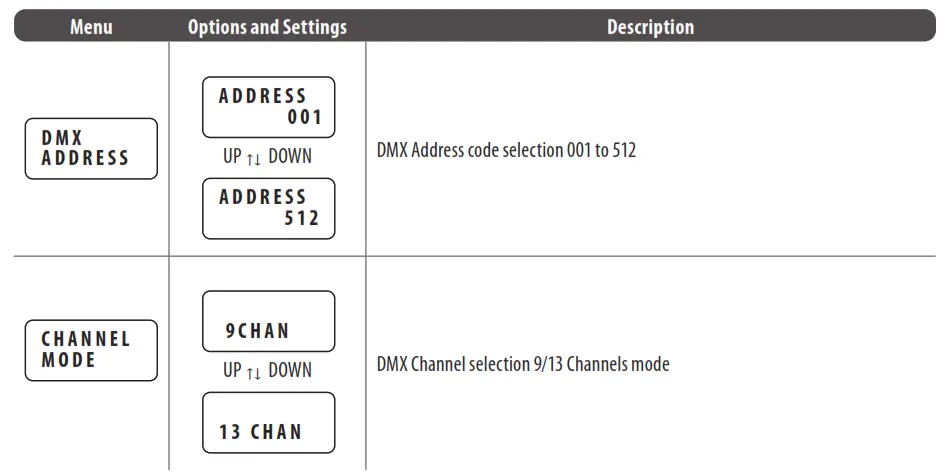

Controlling the Device
The device can be controlled in the following ways:
- Master/slave
- DMX control
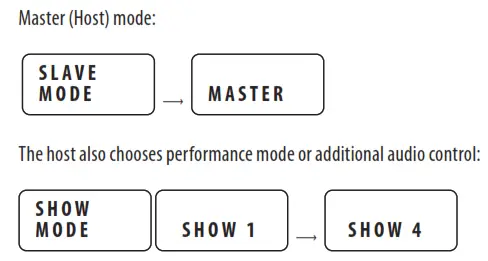
Master/Slave control
- Connect the device(s) with DMX cable. Note: In order to prevent interference, connect less than or equal to 17 units at one time.
- Master/slave mode will be automatically activated.
- Specify host mode, and set the other units to SLAVE1/2/3/4/5 and all slaves will follow (Refer to Display Functions table for SLAVE mode details)

DMX control
To use a DMX controller to control the lights, first set the DMX address code (the address code range is between 1-512) so that the lights can receive the DMX signal.
- Press the MENU button and select the “DMX Address” menu option.
- Press ENTER button to enter. Using DOWN/UP to select DMX address code, the factory value is “Address 001”.
- After the address code is set, hold down the ENTER key to save.

- Connect the output port of the controller to the DMX input port of the first device, and connect the DMX output port to the DMX input port of the second device, and so on, until all slaves are connected.


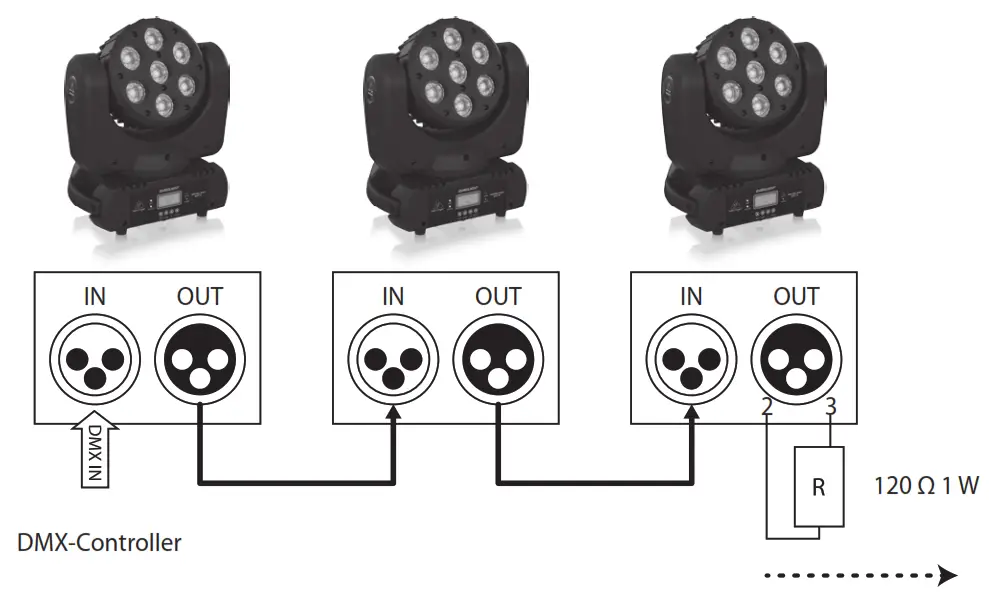
DMX Connection terminal device (Loop connection)
During the installation process, if the signal line is laid a long distance, or in a noisy environment, such as a dance hall, it is recommended to use a DMX terminal (loop connection). This can reduce any interference to the digital control signal by electrical noise.
The DMX terminator consists of a simple XLR connector with pin 2 and 3 connected to a 120 Ω resistor. Please insert the terminal into the XLR output port of the last device. Refer to the following picture: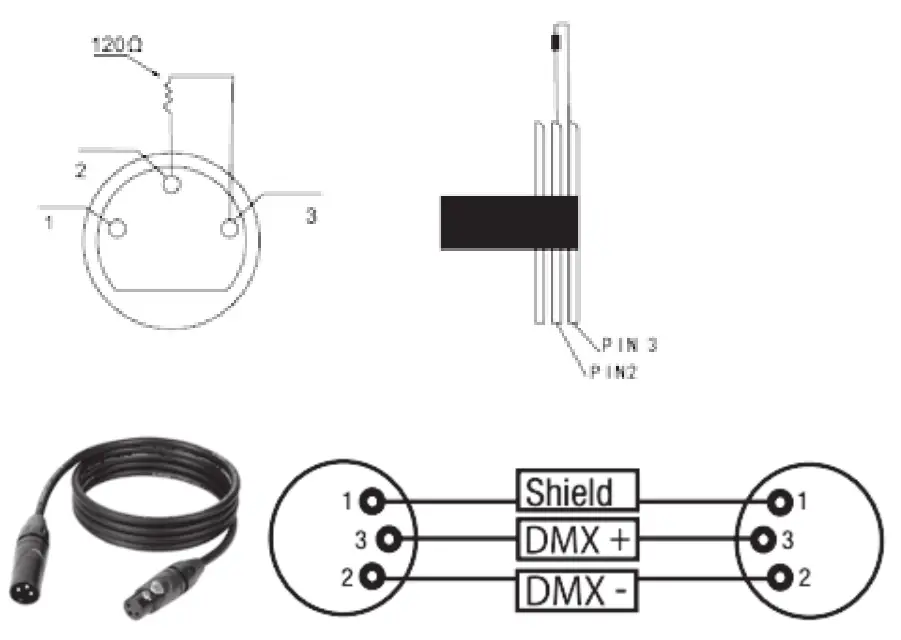
DMX Channel Mode
DMX Channel (9CH)
| Channe | Function | Value | Description | ||
| 1 | Horizontal position | 000 | – | 255 | Horizontal position 0° to 630° (pan) |
| 2 | Vertical position | 000 | – | 255 | Vertical position 0° to 220° (tilt) |
| 3 | LED start switch / strobe | 000 | – | 007 | LED turn off |
| 008 | – | 015 | LED quick turn on channel | ||
| 016 | – | 131 | Strobe, slow to fast | ||
| 132 | – | 139 | LED quick start channel | ||
| 140 | – | 181 | Fade, slow to fast | ||
| 182 | – | 189 | LED quick start channel | ||
| 190 | – | 231 | Fade, slow to fast | ||
| 232 | – | 239 | LED quick start channel | ||
| 240 | – | 247 | Lightning strobe | ||
| 248 | – | 255 | LED start | ||
| 4 | Red | 000 | – | 255 | R dimmer, 0-100% |
| 5 | Green | 000 | – | 255 | G dimmer, 0-100% |
| 6 | Blue | 000 | – | 255 | B dimmer, 0-100% |
| 7 | White | 000 | – | 255 | W dimmer, 0-100% |
| 8 | Dimmer | 000 | – | 255 | Dimmer, 0-100% |
| 9 | Sound Control | 000 | – | 239 | No function |
| 240 | – | 255 | Sound control mode, audio control | ||
DMX Channel (13CH)
| Channe | Function | Value | Description | ||
| 1 | Horizontal position | 000 | – | 255 | Horizontal position 0° to 630° (pan) |
| 2 | Horizontal, fine | 000 | – | 255 | Fine adjustment for horizontal position (pan) |
| 3 | Vertical position | 000 | – | 255 | Vertical position 0° to 220° (tilt) |
| 4 | Vertical, fine | 000 | – | 255 | Fine adjustment for vertical position (tilt) |
| 5 | Speed | 000 | – | 255 | Speed of horizontal (pan) and vertical (tilt) movement, fast to slow |
| 6 | Dimmer | 000 | – | 255 | Dimmer, 0-100% |
| 7 | LED Start Switch/ stroboscopic | 000 | – | 007 | LED turn off |
| 008 | – | 015 | LED quick start channel | ||
| 016 | – | 131 | Strobe, slow to fast | ||
| 132 | – | 139 | LED quick start channel | ||
| 140 | – | 181 | Fade, slow to fast | ||
| 182 | – | 189 | LED quick start channel | ||
| 190 | – | 231 | Fade, slow to fast | ||
| 232 | – | 239 | LED quick start channel | ||
| 240 | – | 247 | Lightning strobe | ||
| 248 | – | 255 | LED Start | ||
| 8 | Red | 000 | – | 255 | R dimmer, 0-100% |
| 9 | Green | 000 | – | 255 | G dimmer, 0-100% |
| 10 | Blue | 000 | – | 255 | B dimmer, 0-100% |
| 11 | White | 000 | 255 | W dimmer, 0-100% | |
| 12 | Color | 000 | 007 | No function | |
| 008 | 255 | Color selection | |||
| 13 | Sound mode | 000 | 239 | No function | |
| 240 | 255 | Sound control mode, audio control | |||
Specifications
| Category | Parameter | |
| Voltage | AC100-240V, 50/60Hz | |
| Power consumption | 96W | |
| Light source | 7 x Single 10W RGBW full-color, four in one | |
| Lumen (1 Meter) | Color | Lux |
| Red | 14620 | |
| Green | 26300 | |
| Blue | 36000 | |
| White | 30000 | |
| Full Bright | 110000 | |
| Beam angle | 15° | |
| X-axis rotation angle | 630° | |
| Y-axis rotation angle | 220° | |
| Channels | 9CH/13CH | |
| Control mode | DMX, Master-slave, Sound control Auto | |
| DMX address code | DMX512 | |
| DMX connection | Three-core DMX connection (DMX+, DMX-, ground) | |
| Display | LCD0802 | |
| Dimensions (H x W x D) | 314 x 268 x 167 mm | |
| Net weight | 4.9 kg | |
| Supplied items | EUROLIGHT MOVING HEAD MH 10 Handle (with fast lock) Ring | |
| Optional accessories | Light damp Safety cable DMX signal cable | |
Other important information
- Register online.
Please register your new Music Tribe equipment right after you purchase it by visiting behringer. com. Registering your purchase using our simple online form helps us to process your repair claims more quickly and efficiently. Also, read the terms and conditions of our warranty, if applicable. - Malfunction. Should your Music Tribe Authorized Reseller not be located in your vicinity, you may contact the Music Tribe Authorized Fulfiller for your country listed under “Support” at behringer. com. Should your country not be listed, please check if your problem can be dealt with by our “Online Support” which may also be found under “Support” at behringer. com. Alternatively, please submit an online warranty claim at behringer. com BEFORE returning the product.
- Power Connections.
Before plugging the unit into a power socket, please make sure you are using the correct mains voltage for your particular model. Faulty fuses must be replaced with fuses of the same type and rating without exception.
We Hear You![]()


