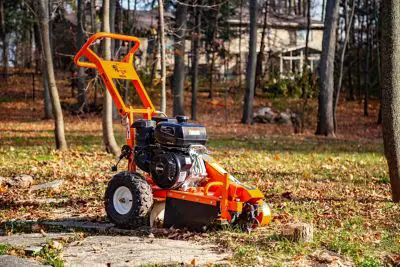
DK2 OPG777 3.5 Cut 14HP Commercial-Grade Stump Grinder
UNPACK
Open and unpack all items. Leave lots of working space. Inspect all parts.
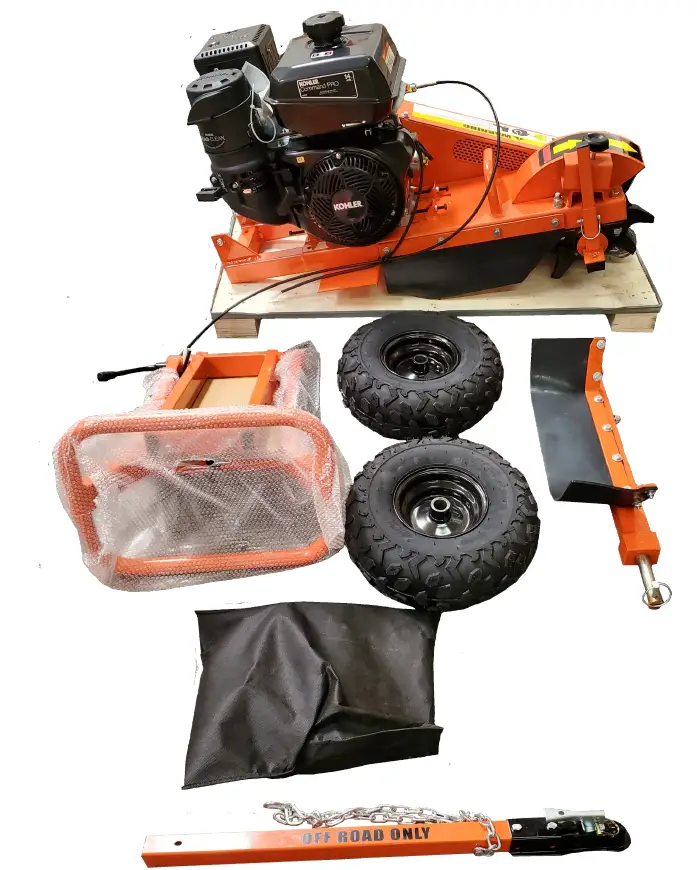
NOTE: UPON INSPECTION OF PARTS IF YOU FIND ANY MISSING PARTS PLEASE CALL DK2 POWER AT 702-331-5353OR CONTACT US VIA OUR WEBSITE WWW.DK2POWER.COM
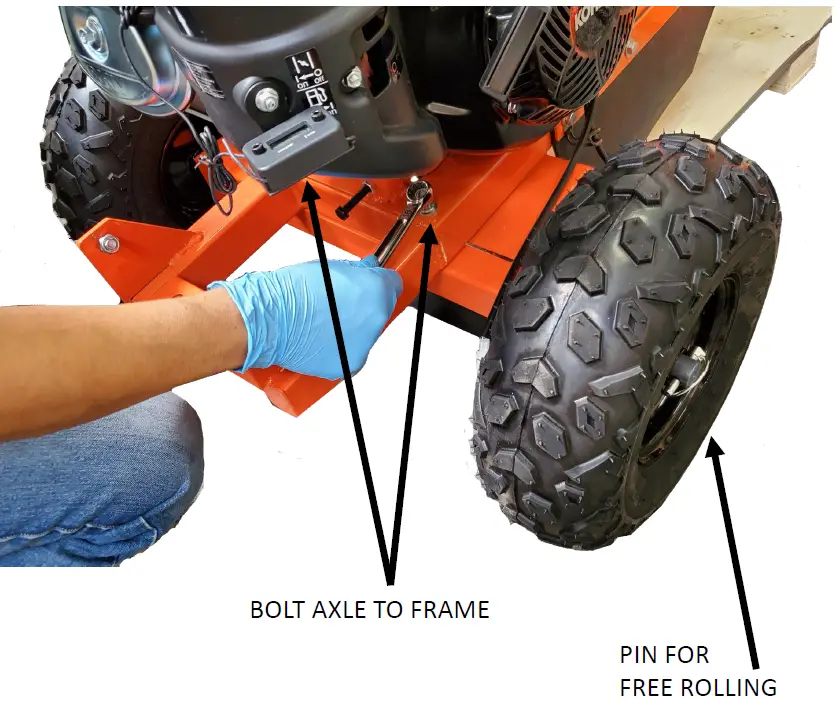
INSTALL AXLE AND WHEELS
- Grease or OIL the axles (grease not included).
- Pin ONLY the axle to allow the wheel to spin freely. PIN WHEEL AND AXLE FOR WHEEL BRAKE DURING GRINDING ONLY.
- During transport in trailer or pickup PIN BOTH WHEELS for dual wheel brakes.
- Install axle onto frame with 2 bolts and hardware provided.

HANDLE MOUNTING
- Mount the handle tower assembly with the bolts provided.
- Connect the 2 wire connectors.
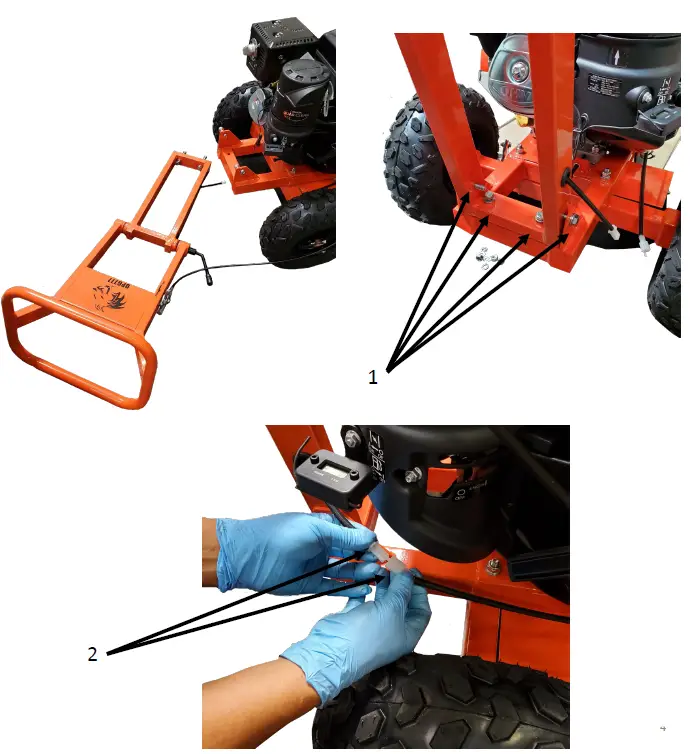
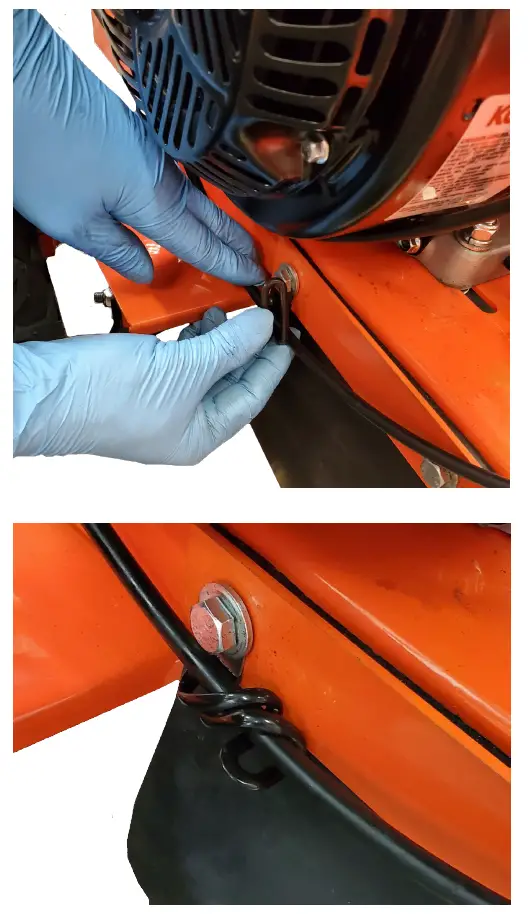
SECURE THE THROTTLE CABLE
SECURE THE THROTTLE CABLE WITH THE LOOP WIRE CLAMP PROVIDED ON THE CHASSIS.
TOW BAR ASSEMBLY
INSTALL THE TOW BAR
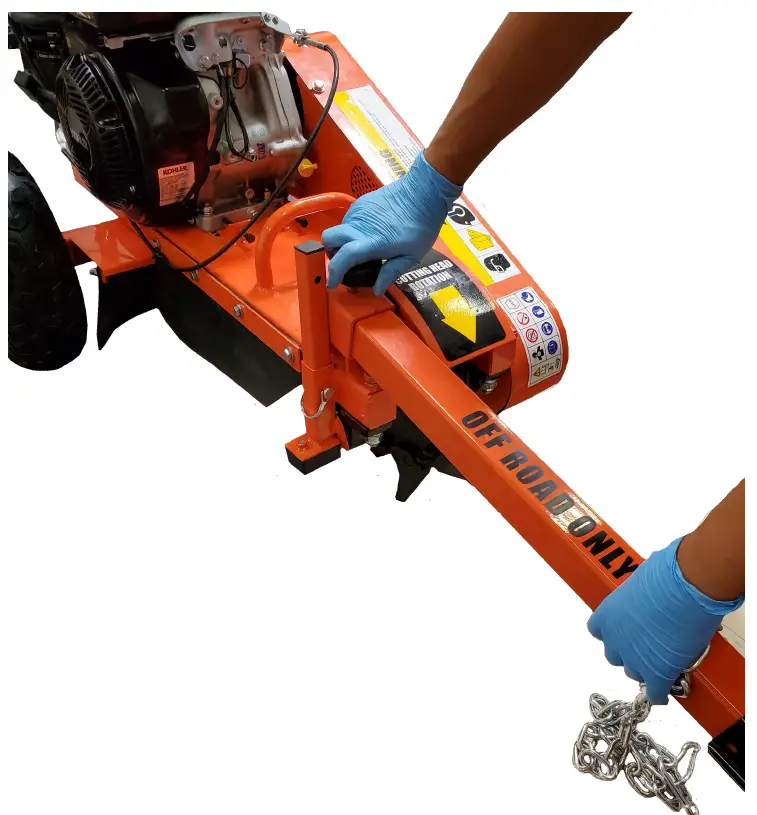 OFF ROAD ONLY
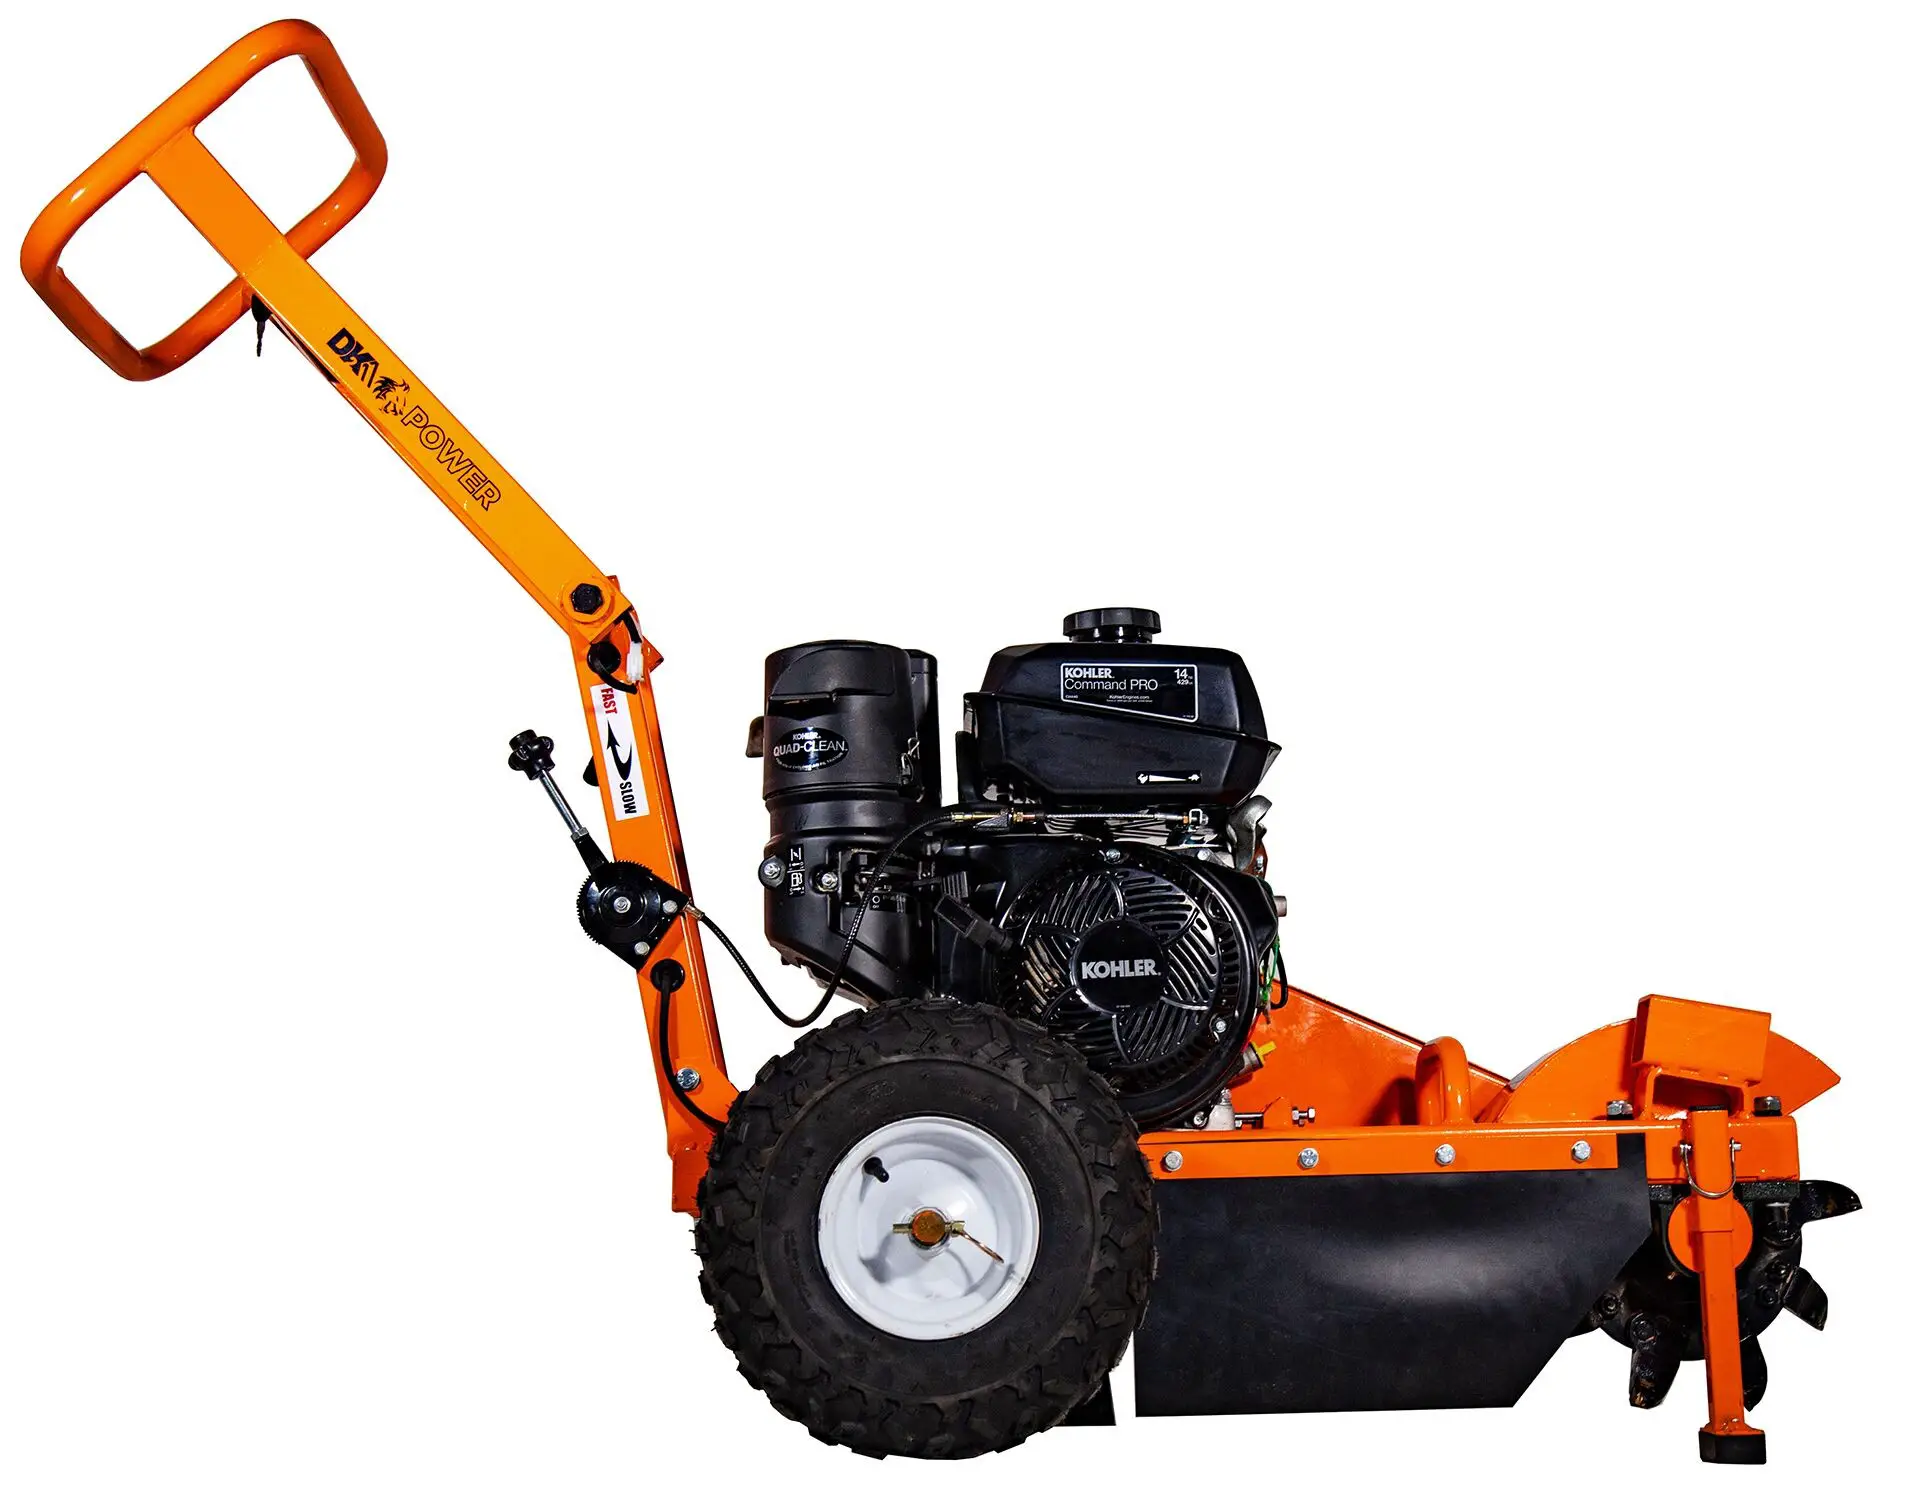
READ THE KOHLER ENGINE MANUAL SUPPLIED WITH YOUR UNIT FOR FULL ENGINE OPERATION, SAFETY, AND MAINTENANCE.
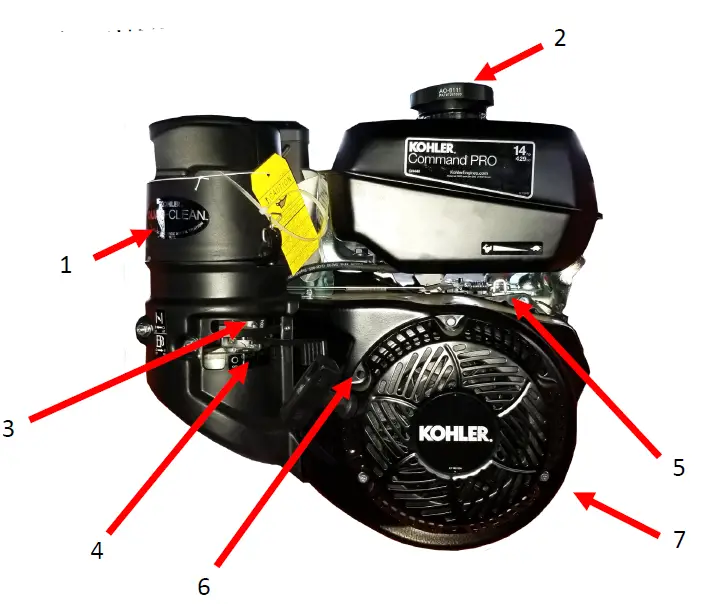
| 1 | Air Filter – Summer and Winter Positions |
| 2 | GAS – USE MID GRADE OR HIGHER |
| 3 | CHOKE – LEFT IS ON / RIGHT IS OFF (RUN POSITION) |
| 4 | GAS ON/OFF SWITCH – LEFT IS OFF / RIGHT IS ON |
| 5 | THROTTLE – RABBIT FAST / TURTLE SLOW |
| 6 | PULL STARTER – PULL TIGHT- THEN PULL START |
| 7 | OIL – FILL TO MARK 10W30, WILL NOT START IF OIL IS LOW, HAS LOW OIL SHUTOFF PROTECTION. 2 YELLOW CAPS ARE OIL FILL CAPS. USE EITHER ONE TO FILL OIL. |
PARTS DIAGRAM
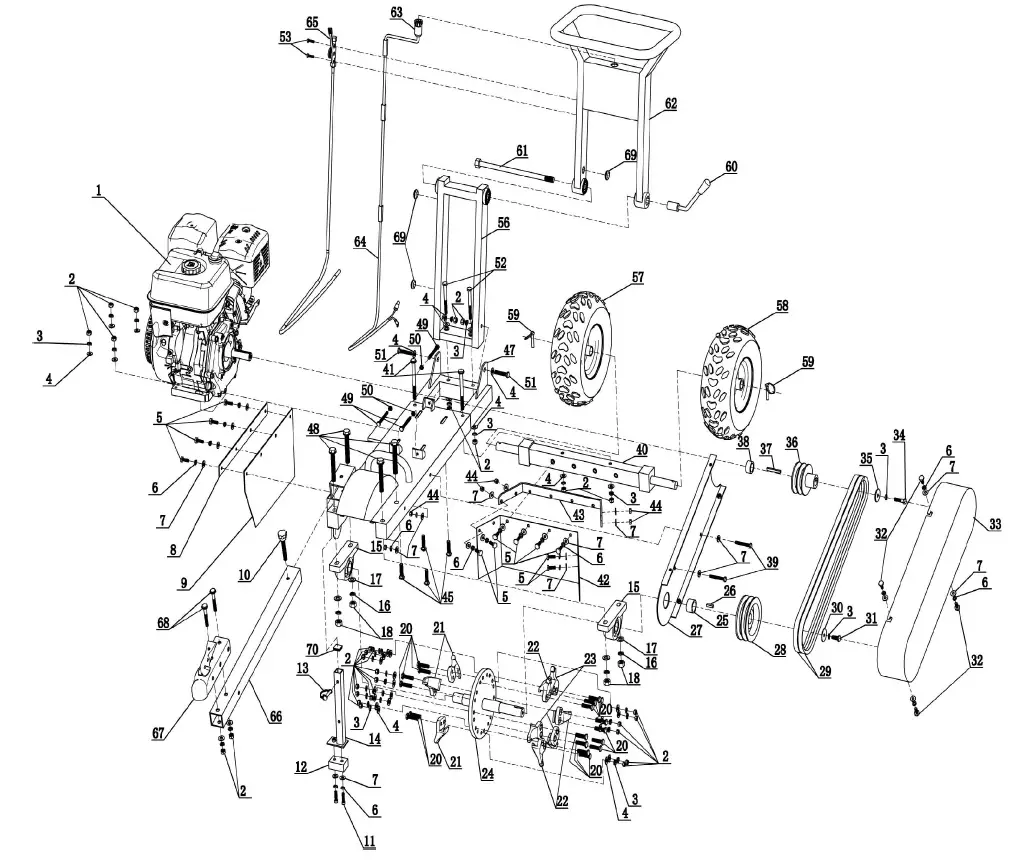
PART NUMBERS
| 1 | engine | 36 | engine pulley |
| 2 | M10 locknut | 37 | key |
| 3 | 010 lockwasher | 38 | engine spacer |
| 4 | washer 01O*02O*1.5 | 39 | bolt M8*65 |
| 5 | Bolt M8*25 | 40 | wheel axle |
| 6 | 8 lockwasher | 41 | bolt M10*125 |
| 7 | washer 08*016*1.5 | 42 | leather protect sheet |
| 8 | protection sheet plate | 43 | leather protect sheet fixed plate |
| 9 | protection sheet | 44 | M8 locknut |
| 10 | knob o50 | 45 | half-round head square neck |
| 11 | bolt M8*30 | 46 | bolt M10*45 46 washer |
| 12 | rubber | 47 | frame |
| 13 | D-pin 08*5O | 48 | Inner six angle cylinder bolt M14*95 |
| 14 | support foot | 49 | bolt M8*80 |
| 15 | vertical seat bearing | 50 | M8 nut |
| 16 | 014 lockwasher | 51 | bolt M10*50 |
| 17 | washer 014*028*2 | 52 | bolt MIO* 100 |
| 18 | M14 locknut | 53 | bolt M6*50 |
| 19 | M10 nut | 54 | washer 06*012*1.2 |
| 20 | bolt M10*35 | 55 | M6 locknut |
| 21 | right cutter | 56 | lower part of handle |
| 22 | left cutter | 57 | right tire |
| 23 | straight cutter | 58 | left tire |
| 24 | cutter rotor | 59 | Ring type lock |
| 25 | side spacer | 60 | handle adjusted bar |
| 26 | key | 61 | bolt M16*310 |
| 27 | Belt cover accessory plate | 62 | handle |
| 28 | rotor pulley | 63 | key switch |
| 29 | belt | 64 | stop wire |
| 30 | washer | 65 | throttle |
| 31 | bolt M10*25 | 66 | tow bar |
| 32 | bolt M8*16 | 67 | hitch trailer |
| 33 | belt cover | 68 | bolt M10*80 |
| 34 | engine bolt | 69 | rubber ring |
| 35 | washer | 70 | Pipe Plug |
OPERATION –BEFORE TURNING KEY AND PULL STARTING ENGINE
CLEAR AREA OF ALL PEOPLE AND PROPERTY THAT COULD BE DAMAGED. THINK SAFETY. CHIPS ARE FLYING PROJECTILES AND CAN CAUSE INJURY.
WEAR SAFETY GLASSES, HEARING PROTECTION, AND GLOVES
DO NOT WEAR LOOSE FITTING CLOTHES THAT COULD GET STUCK IN THE MACHINE MOVING PARTS, ONLY CHIP WOOD, CHILDREN SHOULD NOT RUN THIS EQUIPMENT, STAY ALERT OF YOUR SURROUNDING AND PERSONS THAT COULD APEAR IN THE CHIP PATH WHILE YOU ARE WORKING.
UNIT IS A DIRECT DUAL BELT DRIVE. NO CLUTCH TO SLIP OR BURN UP BUT YOUR BELTS WILL NEED TIGHTENED AND CHECKED ON A REGULAR BASIS TO MAINTAIN 100% CUTTING POWER.
Tip the Stump Grinder up with the cutters off the ground when pull starting.
PERFORMANCE OPERATION –
APPROACH STUMP FROM THE TOP CUTTING STRAIGHT DOWN INTO THE STUMP WITH THE 3.5 INCH WIDE CUTTING TEETH. RAISE UP OUT OF THE CUT, MOVE OVER, PLUNGE AGAIN. REPEAT ACROSS ENTIRE STUMP. MOVE SIDE TO SIDE TO FACE OFF THE STUMP. ADJUST YOUR BOW HANDLE FOR COMFORT.
SET ONE OF YOUR WHEEL BRAKES SO YOU CAN PIVOT THE MACHINE CUT.
TO MOVE THE MACHINE FORWARD WITH THE BRAKE ON, ALLOW THE ROTATING TEETH AGAINST THE STUMP TO PULL THE UNIT FORWARD.
TIGHTEN ALL BOLTS AND TEETH BEFORE EACH USE. TEETH ARE NOT COVERED UNDER WARRANTY. CLEAN ALL STONES AND ROCKS AWAYS FROM CUTTING STUMP AREA, CHECK FOR METAL STAKES AND OR NAILS IN THE TREE STUMP BEFORE CUTTING.
KOHLER ENGINES HAVE A LOW OIL SHUTOFF TO PROTECT THE ENGINE, TILTING THE GRINDER HIGHER THAN 12 INCHES AT AN ANGLE CAN CAUSE THE OIL TO ROLL BACK AND THE LOW OIL SENSOR WILL SHUT THE ENGINE OFF. CUT YOUR STUMP 9 TO 10 INCHES OFF THE GROUND SO YOU DON’T TRIP THE SENSOR ON THE ENGINE. READ AND OBEY ALL WARNING LABELS ON THIS MACHINE.
TROUBLESHOOTING GUIDE
QUICK START SETUP
- ADD 10W30 OIL TO ENGINE
- ADD GAS
- RAISE UP KICK STAND
- TURN KEY ON
- TURN GAS ON
- HALF THROTTLE (CHOKE OPTIONAL FOR COLD STARTS)
- TIP THE UNIT BACK WITH THE CUTTERS OFF THE GROUND
- PULL START THE ENGINE
STUMP CUTTING
- ENGINE ON HIGHEST SPEED
- HOLD TIGHT ON BOW HANDLE WITH BOTH HANDS
- LOWER CUTTERS INTO TOP OF STUMP, CUT 3.5IN WIDE TO CUTTER DEPTH
- RAISE CUTTERS UP AND MOVE OVER FOR NEXT CUT, REPEAT
- PIVOT CUTTERS FROM SIDE TO SIDE TO FACE OFF REMAINING STUMP
TROUBLESHOOTING
ENGINE WON’T START
- TURN KEY ON – CHECK ENGINE OIL LEVEL – CHECK GAS LEVEL
- UNPLUG KEY SWITCH – IF ENGINE STARTS REPLACE THE KEY SWITCH.
- FOLLOW YOUR ENGINE MANUAL FOR FURTHER TROUBLE SHOOTING.
UNIT VIBRATES
- CHECK YOUR CUTTERS FOR MISSING OR LOOSE TEETH.
- CHECK YOUR CUTTER WHEEL PILLAR BEARING MOUNTING BOLTS.
POWER LOSS AT CUTTER WHEEL
- CHECK YOUR BELT TENSION – SLIPPING BELTS CAUSE POWER LOSS.
- WORN BELTS – REPLACE
- BELT TENSION SHOULD BE SET AT .25 INCH MOVEMENT ABOVE AND BELOW BELT NORMAL POSITION.
- CHECK YOUR 4 ENGINE MOUNTING BOLTS, LOOSE ENGINE BOLTS WILL CREATE LOOSE BELT TENSION.
ADJUSTING THE DRIVE BELTS
POWER LOSS AT CUTTER WHEEL
- CHECK YOUR BELT TENSION – SLIPPING BELTS CAUSE POWER LOSS.
- WORN BELTS – REPLACE
- BELT TENSION SHOULD BE SET AT .25 INCH MOVEMENT ABOVE AND BELOW BELT NORMAL POSITION.
- CHECK YOUR 4 ENGINE MOUNTING BOLTS, LOOSE ENGINE BOLTS WILL CREATE LOOSE BELT TENSION.
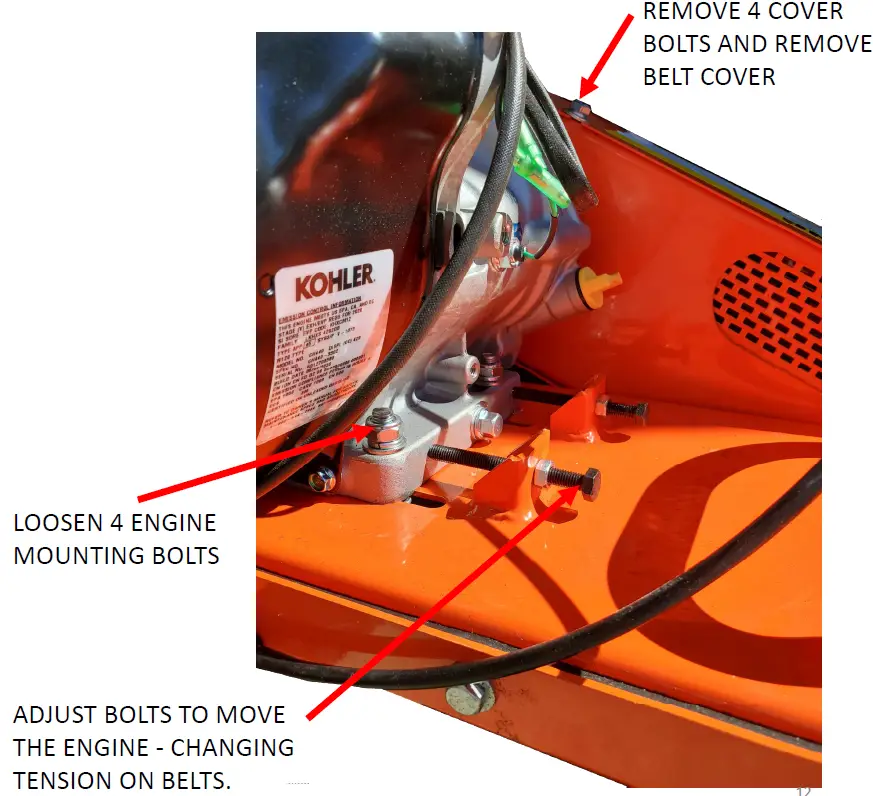
USE DK2 POWER OEM REPLACEMENT BELTS FOR TOP PERFORMANCE
DO’S AND DON’TS
DO’S
- CHECK YOUR BELT TENSION – SLIPPING BELTS CAUSE POWER LOSS.
- CHECK YOUR 4 ENGINE MOUNTING BOLTS, LOOSE ENGINE BOLTS WILL CREATE LOOSE BELT TENSION.
- CHECK YOUR TEETH BOLTS REGULAR, TORQUETO 30 FTLBS
- GREASE YOUR TIRE AXLES
- REMOVE THE TOW BAR WHEN GRINDING
- LIFT THE KICK STAND WHEN GRINDING
- CHANGE YOUR FIRST OIL AFTER 5 HOURS, THEN PER THE ENGINE MANUAL
- USE DK2 POWER OEM REPLACEMENT PARTS FOR TOP PERFORMANCE
- DON’T GRIND SAND, ROCKS OR DIRT, IT WILL DULL OR DAMAGE YOUR TEETH
DONT’S
- DON’T LIFT THE FRONT END UP IN THE AIR TO WORK ON TEETH.
- When you had the nose of your grinder up in the air for extended time the oil from the oil pan has flooded the piston cylinder and your cylinder is full of oil. This creates compression and you can’t turn the engine over. So, remove the spark plug, remove both oil fill caps, this allows air flow. Let it sit for a day over night is best. Replace the oil caps, give it a shot of starting fluid in the spark plug hole, replace the spark plug. Now start your engine. It will smoke until all the oil burns off, but it will burn off. You may even see oil from the muffler until it burns off.
- DON’T GRIND ANYTHING BUT STUMPS
- DON’T PULL ON THE ROAD – HIGH SPEED WITH NO GREASE WILL DAMAGE YOUR RIMS FROM HEAT. KEEP THEM GREASED.
- DON’T PULL START WITH THE KICK STAND DOWN
- DON’T START WITH YOUR TEETH ON THE GROUND
ALWAYS
ALWAYS CALL DK2POWER FOR AND QUESTIONS, TECHNICAL ADVICE AND PARTS.
WHAT IS COVERED – 3 YEAR COMMERCIAL EXTENDED WARRANTY INCLUDED
Detail K2 Inc. warrants to the original purchaser that model OPG777 will be free and clear of manufacturing defects in workmanship and materials under normal use and service for a period of one (1) year from the date of the original purchase after July 4th 2020 and included two more years to extend the warranty to three (3) years. Product registration is required to obtain the extended warranty.
If within three (3) years from the original date of purchase this OPG777 fails due to defect in material or workmanship, Detail K2 will repair, replace, or supply any covered defective part at our option. DK2 POWER OPG777 is 3-years parts only warranty no labor. Kohler 3 year warranty is PARTS and LABOR.
Upon expiry of three (3) years, Detail K2 will have no further liability related to the product. Detail K2 does not authorize any party, including its authorized distributors or dealers, to offer any other warranty on behalf of Detail K2 Inc.
SERIAL NUMBERS MUST BE REGISTERED ONLINE AT WWW.DK2POWER.COM, WARRANTY NON-TRANSFERABLE.
KOHLER ENGINES – KOHLER CH SERIES ENGINES COMMERCIAL 3 YR PARTS AND LABOR WARRANTY
KOHLER ENGINES – KOHLER SH SERIES ENGINES RESIDENTIAL 2 YR PARTS AND LABOR WARRANTY see your Kohler manual for specific warranty.
DK2 OPG777 STUMP GRINDER– 3-Year parts only, no labor. 3-year commercial Kohler warranty.
THIS WARRANTY DOES NOT COVER OR APPLY TO:
- Damage to the product due to misuse, mishandling and abuse
- Improper installation, maintenance and storage
- Expendable parts such as nuts and bolts, pins and springs, wiring and switch components, hydraulic hoses and fittings, cutting teeth, cutting chains, cutting blades, throttles, belts and tires.
- Normal wear and tear
- Consequential damage & incidental damages such as damage to persons or property
PROCEDURE FOR OUTDOOR POWER EQUIPMENT WARRANTY
Within the three (3) year warranty period, the purchaser of the product can CALL 702-331-5353 DK2POWER or contact us on www.DK2Power.com. Notify us of the claimed defect and provide proof of original purchase. At this time the validity of the claim will be determined, and if approved replacement parts will be issued. No returned product will be accepted under warranty unless accompanied by an RGA# issued by Detail K2 Inc.
DAMAGED FREIGHT
Damage to your product caused by freight mishandling is NOT covered under warranty. If your freight arrives damaged, REFUSE it. Inspect your product when it arrives, otherwise if you accept it, you will be responsible for filing any freight claims with the delivery company. Dk2 warranty excludes damage to product.
RETURNS BEFORE GAS AND OIL
Follow the return policy from the retailer you purchased the equipment from.
RESOLUTION FOR A DEFECTIVE PRODUCT AFTER GAS AND OIL HAS BEEN ADDED.
Call DK2Power at 702-331-5353 in Las Vegas between 8am-4pm M-F Pacific Time.
QUICK START GUIDE
- ADD GAS MID GRADE AND 10W30 OIL TO EITHER ONE OF THE YELLOW PLUGS.
- YOUR GRINDER WON’T START ON LOW OIL. MAKE SURE YOUR OIL IS FULL – HALFWAY UP THE FILLER NECK.
- KICK STAND UP
- ENGINE GAS PADDLE ON FULL TO THE RIGHT (LOCATED ON THE AIR CLEANER
- CHOKE IN THE MIDDLE
- SPEED ON TURTLE
- TURN YOUR KEY ON
- TEETH OFF THE GROUND
- PULL START
![]()


