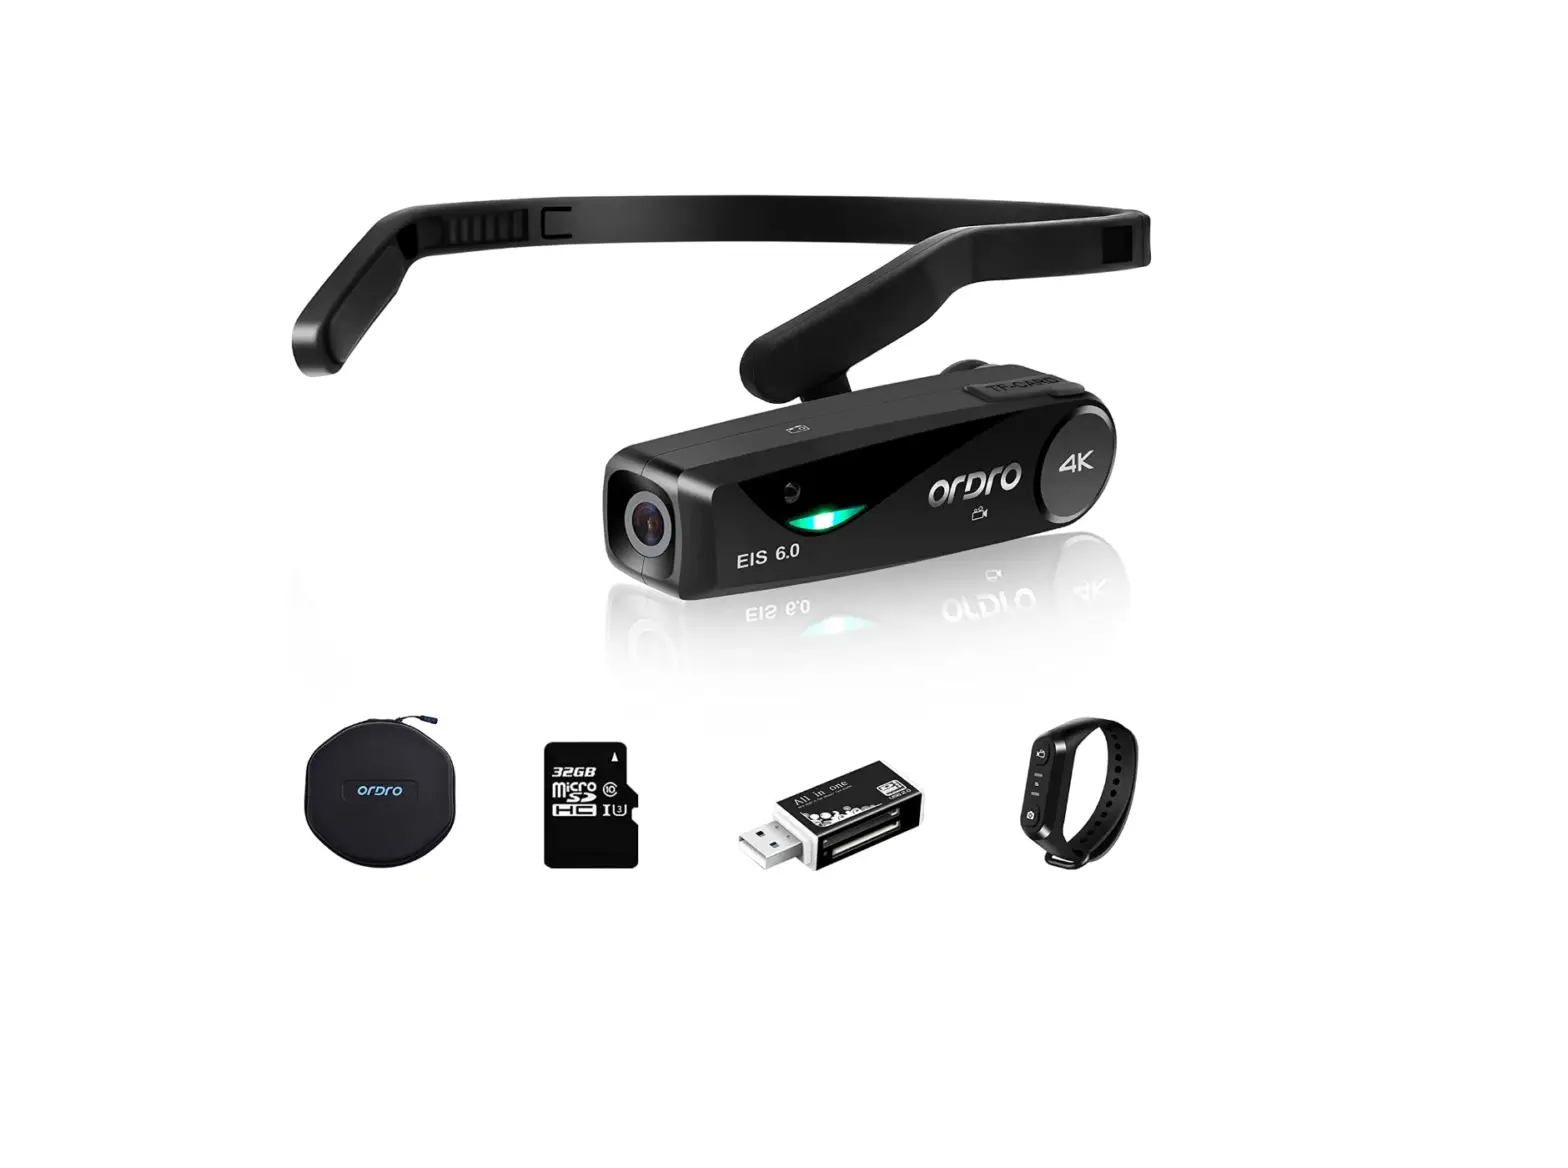

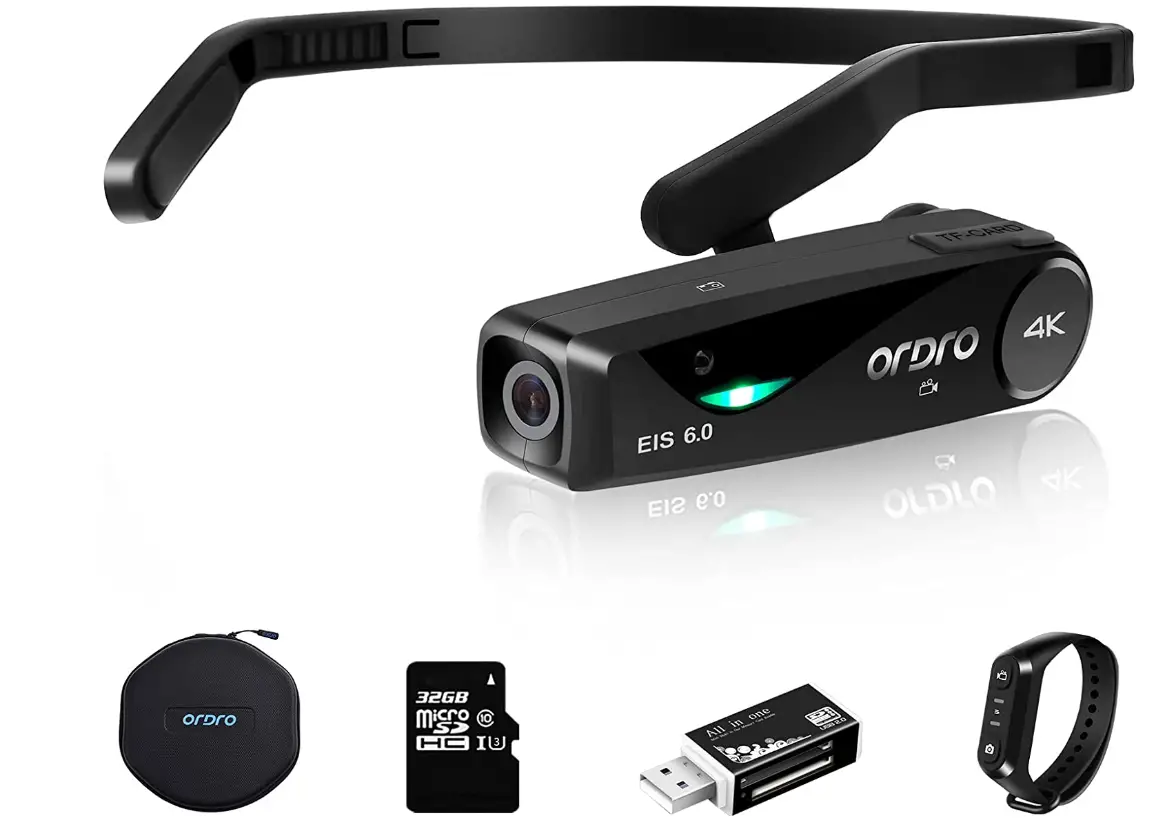
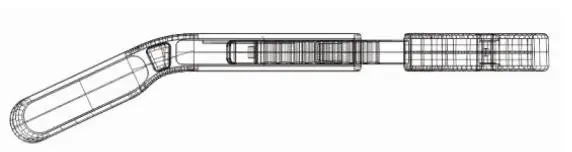
Ordro EP6 Plus 4K Video Camcorder Wearable Vlog Camera
Introduction
More natural colors are provided by the newly updated 1/2.8-inch high-sensitivity starlight CMOS sensor, higher perceived image resolution, and less noise. In comparison to the prior version, it features a greater resolution and a more sophisticated image sensor, allowing it to record every minute of life at 4k 30fps. First-person video recording follows the previous generation of head-wearable design in that it frees up your hands. The body is only 75g, light and unobtrusive, comfortable to wear, and made of ABS+PSC material. It is ideal for cycling, handicrafts, vlogs, etc. and has a two-way adjustable headband that is difficult to tumble out of place. The first EP series to have electronic anti-shake technology is EP6 Plus. Effects for recording videos that are stable and clear can be obtained by modifying the “X Y Z” three-axis balancing and combining it with the algorithm.
Only 1080P resolution is compatible with this function. On the basis of the prior generation, the Ordro EP6 plus includes wide-angle shooting up to 130°, and when the EIS function is used, the shooting angle is changed to 110°. It is advised to activate the new correction function of the ep series if you must take close-up shots of things in order to lessen image distortion. Improved filming effects, richer scenery, and one-click switching in the APP to accommodate the majority of short video platforms. By connecting the camera to the proprietary “OD Cam” APP, you can view photos and videos in real time over Wi-Fi, record and edit films in real time, and share them on social media.
Wireless remote controls are more practical because they come with a remote control and wrist strap. You no longer need to be concerned about power interruptions because the battery life has been improved from 60 minutes to 90 minutes, and the EP6 plus also supports recording while charging. The video is more steady thanks to the bottom 1/4 screw hole design, which supports normal tripod connection.
PRODUCT STANDARD PARTS
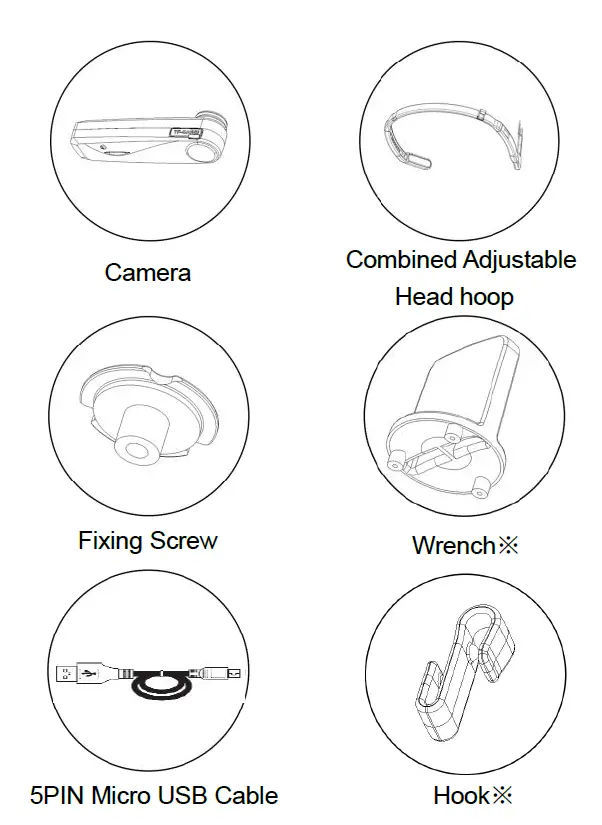
- OTHER ACCESSORIES: Pouch, User Manual, warranty card
- WRENCH: tighten and loosen the screw to the hoop.
- HOOK: prevent charging cable disconnection.
CAMERA INTRODUCTION
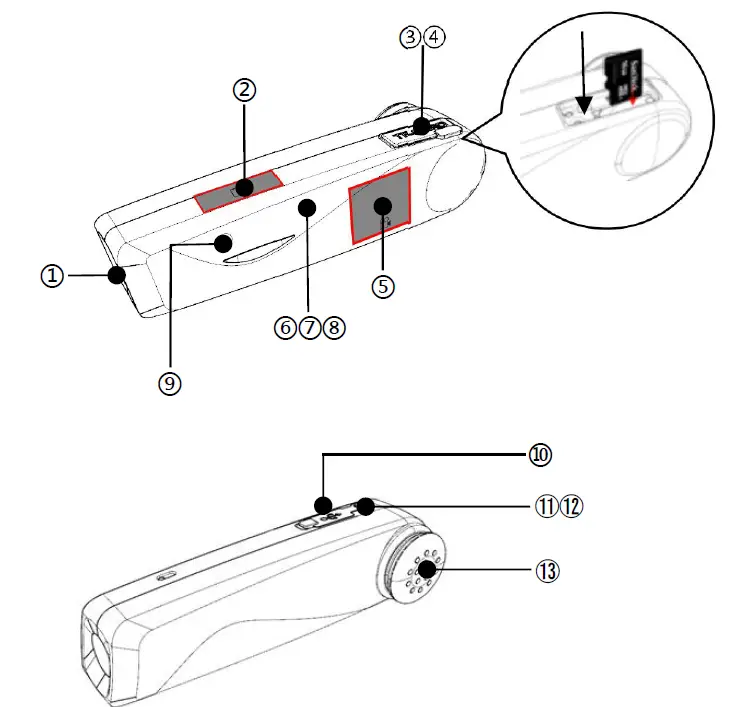
| ① | Lens | ② | Photo Touch Icon | ③ | Micro SD Card Slot |
| ④ | Reset
Button | ⑤ | Recording
Touch Icon | ⑥ | Red Status
Light |
| ⑦ | Green Status
Light | ⑧ | Blue Status Light | ⑨ | Recording MIC |
| ⑩ | USB Port | ⑪ | Power
Button | ⑫ | Wi-Fi
Button |
| ⑬ | Speaker |
|
Indicator Light
Status |
“RED” Charging Light |
“Green” Shooting Light |
“Blue” Wi-Fi Light |
| On | Charging | Standby | Connected |
|
Off | Fully Charged |
Power Off |
Wi-Fi Off |
|
Flash Once |
/ |
Photo |
/ |
| Flash at a frequency of 1 second |
/ |
Video |
Wi-Fi On |
INSTALLATION AND DISASSEMBLY STEPS

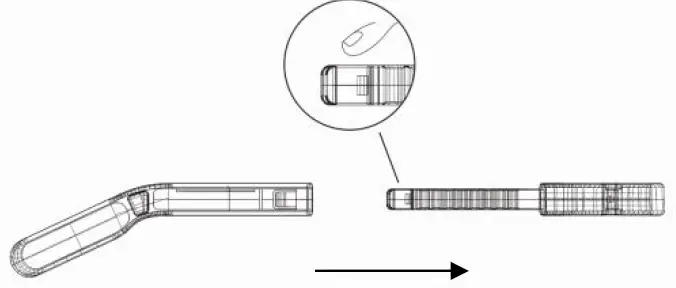
- Align and insert the left and right part to the slot.

- Move the middle part left and right to adjust the headband size.
- DISASSEMBLY OF THE HEADBAND

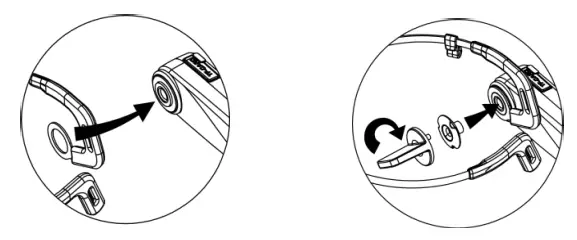
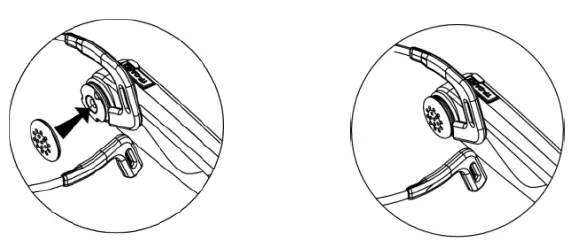
Press the middle part (See picture) to remove the left and right part. - CAMERA INSTALLATION STEPS

- Fix the hoop at the screw hole of the camera.
- Lock the hoop and the camera with the wrench and nut.

- Install the soft rubber sleeve onto the screw.
- Ordro EP6 Plus 4K Video Camcorder Wearable Vlog Camera (7)
WHAT YOU DO BEFORE USE
Be prepared before using the camera to get a better experience
CHARGING
Fully charge the camera for first time using
- Take out the Micro USB Cable.
- Connect the camera to 5V/1A-2A charger or a Computer, and the other end to the Micro USB Port on the bottom of the camera.
- The camera will turn on automatically when charging both the red and green indicator light will be lit. The red indicator light will turn off after the battery is fully charged.
NOTICE:
- It needs about 3 hours for full charge.
- Do not use the camera while charging for a long time.
HOW TO INSTALL A MICRO SD CARD
- Switch off the power before inserting or removing the card.
- Open Micro SD Card slot.
- Insert Micro SD Card to the card slot in the right direction. (Recommended Micro SD Card: U3 & Capacity up to 128GB)
- To remove the card, press it lightly and it will pop out.
NOTICE: Under the situation of the memory card’s format is not compatible with the camera, the camera will sound “Please hold on the Photo button to format the memory card”, please press the photo button for 5 seconds after the prompt tone, the camera will format the Micro SD card automatically. After the formatting is finished, the camera will sound “Format complete”.
HOW TO OPERATE THE CAMERA
- POWER ON: Press the Power button for 3 seconds The green indicator light will be lit.
- POWER OFF: Press the Power button for 3 seconds. The green indicator light will be off.
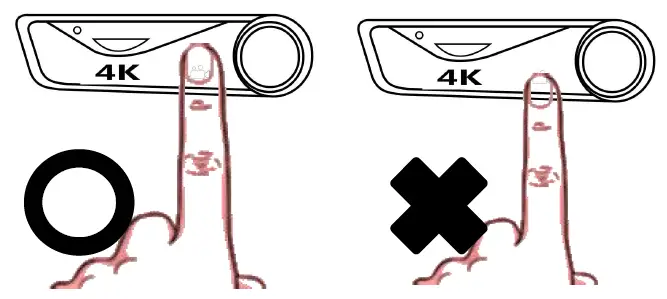
VIDEO
- Standby Mode .
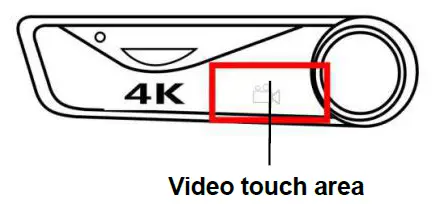
- Touch the video area: The green indicator light flashes intermittently, the speaker emits a beep once and the voice reminder sounds “start recording”, Start recording.
- Touch the video area again; The green indicator light stops flashing. The speaker emits a beeps twice, and the voice reminder “stop recording”. Stop recording.
PHOTO
- Standby mode.
- Touch photo area the green indicator light flashes once; The speaker emits a “beeps” and the voice reminder “Taking a picture”.
CAPTURE
- Recording mode.
- Touch photo area the camera beeps.
NOTICE: Snapshot will not be able to use under the resolution of 4K/2.7K.
REMOTE CONTROL (OPTIONAL)
- This feature works with the wearable remote control.
- When power on, press the record button to start recording, press again to stop recording.
- When power on, press the photo button to take photo.
NOTICE: The maximum distance between the camera and the remote control is 5 meters. Please use this function within the valid range.
HOW TO CONNECT WITH A COMPUTER
The camera can be used as a removable disk and webcam by using this function.
REMOVABLE DISK MODE
- Connect the camera to the computer by using USB cable when the camera is turned on.
- After connecting, the speaker will emit voice reminder “Please select the USB function, press the video button to enter the removable disk mode or press the photo button to enter the PC CAM mode”.
- Touch the video area and the speaker will emit the sound
“Enter the removable disk mode”. You can see “Removable disk is displayed” on your computer.
PC CAM MODE
- Connect the camera to the computer by using Micro USB cable when the camera is turned on.
- After connecting, the speaker will emit voice reminder “Please select the USB function, press the video button to enter the removable disk mode or press the photo button to enter the PC CAM mode”.
- Touch the camera area and the speaker will emit the sound “Enter the PC Cam mode”. You can find the image device on your computer.
NOTICE:
- When connecting the camera to your computer, plug it into the rear USB port of your computer whenever possible.
- Touch the photo shooting area to switch to the camera mode when the camera is used as a USB flash disk.
- Touch the movie shooting area to switch to the USB flash disk mode from camera mode.
APP USING
You can control the camera remotely by using APP. Features include full camera control, live preview, playback and camera setting.
APP DOWNLOADING

For Android user: Search “OD Cam” in Google Play or scan the following QR code to download.
For IOS user: Search “OD cam” In APP Store or scan the following QR code to download.
APP Connecting
Turn on the camera. Touch the power button to turn on the Wi-Fi. The speaker will emit a sound “Wi-Fi On”. The Blue indicator light on and flashes intermittently,
- Enter the setting – Wi-Fi, find the Wi-Fi start with EP6 (EP6_xxxx),Touch and input the password 12345678.
- Enter the APP , connect your phone with the camera to enter the user interface.
NOTICE:
- The Wi-Fi function is a point-to-point wireless connection with a limited distance. The maximum distance is about 10 meters. Please use this function within the effective distance.
- The Wi-Fi ID: EP6_XXXX,Initial password:12345678.

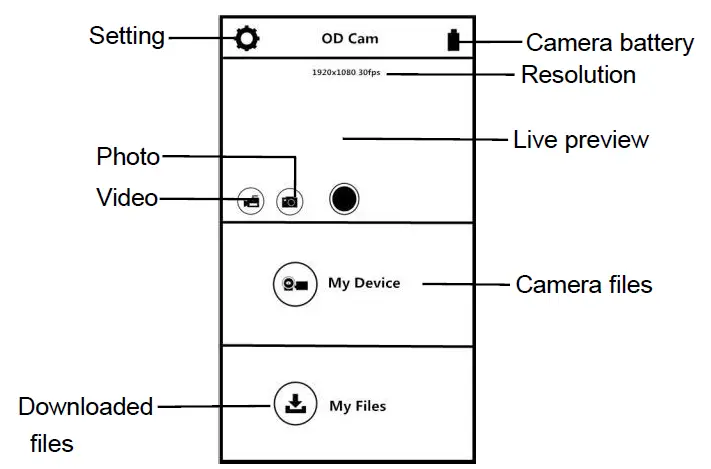
APP VIDEO MODE
- Press the video icon on the App user interface to enter the Video mode.
- Touch the menu icon, “REC” will be displayed at the top left of the interface and flashes on the live preview. The speaker will sound “Start recording” and the Green indicator light will flash (In frequencies of 1 second.) Start recording.
- Touch the menu icon again, .The speaker will beep and the green indicator light will stop flashing, Stop recording.
APP PHOTO MODE
- Press the camera icon on the App user interface to enter the movie shooting mode.
- Press the menu icon in live preview mode.
- The app will sound “click”, the speaker will sound “take a picture”, and the green indicator light flashes once quickly.
- Finished
APP SETTING
This setting function allows you to customize the parameters of the camera, such as the resolution, audio recording, and date
Press the settings icon on the App user interface to enter the movie Setting mode.
| Name | Description |
| Wi-Fi Name | Can be modified |
| Wi-Fi Password | Can be modified |
| Video
Resolution | Select different resolution |
|
Voice Recording |
On/Off Voice recording |
| Date Display | On/Off Date Display |
| Photo resolution |
Select different resolution |
|
Exposure value | Adjust the parameters to get desired results |
|
Memory Space | View the remaining space of the memory card |
| Format the memory card |
Remote to format memory card |
| Factory Setting | Restore factory defaults |
| APP Version | Current APP Version |
| FW Version | Current camera version |
MY DEVICE
You can playback recorded videos and photos download them to your phone through APP.
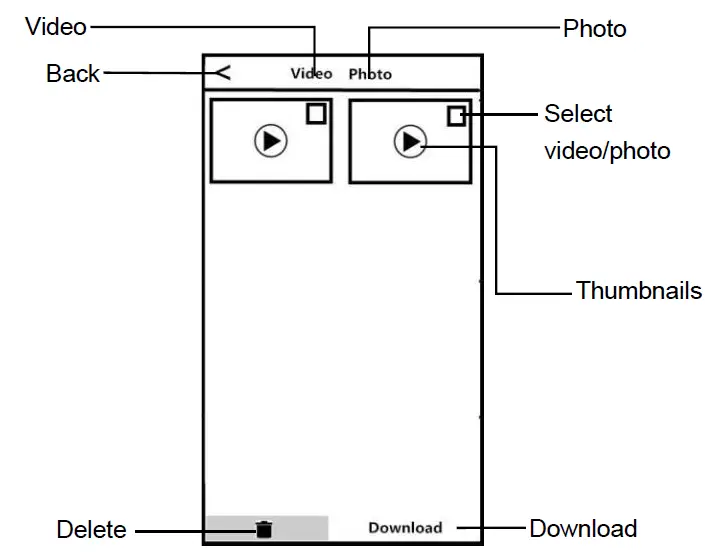
- PLAY FILES ONLINE
- In the main interface of “My Device”, select “Video” or “Photo” to enter the thumbnail preview interface.
- Select any thumbnail to play the file (Photo or video).
- Online Download
- In the main interface of “My Device”, select “Video” or “Photo” to enter the thumbnail preview interface.
- Select one or more of files, tap the Download button to download to your phone.
- You can view the downloaded video or photo in “My Download “page.
- Delete files online
- In the main interface of “My Device”, select “Video” or “Photo” to enter the thumbnail preview interface.
- Select one or more of files, tap the Delete button to delete the photo or video.
MY FILES
This function allows you to view the video & photo you downloaded, and you can clip, add sticker, word or filter to your photos.
- VIDEO CLIP

- In the main interface of “My Download”, select “Video” to enter the thumbnail preview interface.
- Tap the video that you want to edit, and tap “Edit” to enter the video clip screen.
- Move the sliders on both sides of the video timeline to change the start and stop times, tap Done, then tap Save as New Clip. You can share it to your social media platform.
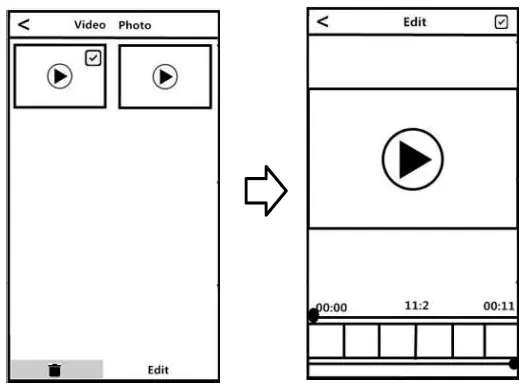
NOTICE:
- At least 8 seconds of video is required when cutting.
- You can preview after editing.
PHOTO EDITING
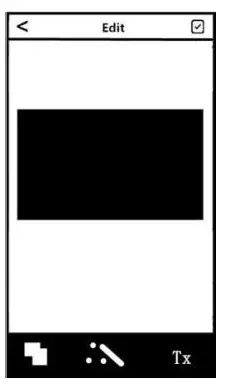
- Enter “My Files”, swipe left.
- Select the photo you need Touch “Edit”.
- Add filter, sticker, words and press “Save”.
- You can Save or Share the photo.
NOTICE:
FOR ANDROID: You must disconnect the camera Wi-Fi first and share after connecting network.
SPECIFICATIONS
| Video | 4K/25fps | ||||
| Photo | 18MP | ||||
| Format | Video:MP4/H.264 Photo:JPEG | ||||
|
Video Resolution | UHD:3840*2160(25fps) QHD:2704*1524(30fps) FHD:1920*1080(60fps)
1920*1080(30fps) HD: 1280*720(120fps) 1280*720(30fps) | ||||
|
Photo Resolution | 18M(4640*3840)/12M(4032*3024)
10M(3648*2736)/8M(3264*2448) 5M(2592*1944)/3M(2048*1536) 2M(1920*1080)/1M(1280*960) VGA(640*480) | ||||
| Sensor | 4M High Sensitivity CMOS | ||||
| Shortest shooting
distance | 50CM | ||||
| Angle | 120° | ||||
| Wi-Fi | 2.4G | ||||
| Microphone | Built-in | ||||
| USB | Micro USB 2.0 | ||||
| Battery | 1000mAh Lithium battery | ||||
| System
compatible | Windows
above | XP/7/8/10 | or | Mac | OSX10.5 |
| Size | 97*24*26mm | ||||
| Weight | Around 70g | ||||
TROUBLESHOOTING
| Trouble | Possible
reason | Solution |
|
Fail to connect Wi-Fi |
Micro SD Card is not formatted or damaged | 1. Replace the Micro SD Card
2. Format the Micro SD Card |
|
APP problem | 1.Turn on APP again. 2.Download most update
version. | |
|
Wi-Fi cannot be turn off | Micro SD Card is not formatted or damaged |
1.Replace Micro SD Card. 2.Format Micro SD Card. |
| Camera cannot be turned on | Low battery power |
Charge the camera. |
| No voice reminder when start
recording |
Micro SD Card is damaged |
Replace Micro SD Card. |
| Camera cannot be turned off |
Micro SD Card is damaged | 1. Open Micro SD Card
slot and press『RESET』 2. Replace Micro SD Card. |
|
Format SD card |
Through APP | Open APP , find the setting mode,
choose format button. |
|
APP cannot open |
The version of cellphone is too low | This camera support the system is :
Android:4.0 or above IOS: IOS8.0 or above. |
|
Mobile phone Matching problem | Please contact the customer service , provide model and version of your phone, we will update the APP
version regularly. | |
| Video No sound or too low sound | Recording function is not enabled | Open the APP and turn on the camera sound in the Settings. |
|
Night shooting is not clear |
Too far away from the video object | The effective distance of this camera is 5 meters. It is recommended to record in this area. |
|
The light is too dark | 1. Please use other auxiliary lighting sources at the same time.
2. Reset the exposure value of the camera through the APP. |
Frequently Asked Questions
EP6 plus does not support live streaming on mobile phones. If you broadcast live on a computer, the machine can act as a webcam, which can synchronize the screen in real time.
In order to ensure your normal use of the functions of this APP, please agree to the permission to use this APP.
When a new memory card is used for the first time, the machine will prompt you to format the memory card by long pressing the camera button, then just follow the prompts. Only a small number of memory cards can be used directly without formatting.
Press and hold the Photo button, the camera will automatically format the SD card, and the camera will give a prompt sound “Formatting complete”.
Please provide the serial number on the label at the bottom of the machine you purchased so that we can confirm your product and provide you with an upgrade software to reconnect to Wi-Fi.
The reset button is in the SD card slot. It has an R. Poke it with a needle.
And while using the camera built into your smartphone could help you save some money and yet maintain a passable vlog, upgrading to a dedicated camcorder can eventually significantly improve the quality of the movies for your vlog.
In addition to being built to record sound, camcorders are specifically made to record video. Because of this, camcorders’ inbuilt microphones are superior than those in video cameras. Of course, you should almost never utilize the internal camcorder or video camera audio in the first place if you truly want high-quality audio.
Camcorders are also capable of producing excellent video quality, from high to ultra-high definition. With built-in, specifically calibrated zoom lenses, they can zoom and focus well, outperforming cameras with more refined AF (autofocus) systems.
The ability to continually autofocus while capturing video is a feature of a good vlogging camera. As a vlogger, you should consider this since you want the subject that is the primary focus to remain sharp no matter how close or how far it is from the camera.
A night vision camcorder is a type of camera that can record video in dimly lit settings, such as at night or in other low-light environments. Security guards, law enforcement officers, and other people who need to capture nighttime activity frequently use night vision camcorders.
Almost all camcorders have a feature that allows you to take still pictures, thus converting the device into a digital camera. You can also extract digital stills from your videos.
In most circumstances, a camera with 10 to 20 megapixels will be more than enough to suit all of your needs. Saving money for your camera and making investments will serve you far better.
The purpose of a camcorder is to record video. Most of them include screens that can tilt and rotate as well as built-in zoom lenses. Professional XLR audio inputs and strong built-in microphones are features of more expensive pro camcorders. For still photography, they are not very good.
Using a camcorder, which combines a television camera, a video recorder, and a synchronization pulse generator, you can record both video and audio on a small cassette, a digital versatile disc (DVD), or a memory card and then transfer the data to a larger DVD or another media.


