CHINFON F18-17LT1 Fireplace User Manual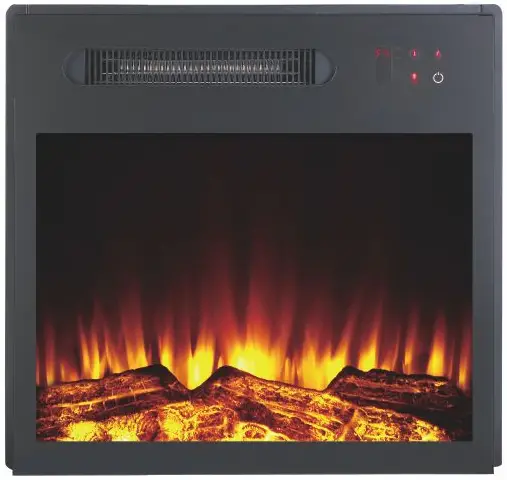
IMPORTANT SAFETY INSTRUCTIONS
IMPORTANT NOTICE Please keep this user’s guide for future reference.
When using electric appliances, basic precautions should always be followed to reduce the risk of fire, electric shock, and injury to persons, including the following:
- Read all instructions before using this appliance.
- The heater is hot when in use. To avoid burns, do not let bare skin touch hot surfaces. The trim around the heater outlet becomes hot during heater operation.
Keep combustible materials, such as furniture, pillows, bedding, papers, clothes, and curtains at least 3 feet (0.9m) from the front, sides and rear of the unit. - Extreme caution is necessary when any heater is used by or near children or persons with disabilities and whenever the unit is left operating and unattended.
- Always unplug the electric heater when not in use.
- Do not operate any unit with a damaged cord or plug, or if the heater has malfunctioned, or if the electric heater has been dropped or damaged in any manner. Return heater to authorized service facility for examination, electrical or mechanical adjustment, or repair.
- Do not use outdoors.
- The electric heater is not intended for use in bathrooms, laundry areas and similar indoor locations. Never locate heater where it may fall into a bathtub or other water container.
- Do not run the cord under carpeting, furniture, or appliances. Do not cover cord with throw rugs, runners, or the like. Arrange cord away from high traffic areas, where it will not be tripped over.
- To disconnect the unit, turn the firebox off, and then remove the plug from the outlet.
- Connect to properly grounded outlets only.
- Do not insert or allow foreign objects to enter any ventilation or exhaust opening as this may cause an electric shock, fire, or damage to the heater.
- To prevent a possible fire, do not block air intake or exhaust in any manner. Do not use on soft surfaces, like a bed, where openings may become blocked.
- All electrical heaters have hot, arcing or sparking parts inside. Do not use in areas where gasoline, paint, or flammable liquids are used or stored or where the unit will be exposed to flammable vapors.
- Do not modify the electric heater. Use it only as described in this manual. Any other use not recommended by the manufacturer may cause fire, electric shock, injury, or death.
- Do not burn wood or other materials in the electric heater.
- Do not strike the glass panel.
- Always use a certified electrician if new circuits or outlets will be required.
- Always use properly grounded, fused and polarized outlets. excessive vibration and store so as avoid damage.
Product Specification
| VOLTAGE | 120VAC, 60 Hz |
| AMPS | 12.5 Amps |
| WATTS | 1500 Watts (]cinch : 1000 Watts ) |
Save These instructions
SITE SELECTION AND PREPARATION
![]() WARNING
WARNING
Ensure the power cord is not installed so that it is pinched or against a sharp edge and ensure that the power core is stored or secured to avoid tripping or snagging to reduce the risk of fire, electric shock or injury to persons.
Construction and electrical outlet wiring must comply with local building codes and other applicable regulations to reduce the risk of fire, electric shock and injury to persons.
Do not attempt to wire your own new outlets or circuits. To reduce the risk of fire, electric shock or injury to persons, always use a licensed electrician.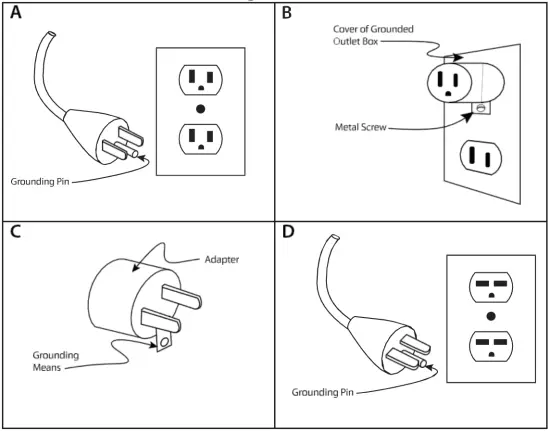
Figure 1
See figure 1 for grounding instruction. This heater is for use on 120 volts. The cord has a plug as shown at A in Figure 1. An adapter as shown at C is available for connecting three-blade grounding-type plugs to two-slot receptacles. The green grounding lug extending from the adapter must be connected to a permanent ground such as a properly grounded outlet box. The adapter should not be used if a three-slot grounded receptacle is available.
This section provides easy step by step instructions for selecting a location and preparing the site to install the fireplace.
NOTE
- The fireplace insert comes completely assembled and wired. Some tools may be required to prepare the site and install the trim.
- You should allow 1/4″ around the fireplace insert for ease of installation.
- This fireplace does not require any venting.

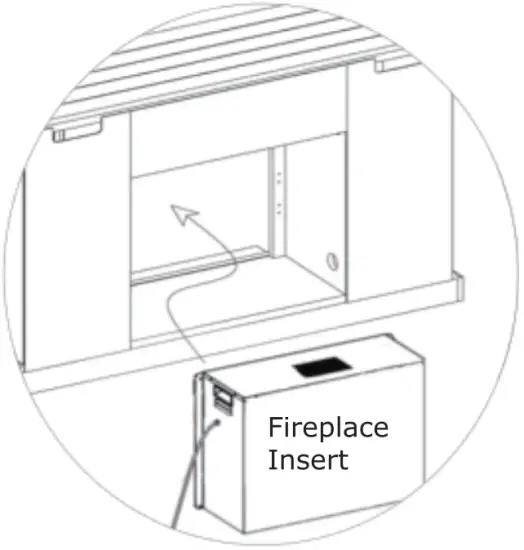
- Select a suitable location that is not susceptible to moisture and is away from drapes, furniture and high traffic.
- For ease of electrical hook up you may wish to locate the fireplace near an existing outlet.
Operation And Features
Using the Control Panel
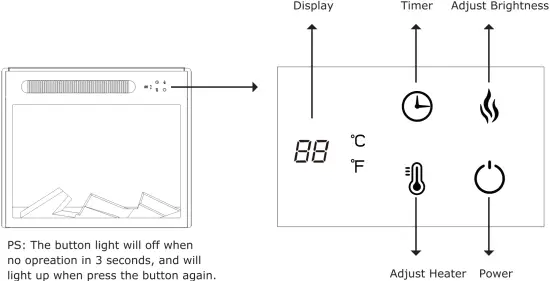
PS: The button light will off when no operation in 3 seconds, and will light up when press the button again.
 Display
Display could be awake by pressing any button. Timer
Timer
This will allow you to set the automatic switch off on the fireplace. Setting can be 0.5h to 9h. Adjust Brightness
This function will cycle through the four different levels of flame brightness. Hold 5 seconds to switch readout between °F and °C. Adjust Heater
This function will cycle through the different temperature levels 62-82 °F (17-27 °C) of the heater. Hold 5 seconds, Temperature figure blinking and can adjust. Default temperature is 62 °F ( 17 °C) . Power
Power
This will turn the unit ON/OFF.Hold the power button on the control panel for 5 seconds to disable or re-enable the Child-Lock function.
Remote Control
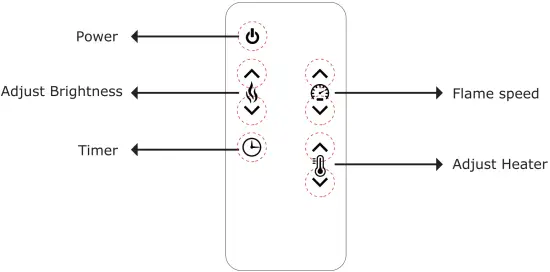
- Power
This will turn the unit ON/ OFF.  Adjust Brightness
This function will cycle through the four different levels of flame brightness. Timer
Timer
This will allow you to set the automatic switch off on the fireplace. Setting can be 0.5h to 9h. Flame speed
Press to adjust the lever of speed of the flame:Ll-L5(L5 being the fastest and Ll the slowest) Adjust Heater
This function will cycle through the different temperature levels 62-82°F (17-27°C)of the heater.
Care And Maintenance
- Slide the battery cover open by squeezing the release lever while pulling the battery out. Please see the underside of remote for instructions.
- Replace the dead battery with one CR2025 battery. Replacement batteries are not included with the firebox.
- Do not dispose of the dead battery in the municipal trash. Batteries should be disposed of at a local collection point for recycling batteries.
- Close the battery cover.
Diode This firebox is fitted with LED (Light Emitting Diode) bulbs in place of conventional bulbs. These generate the same light levels as conventional bulbs, but use a fraction of the energy. These LED bulbs are maintenance free and should not require replacing during the life of the product.
Disconnect power before attempting any maintenance or cleaning to reduce the risk of fire, electric shock, injury or death.
When transporting or storing the unit and cord, keep in a dry place, free from excessive vibration and store so as avoid damage.
- Dust the unit using a clean dry cloth.
- Use warm water and a clean cloth to wipe off all painted surfaces. Do not use abrasive cleaners.
- Use a standard glass cleaner for the glass panel of the unit.
![]() NOTE: This firebox is equipped with power saving programs. In order for the remote to become active, the power must first be turned ON manually by using the Control Panel. If the power is turned OFF manually with the Unit Control Panel or with the automatic timer mode, the remote cannot be used to turn the firebox ON. If the remote does not seem to function, turn the unit ON using the control panel to engage the remote.
NOTE: This firebox is equipped with power saving programs. In order for the remote to become active, the power must first be turned ON manually by using the Control Panel. If the power is turned OFF manually with the Unit Control Panel or with the automatic timer mode, the remote cannot be used to turn the firebox ON. If the remote does not seem to function, turn the unit ON using the control panel to engage the remote.
![]() NOTE: Although the heater has been turned off the fan may still run to prevent over heating.
NOTE: Although the heater has been turned off the fan may still run to prevent over heating.
![]() NOTE: When turned OFF the embers of the log set will not immediately go out. This is a designed feature to represent the embers of the fire slowly fading out.
NOTE: When turned OFF the embers of the log set will not immediately go out. This is a designed feature to represent the embers of the fire slowly fading out.
Troubleshooting
| PROBLEM | ROOT CAUSE | CORRECTIVE ACTION |
| Display shows “EE’ | The thermostat sensor is broken or disconnected. | Unplug the fireplace, remove the back Panel of the fireplace and check that the sensor is plugged into the main circuit board. If this does not solve the problem contact customer service for a replacement sensor. |
| The remote control is not working. | There are no batteries. | Change the remote batteries. |
| The signal is poor. | Operate remote transmitter at a slow measured pace. Press the remote control buttons with an even motion and gentle pressure. Repeatedly pressing buttons in rapid succession may cause the transmitter to malfunction. | |
| The remote is too far from the heater. | Operate the remote at a distance less than 20 ft from the front of the appliance; point the remote at the control panel. | |
| Heater does not blow warm air. | The heater is in a cool down cycle. | Normal operation will continue to run for several minutes before shutting down. Times will vary based on temperatures. During this time cool air will blow. |
| Thermostat setting is preventing the heater from turning on. | Adjust the temperature settings to ensure that the thermostat is set higher than the current room temperature. | |
| The thermostat is disconnected. | Unplug the unit. Clear the vent area of dust and debris. Wait ten minutes, plug the unit in again and turn on the heater. | |
| There is no power and the logs do not glow. | There is no power to the unit. | Check that the unit is plugged into a standard 120V outlet. Press the Power button several times and make sure power is set to the “ON” position. |
| Flame effect works but heater function does not and the buzzer rings 4 times when the heater button is pressed. | The heater is disabled. | With the power on press and hold the POWER button on the control panel for 5 seconds. Once re-enabled the buzzer rings 2 times |
| LED light on the shelf does not working. | The power line does not plug in LED socket | Try to plug the power line of the LED light into the socket on the back of the fireplace. Check the location of the socket on the final page of this manual. |
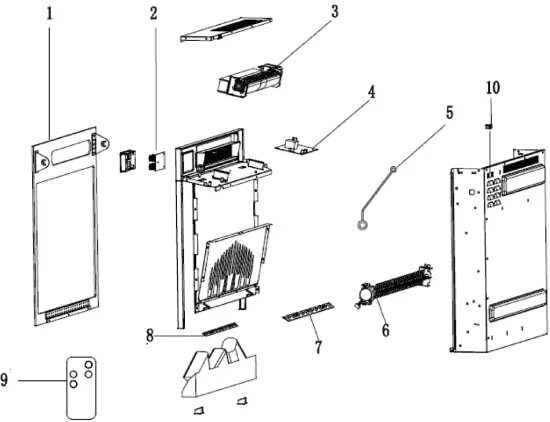
Replacement Parts
For replacement parts, call our customer service department
| Part | Description | Qty. |
| 1 | Front Panel | 1 |
| 2 | Control Panel Circuit Board | 1 |
| 3 | Flame Generator Drive Motor | 1 |
| 4 | Main Circuit Board | 1 |
| 5 | Thermostat Sensor | 1 |
| 6 | Blower/Heater Assembly | 1 |
| 7 | Flame Circuit Board | 1 |
| 8 | Embered Circuit Board | 1 |
| 9 | Remote Control | 1 |
| 10 | LED Socket (only available on certain models. 12V) | 1 |