![]() INSPIRE 2 SERIES
INSPIRE 2 SERIES
Inspire 2/Inspire 2 ProRes/Inspire 2 L
Quick Start Guide
Inspire 2 Drone Camera
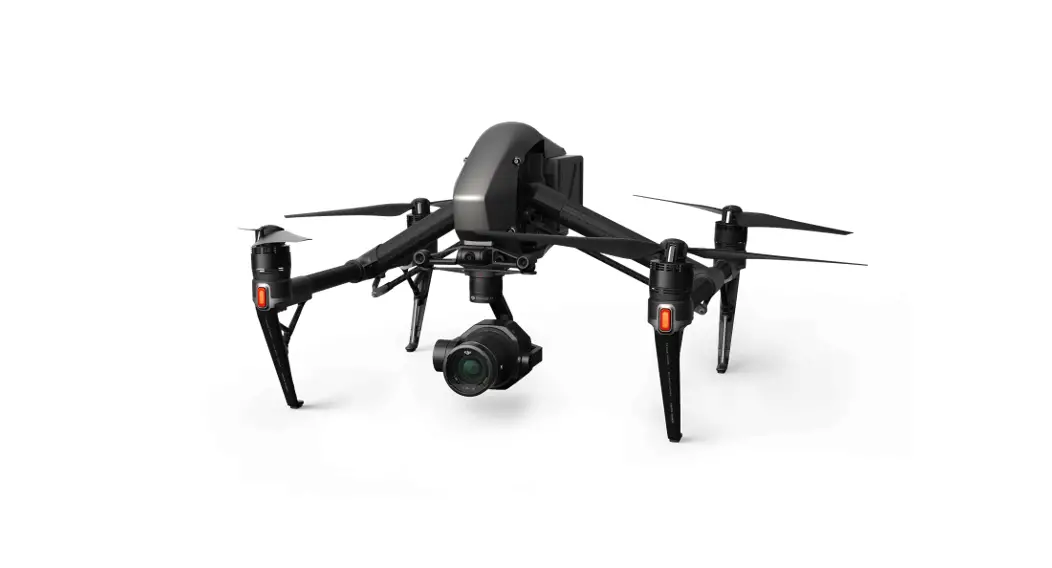
Inspire 2
The INSPIRE™ 2 is a powerful aerial film making system with class leading agility and speed, redundancy features for maximum reliability, and new, smart features that make capturing complex shots easy. A new airframe design together with dual batteries boost flight time to 25* minutes.
The camera unit is now independent from image processor so that you have the flexibility to choose the perfect gimbal and camera** system for each of your scenes. This means that regardless of which camera you choose, you have the same powerful processing backing it, and when using the Zenmuse X5S, the ability to capture RAW videos.
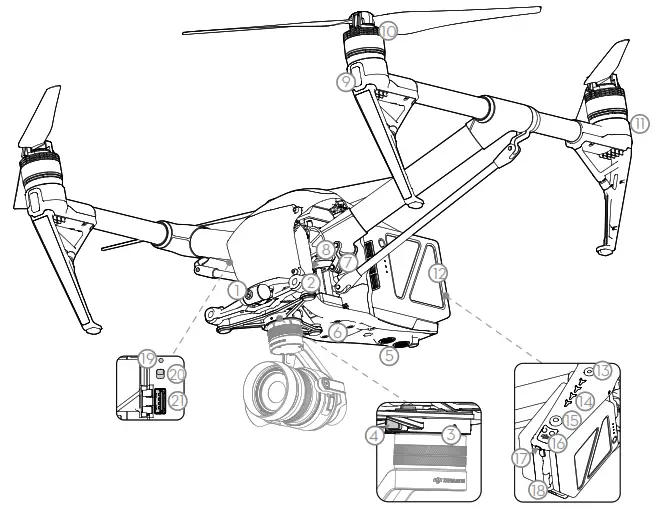
| 1. FPV Camera | 12. Intelligent Flight Batteries |
| 2. Forward Vision System | 13. Power Button |
| 3. DJI™ Gimbal Connector V2.0 (DGC2.0) | 14. Battery Level Indicators |
| 4. Gimbal and Camera Detach Button | 15. Battery Remove Button |
| 5. Downward Vision System | 16. Upward Infrared Sensor |
| 6. Extended Device Mounting Position | 17. Aircraft Status Indicator |
| 7. Transformation Mechanism | 18. DJI CINESSD™ Slot*** |
| 8. Control and Processing Center (with Micro SD Card Slot) | 19. Linking Button |
| 9. Front LEDs | 20. USB Mode Switch |
| 10. Propulsion System (with Motors, Propellers, etc.) | 21. USB Port |
| 11. Rear LEDs |

* Max runtime is tested in a laboratory environment, with the aircraft hovering at sea level with no wind. Performance may vary depending on local conditions.
** Gimbal and camera can be purchased separately on the official DJI Online Store.
*** Lossless video (CinemaDNG, ProRes) and DNG RAW photo burst shooting will be available when using DJI CINESSD. You can purchase the
DJI CINESSD and DJI CINESSD STATION separately on the official DJI Online Store. CinemaDNG and ProRes formats will be available when the appropriate license is purchased and applied. The Inspire 2 L ships with both ProRes and CinemaDNG pre-activated; the Inspire 2 ProRes ships with ProRes pre-activated.
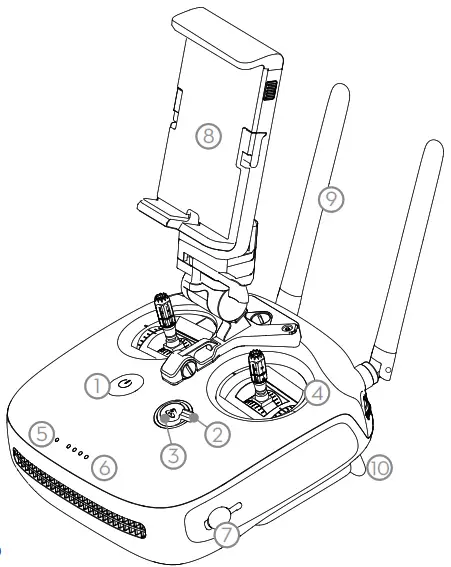
Remote Controller
The Inspire 2 remote controller features DJI’s LIGHTBRIDGE™ technology for a maximum transmission distance of up to 4.3 mi (7km)*. While flying the aircraft, you have a live HD view directly within the DJI GO™ 4 app on your paired device for a precise and responsive flying experience. When in dual remote controller mode, each of the two remote controllers separately control aircraft and camera and can be up to 328 feet (100m) apart.
The maximum run-time of the remote controller’s LiPo battery is approx. four hours**.
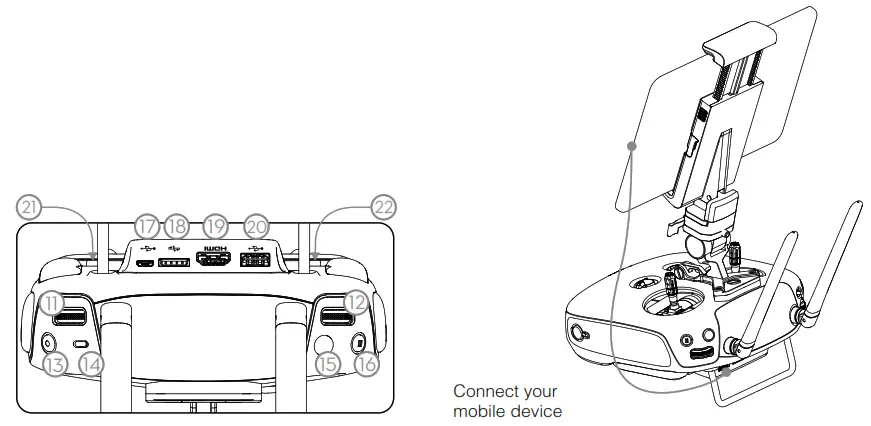
| 1. Power Button | 12. Camera Settings Dial |
| 2. Transformation Switch | 13. Record Button |
| 3. Return-to-Home (RTH) Button | 14. Flight Mode Switch |
| 4. Control Sticks | 15. Shutter Button |
| 5. Status LED | 16. Pause Button |
| 6. Battery Level LEDs | 17. Micro USB Port |
| 7. Power Port | 18. CAN Bus (Extended Port) |
| 8. Mobile Device Holder | 19. HDMI A Port (for Video Output) |
| 9. Antennas | 20. USB Port (for Mobile Device Connection) |
| 10. Handle Bar | 21. C1 Button |
| 11. Control Dial (Gimbal/FPV) | 22. C2 Button |
 * The remote controller is able to reach its maximum transmission distance (FCC) in a wide open area with no Electro-Magnetic interference, and at an altitude of about 400 feet (120 meters).
** The maximum run-time is tested without supplying power to a smart device.
Basic Knowledge
Fly Safe
DJI encourages you to enjoy flying in a safe, responsible and smart way.
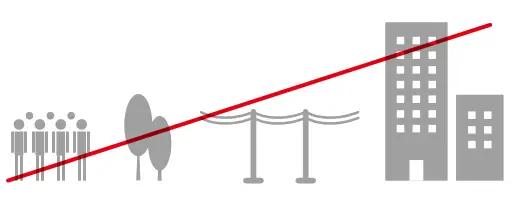
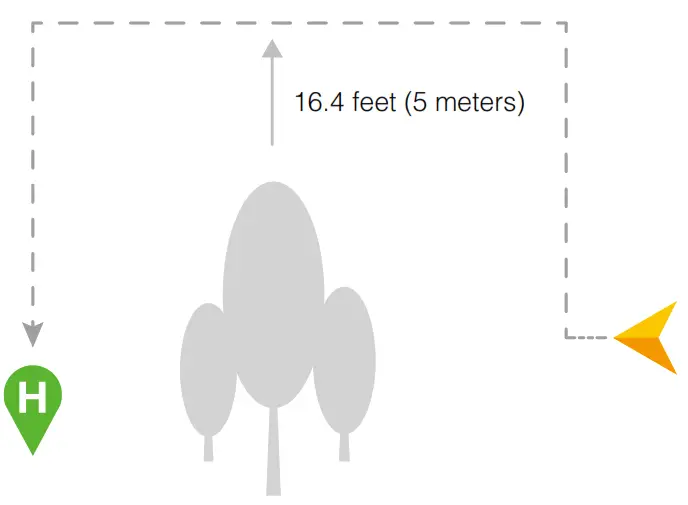
DO NOT FLY near or above people, near trees, power lines or buildings.
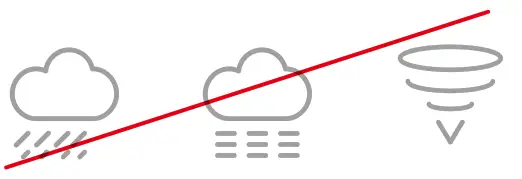
DO NOT FLY in rain, snow, fog, and wind speeds exceeding 22 mph or 10 m/s.
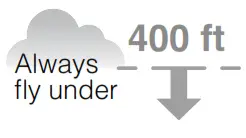
DO MONITOR YOUR ALTITUDE and fly under 400 feet (120 meters).![]() DO MAINTAIN LINE OF SIGHT and avoid flying behind buildings or obstacles that block your view.
DO MAINTAIN LINE OF SIGHT and avoid flying behind buildings or obstacles that block your view.

It is important to understand basic flight guidelines for the safety of both you and those around you. Refer to the Disclaimer and Safety Guidelines for more information.![]() No Fly Zones
No Fly Zones
Learn more:
http://www.dji.com/flysafe
 Be very careful when flying at high altitude as aircraft performance may be reduced. It is recommended to use a specially-designed propeller when flying at high altitude.
- The compass and GPS will not work in Polar Regions. The aircraft will auto switch to A-mode and use the Vision System for positioning.
Flight Mode
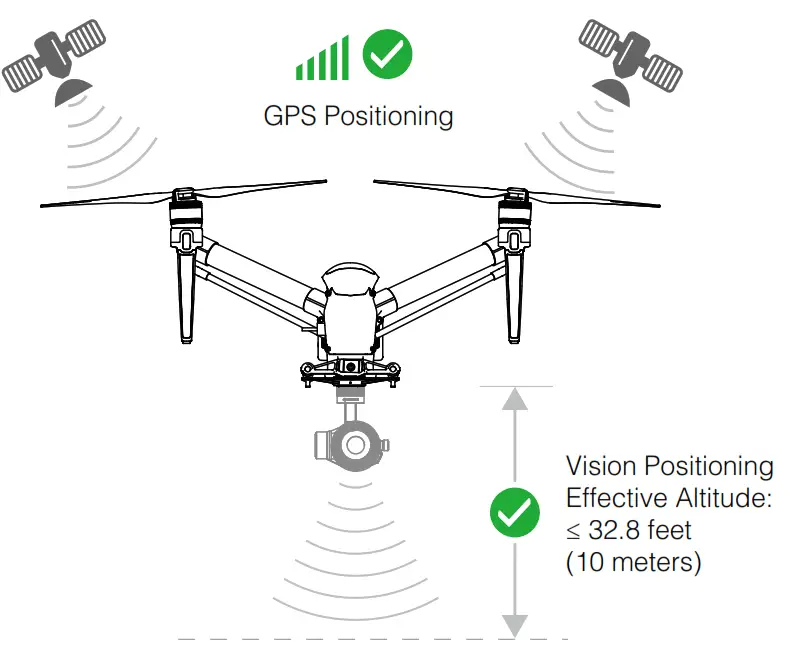
P-mode (Positioning): P-mode works best when the GPS signal is strong. The aircraft utilizes the GPS and Vision System to automatically stabilize itself, navigate between
obstacles or track a moving object. Advanced features such as TapFly™ and ActiveTrack ™ are enabled in this mode.
S-mode (Sport): The handling gain values of the aircraft are adjusted in order to enhance the maneuverability of the aircraft in S-mode. Note that the Vision System is disabled in this mode. A-mode (Attitude): When neither the GPS nor the Vision System is available, the aircraft will only use its barometer for positioning to control the altitude.
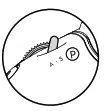 Toggle the flight mode switch on the remote controller to ‘P’ and wait for a stable satellite count before takeoff.
- S-mode and A-mode should be enabled in the DJI GO 4 app.
- The Downward Vision System will not work properly over surfaces that do not have pattern variations, over water or in low light conditions (< 15 lux).
Return-to-Home
It is important to take off with a strong GPS signal (GPS icon is followed by at least four bars) to ensure that the Home Point is recorded by the aircraft. The aircraft will automatically return to the Home Point in the following cases.
Smart RTH: The pilot presses the RTH button. Low Battery RTH: The battery level is low or critically low.
Failsafe RTH: Remote controller signal is lost. The aircraft can sense obstacles at a distance up to 300 meters, then automatically avoid obstacle and fly to the Home Point.![]() The Forward Vision System will work properly over surfaces with a clear pattern and adequate lighting (>15lux).
The Forward Vision System will work properly over surfaces with a clear pattern and adequate lighting (>15lux).
Using Inspire 2
Download the DJI GO 4 App
Search ‘DJI GO 4’ on the App Store or Google Play and download the app to your mobile device.
Watch the Tutorial Videos
Watch the tutorial videos at www.dji.com or in the DJI GO 4 app.
 http://www.dji.com/inspire-2/info#video
![]() First-time activation requires your DJI account and internet connection.
First-time activation requires your DJI account and internet connection.![]() DJI GO 4 app supports iOS 9 (or later) or Android 4.4 (or later).
DJI GO 4 app supports iOS 9 (or later) or Android 4.4 (or later).
Check the Battery Levels and Power on
- Press once to check the battery level.
- Press once, again and hold to turn on/off.
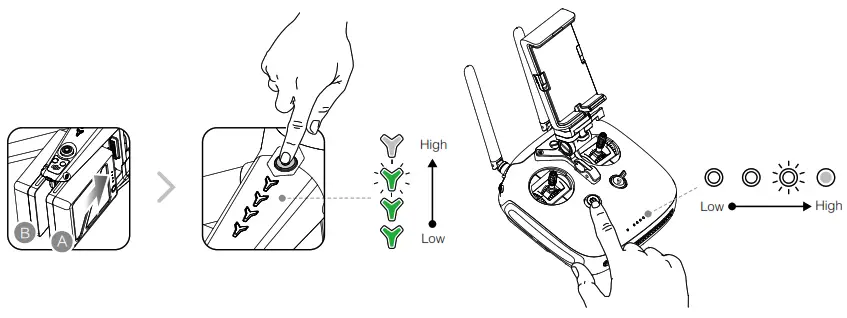
![]() Only use battery slot A when using one battery to supply powe
Only use battery slot A when using one battery to supply powe
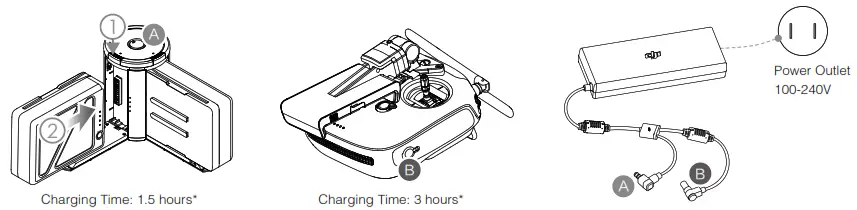
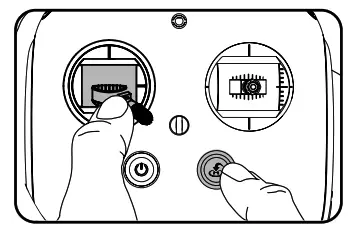
Charge the Batteries
Press the release button and open the corresponding charging port cover. Insert the Intelligent Flight Battery into the charging port to begin charging.
- The Intelligent Flight Battery must be fully charged before using it for the first time. Make sure to press the release button on the Charging Hub’s top when removing the fully charged battery.
- Only use the official DJI charger and Charging Hub with your Intelligent Flight Battery and remote controller.
- When charging is complete, the LED lights on the Intelligent Flight Battery will turn off, and the LED on the Charging Hub will show green.
- Power off the remote controller before charging. When charging is complete, the LED lights on the remote controller will turn off.
- The Charging Hub will sound a signal when the battery has been fully charged. The sound can be turned on or off by toggling the switch under the hub.
- Press the button on the battery once to check the battery level.
- Install the battery to the aircraft and power on. Once the battery temperature is lower than 15℃,it will auto heat to maintain a temperature between 15-20℃.
- Pairing batteries is recommended. This can be done inside DJI GO 4 app. Ensure each battery pair is charged and discharged simultaneously to prolong their service life and for a better flight experience.
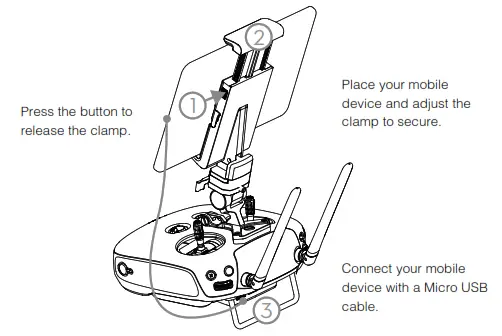
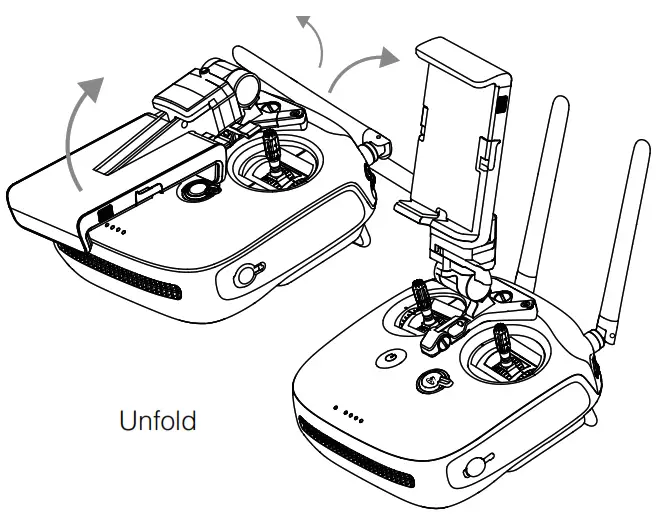
Prepare the Remote Controller
Unfold the mobile device holder and the antennas.
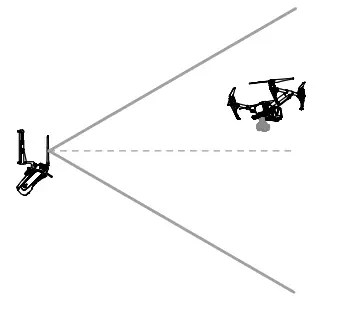
Optimal Transmission Range

Try to keep the aircraft inside the optimal transmission range. If the signal is weak, adjust the antennas or fly the aircraft closer.
Dual Remote Controllers
You are required to link the Master and Slave remote controllers.
Regarding the Master RC, launch the DJI GO 4 app and enter GO FLY. Tap![]() on the top of your screen to enter the RC Settings. Set the RC Status as ‘Master’, and then enter the desired connection password. Repeat to set Slave RC Status to ‘Slave’. Then tap Search for Master RC and connect to the Master RC with your preset password.
on the top of your screen to enter the RC Settings. Set the RC Status as ‘Master’, and then enter the desired connection password. Repeat to set Slave RC Status to ‘Slave’. Then tap Search for Master RC and connect to the Master RC with your preset password.
- Dual frequency support makes the HD video downlink more stable. Note that the Russian only have the 2.4G frequency.
- DO NOT operate more than 3 aircrafts within the same area (size equivalent to a soccer field) to prevent transmission interference.
Controls
The stick mode is set to Mode 2 by default (left hand throttle). The left stick controls the aircraft’s elevation and heading. The right stick controls the aircraft’s forward, backward and lateral movements. To adjust the FPV camera, press and hold the C2 Button and rotate the control dial.
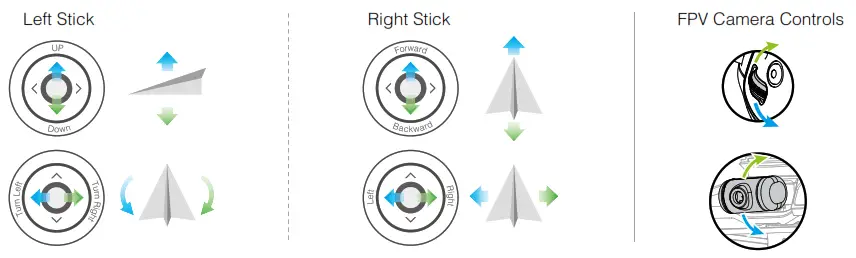
![]() You can change the stick mode in the DJI GO 4 app.
You can change the stick mode in the DJI GO 4 app.
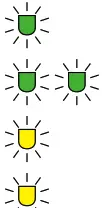
 Remote Controller Status Indicator
![]() RC normal but not connected to aircraft.
RC normal but not connected to aircraft.
RC normal and connected to aircraft.
RC Slave Mode and not connected to aircraft.
![]() RC Slave Mode and connected to aircraft.
RC Slave Mode and connected to aircraft.
( ![]() B…) Low battery warning / RC error.
B…) Low battery warning / RC error.
( ![]() B—B—…) RC idle for 5 minutes.
B—B—…) RC idle for 5 minutes.
Prepare the Aircraft
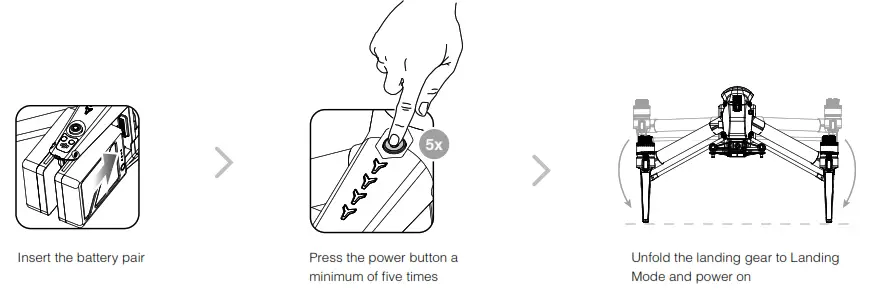
- Keep your hands away from the transformation mechanism when unfolding the landing gear.
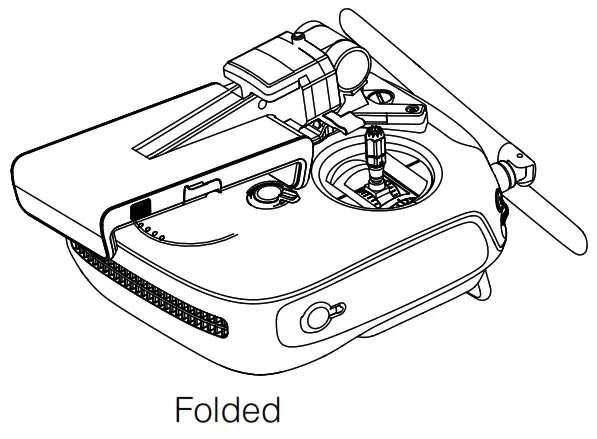
- Press the power button at least five times can transform the aircraft to Travel Mode again.
- Make sure to press the battery remove button when removing the battery.
Mount the Gimbal and Camera
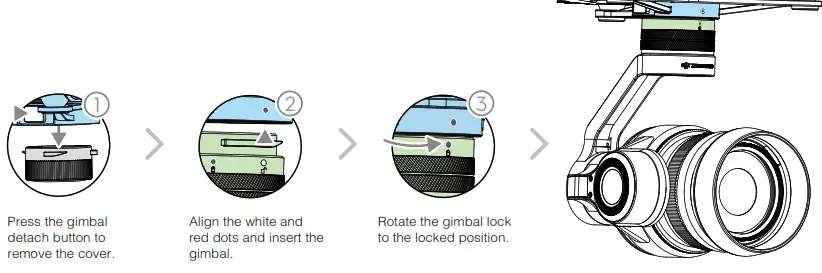
- Always power off the aircraft before removing the gimbal. Be sure to remove the gimbal before transforming the aircraft to Travel Mode.
- Make sure to press down the gimbal detach button when rotating the gimbal lock to remove the gimbal and camera. The gimbal lock should be fully rotated when removing the gimbal for the next installation.
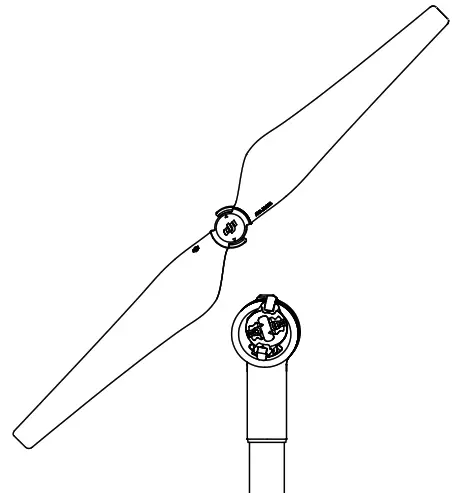
Prepare for Takeoff
Pair the propellers and motors with arrows of the same color (red or white).
 | ||
| Press down the spring pad and rotate the propeller lock until the arrows are aligned and you hear a click. | Attach the propeller onto the motor. | Again, rotate the propeller lock until you hear a click. |
![]() Make sure to press down the shrapnel before rotating the propeller lock.
Make sure to press down the shrapnel before rotating the propeller lock.
 | |||
| Toggle the flight mode switch to the safest P-mode. | Connect your mobile device. | Power on the remote controller and the aircraft. | Launch the DJI GO 4 app and tap GO FLY. |
Flight
Ready to Go (GPS)
Before taking off, ensure that the Aircraft Status Bar in the DJI GO 4 app indicates ‘Ready to Go (GPS)’ or ‘Ready to Go (Vision)’ in flying indoors.
In the DJI GO 4 App
 | Auto Takeoff The aircraft will take off and hover at an altitude of 4 feet (1.2 meters). |
 | Return-to-Home (RTH) Brings the aircraft back to the Home Point. Tap again to stop the procedure. |
 | More Intelligent Flight Modes Tap to use TapFly (P-mode), ActiveTrack (P-mode) and more. |
| Auto Landing The aircraft will land vertically and stop its motors. |
 | Gimbal Working Modes Includes Tracking Mode, Free Mode and Reset Mode. |
- Watch the tutorial in the DJI GO 4 app or on the official DJI website to learn more.
- Always set an appropriate RTH altitude before takeoff. Refer to the Disclaimer and Safety Guidelines for more details.
Manual Takeoff
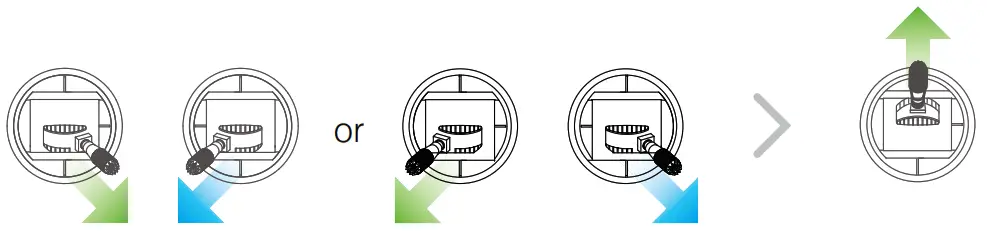 | |
| Combination Stick Command to start/stop the motors | Left stick up (slowly) to take off |
Return-to-Home (RC)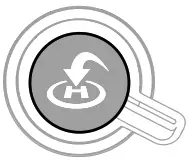 Same as the RTH button in the DJI GO 4 app. Brings the aircraft back to the Home Point.
Press and hold to initiate the RTH procedure. Press again to cancel.![]() Determine RTH status by sound:
Determine RTH status by sound:
Single beep… Request to return, but not receive the respond from the aircraft yet.![]() Double beep… RTH in progress.
Double beep… RTH in progress.
- Rotating propellers can be dangerous. DO NOT start the motors in narrow spaces or when there are people nearby.
- Always keep your hands on the remote controller so long as the motor is still spinning.
- After landing, power off the aircraft before turning off the remote controller.
- Take off from a flat surface in a wide open space, with the rear of the aircraft facing towards you.
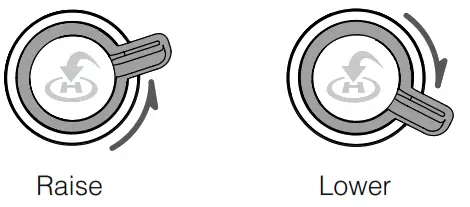
- Intelligent landing gear will automatically raise after takeoff and lower when landing.
- They can also be controlled manually using the Transformation Switch.
- The aircraft will not be able to land if the landing gear does not lower.
Manual Landing
- Ensure the landing gear is lowered before landing.

- Pull left stick down (slowly) until you touch the ground. Hold a few seconds to stop the motors.

![]() Stop motor mid-flight: Press the RTH button while simultaneously pulling the left stick to the bottom inside corner and hold for 3 seconds. Only stop motors mid-flight in emergency situations when doing so can reduce the risk of damage or injury.
Stop motor mid-flight: Press the RTH button while simultaneously pulling the left stick to the bottom inside corner and hold for 3 seconds. Only stop motors mid-flight in emergency situations when doing so can reduce the risk of damage or injury.
Aircraft Status Indicator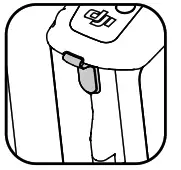
 Ready to go (GPS working).
Vision System on, GPS off or unavailable.
P-ATTI or ATTI mode.
Not connected to remote controller.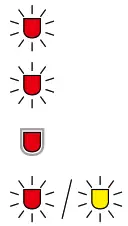 Low battery warning.
Critically low battery warning.
Critical error.
Compass calibration required.
Specifications
Aircraft (Model: T650)
| Weight | 7.25 lbs (3290 g, including two batteries, without gimbal and camera) |
| Diagonal Distance (propeller excluded) | 23.8 inch (605 mm, Landing Mode) |
| Max Takeoff Weight | 9.37 lbs (4250 g) |
| Max Takeoff Sea Level | 1.55 mi (2500 m); 3.1 mi (5000 m with specially-designed propeller) |
| Max Flight Time | Approx. 25 min (with Zenmuse X5S) , Approx. 23 min (with Zenmuse X7) |
| Max Tilt Angle | P-mode: 35° (Forward Vision System enabled: 25°); A-mode: 35°; S-mode: 40° |
| Max Ascent Speed | P-mode/A-mode: 16.4 ft/s (5 m/s); S-mode: 19.7 ft/s (6 m/s) |
| Max Descent Speed | Vertical: 13.1 ft/s (4 m/s); Tilt: 13.1-29.5 ft/s (4-9 m/s) |
| GPS Hovering Accuracy | Vertical: ±1.64 feet (0.5 m) or ±0.33 feet (0.1 m, Downward Vision System enabled) Horizontal: ±4.92 feet (1.5 m) or ±0.98 feet (0.3 m, Downward Vision System enabled) |
| Operating Temperature | -4° to 104° F (-20° to 40° C) |
Gimbal
| Angular Vibration Range | ±0.01° |
| Controllable Range | Pitch: -130° to +40°; Roll: ±20°; Pan: ±320° |
| Max Controllable Speed | Pitch: 180°/s; Roll: 180°/s; Pan: 270°/s |
| Interface Type | DGC2.0 |
Downward Vision System
| Velocity Range | <32.8 ft/s (10 m/s) at height of 6.56 feet (2 m) |
| Altitude Range | <32.8 feet (10 m) |
| Operating Range | <32.8 feet (10 m) |
| Operating Environment | Surfaces with clear patterns and adequate lighting (> 15 lux) |
| Ultrasonic Sensor Operating Range | 0.33-16.4 feet (10-500 cm) |
| Ultrasonic Sensor Operating Environment | Non-absorbing material, rigid surface (thick indoor carpeting will reduce performance) |
Forward Vision System
| Obstacle Sensing Range | 2.3-98.4 feet (0.7-30 m) |
| FOV | Horizontal: 60°; Vertical: 54° |
| Operating Environment | Surfaces with clear patterns and adequate lighting (> 15 lux) |
Upward Infrared Sensing System
| Obstacle Sensing Range | 0-16.4 feet (0-5 m) |
| FOV | ±5° |
| Operating Environment | Large, diffuse and reflective obstacles (reflectivity >10%) |
Remote Controller
| Operating Frequency | 2.400-2.483 GHz; 5.725-5.825 GHz |
| Max Transmitting Distance (unobstructed, free of interference) | 2.4 GHz: 4.3 miles (7 km, FCC); 2.2 miles (3.5 km, CE); 2.5 miles (4 km, SRRC) 5.8 GHz: 4.3 miles (7 km, FCC); 1.2 miles (2 km, CE); 3.1 miles (5 km, SRRC) |
| EIRP | 2.4 GHz: 26 dBm (FCC); 17 dBm (CE); 20 dBm (SRRC) 5.8 GHz: 28 dBm (FCC); 14 dBm (CE); 20 dBm (SRRC) |
| Battery | 6000mAh 2S LiPo |
| Output Power | 9W (Without supplying power to smart device) |
| USB Supply Power | iOS: 1 A @ 5.2 V (Max); Android: 1.5 A @ 5.2 V (Max) |
| Operating Temperature | -4° to 104° F (-20° to 40° C) |
Charger (Model: IN2C180)
| Voltage | 26.1 V |
| Rated Power | 180 W |
Intelligent Flight Battery (Model: TB50-4280mAh-22.8V)
| Capacity | 4280 mAh |
| Voltage | 22.8 V |
| Battery Type | LiPo 6S |
| Energy | 97.58 Wh |
| Net Weight | 515 g |
| Charging Temperature | 41° to 104° F (5° to 40° C) |
| Operating Temperature | -4° to 104° F (-20° to 40° C) |
| Max Charging Power | 180 W |
Charging Hub (Model: IN2CH)
| Input Voltage | 26.1 V |
| Input Current | 6.9 A |
![]() DJI incorporates HDMI™ technology.
DJI incorporates HDMI™ technology.
The terms HDMI and HDMI High-Definition Multimedia Interface, and the HDMI Logo are trademarks or registered trademarks of HDMI Licensing LLC in the United States and other countries.
Download the detailed user manual at:
www.dji.com/inspire-2
※ This content is subject to change without prior notice.
INSPIRE and DJI are trademarks of DJI.
Copyright © 2017 DJI All Rights Reserved.
Designed by DJI. Printed in China.
www.dji.com
YC.BZ.SS000191.03


