JVC KD-X262 Digital Media Receiver
INSTALLATION/CONNECTION
![]() Warning
Warning
- The unit can only be used with a 12 V DC power supply, negative ground.
- Disconnect the battery’s negative terminal before wiring and mounting.
- Do not connect Battery wire (yellow) and Ignition wire (red) to the car chassis or Ground wire (black) to prevent a short circuit.
- To prevent short circuit:
– Insulate unconnected wires with vinyl tape.
– Be sure to ground this unit to the car’s chassis again after installation.
– Secure the wires with cable clamps and wrap vinyl tape around the wires that comes into contact with metal parts to protect the wires.
![]() Caution
Caution
- For safety’s sake, leave wiring and mounting to professionals. Consult the car audio dealer.
- Install this unit in the console of your vehicle. Do not touch the metal parts of this unit during and shortly after use of the unit. Metal parts such as the heat sink and enclosure become hot.
- Do not connect the
 wires of speakers to the car chassis or Ground wire (black), or connect them in parallel.
 - Connect speakers with a maximum power of more than 50 W. If the maximum power of the speakers is lower than 50 W, change the [AMP GAIN] setting to avoid damaging the speakers.
- Mount the unit at an angle of less than 30º.
- If your vehicle wiring harness does not have the ignition terminal, connect Ignition wire (red) to the terminal on the vehicle’s fuse box which provides 12 V DC power supply and is turned on and off by the ignition key.
- Keep all cables away from heat dissipate metal parts.
- After the unit is installed, check whether the brake lamps, blinkers, wipers, etc. on the car are working properly.
- If the fuse blows, first make sure the wires are not touching car’s chassis, then replace the old fuse with one that has the same rating.
Basic procedure
- Remove the key from the ignition switch, then disconnect the terminal of the car battery.
- Connect the wires properly. See “Wiring connection” on page 3.
- Install the unit to your car. See “Installing the unit (in-dash mounting)”.
- Connect the terminal of the car battery.
- Detach the faceplate and reset the unit. See “How to reset” on page 4.
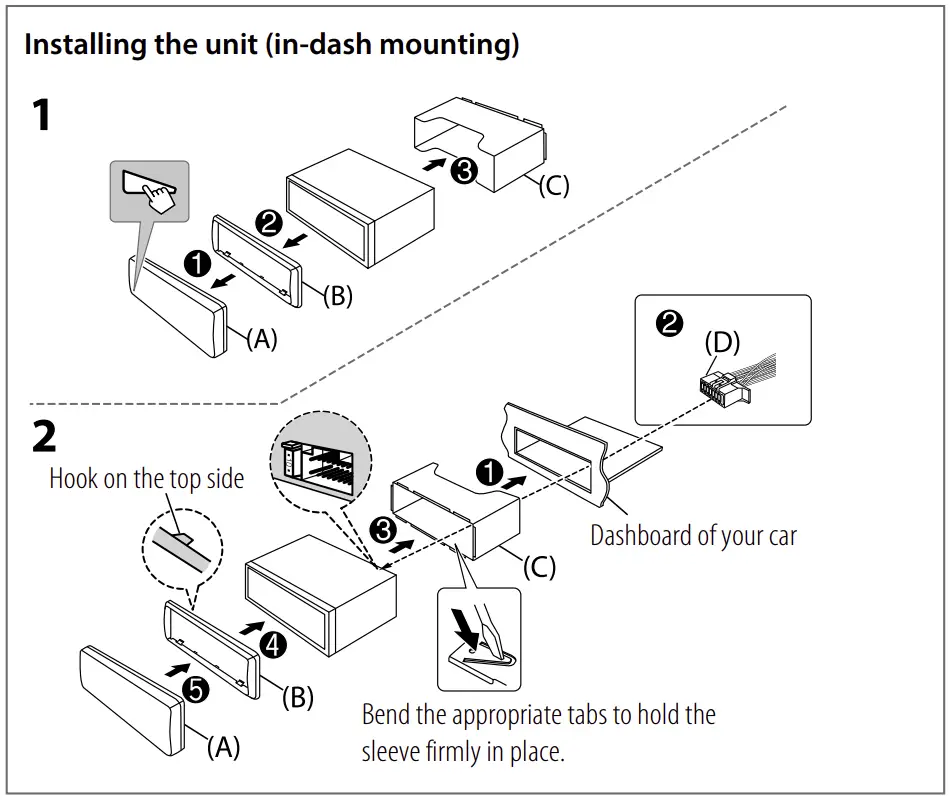
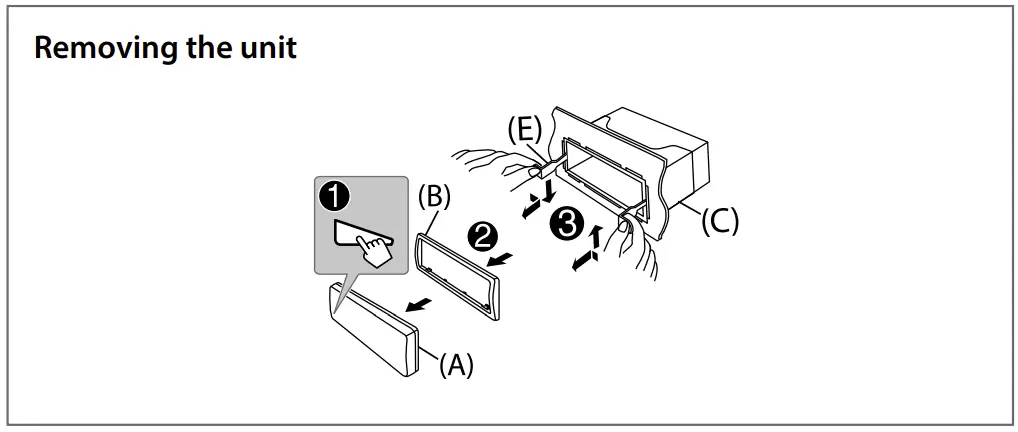
Part list (supplied)
A) Faceplate (×1)
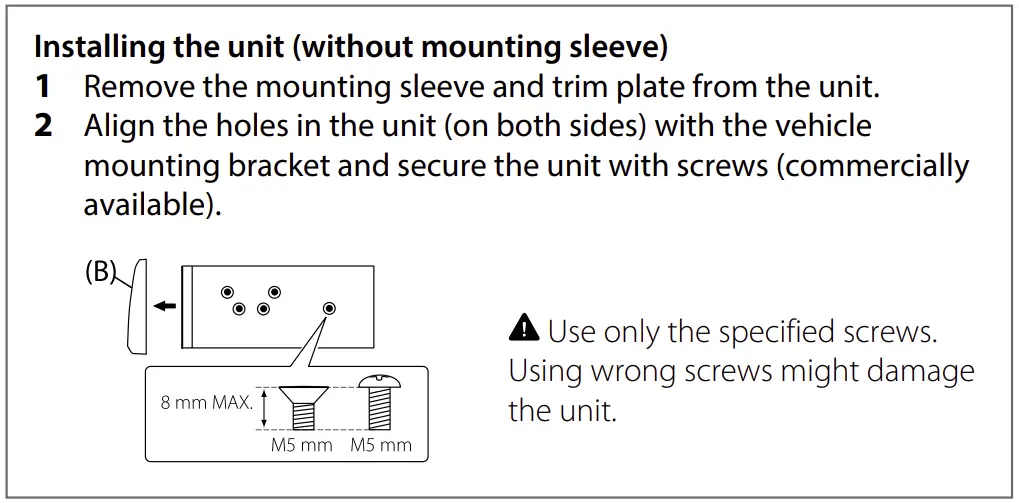
(B) Trimplate (×1)
(C) Mounting sleeve (×1)
(D) Wiring harness (×1)
(E) Extraction key (×2)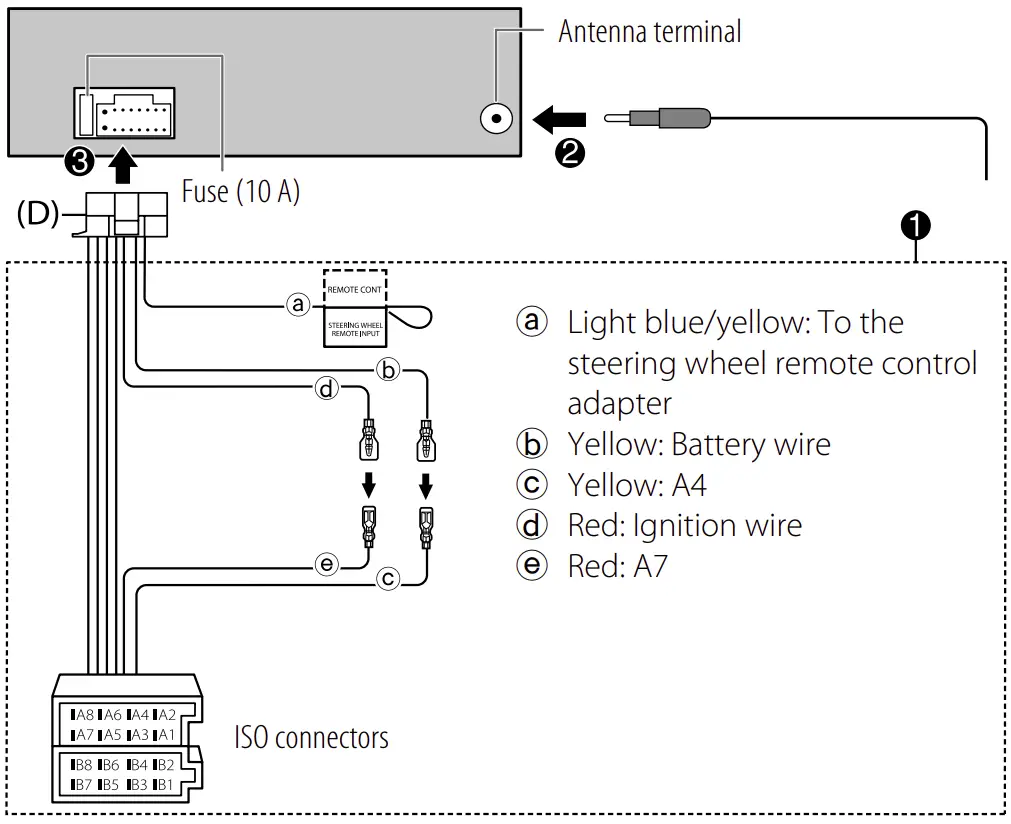
| Pin | Color and function | |
| A4 | Yellow | : Battery |
| A5 | Blue/White | : Power control (12 V |
| A6 | Orange/white | : Car light control switch |
| A7 | Red | : Ignition (ACC) |
| A8 | Black | : Earth (ground) connection |
| B1, B2 | Purple | : Rear speaker (right) |
| B3, B4 | Gray | : Front speaker (right) |
| B5, B6 | White | : Front speaker (left) |
| B7, B8 | Green | : Rear speaker (left) |
BEFORE USE
IMPORTANT
- To ensure proper use, please read through this Guide before using this product. It is especially important that you read and observe Warnings and Cautions in this Guide.
- Please keep the Guide in a safe and accessible place for future reference.
![]() Warning
Warning
Do not operate any function that takes your attention away from safe driving.
![]() Caution
Caution
Volume setting:
- Adjust the volume so that you can hear sounds outside the car to prevent accidents
- Lower the volume before playing digital sources to avoid damaging the speakers by the sudden increase of the output level
General:
- Avoid using the external device if it might hinder safe driving.
- Make sure all important data has been backed up. We shall bear no responsibility for any loss of recorded data.
- Never put or leave any metallic objects (such as coins or metal tools) inside the unit to prevent a short circuit.
BASICS
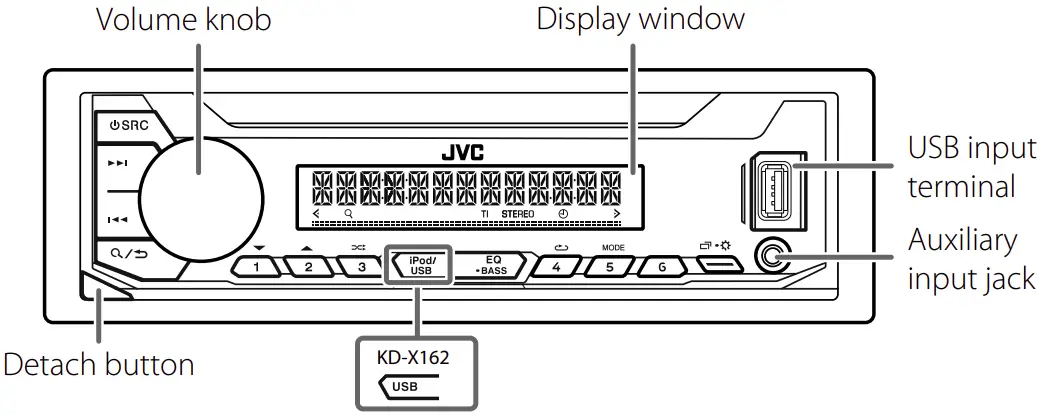
Faceplate

| To | On the faceplate |
| Turn on the power | Press
|
| Adjust the volume | Turn the volume knob. |
| Select a source | Press |
| Change the display information | Press |
GETTING STARTED
Cancel the demonstration
When you turn on the power for the first time (or after you reset the unit), the display shows: “CANCEL DEMO” ![]() “PRESS”
“PRESS” ![]() “VOLUME KNOB”
“VOLUME KNOB”
- Press the volume knob.
[YES] is selected for the initial setup. - Press the volume knob again.
“DEMO OFF” appears.
Set the clock and date
- Press and hold
 .
. - Turn the volume knob to select [CLOCK], then press the knob.
To adjust the clock - Turn the volume knob to select [CLOCK ADJUST], then press the knob.
- Turn the volume knob to make the settings, then press the knob.
Hour Minute
 - Turn the volume knob to select [CLOCK FORMAT], then press the knob.
- Turn the volume knob to select [12H] or [24H], then press the knob.
To set the date - Turn the volume knob to select [DATE SET], then press the knob.
- Turn the volume knob to make the settings, then press the knob.
Day Month Year - Press to exit.
To return to the previous setting item, press ![]() .
.
Set the basic settings
- Press and hold .
- Turn the volume knob to select an item (see the following table), then press the knob.
- Repeat step 2 until the desired item is selected or activated.
- Press to exit.
To return to the previous setting item, press ![]() .
.
RADIO
Search for a station
- Press
 SRC repeatedly to select FM or AM.
 - Press
 to search for a station automatically. (or) Press and hold until “M” flashes, then press repeatedly to search for a station manually.
Settings in memory
You can store up to 18 stations for FM and 6 stations for AM.
Store a station
While listening to a station….
Press and hold one of the number buttons (1 to 6).
(or)
- Press and hold the volume knob until “PRESET MODE” flashes.
- Turn the volume knob to select a preset number, then press the knob. “MEMORY” appears once the station is stored.
Select a stored station
Press one of the number buttons (1 to 6)
(or)
- Press
 .
. - Turn the volume knob to select a preset number, then press the knob.
USB/iPod/ANDROID
Selectable source:
- KD-X262: USB/iPod/ANDROID
- KD-X162: USB/ANDROID
Start playback
The source changes automatically and playback starts when you attach a device (USB device/ iPod/iPhone/ Android device) to the USB input terminal.
| To | On the faceplate |
| Reverse/Fast-forward | Press and hold |
| Select a file | Press |
| Select a folder | Press 2 |
| Repeat play | Press 4 |
| Random play | Press 3 |
- Press and hold to enter menu settings.
- Turn the volume knob to select an item, then press the knob.
- Repeat step 2 until the desired item is selected/activated.
- Press to exit .
To return to the previous setting item, press ![]() .
.
- Refer to the INSTRUCTION MANUAL on the following website for the detailed explanation of each item: <http://www.jvc.net/cs/car/>
- The availability of each item vary depending on the model.
Menu items
[EQ SETTING] : Selects a preset equalizer or adjusts your own sound settings.
[AUDIO CONTROL] : Sets your preferred audio settings.
[DISPLAY] : Sets your preferred control for the display window.
[TUNER SETTING] : Settings for radio source.
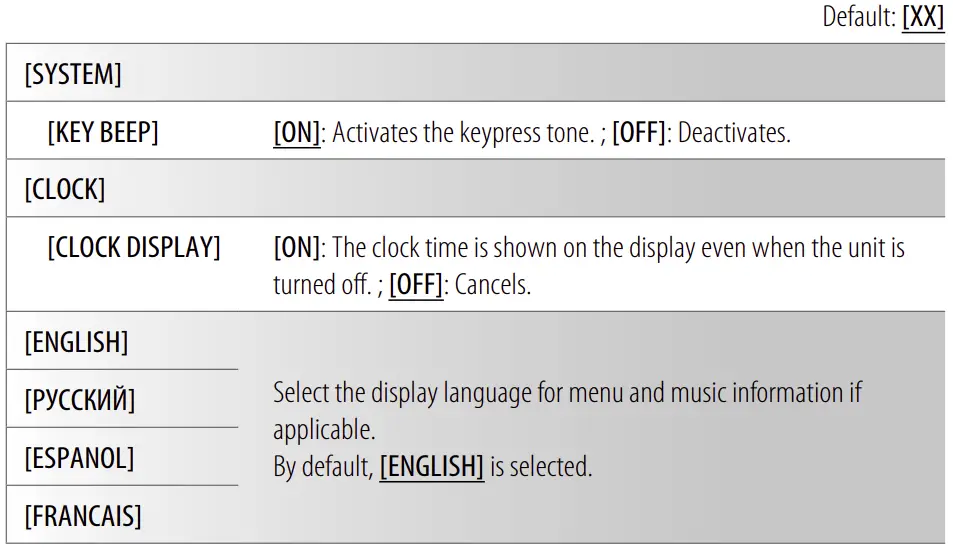
[SYSTEM] : Settings for this unit.
[CLOCK] : Adjusts the clock.
[ENGLISH] : Selects language for the menu and music information.
[РУССКИЙ] : Selects language for the menu and music information.
[ESPANOL] : Selects language for the menu and music information.
[FRANCAIS] : Selects language for the menu and music information.
[DEMO MODE] : Activates or deactivates the display demonstration.
Examples of some well-used settings
Subwoofer Level Setting
- Press and hold to enter menu settings.

- Turn the volume knob clockwise to select [AUDIO CONTROL], then press the knob.

- Turn the volume knob clockwise to select [SUBWOOFER SET], then press the knob.

- Turn the volume knob clockwise to select [ON], then press the knob.

- Turn the volume knob clockwise to select [SUB.W LEVEL], then press the knob.

- Press the volume knob if [PRE-OUT] is shown on the display.

- Turn the volume knob to adjust the subwoofer level, then press the knob.

- Press to exit the setting menu.


Note:
You need to set [SPK/PRE OUT] to [REAR/SUB.W] or [SUB.W/SUB.W] before you can make the subwoofer level settings.
OTHER INFORMATION
For playback operations of AUX source, refer to the INSTRUCTION MANUAL on the following website: <http://www.jvc.net/cs/car/>
- The availability of each source vary depending on the model.
For detailed operations and information, refer to the INSTRUCTION MANUAL on the following website: <http://www.jvc.net/cs/car/>
 Information on Disposal of Old Electrical and Electronic Equipment and Batteries (applicable for countries that have adopted separate waste collection systems)
Products and batteries with the symbol (crossed-out wheeled bin) cannot be disposed as household waste.
Old electrical and electronic equipment and batteries should be recycled at a facility capable of handling these items and their waste byproducts.
Contact your local authority for details in locating a recycle facility nearest to you. Proper recycling and waste disposal will help conserve resources whilst preventing detrimental effects on our health and the environment.
Notice: The sign “Pb” below the symbol for batteries indicates that this battery contains lead.
 Informazioni sullo smaltimento delle vecchie apparecchiature elettriche ed elettroniche e delle batterie (valide per i paesi che hanno adottato sistemi di raccolta differenziata)
I prodotti e le batterie recanti il simbolo di un cassonetto della spazzatura su ruote barrato non possono essere smaltiti insieme ai normali rifiuti di casa.
I vecchi prodotti elettrici ed elettronici e le batterie devono essere riciclati presso un’apposita struttura in grado di trattare questi prodotti e di smaltirne i loro componenti.
Per conoscere dove e come recapitare tali prodotti nel luogo a voi più vicino, contattare l’apposito ufficio comunale. Un appropriato riciclo e smaltimento aiuta a conservare la natura e a prevenire effetti nocivi alla salute e all’ambiente.
Nota: Il simbolo “Pb” sotto al simbolo delle batterie indica che questa batteria contiene piombo.
 Declaration of Conformity with regard to the RE Directive 2014/53/EU
Declaration of Conformity with regard to the RoHS Directive 2011/65/EU
Manufacturer:
JVC KENWOOD Corporation
3-12, Moriya-cho, Kanagawa-ku, Yokohama-shi, Kanagawa, 221-0022, JAPAN
EU Representative:
JVCKENWOOD Europe B.V.
Amsterdamseweg 37, 1422 AC UITHOORN, THE NETHERLANDS
Hereby, JVCKENWOOD declares that the radio equipment “KD-X262/KD-X162” is in compliance with Directive 2014/53/EU.
The full text of the EU declaration of conformity is available at the following internet address: http://www.jvc.net/cs/car/eudoc/
|
Note for specifications
Speaker Impedance:
4 Ω — 8 Ω
Operating Voltage:
12 V DC car battery