BOYO VTR93M Vehicle HD Backup Camera
Precautions
- Please insert the micro SD card in the right direction to avoid damage to the card or the VTR93M. If the VTR93M shows an error message, please format the micro SD card from the VTR93M menu. Please reset the VTR93M or replace the micro SD card if the error continues.
Note: All files will be deleted when formatting the micro SD card. Please backup the important files before you format. When the reset function is selected, the settings will be returned to the default setting. - Recommended micro SD card: CLASS 10 or above micro SD card. Micro SD card specification varies from one brand to another and it may not function as expected when using with the VTR93M. Please review the micro SD’s specifications before you use the micro SD card.
- The micro SD card must be formatted before using with the VTR93M. Backup recording files once a week to prevent files from being overwritten. Please format the micro SD card once every month for recording stability.
- Please make sure the straps are installed properly and firmly onto the rearview mirror to avoid any damage to the VTR93M and for better recording angle.
- The battery life-span will continuously decrease upon usage. Please charge the battery once every month to preserve the battery life.
- Please do not use the VTR93M in a wet environment as the mirror monitor is not waterproof or water resistant.
- Please do not record or take pictures in direct sunlight.
- To obtain clear images, please clean the windshield and the VTR93M cameras on a regular basis. Avoid using the VTR93M in a dusty environment.
- Please handle the VTR93M with care. Avoid using the VTR93M in a high
electromagnetic environment. - Operating temperature of the VTR93M is -4°F to 140°F. Continuous exposure to sunlight, especially when the VTR93M is mounted in a vehicle where the temperature exceeds above 158°F, the VTR93M may malfunction, screen change colors or image distortion.
Disclaimer:
This device is NOT intended to be used for illegal purposes; surveillance shall not be used in any form as evidence for claim purposes. Some countries prohibit drivers from mounting anything on the windshield or restrict mounting to specific areas of the windshield. It is the owner’s responsibility to mount the device in compliance with local laws. Errors may occur depending on the surrounding environment and the voltage of the vehicle. The company is not liable or responsible for the non-recorded event, missing files and others. The company will not be liable for any damage incurred directly or indirectly from errors, omissions, or discrepancies. Do not operate the device while driving. Using this device does not change the requirement for a driver to take full responsibility for his or her behavior. This responsibility includes observing all traffic rules and regulations in order to avoid accidents, personal injury or property damage.
Product Structure
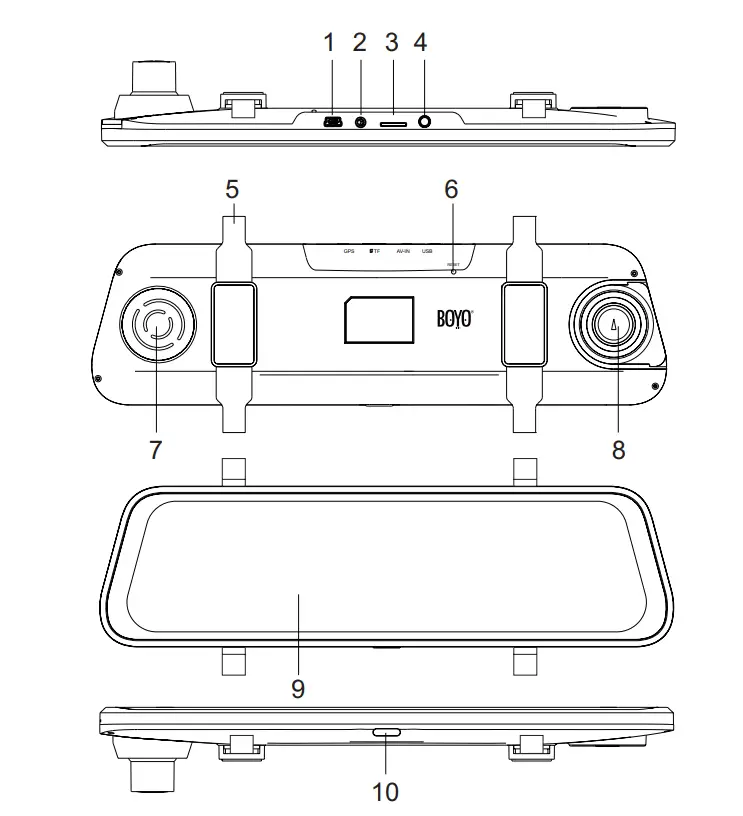
| 1 | USB power input | 6 | RESET button |
| 2 | AV-IN rear camera input | 7 | Speaker |
| 3 | Micro SD Card slot | 8 | Front Camera |
| 4 | GPS antenna input | 9 | LCD Screen |
| 5 | Back strap mounting hook | 10 | ON/OFF/LCD Off |
Function
Power Function
- Power On
In the off state, long press the ON/OFF button, the VTR93M enters into video mode and starts recording automatically. Or when the VTR93M is connected with the vehicle charger in the off state, it enters video mode and starts recording automatically. When the USB charger is unplugged, the VTR93M will automatically save the current file and shut down within 10 seconds delay.
Note: LCD screen displays ‘Please insert SD card’ if Micro SD card not inserted. - Power Off
In the working state, long press ON/OFF button to power off the VTR93M.
Note: In low battery state, the VTR93M displays ‘Low Battery’ and will automatically saves the current file and shuts down.
Function Keys
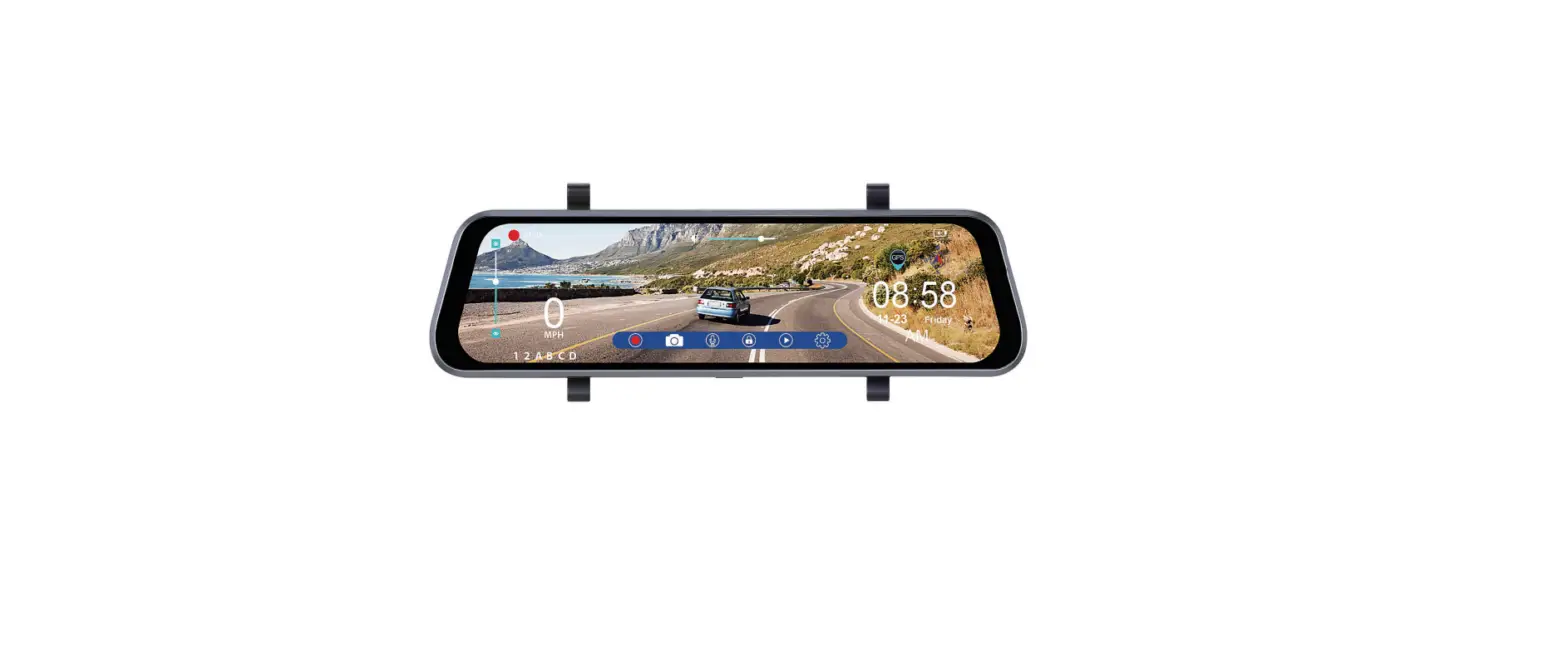
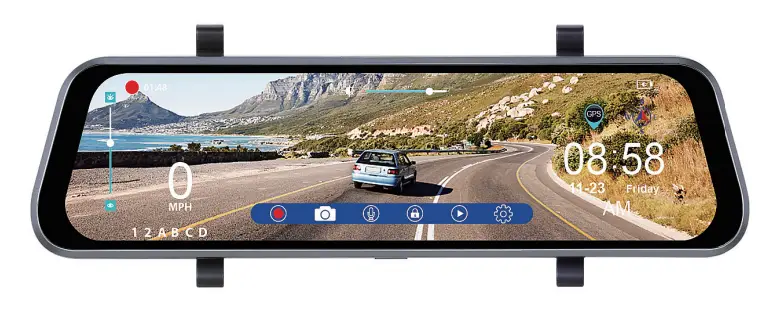
VTR93M will enter into the main interface after it is powered on. (As shown below)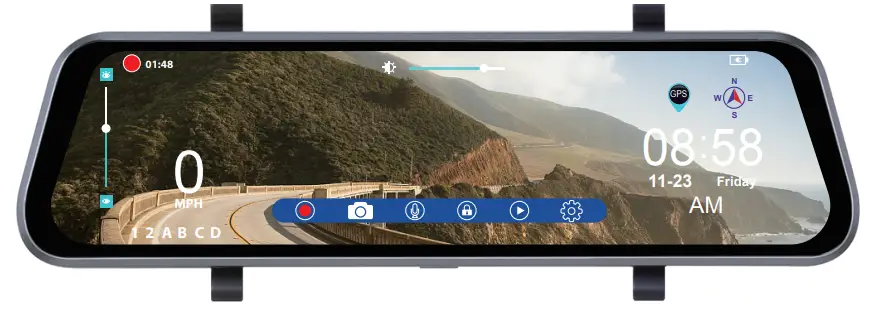

These are function operation keys. If no operations within 5 seconds, the keys will disappear, touch the LCD screen anywhere and the keys will appear on the screen again.
- Video key: Click the key in video standby mode, the VTR93M enters into video mode and starts recording and the appears on the top left corner of the screen. Click it again, the VTR93M stops recording and the
 disappears off the screen.
 - Photo key: Click the key to take a photo with sounds prompt in standby or video mode.
- Record audio key: The icon shows the recorded audio on. Click the key to close record audio in the standby or video mode and appears.
- Manual lock key: Click the key in the recording to save the current video file from being overwritten and
 the appears on the top of the screen.
Click it again to unlock the current file andthe disappears off the screen. - File management key: In video standby mode, click the key to access the file management interface to playback/delete videos and photos.
- System setting key: In video standby mode, click the key to enter into system setting.
 Screen brightness adjustment bar: Hold the middle adjustment button and drag it left or right to adjust the brightness of the screen.
 Window adjustment bar of rear camera: The icon appears after the VTR93M is powered on and connects with rear camera. Click on the top or bottom position of the adjustment bar to adjust the viewing position of rear camera’s image on the screen, this allows the users to focus on the appropriate area behind the vehicle.
Front and rear camera image display switch: In the screen control interface, click any position of the screen (non-operation button) to switch between the current camera image to the other camera image.
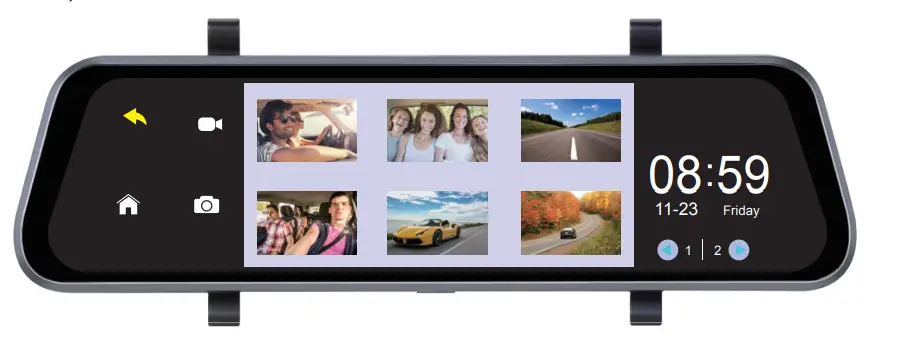
File management
- Click the
 key to enter into file management interface. (As shown below)
 Click
Click  to playback the videos and click
  to view the photos; the middle window displays the files and the bottom right window displays the current page and the total number of pages of the file. Click the
  or the to change the file page.
 - Click the play icon in the middle window to play the video. (As shown below)
 Click key to play the current video, click the
 key to lock or unlock the file, and click the
  key to delete the curGrPeS nt file that is unlocked. Click the
 to return the last interface and Click the to return to the main interface.
 - System setting
Click the key to enter into the system setting menu. (As shown below)
 Click
Click  to switch the menu page.When set a menu,click the menu and the setting options of the menu will be shown on the right,and then click the setting option with its color changed.The setting is completed.
 - G-Sensor
When the vehicle brakes suddenly or being hit heavily, G-sensor will activate to save and protect the current video clip from being overwritten automatically. Three grades setting (high, medium and low) to cater for different vehicle owners. - Parking Monitor
Parking monitor is for security monitoring when the vehicle is parked. Please set the Parking Monitor ON in settings menu. After the vehicle engine is off, the VTR93M will power off accordingly. If the VTR93M detects vibration, it will power up to record automatically. The function only can be used in the condition of a fully charged battery. - Motion Detection
When motion detection is on, the camera automatically starts recording when it detects movement in the front camera field of view. The function only works when the camera is turned on. The factory default is OFF, turn on if needed. - Vehicle License Plate Number
Go to the vehicle license plate number in the setting menu to input the license plate number. - GPS Tracking
- As soon as the GPS antenna is connected to the VTR93M and detects a signal, the GPS icon
 GPS will appear on the right of screen, when the VTR93M locates GPS successfully, the driving speed and compass direction can be viewed on the screen.
 - Please use a professional Dash Cam player to play video files. The current driving track, speed and coordinates will be displayed on the player.
Go to Update Time of GPS settings menu to select time zones. When
the VTR93M locates GPS successfully, the VTR93M’s current time will
be synchronized with the GPS satellite time. GPS functions outdoors, the
VTR93M may not receive GPS signal indoors.
- As soon as the GPS antenna is connected to the VTR93M and detects a signal, the GPS icon
- USB Mode (USB cable not included)
Connect the USB cable to the computer, the VTR93M will automatically pop up the USB menu. There are three different modes to choose from:- Memory Mode
In this mode, you can access video files and photo files. - Camera Mode
Selecting this mode, the VTR93M can be used as a PC Camera. - Camera Recording Mode (USB cable is used as a power supply in this mode)
In this mode, you can record the video and take pictures.
Note: Incorrect operation can leads to a system crash. Please use a small hard pin to press the reset button to restart the VTR93M.
- Memory Mode
 Click
Click 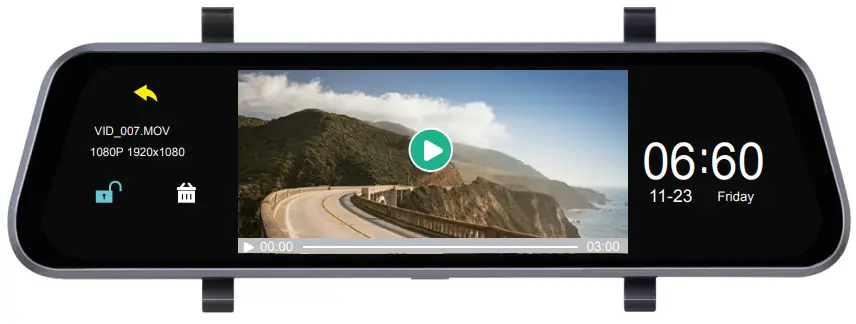 Click
Click 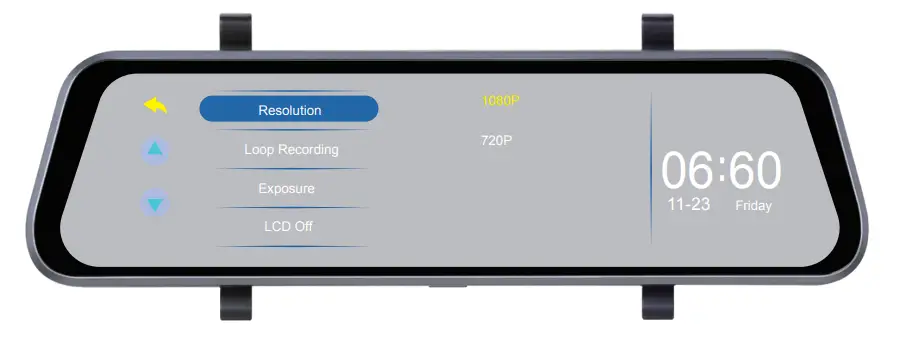 Click
Click Specifications
Specifications may change without prior notice.
| Screen | 9.35” full touch screen display |
| Video Resolution | 1920*1080P or 1280*720P (front cam); 1280*720P (rearview cam) |
| Cameras | 170° diagonal for front camera; 120° diagonal for rearview camera |
| Video Format | MOV |
| Photo Resolution | 2M |
| Photo Format | JPG |
| G-sensor | Supported |
| GPS Tracking | Supported |
| Motion Detection | Supported |
| Parking Monitoring | Supported |
| Loop Recording | Supported |
| Vehicle License Plate Number | Supported |
| Microphone/Speaker | Supported |
| Memory Card Capacity | Max. support 32GB (class 10 or above suggested) |
| Frequency | 50HZ/60HZ |
| Power | 5V/2A |
| USB Type | Mini USB |
| Language | English/Spanish/French/Chinese/ Japanese/Russian |
| Battery | Built-in battery |
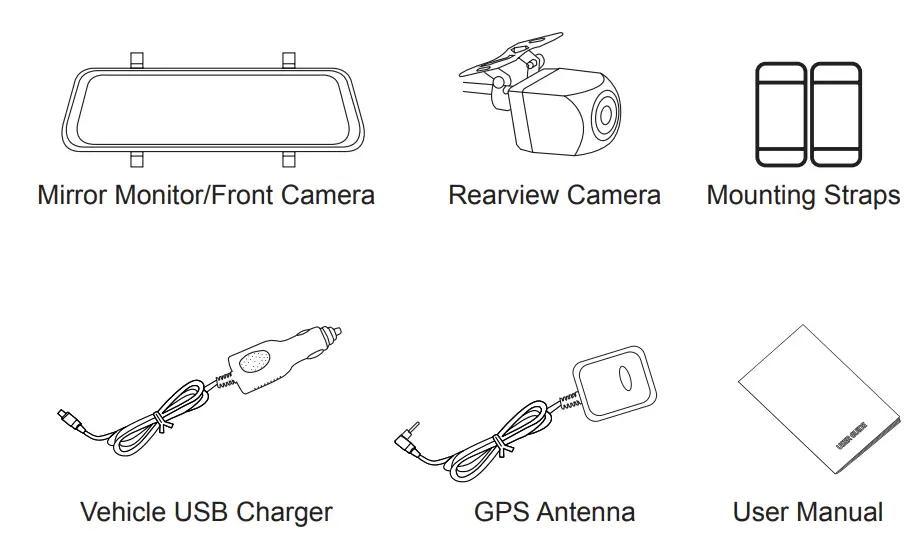
Accessories
Vision Tech America, Inc.
® 1452 E. Valencia Dr., Fullerton, CA 92831
Tel: 888-941-3060
For technical support contact 888-941-3060 or email [email protected] WWW.VISIONTECHAMERICA.COM
FAQS
Blue lines outside the white lines indicate that your car is heading in the right direction. A dotted black line is the center line guide that helps you line up your vehicle in front of a trailer or camper. Green lines represent objects farthest from your vehicle. Red lines represent objects nearest your vehicle.
If a driver does not get a rearview camera feed while in reverse, there is likely some issue with the electrical system. Most likely, the camera itself behind your vehicle is not the problem. The very first step to troubleshooting this issue is to check the manual provided by the manufacturer.
Not every backup camera has an adjustable lens or enclosure. This means adjusting the angle of the camera includes adjusting the entire mount. Simply remove the mount from the vehicle and place washers, bolts, or grommets between the mount and the surface of the vehicle and refasten the screws or bolts.
The best place to put a reversing camera is in the middle of the vehicle. Being fitted in a lower position will give it a better field of view – or high up looking downwards. For example, the rear bumper is ideal – but on some vehicles above the rear doors can also be suitable.
In order to wire a backup camera to be on all of the time, you would have to wire it into the running light circuit instead of the reverse light circuit. This way, when you wanted it on, you would just turn the running lights on
Description. The red wire at the end of video cable are extra power wires runs inside the video cable, It’s purpose is-if you power easily in the rear from the reverse lights, you can get your power fro the rear and use this to bring it to the front.
If the reverse camera is misbehaving and showing the message, “No Signal” instead of an image on the dashboard monitor, then the connection between the reverse camera and the monitor has been interrupted. This is likely caused by a connection point fully dislodging or the wiring circuit being completely cut through
Most rear view backup cameras today come with a 120-degree viewable angle, it is the minimum you should have and if the option to upgrade to 170 degrees is available we suggest you take it. This will allow you to see approximately 3 lanes behind you.
A rear view mirror system (also known as a Reverse camera mirror) is the most popular type of reversing camera system. It replaces the existing rear view mirror in your vehicle, with one that has a LCD screen integrated. When you select the reverse gear, the screen appears. This type of mirror needs power.
Step 1: Long-tap on the Camera app icon and open the app info menu. Step 2: Go to Storage & cache menu. Step 3: Tap on Clear cache and you are all set to use a working Camera app on Android.
No you don’t have to drill a hole in your car. you can feed the wire for the back up cam through the tag, light, or even through the grommet.
Although many high-end reversing cameras in the market are designed to work in a wide variety of lighting conditions, these can provide a clear image in near or total darkness. This is where the infrared night vision illumination or light emission diode (LED) helps.
If the camera is installed and connected to the ignition circuit for main power, the dash camera will never drain your battery.
Backup camera – a camera that turns on when you put your vehicle in reverse. Rear-view camera – a camera that you can turn on at any time to see what’s behind your vehicle.


