![]()
DVB-T RECEIVER
USER MANUAL
DVBTR – DVB-T RECEIVER
Introduction
To all residents of the European Union
Important environmental information about this product  This symbol on the device or the package indicates that disposal of the device after its lifecycle could harm the environment. Do not dispose of the unit (or batteries) as unsorted municipal waste; it should be taken to a specialized company for recycling. This device should be returned to your distributor or to a local recycling service. Respect the local environmental rules. If in doubt, contact your local waste disposal authorities.
Thank you for buying the DVBTR! Please read the manual thoroughly before bringing this device into service. If the device was damaged in transit, don’t install or use it and contact your dealer. Features:
- Connectable to any TV set (PAL / NTSC)
- Easy connection and operation
- Perfect digital and noise-free image and sound
- Perfect reception with a standard antenna
Safety Instructions
 Be very careful during the installation: touching live wires can cause life-threatening electroshocks.
Keep this device away from rain and moisture.
- Damage caused by disregard of certain guidelines in this manual is not covered by the warranty and the dealer will not accept responsibility for any ensuing defects or problems.
- Make sure that the available voltage does not exceed the voltage stated in the specifications of this manual.
- Do not crimp the power cord and protect it against damage. Have an authorized dealer replace it if necessary.
- Do not plug or unplug the power cord when your hands are wet.
- Keep the power cord away from heat sources. Clean the plug every now and then.
- Switch the unit to standby mode or turn off the power when the unit is not being used. Disconnect the device from the mains to clean it. Handle the power cord by the plug only.
- If the device emits smoke, bad smells or noises, switch off the unit and disconnect the power cord from the mains.
- Note that damage caused by user modifications to the device is not covered by the warranty.
- Keep the device away from children and unauthorized users.
General Guidelines
- The DVBTR should only be used with an alternating current of max. 230VAC / 50Hz.
- Do not attempt to disassemble the unit.
- Select a location where the device is protected against extreme heat (see “Technical Specifications”), dust and moisture.
- Keep the unit out of direct sunlight. Do not place the unit near heating devices or in automobiles. Avoid places with excessive dust, strong magnetic or static electricity and vibrations.
- Keep the device away from water and other liquids. Never bring magnetic objects near the unit.
- Place the unit in a horizontal position and avoid placing heavy objects atop of it. Do not place the device on top of amplifiers or other heat-producing equipment.
- All modifications of the device are forbidden for safety reasons.
- Only use the device for its intended purpose. All other uses may lead to short circuits, burns, electroshocks, crash, etc. Using the device in an unauthorized way will void the warranty.
Description
Front Panel
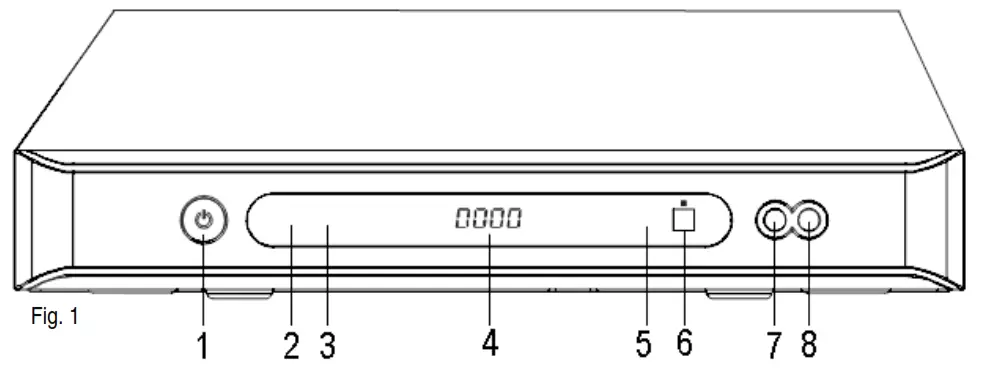
- Standby button
- Power LED
- Lock LED
- Digital LED display
- Standby LED
- IR sensor
- PROG ▼button (DOWN / CH -)
- PROG ▲button (UP / CH +)
Rear Panel
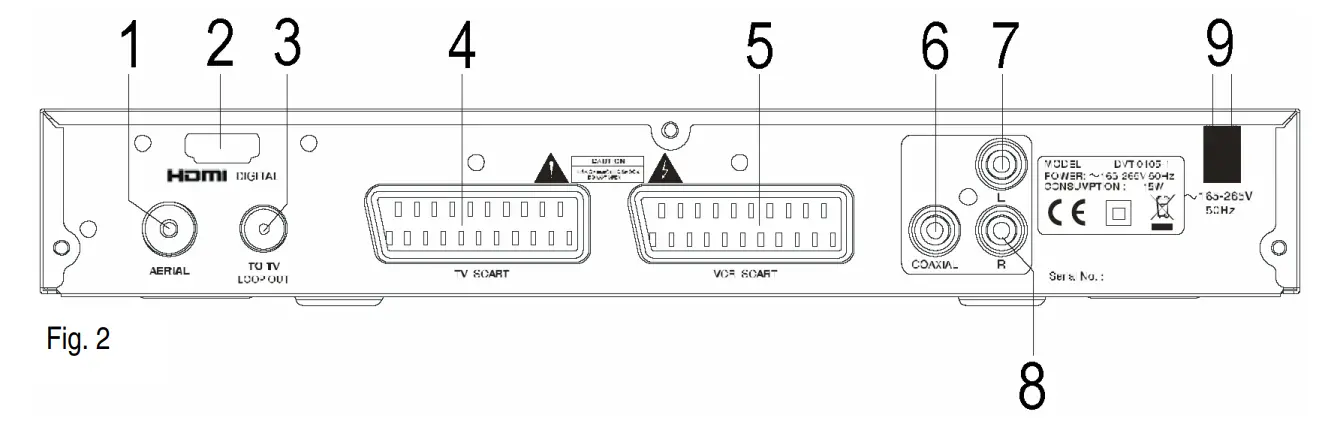
- Aerial connection
- HDMI™ output jack
- Loop out connection
- TV SCART connection
- VCR SCART connection
- Audio coaxial output connection
- Left channel output connection
- Right channel output connection
- AC power cord
NOTE: Unplug and keep the power cord orderly when the unit is idle for a long time in order to avoid electricity leakage and shock.
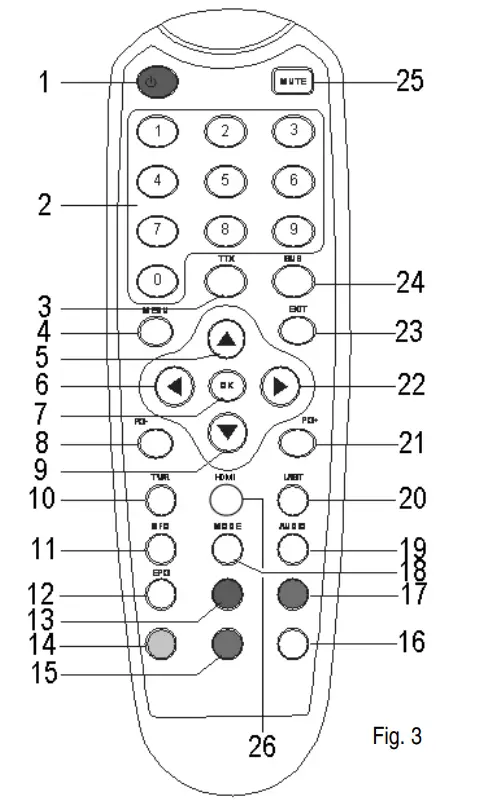
Remote Control
- Standby button
- Numerical buttons
- TTX (Teletext) button
- the MENU button
- ▲ button (UP / CH +)
- ◄ button (LEFT / VOL -)
- OK button
- PG- button (page down)
- ▼ button (DOWN / CH -)
- TV / R button (TV/radio channel)
- INFO button (channel information)
- EPG button (Electronic Program Guide)
- RED button
- YELLOW button
- BLUE button
- WHITE button
- GREEN button
- MODE button
- AUDIO button
- LAST button (last channel)
- PG+ button (page up)
- ► button (RIGHT / VOL +)
- EXIT button
- SUB button (subtitle)
- MUTE button
- HDMI™
 Connection
 Connection
- Make sure the power switch and other equipment to be connected are turned off before connection.
- Observe the colour coding when connecting audio and video cords.
- Use the correct output mode when connecting the system to the TV set (including signal mode and signal code type) to avoid image distortion.
- Aerial (optional)
- TV set (optional)
- DVBTR
- TV SCART connector (cable optional)
- TV S-VIDEO connector (cable optional)
- Audio / Video cable (cable optional)
- Power cord
- VCR SCART connector (cable optional)
- Second DVBTR (optional)
- VCR (optional)

Remote Control
Battery Installation
Insert the batteries respecting the polarity.
Batteries’ Service Life
- The batteries normally last up to one year depending on frequency of usage.
- Replace the batteries when the remote control unit fails to work. Do not mix old and new batteries.
- Use 2 x AAA batteries. Do not use rechargeable (NiCd) batteries.
- Do not short circuit, disassemble, heat or throw the batteries into the fire.
- Do not drop or step onto the remote control.
- Remove the batteries when the remote control is not being used for a long time to avoid electrolytic leakage. Wipe away any electrolyte leakage inside the remote control. If any leaking should come into contact with parts of your body, rinse thoroughly with water.
Operation Range
- The operation range is up to 5 meters in angle of 60° of the front of the IR sensor.
- The operating distance may vary according to the room’s brightness.
- Do not point bright lights at the remote control sensor.
- Do not place objects between the remote control and the IR sensor. Do not use the remote control while simultaneously operating the remote control of any other equipment.
Installation
Connect this unit and other equipment according to fig. 4 (see “5. Connection”
- Switch on the device via the power switch on the front panel.
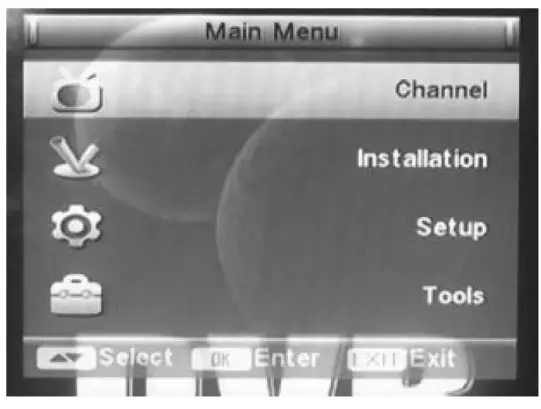
- Press the MENU button to enter the MAIN MENU.
- Select a submenu with
 /
/ and press OK to enter. Press
 /
/ to select an option and exit the submenu by pressing ENTER..
MUTE: press to mute/un-mute the sound.
TTX: press this button to show the teletext information (if available).
SUB: turn the subtitles on/off by pressing this button.
STANDBY: enter the standby mode, press again to return to working status.
CH+/CH- ( ![]() /
/![]() ): press this button to enter the next or previous menu.
): press this button to enter the next or previous menu.
VOL+/VOL- (![]() /
/![]() ): adjust the volume level.
): adjust the volume level.
OK: press to confirm.
PG+/PG-: press this button to go to the next/previous page.
TV/R: press to switch between TV channels and radio channels.
LAST: return to the last service.
INFO: press this button to show the information of the current service.
MODE: press to browse nine channels at the time.
RED, GREEN, YELLOW, BLUE: function operation.
AUDIO: press to select the audio language or audio output mode.
P-TIMER: press to set the program timer.
HDMI: press to switch between digital and normal AV output.
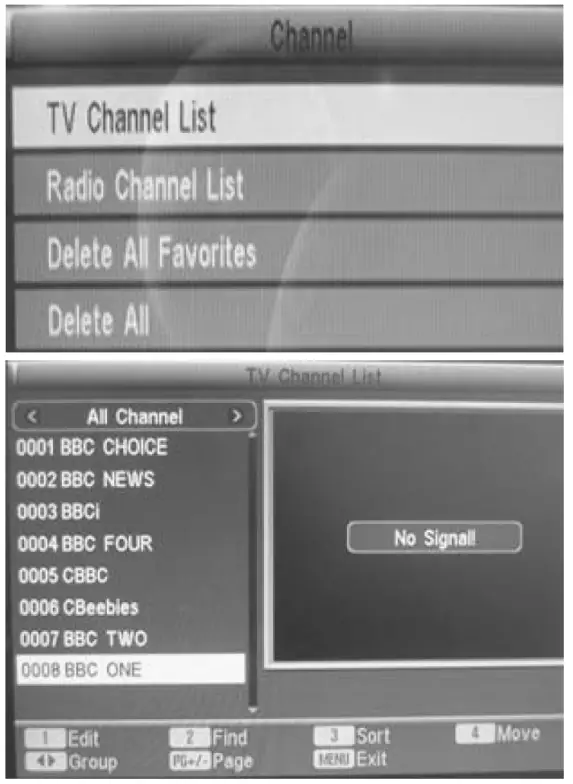
The Channel Menu
This window shows the channel list. Choose one the four submenus.
TV Channel List
- Choose a channel with /.
- Press / to select a favorite group.
- Quit the submenu with MENU or EXIT.
- Press numeric button 1 to edit all TV channels.
- Press numeric button 2 to search for a particular channel.
- Press numeric button 3 to sort the TV channels into various favorite groups.
- Press numeric button 4 to move the TV channel to a different place.
- Press PG+/PG- to see the next/previous page. A maximum of 400 channels can be stored.
Radio Channel List
- Choose a channel with /.
- Press / to select a favorite group.
- Quit the submenu with MENU or EXIT.
- Press numeric button 1 to edit all radio channels.
- Press numeric button 2 to search for a particular channel.
- Press numeric button 3 to sort the TV channels into various favorite groups.
- Press numeric button 4 to move the radio channel to a different place.
- Press PG+/PG- to see the next/previous page. A maximum of 400 channels can be stored.
Delete All Favorites/Delete All - Press OK to select the submenu and to delete all the favorite TV and radio channels or all stored channels.
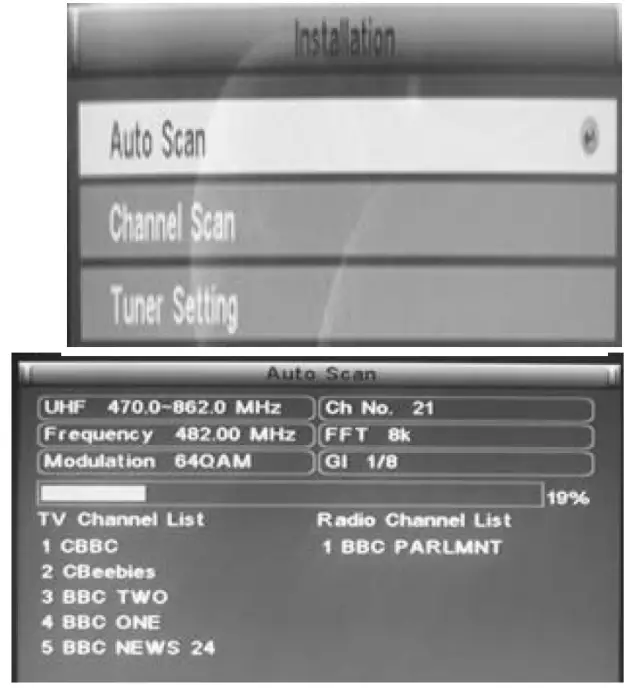
This window shows the installation menu. Choose one the three submenus.
Auto Scan
- Scan Mode: scan all free or all channels (including paid channels).
- Search: press OK to conduct an automatic scan or press EXIT to quit. The scan box displays the scan progress as well as details about the scan band, frequency, demodulation mode, channel number, transmission mode and guard interval.
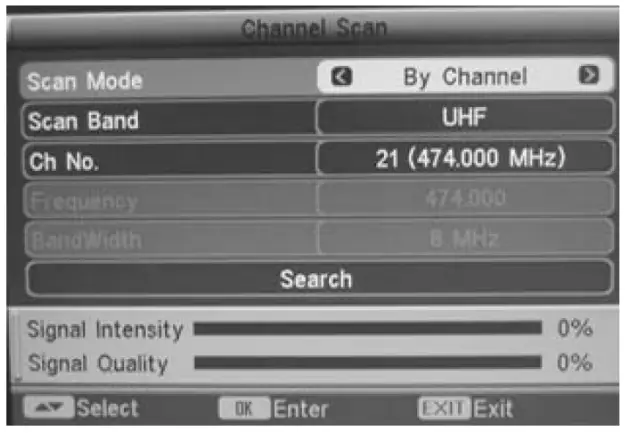
Channel Scan
- Scan Mode: scan by channel/frequency.
- Scan Band: select the VHF/UHF band.
- Ch No: channels 5 ~ 12 (VHF) and channels 21 ~ 69 (UHF).
- Frequency: frequencies 174 ~ 230MHz (VHF) and 470 ~ 862MHz (UHF) are available.
- Band Width: select between 6MHz, 7MHz and 8MHz.
- Search: press OK to conduct an automatic scan or press EXIT to
quit. The scan box displays the scan progress as well as details about the scan band, frequency, demodulation mode, channel number, transmission mode, guard interval, signal intensity and signal quality.
Tuner Setting
- On/Off: enable or disable the 5V power supply for the active antenna.
The Setup Menu
This window shows the setup menu. Choose one the six submenus.
OSD Language
- Press OK to enter the menu and choose a language: English, Croatian, Czech, Danish, Dutch, Finnish, French, German, Greek, Hungarian, Italian, Polish, Portugal, Russian, Slovak or Spanish.
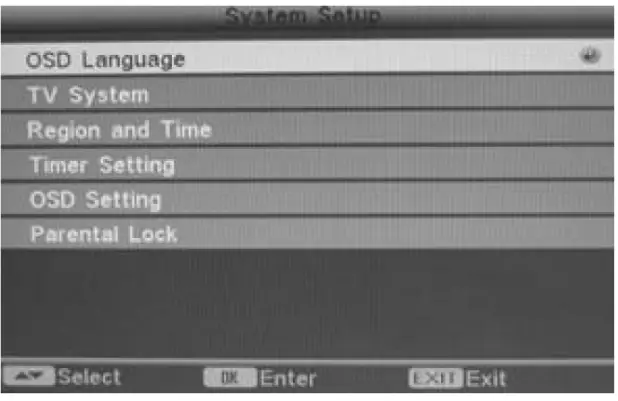
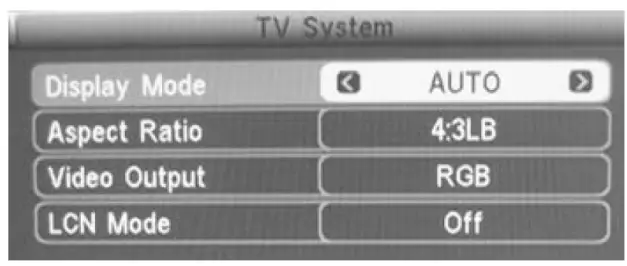
TV System
- Display Mode: Auto, PAL, NTSC.
- Aspect Ratio: 4:3 LB, 4:3 PS, 16:9.
- Video Output: CVBS, RGB, HDMI™.
- LCN Mode: On/Off. Select On to automatically list the channels in a natural order according to the stream. Select Off to list the channels in a routine order of channel numbers.
Region and Time
- Region: France, Germany, Greece, Iran, Italy, Poland, Portugal, Russia, Spain, Sweden, United Kingdom, Vietnam, Argentina, Australia, Czech, Denmark and Finland.
- GMT Usage: User Define, By Region and Off.
- GMT Offset: Within GMT + 12:00 ~ GMT -11:30.
- Date: Press OK to start the setup, then move the cursor with /and use the numeric buttons to modify the date. Press OK to confirm.
- Time: Press OK to start the setup, then move the cursor with / and use the numeric buttons to modify the time. Press OK to confirm.
- Summer Time: On/Off.
- Time Display: On/Off.
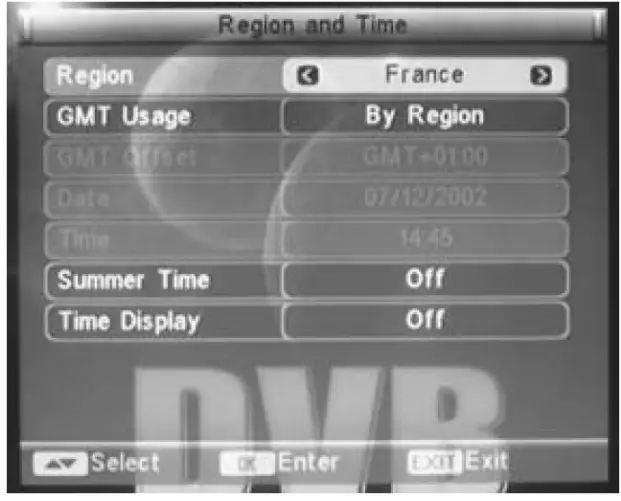
Summer Time only available when By Region is selected; GMT Offset only available when User Define is selected
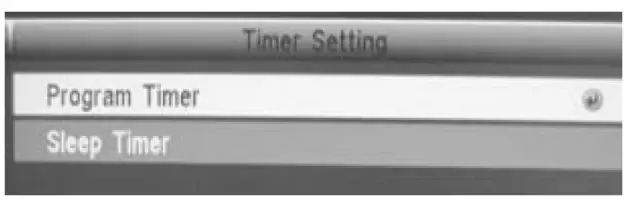
Timer Setting
- Program Timer: Timer Number (1 ~ 8), Timer Mode (Once, Daily, Weekly, Monthly), Timer Service (TV/Radio), Wakeup Channel, Month, Date, Day, Time.
- Sleep Timer: Off, 10 min, 30 min, 60 min, 90 min, 120 min. Press OK to confirm.
- Remains: Displays the remaining sleep time.
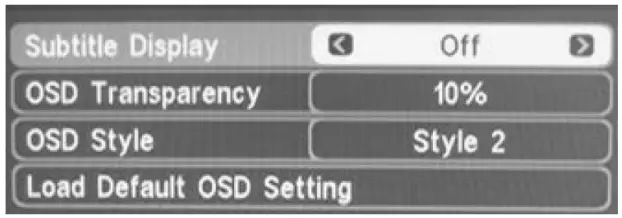
OSD Setting
- Subtitle display: On/Off.
- OSD Transparency: 10%, 20%, 30%, 40%, 50%, 60%, 70%.
- OSD Style: Style 1, Style2.
- Load Default OSD Setting: Yes/No or Restore to default settings.
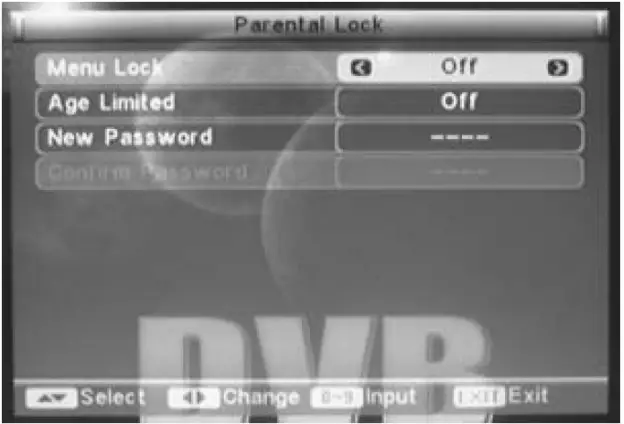
Parental Lock
- Enter the default password (0000) to enter the setup page.
- Menu Lock: On/Off.
- Channel Lock: On/Off.
- Parental Lock: None, Age 4 ~ 18.
- New Password: Press OK and enter your new password.
- Confirm password: Re-enter your password and press OK to confirm.
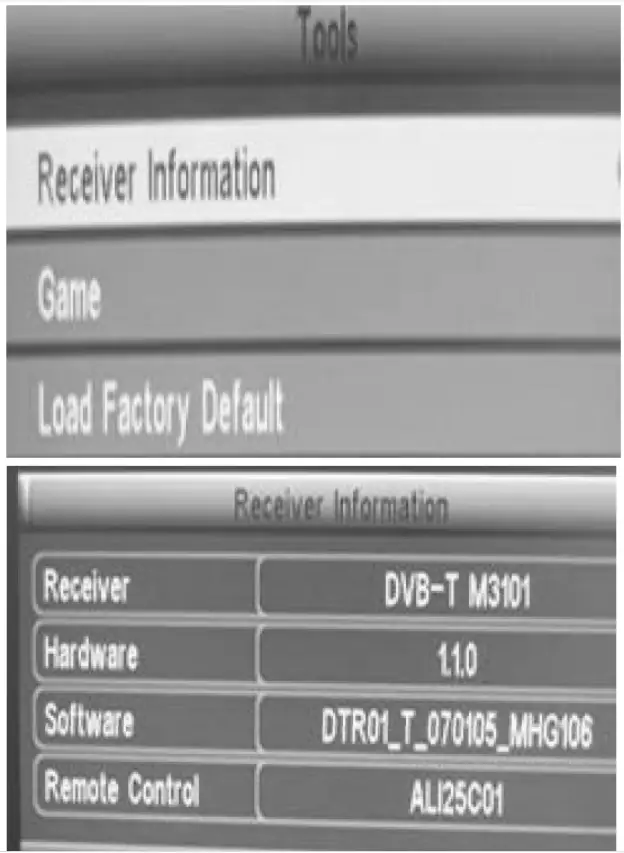
Tools
This window shows the tools menu. Choose one the three submenus.
Receiver Information
- Move the cursor and press OK to display information about the receiver, hardware, software and remote control.Game

- Choose a game: Tetris ®, Snake ®or Othello ® .
Load Factory Default - Press OK to load the default settings. Press Yes and OK to confirm. We recommend setting the default settings at first use.
| Main Menu | Submenu | Options | Description | |
| Channel | TV channel ist | |||
| Radio channel list | ||||
| Delete at favorites | ||||
| Delete all | ||||
| Installation | Auto-scan | Scan mode | Free | Scan free channels |
| Al | Scan all channels | |||
| Search | ||||
| Channel scan | Scan mode | By channel | ||
| By frequency | ||||
| Scan band | VHF | |||
| UHF | ||||
| Cli no | 5-12 | VHF channels | ||
| 21 – 69 | UHF channels | |||
| Frequency | 174 – 230MHz | VHF frequency | ||
| 470 – 862Mhz | UHF frequency | |||
| Bandwklh | 6MHz | |||
| 7MHz | ||||
| 8MHz | ||||
| Search | ||||
| Tuner setting | Tuner power | OrVofi | Active antenna onfoff | |
| Setup | OSD language | OSD language | English | |
| Croatian | ||||
| Czech | ||||
| Danish | ||||
| Dutch | ||||
| Finnish | ||||
| French | ||||
| German | ||||
| Greek | ||||
| Hungarian | ||||
| Italian | ||||
| Polish | ||||
| Portuguese | ||||
| Russian | ||||
| Slovak | ||||
| Spanish | ||||
| TV system | Display mode | Auto | ||
| PAL | ||||
| NTSC | ||||
| Aspect ratio | 4:3 LB | Letterbox | ||
| 4:3 PS | P-scan | |||
| 16:09 | ||||
| Video output | CVBS | |||
| RGB | ||||
| HDMI”‘ | ||||
| LCN mode | Wort | |||
| Regan and time | Region | France | ||
| Germany | ||||
| Greece | ||||
| Iran | ||||
| Italy | ||||
| Poland | ||||
| Portugal | ||||
| Russia | ||||
| Spain | ||||
| Sweden | ||||
| United Kingdom | ||||
| Argentina | ||||
| Australia | ||||
| Czech Republic | ||||
| Denmark | ||||
| Finland | ||||
| GMT usage | User define | |||
| By region | ||||
| Off | ||||
| GMT offset | GMT+12:00-GMT•11:30 | |||
| Date | ||||
| Time | ||||
| Sumer Time | On/of | |||
| Time display | OrVoff | |||
| Timer setting | Program timer | Timer number | ||
| Timer mode | ||||
| Timer service | ||||
| Wake up channel | ||||
| Month | ||||
| Date | ||||
| Day | ||||
| Time | ||||
| Sleep Meg | 011/10/30/6CV90/120 min | |||
| Remats | ||||
| OSD setting | Subtitle display | wort | ||
| 050 transparency | on | |||
| 1020/30/40/50% | ||||
| 60/70% | ||||
| OSD style | 1 Style | |||
| stvie 2 | ||||
| Load default OSD setting | ||||
| Parental lock | Menu lock | Orval | ||
| Channel lock | Wolf | |||
| Parental lock | None/age 4 -18 | |||
| New password | ||||
| Confirm password | ||||
| Tools | Receiver info | Receiver | Display Info about receiver | |
| hardware | ||||
| Software | ||||
| Remote control | ||||
| Game | Tetris | |||
| Snake | ||||
| Othelo | ||||
| Load factory default | ||||
Troubleshooting
Some simple checks or a minor adjustment may eliminate the problem and restore proper operation. Let a technician maintain the unit.
Keep the device away from static electricity during maintenance as the video processor is very sensitive.
| Trouble | PassOle Cause | Suggested Solution |
| No power | Power cord has not been connected property | Plug the power cord bghtly into the power outlet and switch on the power. If there still is no power, switch off the unit again and wait 5 to 10 min. before switching the unit on |
| Can not scan program | •Antenna is not aclusted properly •Parameter input is incorrect •Use the antenna correctly | •Adjust the antenna or use an outdoor antenna •Use an antenna with a 750 impedance •Set the frequency and bandwidth correctly |
| No picture | •Output cord incorrectly connected •Video output mode of the unit is set differently than the mode of the monitor | •Connect the output cord correctly •Reset the working mode |
| No colour | •Output cord incorrectly connected •Video output mode of the unit is set differently than the mode of the monitor | •Connect the output cord correctly •Reset the working system |
| Image distortion from one channel to another | Normal | |
| The RCU is not working | •Batteries incorrectly inserted •Batteries are exhausted •Operation distance is too far or operating angle is too large •Remote control sensor is obstructed by bright fight | •Insert the batteries correctly •Replace the batteries •Operate within the range •Place the unit in another place |
| Audio sound and subtitle cannot be chosen | chosen Sound channel incorrectly | Press the AUDIO button to shift the channel |
| No sound | •Mute button is pressed •Volume is set at a low level •Cable incorrectly connected | •Cancel the mute •Augment the volume •Connect the cable correctly |
| Sudden sound drop | •Shod circuit •Mute button is pressed •Entering sleeping status | •Connect the output cable correctly and reopen the unit •Cancel the mute •Reopen the unit |
| Seriously distorted reception | Serious interferential status | Adjust the antenna |
Technical Specifications
| Tuner Input Frequency Range IF Bandwidth Input Signal Level RF Input Connector RF Output Connector Input Impedance | 174 ~ 230MHz; 470 ~ 862MHz 7 or 8MHz -72 ~ -20dBm IEC169-2 type, female IEC type, male 75Ω |
| Demodulation Mode Waveform Demodulation Mode Guard Interval Code Rate | COFDM (Code Orthogonal Frequency Division Multiplexing) QPSK, QAM16, QAM64 2K, 8K 1/4, 1/8, 1/16, 1/32 1/2, 2/3, 3/4, 5/6, 7/8 |
| Video, Audio Decoding Video Decode Video Resolution Video Code Rate Teletext Audio Decode Audio Track Audio Sample Rate | ISO/IEC13818-2 MPEG2 compatible 720 x 576 (PAL) or 720 x 480 (NTSC) max. 15M bits/s support DVB-TXTETSI/EN300472 ISO 11172-3 stereo, left ch, right ch 32, 44.1, 48kHz |
| HDMI™ Interface Compliance HD Video Mode | HDMI™ Interface Compliance HD Video Mode |
| Power Specifications Power Input Power Consumption | 230VAC/50Hz < 15W |
| Environment Requirements Working Temperature Range Working Humidity Range | 0 ~ 40°C < 90% |
| Others Weight Dimensions | < 1.5kg 266 x 158 x 39mm |
DVB ® is a registered trademark of the DVB Project.
Use this device with original accessories only. Velleman nv cannot be held responsible in the event of damage or injury resulted from (incorrect) use of this device. For more info concerning this product, please visit our website www.velleman.eu. The information in this manual is subject to change without prior notice.


