

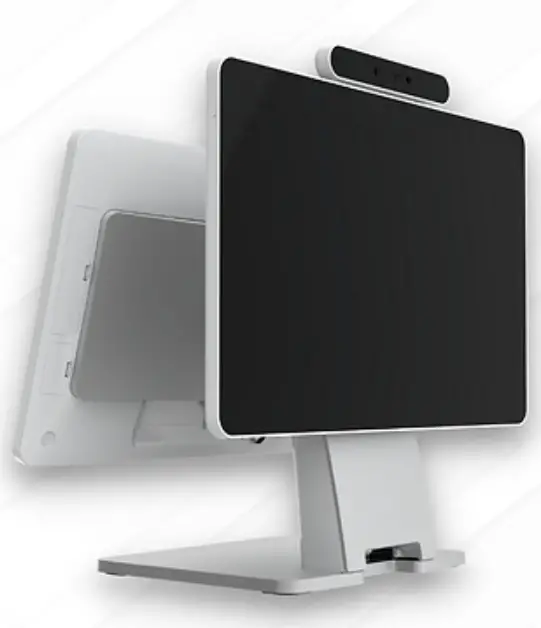
Hisense HK316V Luna X All in One POS
Safety Notices Before Installation or Use
- It is required grounded well and the supply voltage shall be stable, and you must confirm that the voltage of the outlet provides shall be in line with the voltage marked on the label of the unit.
- Be sure not to sprinkle any liquid or fall any object into the unit.
- Be sure not to keep heavy, strenuous movement, shake & heavy strike away from the POS.
- Do not switch on or off the host frequently, because it is easy to result in damage on the machine.
- Be sure not to unplug or plug in any live part or external device when they are in energized state, and the connecting cables of the POS between parts shall be connected securely.
- Be sure neither to lengthen cable nor to replace parts at your will, if you have any demand, please contact with the reseller.
- The unit shall be used under dry, ventilated & clean environment away from sunlight. Avoid to making the air vent of the host machine blocked or covered
- If any liquid sprinkles or any sundry falls into the unit, please shut it down immediately & switch off power supply, take batteries down, dry the liquid or remove the sundry. If you take the batteries down, you shall reset CMOS.
- In case of safety fault, such as peculiar smell, abnormal sound, leakage and other faults, you must switch off the power supply at once and then contact with reseller.
- When inserting USB flash or disk, you shall kill virus to prevent the host machine from virus.
- The RJ11 port at the back of the host is connected with the cash drawer, as it is not a communication port, users shall not use the port for dial-up networking.
- The product is a Level A one, it may cause radio interference in living environment. In such case, users may need to take practical & feasible measures against the interference.
- When the POS is not in use, you shall switch off power supply.
Warning:
- Absolute Ratings of Environment:
- Operating Temperature:0~40℃
- Operating Humidity:10%~85%RH
- Storage Temperature:-10~50℃
- Storage Humidity:10%~90%RH
- The main plug on the power supply was used as a disconnected device. The socket-outlet shall be installed near the equipment and shall be easily accessible
- If any damage to the power supply or the equipment, please contact local service person for help.
- Static may damage to the integrated circuit in the host machine.
- If a replaced battery is not right, this may cause explosion or serious damage. Must replace the same type of batteries or similar ones recommended by the manufacturer
- Used only with attached AC/DC power supply.
The manufacturer has the right to modify the contents of the manual without prior notice!
- Product standard NO:Q/0202 RSR527
- Product standard Name: POS device
Applied range
The HK316 terminal adopt open operating system, flexible component structure and standard peripherals. The products are suitable for the commercial enterprises, such as restaurants, supermarkets, and convenience stores to Internet –connected use or stand-alone use. The main components are standard parts, so the quality of the products is reliable, the system is easy to upgrade and the components are conveniently and easily maintained. Reasonable price ratio makes it more competitive than similar products.
Specification
| Item | Description | |
| Model | HK316V | |
|
System | CPU | Dual-core ARM Cortex-A72+ Quad-core ARM Cortex-A53, clock speed 1.8GHz |
| Memory | 4G | |
| Storage | Flash Memory | eMMC 32GB Nand Flash(16GB, 64GB is optional) |
|
LCD Touch Panel | LCD Size | 15.6 inch |
| Resolution | 1920×1080 | |
| Touch Screen | capacitive true flat touch | |
|
I/O Ports | Serial Ports | 1* RJ48 COM(COM1); |
| USB | 5* USB 2.0(4* on IO panel, 1*under side cover ) | |
| Micro USB | 1* under side cover(for debug only) | |
| TF card | 1* under side cover | |
| Standard SIM card slot | 1* under side cover(reserved, for China domestic market only) | |
| LAN | 1 * RJ-45 (100M/1000Mbps Gigabit LAN) | |
| Audio | 1 * Line-out | |
| Power out | 24V for Printer | |
| Cash Drawer | 1 * RJ-11 for cash drawer(With Extra transfer wire) | |
| Power | Power Adapter | Adapter (DC 24V, 3.75A)(Standard) Adapter(DC 24V, 5A)/(optional) |
| Communication | Bluetooth | BT 4.2 |
| Wi-Fi | Dual-band Wi-Fi® 802.11a/b/g/n/ac 2.4GHz/5GHz | |
|
Peripheral | Customer Display | OLED customer display |
| Second Display | 15.6 inch (touch/non-touch) | |
| Printer | Separate 80MM thermal printer | |
| MSR card reader | 3 Tracks | |
| Operating system | Android 7.1/9.0 | |
I/O port view
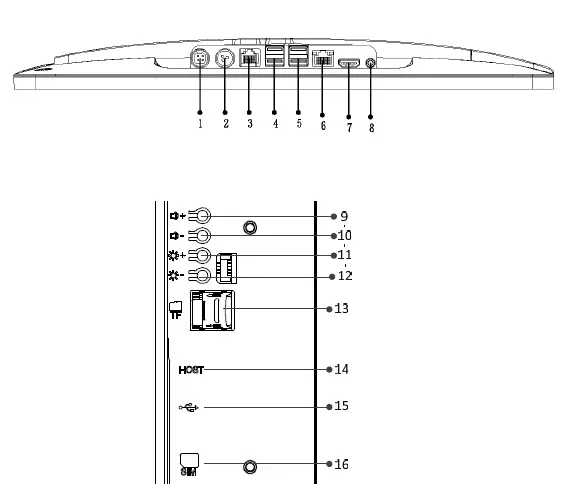
| 1、24V power input | 2、printer 24V power |
| 3、Serial port& Cash drawer interface | 4、USB*2 |
| 5、USB*2 | 6、RJ45 ethernet interface |
| 7、nothing | 8、Audio |
| 9、Volume+ button | 10、Volume – button |
| 11、Brightness+ button | 12、Brightness – button |
| 13、TF card slot | 14、Micro USB |
| 15、USB |
Mainboard
Mainboard front layout: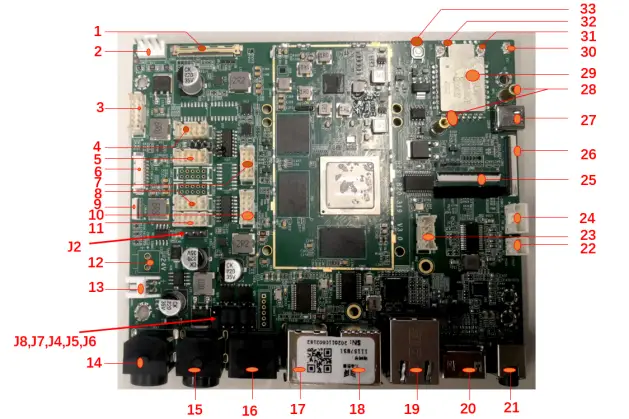
Ports and definition
| Ports | Interface | Item |
| 1.CON2 | Edp zero lift drag 40 pin x1set | Display |
| 2.CON57 | wafer2.5 *4 x1set | Fan control |
| 3.CON32 | Button board pin wafer2.0 2*6 pin x1set | Power On/Off |
| 4.CON58 | USB port pin wafer2.0 2*5 pinx1set | USB port |
| 5.CON33 | Serial port COM0 pin wafer2.0 2*5 pinx1set | |
| 6.CON34 | Button board pin wafer2.0 2*6 pin x1set | Power On/Off (reserved) |
| 7.CON31 | Reserved IO pin wafer2.0 2*5 pinx1set | IO port |
| 8.CON30 | Serial port COM4 pin wafer2.0 2*5 pinx1set | |
| 9.CON36 | Serial port 12PIN FPC socket | Power On/Off |
| 10.CON40 | USB port pin wafer2.0 2*5 pinx1set | |
| 11.CON5 | Serial port COM2 pin wafer2.0 2*5 pinx1set | Debug uart |
| 12.CON61 | Wafer3.95mm 2pinx1set | 24V power output |
| 13.CON41 | Wafer2.5mm 2pinx1set | 12V power output |
| 14.CON47 | 4pin-power port | 24V power input |
| 15.CON52 | 3pin-power port | 24V power output |
| 16.CON48 | RJ48 port | COM&Cash BOX |
| 17.CON44 | Double USB | USB2.0*2 |
| 18.CON46 | Double USB | USB2.0+USB3.0 |
| 19.CON45 | RJ45 Ethernet port |
| 20.CON51 | HDMI port | Reserved HDMI |
| 21.CON50 | 3.5 mm headphone port | |
| 22.CON42 | MIC pin wafer2.0 1*2 pin x1set | MIC |
| 23.CON60 | USB port pin wafer2.0 2*5 pinx1set | USB*2 |
| 24.CON55 | Speaker pin wafer2.0 1*4 pin x1set | Speaker |
| 25.CON1 | Serial port 40PIN FPC socket | Second display expand |
| 26.CON3 | Serial port 40PIN FPC socket | Expansion board |
| 27.CON38 | USB TYPE C PORT | For debug |
| 28.MH1,MH4 | 8.6mm height copper column | copper column |
| 29.U15 | module | WIFI module |
| 30.XS1 | RF port Dia. 1mm*1pin x1set | BT antenna slot |
| 31. | RF port Dia. 1mm*1pin x1set | Wi-Fi aux antenna socket |
| 32. | RF port Dia. 1mm*1pin x1set | Wi-Fi main antenna socket |
| 33.s1 | tuch-button | Force download |
| button |
Mainboard back layout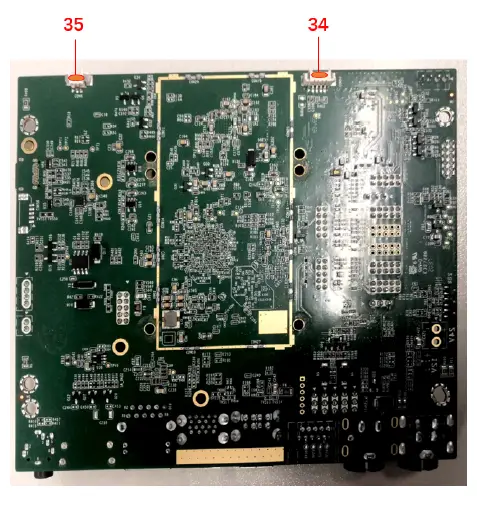
Ports and definition
| Ports | Interface | Item |
| 34.CON59 | 1.25 1*4pin x1set | Uart port |
| 35.CON6 | RTC battery wafer1.25 1*2pin x1set | Button Battery Port |
Edp1 interface definition(CON2)
| Pin No. | Function | Pin No. | Function |
| 1 | NC | 21 | GND |
| 2 | GND | 22 | Enable |
| 3 | Lane1_N | 23 | PWM |
| 4 | Lane1_P | 24 | NC |
| 5 | GND | 25 | NC |
| 6 | Lane0_N | 26 | PWR |
| 7 | Lane0_N | 27 | PWR |
| 8 | GND | 28 | PWR |
| 9 | AUX_CH_P | 29 | PWR |
| 10 | AUX_CH_N | 30 | NC |
| 11 | GND | 31 | GND |
| 12 | VCC | 32 | GND |
| 13 | VCC | 33 | NC |
| 14 | NC | 34 | NC |
| 15 | GND | 35 | GND |
| 16 | GND | 36 | INT |
| 17 | HPD | 37 | RST |
| 18 | GND | 38 | SCL |
| 19 | GND | 39 | SDA |
| 20 | GND | 40 | VCC |
Audio interface definition
| Audio | Description | |||||
| Audio Code | ES8388 | |||||
| Rear IO Type | HP Connector | |||||
| Onboard audio pin | PIN defined | |||||
| 1 | SPK_LP | 2 | SPK_LN | 1■ 2● 3● 4● | ||
| 3 | SPK_RP | 4 | SPK_RN | |||
| PIN Type | 1*4Pin 2.0mm wafer box | |||||
LAN interface definition
| LAN | Description |
| LAN IC | RTL8211E 100M/1000M |
| PIN Type | RJ45 |
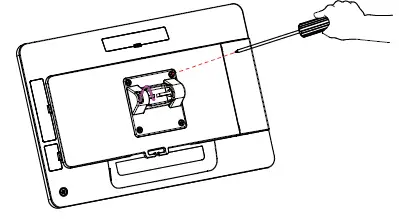
Device Assembly and disassembly
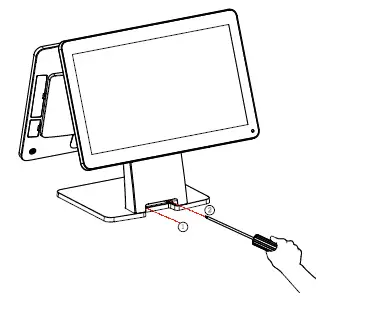
- Unscrew the two screw shown to remove the back shell of the base.

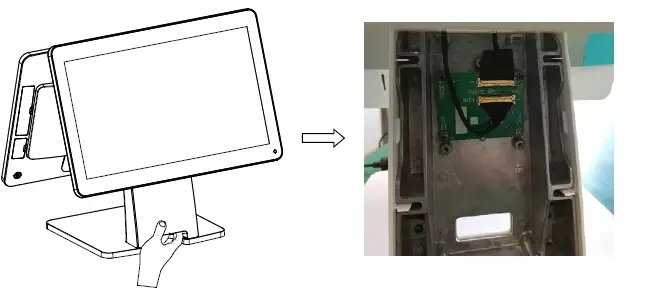
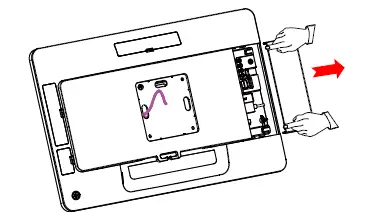
- After removing the screw, pull at the back shell of the base according to the picture shows, and remove the back shell of the base.

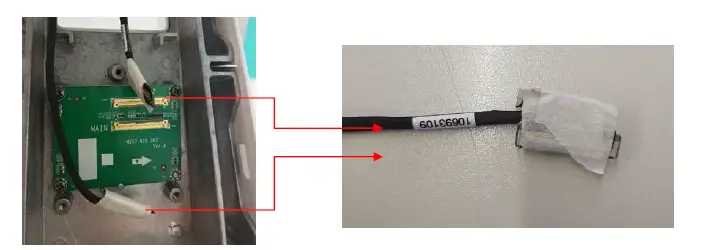
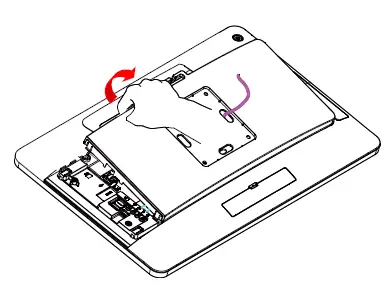
- Remove the two connectors shown in the picture and protect them with the tape according to the picture shows (to prevent the connector from being pulled out in the process of dismantling and threading); for device with OLED customer display, can directly pull out the OLED customer display line.

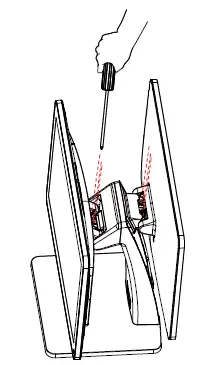
- Rotate the main screen and the secondary screen : to the vertical angle, remove the three screws of the main screen hinge and the second screen hinge respectively, and carefully pass the screen line through the line hole. Separate the main and auxiliary screen from the base respectively.

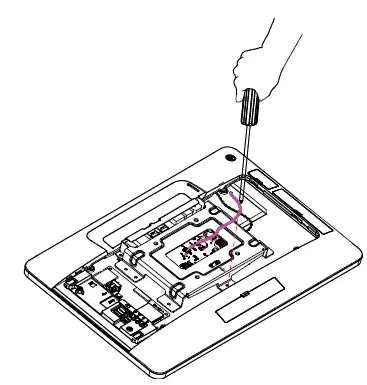
- Remove the hinges of the host: Remove four screws according to the picture shows. Remove the hinges of the host and the hinges cover of the host separately.

- Remove the extended interface cover: pull the expanded interface cover outward at the notch according to the picture shows, and remove it.

- Remove the rear case of the host: pull up the rear cover of the host according to the picture shows, and remove the rear cover of the host .

- Remove 7 screws according to the picture shows to remove the host fixed seat, so that the motherboard can be replaced and maintained.

Functional testing and parameter setting of peripherals
In product test mode, magnetic stripe card test items are swiped by magnetic stripe card, and magnetic stripe card corresponding to the track shows “success” (three tracks, different magnetic stripe cards may store info into different tracks). As the following figure.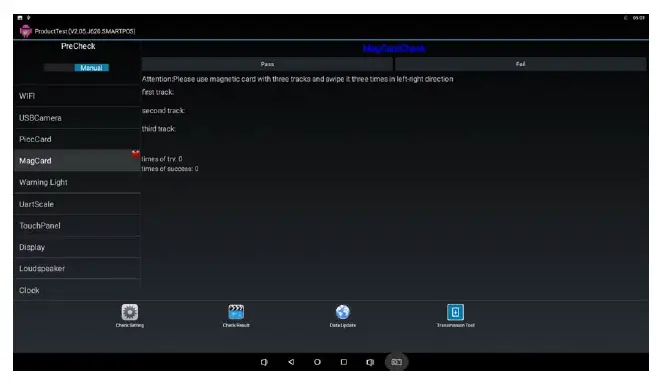
Contactless card test items In product test, with RFID card close to the back of the card reader, show “find * card” (Contactless card is divided into A card, B card, M card). As The following figure.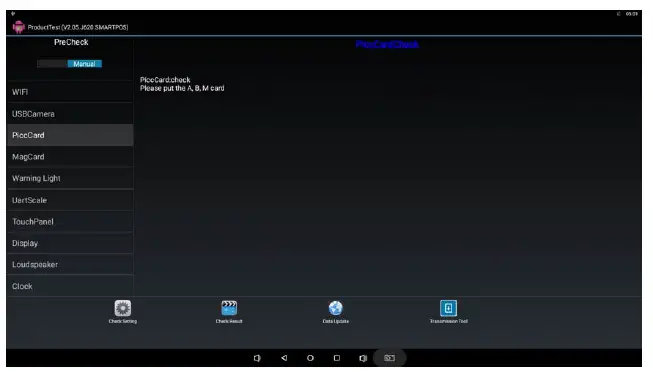
Printer
U-port printer, without setting baud rate, can use the normal detection of product test procedures.
Cash drawer
As shown below, for the item “CashBox ByCPU” in the product test, click “Click to Open Cashbox”.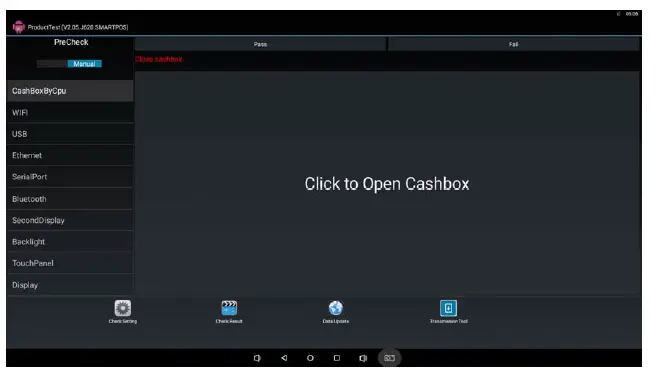
Environmental requirements
| Type | State | |
| Environmental | Voltage | AC 100V-240V 50-60Hz Bipolar |
| Temperature | 5℃ – 40℃ | |
| Optimal | 40% – 90% | |
Size specification
Single screen, Length×Width×Height:405*210*330;Flip Angle 0-45° 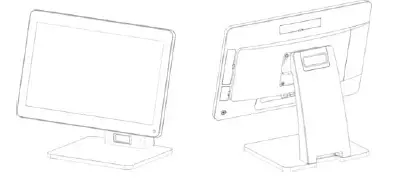
Double Screen, Length×Width×Height:405*250*370;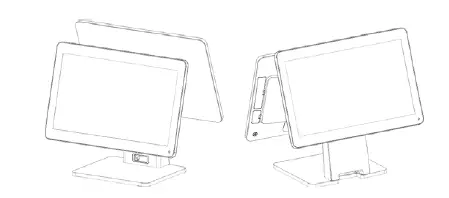
Main Flip Angle 0-45°,Second screen Flip Angle 0-30°
High position +printer,Length×Width×Height:405*250*420
Self-service,Length×Width×Height:230*250*450
Open the box and check.
- Before opening the box, check whether the box is in good condition, and whether there is any obvious damage.
- The equipment must be installed by technical service person or distributors
Operation
- Switching Instructions:
- Start-up: When the adapter is connected, hold down the switch button on the right back side of the bottom of the machine for about 3 seconds. When the screen is on and the button indicator light is on, the startup can be realized.
- Shutdown: Press the switch button on the right back side of the bottom of the machine for about 3 seconds, and operate according to the screen prompt, which can realize shutdown and restart functions.
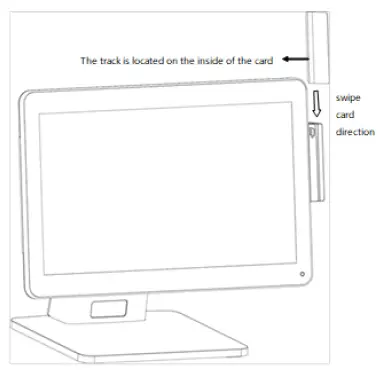
- Swipe magnetic cards:
- When swiping the card, the machine should be placed on a hard horizontal plane.
- Please swipe the magnetic strip of the magnetic strip card inward from the swipe slot.
- The process of card swiping should be smooth and uniform.

- Contactless card operation:
Contactless card induction zone is located behind the right side of the host (with the contactless mark printed). When need read contactless card, please place the card above the induction zone.
Printer operations
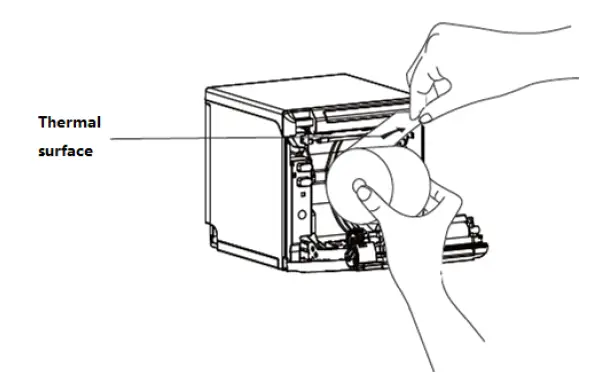
Printer Structure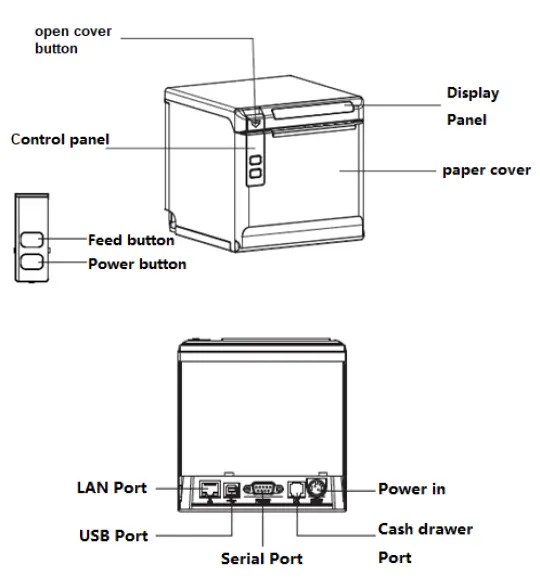
Load and change paper introduction
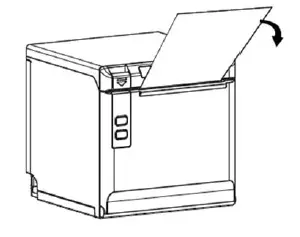
- Press the open button to open the paper bin cover, as shown below. If there are paper tubes in the paper warehouse, please take them out.

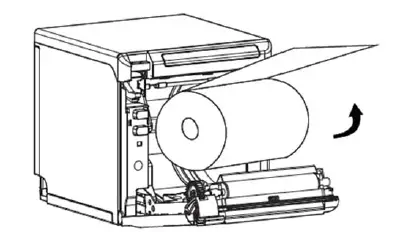
- Put the paper roll into the paper bin, pay attention to the correct direction of the paper roll.

- Please take out a small amount of paper from the front of the roll and close the cover of the printer’s paper bin

- Remove excess paper toward the side of the paper cut.


Paper rolling
- Requirements of the thermal paper:
- Type:Thermal paper
- Width of paper:57.5±0.5mm / 79.5±0.5mm
- Outside Diameter of paper roll:Max 83mm
- Thickness of Thermal Paper:0.056 ~ 0.13mm
- Recommendation of thermal Paper Model:
Type Manufacture FD210,PD150R,PD160R OJI Paper CO.,
Notes:
- Please use the recommended paper roll or the same quality paper roll. The use of other types of paper roll may affect the printing effect and the life of the printing head.
- If the paper roll is contaminated by chemicals or oil, the contaminated part of the paper roll may fade or the printing effect is not clear.
- Do not scratch the thermal sensitive layer of the paper roll with sharp objects, which may make the printing effect unclear.
- When the temperature exceeds 70 degree C, the thermal sensitive layer of the paper roll will fade. Therefore, the use or storage of paper rolls should avoid high temperature, high humidity, strong light, etc.
- Thermal paper that has been stored for too long should not be used.
Printer Maintenance
- Printer head and Printer rubber roller
- When one of the following situations occurs in the printing unit, the print head should be cleaned:
- Printing is not clear;
- The vertical column of the printed page is not clear.
- Noise of feeding and returning paper is high.
- The cleaning steps of the printing head and Printer rubber roller are as follows:
- Turn off the power supply of the printing unit, open the printer cover, and expose the printer head and Printer rubber roller;
- If you have just finished printing, you should wait for the print head to cool completely.
- Use alcohol cotton balls (should be screwed dry) to erase the dust, stains and paper scraps on the surface of the printed hair heater.
- Close the top cover of the printer after the alcohol evaporates completely.
- When one of the following situations occurs in the printing unit, the print head should be cleaned:
- Daily maintenance matters needing attention
- The power supply must be turned off during the daily maintenance of the printing unit.
- Do not touch the surface of the printing head with your hands or metal objects. Do not scratch the surface of the printing head, Printer rubber roller and sensors with tweezers or other tools.
- Organic solvents such as gasoline and acetone should not be used.
- Wait for the cleaning solution to evaporate completely, then turn on the power supply to continue printing.
- Maintenance cycle: It is recommended to clean it up once a month.
Accessories
| No. | Item | Unit | Quantity | Note |
| 1 | POS terminal | 1 | ||
| 2 | Power adaptor | 1 | ||
| 3 | Power cable | 1 |
FCC Warning Statement
This device has been tested and found to comply with the limits for a Class B digital device, pursuant to Part 15 of the FCC Rules. These limits are designed to provide reasonable protection against harmful interference in a residential installation. This device generates, uses and can radiate radio frequency energy and, if not installed and used in accordance with the instructions, may cause harmful interference to radio communications.
However, there is no guarantee that interference will not occur in a particular installation. If this device does cause harmful interference to radio or television reception, which can be determined by turning the device off and on, the user is encouraged to try to correct the interference by one or more of the following measures:
- Reorient or relocate the receiving antenna.
- Increase the separation between the device and receiver.
- Connect the device into an outlet on a circuit different from that to which the receiver is connected.
- Consult the dealer or an experienced radio/TV technician for help
Changes or modifications not expressly approved by the party responsible for compliance could void the user’s authority to operate the equipment
FCC Radiation Exposure Statement:
The antennas used for this transmitter must be installed to provide a separation distance of at least 20 cm from all persons and must not be co-located for operating in conjunction with any other antenna or transmitter.


