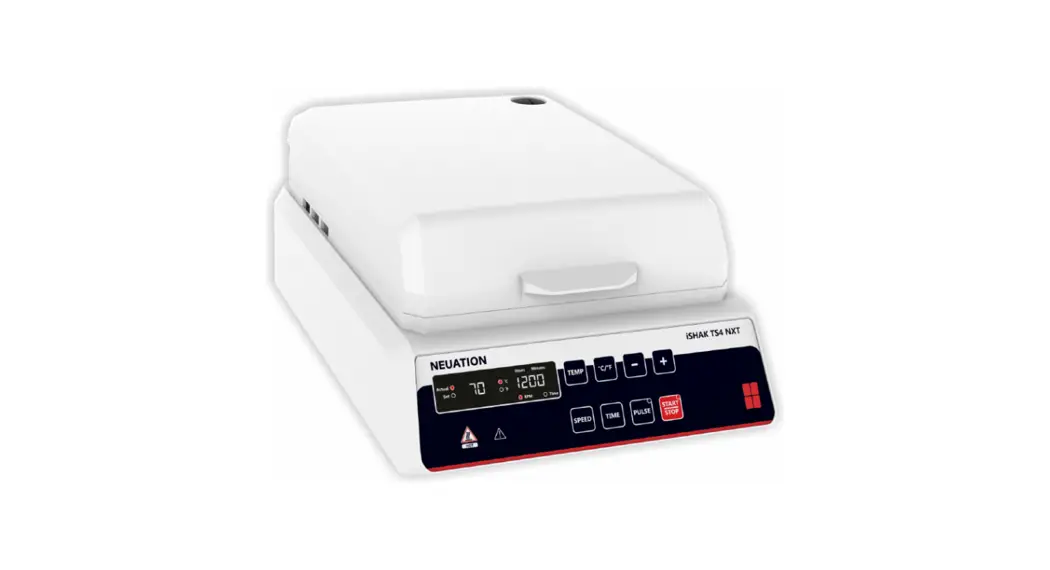
![]() iSHAK TS4 NXT
iSHAK TS4 NXT
PRODUCT USER MANUAL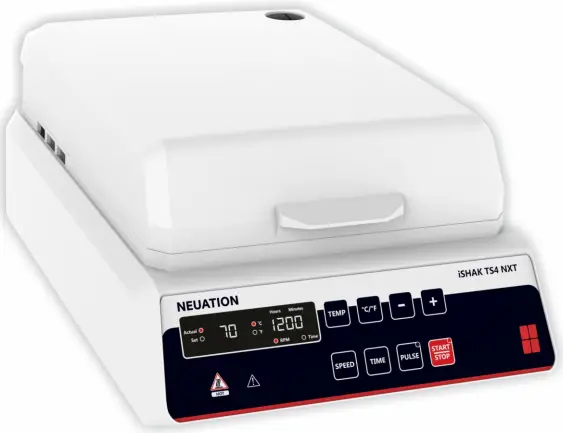
BRIEF OVERVIEW
This four micro plate Thermo Shaker comes with long life maintenance free BLDC motor controlled by microprocessor, LED digital display and “PULSE” mode feature with an orbital diameter of 3mm for proper mixing of samples and uniform temperature across the plate.
INTENDED USE
The Thermal shaker is designed for shaking 4 microplates, widely used for mixing applications along with thermal incubation in general purpose laboratories and research organizations.
NOTE: Before using the instrument, please read this user manual carefully. This user manual is intended to assist with the operation and care of the unit only and not its repair. For repair please contact the supplier.
SYMBOL
![]() Risk of burn
Risk of burn![]() Waste electrical
Waste electrical![]() Earthing
Earthing![]() Warning
Warning![]() Fuse
Fuse
FEATURES
- Uniform heating and shaking across the plates
- Microprocessor controlled device and digital display
- Adjustable speed from 200 to 1200 RPM at every 10 RPM
- Adjustable time from 1min-99h 59min & infinite mode
- 3 mm orbital motion for thorough mixing in micro-plates
- Easyloadingand unloading of micro-plates
- Brushless DC motor for quite operation and maintenance free life
- Spill safe operation even at higher speeds
- Pulse mode feature for clockwise and counter clockwise motion
- Temperature control from ambient to 70°C
TECHNICAL SPECIFICATIONS
| Motor Type | BLDC |
| Type of Movement | Orbital |
| Orbital Diameter | 3mm |
| Plate Capacity | 4 Microplate |
| Speed | 200 to 1200 RPM at every 10 RPM |
| Timer | 1 to 99 h 59 min. & infinite |
| Temperature Range | Ambient +3 to 70°C |
| Temperature Stability | 10.5°C |
| Temperature Accuracy | +0.5°C |
| Pulse Mode | Yes (clockwise & counter clockwise) |
| Display (Speed & Timer) | LED Digital |
| Dimensions (W x D x H) mm | 267 x361x 155 |
| Permissible Ambient Temp. | 40 40°C |
| Permissible Relative Humidity | <80% |
| Weight | 8.45Kg |
| Altitude | Use upto an altitude of 2000 m above MSL |
| Pollution Degree | 2 |
| Environment | For indoor use only |
| Power Supply | 230 VAC, 50Hz |
| Power Consumption | 276 W |
| Safety Fuse Rating | 3 Amp |
ACCESSORIES
Replaceable O-ring, Product manual & Warranty card, Power cable, Fuse 3Amp.
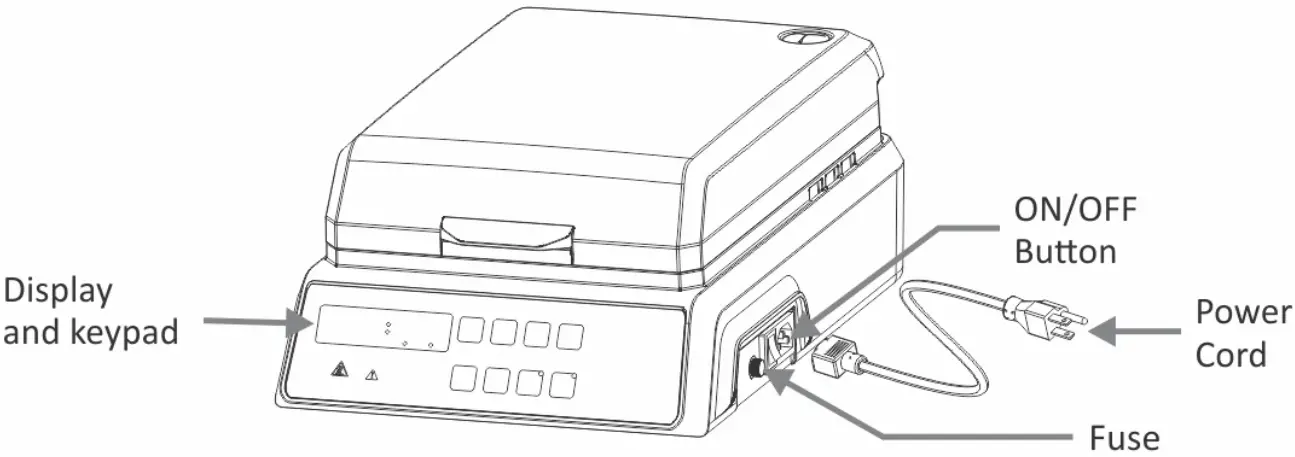
INSTALLATION
Gently take the unit out of the box and place it on a flat, stable and non slippery surface. Keep 2-inches clearance from all 4 sides of the shaker so that it can be operated easily and safely. Do not lift the instrument by holding the platform. Check whether the rubber suction cup is attached to the table properly. Plug in the power adapter pin before connecting to the power source. The instruction manual and accessories should be kept near the device in a safe storage location for at least 2 years for warranty purposes.
INSTALLING MICRO-PLATES
The plates can be fixed on any side of the central pre-set O-ring. Gently push the O-ring towards the center of the plate sets locked on the wall of the platform. Ensure thatthe plate sits flat on the platform.
STANDARD PART LISTING
USER INTERFACE AND DISPLAY
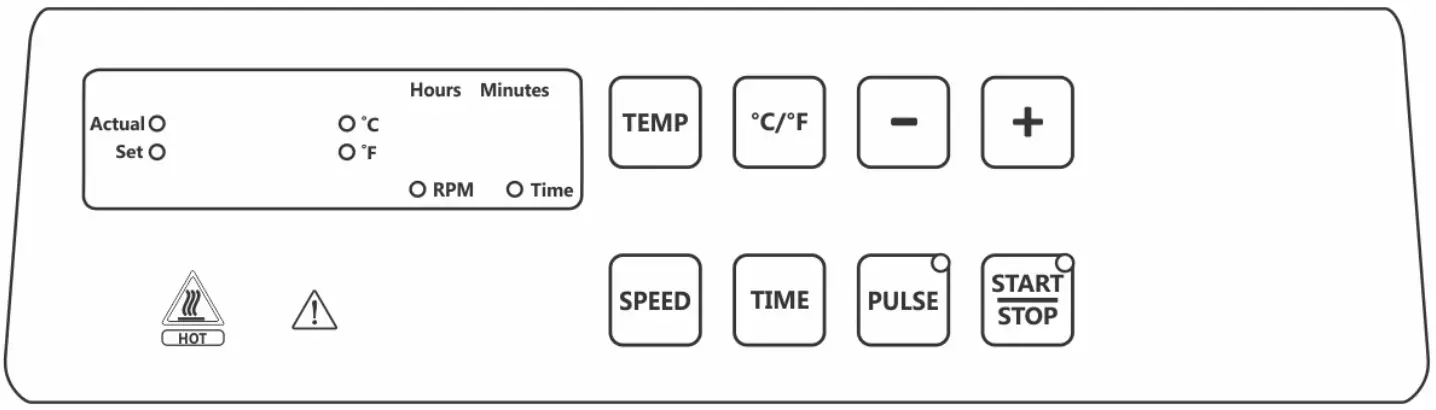 CONTROL PANEL OPERATION
- SETand ACTUAL LED will flash as per status of command.
- “4+/-“utton willincrease and decrease the value of each parameter.
- Each LED light willflash as per status of parameter.
- “START /STOP” button for operation start and stop.
- “SPEED, TIMEand TEMP” buttons to select it respective values.
- “PULSE” button to start pulse mode.
START / STOP BUTTON
To start the operation, press the “START” button after setting all the parameters (speed, timer & temperature) which will be indicated by LED. And to stop the operation atany time press “STOP” button.
SPEED SETTING
To set speed in RPM, press “SPEED” button, which will blink on screen. It has last run memory ie last set parameter will be on display upon turning ON [For the first time “0000” will appear – default factory setting] to set RPM value, press “+ or -” key for increment or decrement of the values between 200 to 1200 RPM. The incremental and decremental values will be in 10 RPM upon single press, for rapid increment & To set speed in RPM, press “SPEED” button, which will blink on screen. It has last run memory ie last set parameter will be on display upon turning ON [For the first time “0000” will appear – default factory setting] to set RPM value, press “+ or -” key for increment or decrement of the values between 200 to 1200 RPM. The incremental and decremental values will be in 10 RPM upon single press, for rapid increment & decrement of RPM keep “+/-” button long pressed. The set value will be saved automatically when blinking of the value stops.
Atany point during the operation if speed needs to be changed then follow the above instruction to set new desired values without turning off the instrument.
For heating only (no shaking operation) set the speed values to “G3CD” following above instruction & set the heating parameter.
TEMPERATURE SETTING
To set temperature press “TEMP” Key, the ACTUAL and SET Led will flash alternatively, then select desired function, to set the temperature press the “+/-” key from ambient to 70 °C, and set the required value, the set value will be saved automatically when the blinking stops. For rapid increment and decrements long press the “+/-” key. The value can be set atan increment or decrement of 0.1 °C/°F. Ambient temperature can be seen on the home screen, itis automatically detected from the internal unit sensor and will be displayed by default.
By pressing “TEMP”, the set value blinks and when “+/-” key pressed “ambient value” displayed this can be used for shaking when no heating is required. Temperature can not be set below amhient temperature.
At any point during the operation the temperature values can be changed without turning off the instrument by following the above instruction.
Actual temperature will be seen throughout the heating operation.
NOTE: Temperature cannot be set below Ambient temperature. Which is identified by internal temperature sensor.
TIMER SETTING
To set time, press “Time” button, which will blink on screen. The time can be always set during the blinking of the screen. It has last run memory ie last set parameter will be on display upon turning ON [For the first time “)(” will appear – default factory setting] to set time value, press “+/-” key for increment or decrement of the values between – 1min to 99hr 59min & )(. For setting in hour or minute press “TIME” button until the desired segment in screen blinks (Left values in time screen are for hours & right values for minutes). The incremental and decremental values will be in 1min for minute & 1 hour for hour selection upon single press of “+/-” button. The set value will be saved automatically when blinking of the value stops.
Atany point during the operation if wants to set different timer then follow the above instruction to set new desired values without turning off the instrument.
PULSE MODE
To activate pulse mode, press “PULSE” button. The activation of pulse mode will be indicated by LED light. The pulse mode time can be set from 30-99 seconds (30 sec is by default factory setting). To program the pulse timer, press “PULSE” button for longer To change the time from 30 sec – 99 sec by pressing “+/-” for increment & decrement respectively. The set value will be saved automatically when blinking of the value stops. The motion in pulse mode would be CW/CCW. The pulse timer will set backitself to 30 sec by default upon restart of the timer.
TEMPERATURE CALIBRATION MODE
Calibration of temperature is to reset the temperature accuracy. To enter into calibration mode press “TEMP” button longer until temperature mode is activated.
Enter the new temperature value from the reference unit. The new entered value will be saved automatically replacing older value. This is a single point calibration.
SPEED CALIBRATION MODE
By long pressing “SPEED” button we can enter RPM calibration mode, any single value of RPM can be calibrated. To enter into calibration mode long press “SPEED, TIME and PULSE” simultaneously at set rpm 1190 in running mode. (We can change in + 50 rpm). Thisis a single point calibration.
TROUBLESHOOTING
| Error Code | Cause | Effect | Solution |
| E 01 | If salty circuit is fail, temp. will go beyond safe temp. 95°C off | Heating | Switch off device • Warranty only to be carried out by authorized service personnel |
| E 02 | Temperature sensor of shaking plate is fail | Over Heating | |
| E 03 | Temperature sensor of top lid is fail | Over Heating | |
| E 04 | Heater connection is not proper/Heater fail (SHAKING PLATE) | — | |
| E 05 | Heater connection is not proper/Heater fail (TOP HEATING PLATE) | — |
TIPS FOR EFFICIENT OPERATION
Orbital shaking is a simple way for the mixing of assay components, but simply putting the samples in a micro-plate does not guarantee reaching complete blending after the mixing process.
The adjustment of the optimal mixing speed for micro-plates is dependent on the size of the well and the filling volume. The below table is a short summary for recommended mixing speeds for different microplates.
| Mixing Speeds (RPM) for Different Micro-plates Depending on Filling Volume/Well (%) | |||
| Filling Volume in % | 96 Standard Well | 96 Deep Well | 384 Standard Well |
| 50% | 1000 – 1200 RPM | 800 – 1200 RPM | 1200 RPM |
| 75% | 800 – 1000 RPM | 600 – 1000 RPM | 900 – 1100 RPM |
Larger volumes should be mixed with a higher orbit and low speed. Smaller volumes requires alower orbit, buta much higher speed.
NOTE: Overfilling of wells can lead to spillage.
MAINTENANCE & CLEANING
- Cleaningshould be done usinga Damp cloth.
- Unplug the unit from its power source before any cleanup process.
- Incase of anyspillage allow the device to be steady.
- Remove a contaminant by cleaning the unit frequently.
- Storeinadry place after packing.
NOTE: Do not attempt to service or repair a product under warranty before consulting your manufacturer or distributor. After warranty period even such consultation are advised.
SAFETY PRECAUTION
![]() Read all safety & usage information provided in this manual carefully before using the device.
Read all safety & usage information provided in this manual carefully before using the device.
- Do notliftthe shaker by holding the micro-plate or shaking platform.
- Unplugthe power cord before cleaning.
- Thewhole unitshould be cleaned regularly with a moist cloth only.
- Always operate the unit on a leveled and stable surface to avoid any kind of accident.
- Always keep the shaker clean. If any liquid spill occurs, it should be removed promptly. Do notimmerse the unitin liguid for cleaning.
- Theshakershould be used for specific applications only.
- Do not use shaker in the hazardous environment or with hazardous material for which the unitis not designed.
- Do not operate the unit if it shows signs of electrical or mechanical damage. If any such damage is found, contact the supplier.
- Careshould be taken on the basis of sample used for mixing.
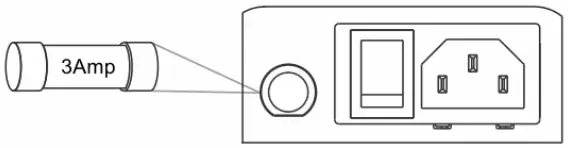
- Safety Fuse is provided of 3Amp configuration which can be replace by the operator. The same will protect the machine circuit during an electrical fault or overload.
 For safety we have provided protective earthling with power supply. Make sure power supply is earthened.
WARRANTY STATEMENT
This product is warranted to be free from defects in material and workmanship for a period of two (2) years from date of purchase. Your product will be duly repaired upon prompt notification in compliance with the following conditions:
This warranty is valid only if the product is used for its intended purpose and within the guidelines specified in this instruction manual. This warranty does not cover damage caused by accident, neglect, misuse, improper service, natural forces or other causes not arising from defects in original material or workmanship. This warranty does not cover any incidental or consequential damages, commercial loss or any other damages from the use of this product.
The warranty is invalidated by any non-factory modification, which will immediately terminate all liabilities on us for the products or damages caused by its use. The buyer and its customer shall be responsible for the product or use of products as well as any supervision required for Safety. If requested the products must be returned to the distributor in well packed and insured manner and all shipping charges must be paid.
Some states do not allow limitation on the length of implied warranties or the exclusion or limitation of incidental or consequential damages. This warranty gives you specific legal rights. This warranty is given expressly in lieu of all other warranties, expressed orimplied.
Products received without proper authorization will not be entertained. All items returned for service should be sent postage prepaid in the original packaging or other suitable carton, padded to avoid damage. We will not be responsible for damage incurred by improper packaging.
This warranty is valid only if the warranty is registered with the supplier within 30 days, from the date of purchase.
For you reference, make a note of serial number, date of purchase and supplier here.
Serial No.: ————-
Purchase Date: ————-
Supplier: ————-
PRODUCT DISPOSAL
In case the product is to be disposed off, the relevant legal regulations are to be observed.
The disposal of electrical devices is regulated within the European Community by national regulations based on EU Directive 2012/19/EU on waste electrical and electronic equipment (WEEE).
According to these regulations, any devices supplied after 13.06.05 in the business to business sphere, to which this product is assigned, may no longer be disposed off in municipal or domestic waste. They are marked with the following symbol to indicate this.![]() As disposal regulations within the EU may vary from country to country, please contactyour supplierif necessary.
As disposal regulations within the EU may vary from country to country, please contactyour supplierif necessary.
Accumax Lab Devices Private Limited
Plot No. 15, 16 & 32 GIDC Electronic Park SEZ, Sector 26, Gandhinagar, Gujarat, India – 382026.
Website: www.neuation.com
0275-00-0000-02-003-83


