PROJECT X AL538805 Combo High Power 8.5 Inch Round LED Auxiliary Light Headlight
Important safety Information
- Remove negative battery cable before installation.
- Ensure lights are fitted using the appropriate wiring harness or an equivalent auxilary wiring system.
- Ensure the lights are mounted securly to a solid surface on the vehicle.
- Cables connected to the light must not be subjected to wear or other damage.
- Do not operate device in proximity to flammable or combustable objects
Technical Specifications
Voltage: 9-33V
LEDs: 33 x 5 Watt Osram® L.E.Ds
Housing & Bracket: Pressure die-cast aluminum housing and bracket
Beam Type: Combo Beam Pattern
Lenses: Polycarbonate
Color Temperature: 5700°K
Current Draw: 14.4A at 12V per light
Wiring
Every Install is unique and we provide simple installation information but professional installation is highly recommended.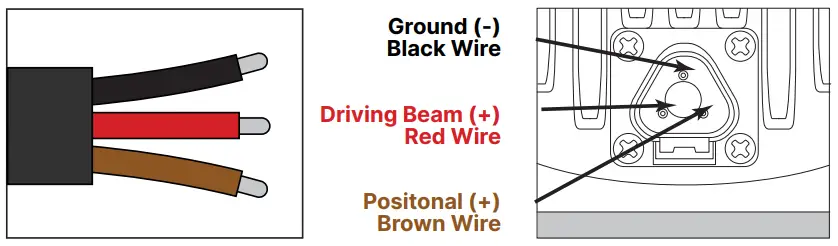
A Horizon Brands Company
2975 Red Hill Ave, Ste. 100, Costa Mesa, CA 92626
Copyright © 2021 ADC Solutions Auto, LLC. All rights reserved.
Follow manufacturer’s instructions to ensure the product is properly & safely installed.
The manufacturer and seller are not responsible or liable for consequential, incidental, or indirect damages, whether to person or property, resulting from the installation or improper use of this product.
- Before installing, please make sure the Driving Lights are free from damage, fracture and no impurities.
- Considering the high intensity of light, DO NOT stare at the light when it is switched on.
- The surface of the LED will reach very high temperature when it is turned on.
DO NOT touch the surface directly to avoid severe burns. - Do not install or use product if it, in any way, impairs the safe operation of your vehicle.
![]() WARNING: This product can expose you to chemicals including DEHP and DINP, which are known to the State of California to cause cancer and birth defects or other reproductive harm.
WARNING: This product can expose you to chemicals including DEHP and DINP, which are known to the State of California to cause cancer and birth defects or other reproductive harm.
For more information go to www.P65Warnings.ca.gov.
Warranty
This PROJECT X product carries a Limited Lifetime warranty against defects in workmanship and materials subject to the conditions and additional warranty information available at: www.projectxoffroad.com/pages/returns-warranty
DISCLAIMER OF WARRANTIES, INCLUDING WARRANTY OF MERCHANTABILITY AND WARRANTY OF FITNESS FOR PARTICULAR PURPOSE: EXCEPT AS SPECIFICALLY SET FORTH HEREIN, NO WARRANTY OR REPRESENTATION, EXPRESS OR IMPLIED, IS MADE AS TO THE LED CEILING LIGHT. PROJECT X AND/OR ITS AFFILIATES EXPRESSLY DISCLAIMS, WITHOUT LIMITATION, ANY STATUTORY WARRANTIES AND ALL IMPLIED WARRANTIES, INCLUDING ANY IMPLIED WARRANTY OF MERCHANTABILITY OR FITNESS FOR A PARTICULAR PURPOSE.
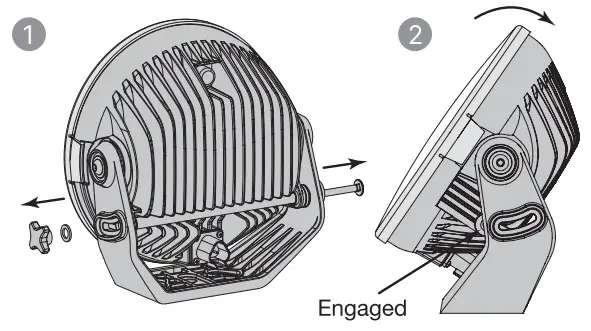
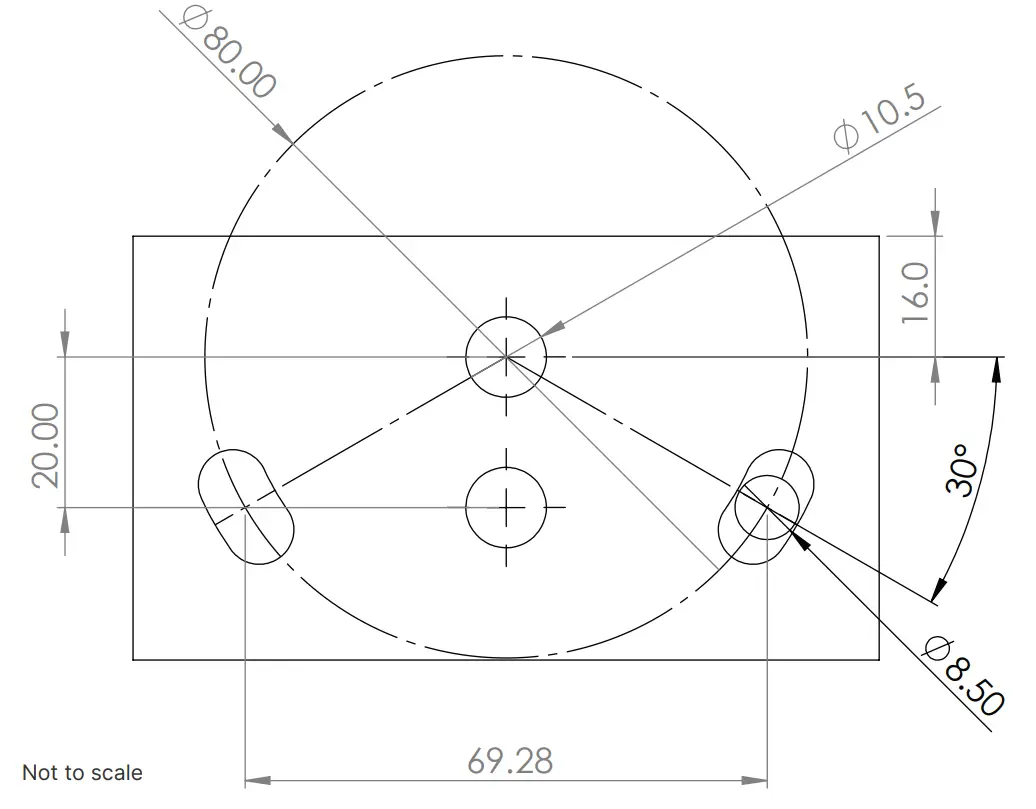
Mounting
- Remove Adjuster Knob, Flat Washer and Long Bolt.
- Tilt lamp backwards to allow access to insert the mounting bolts (Ensure the light pivots are still engaged with the bracket).

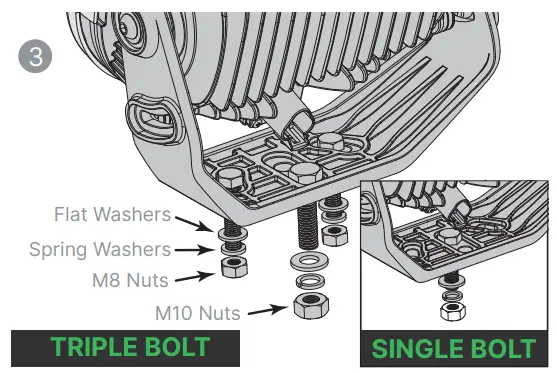
- Place the mounting bolts through the holes in bracket. Note, 3 Bolts are advised, if single bolt only, mount in center hole.

- Re-assemble the Adjuster Knob, Flat Washer and Long Bolt in reverse order.
- Choose a solid surface on the vehicle to mount the driving lights and secure the lamp by using flat washers, spring washers with M10 & M8 nuts.
- Ensure the Adjuster Knob is done up tight

Customization
TRIM PIECE COLOR CHANGE
To change the color of the plastic trim ring, remove 5 x screws and metal bezel. Re-assemble in reverse order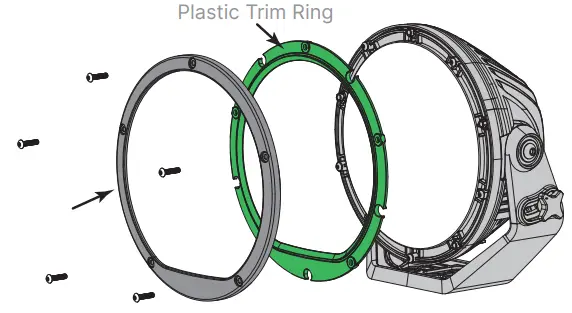
RUBBER BUSHING COLOR CHANGE
Remove the side M8 bolts, washers and blue rubber bushings. Replace with black rubber bushings. Re-assemble in reverse order.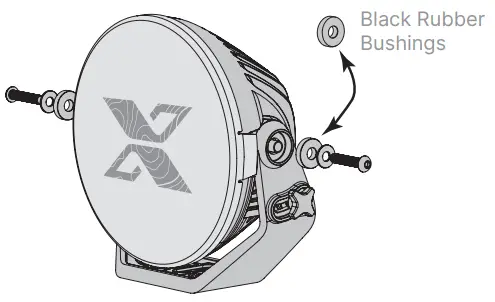
ADJUSTER KNOB
Adjuster Knob can be reversed from left hand to right hand side.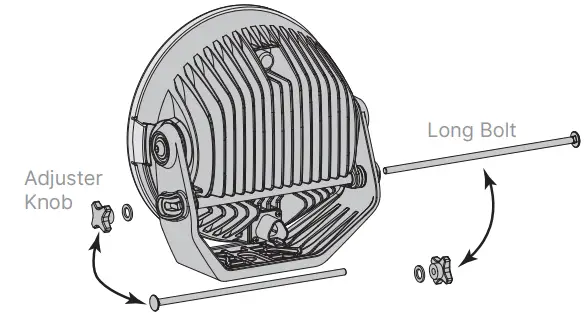
LENS COVER REMOVAL
Remove lens protector by unclipping the side wings.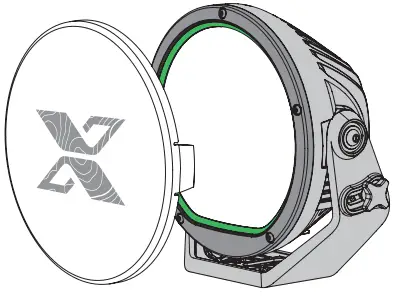
Components
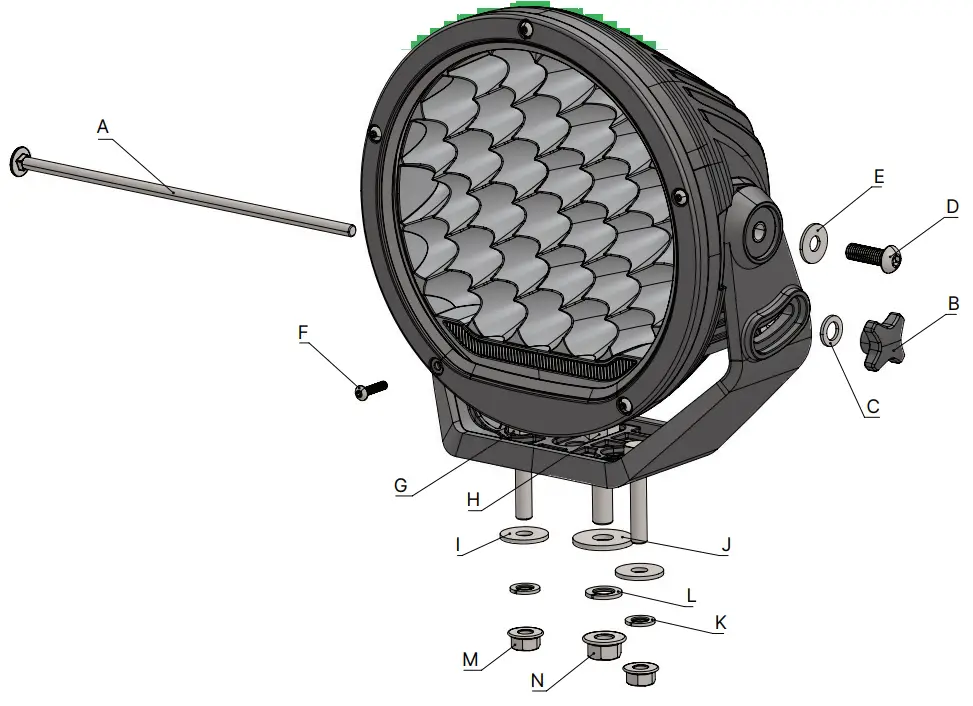
| Item | Description | Torque (ft/lb) |
| A | M6 CUSTOM CARRIAGE BOLT | – |
| B | M6 CUSTOM HNOB | – |
| C | M6 X 14 X 2mm FLAT WASHER | – |
| D | M8 X 25mm BHCS | 3.7 |
| E | M8 X 17 X 1.6mm FLAT WASHER | – |
| F | M4 X 18mm BHCS | 1.5 |
| G | M8 X 1.25 X 40mm HEX | – |
| H | M10 X 1.5 X 40mm HEX | – |
| I | M8 X 24 X 2mm FLAT WASHER | – |
| J | M10 X 30 X 2.5mm FLAT WASHER | – |
| H | M8 SPRING LOCH WASHER | – |
| L | M10 SPRING LOCH WASHER | – |
| M | M8 FLANGE NUT | 11.0 |
| N | M10 FLANGE NUT | 22.0 |
Customer Service

[email protected]
(866) 294-9244
Mon-Sat 8am-5pm PST