 NiteDevil IP-CAM828 24C Camera
Instruction Manual
NiteDevil 24C Camera IP-CAM828
NiteDevil.com
Part 1 Introduction
- Key Features – IP-CAM828
Part 2 Connections and Dimensions
- IP-CAM828
Part 3 Mounting and SD Card Installation
- Mini-Eyeball
Part 4 Setup Options
- PoE ZIP NVR
- Non-PoE ZIP NVR
Part 5 How to log in via Browser
Part 6 Browser Menu Settings
- IP-CAM828
- Customizing the Day / Night Setting to IR
Part 7 Extra Resources
Part 8 General Maintenance
Part 9 Specifications
- IP-CAM828
Index
NiteDevil.com
Introduction
Key Features – IP-CAM828
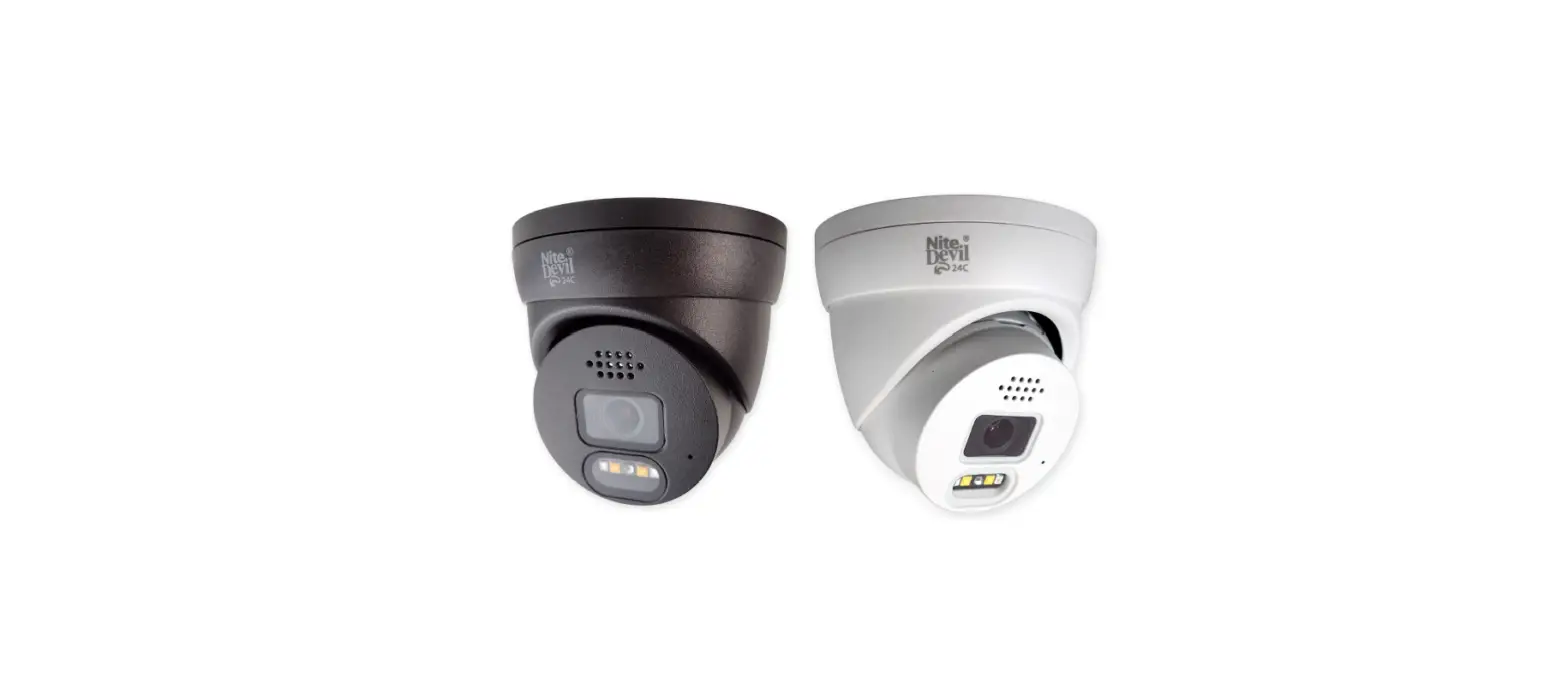
The NiteDevil HERO IP Camera is a 4K camera that can capture color images in low light conditions. It also has a built-in warning strobe.
Connections and Dimensions
IP-CAM828
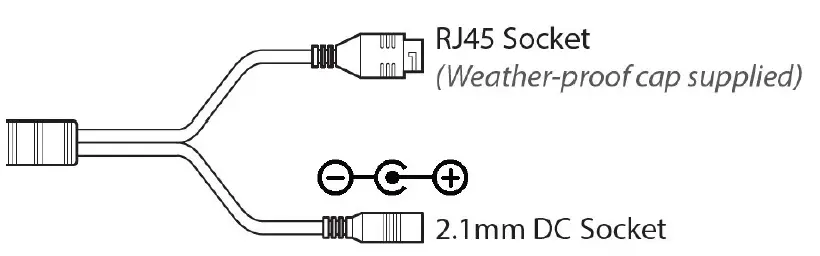
The camera can be powered in two ways:
- 12V DC via the 2.1mm DC socket with a current consumption of 420mA. The camera is polarity sensitive, so connections must be made correctly.
- PoE 48V RJ45 socket when connecting to a ZIP PoE NVR. Plug the camera directly into the NVR’s built-in PoE switch. After approximately 1 minute of being connected, the camera should become visible.

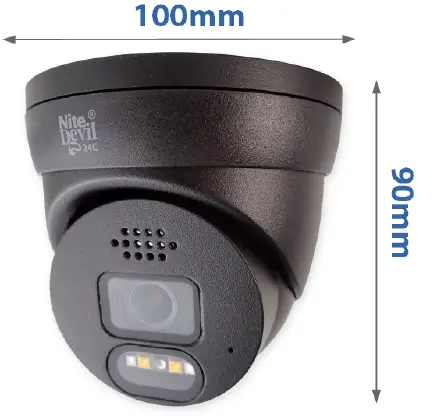
The camera’s dimensions are provided, excluding the bracket.
Mounting and SD Card Installation
To perform local recording on the camera, an SD card must be installed. The recording time will vary depending on the size of the SD card and encoding settings. The following are the maximum
recording times for different SD card sizes:
- 32GB SD Card: 31 hours
- 64GB SD Card: 62 hours
- 128GB SD Card (MAX): 124 hours
- 256GB SD Card (MAX): 248 hours
The camera can be set to only record when triggered by motion detection, alarm input, or AI smart, maximizing the recording time achievable. Note that power must be removed from the camera when inserting or removing the SD card.
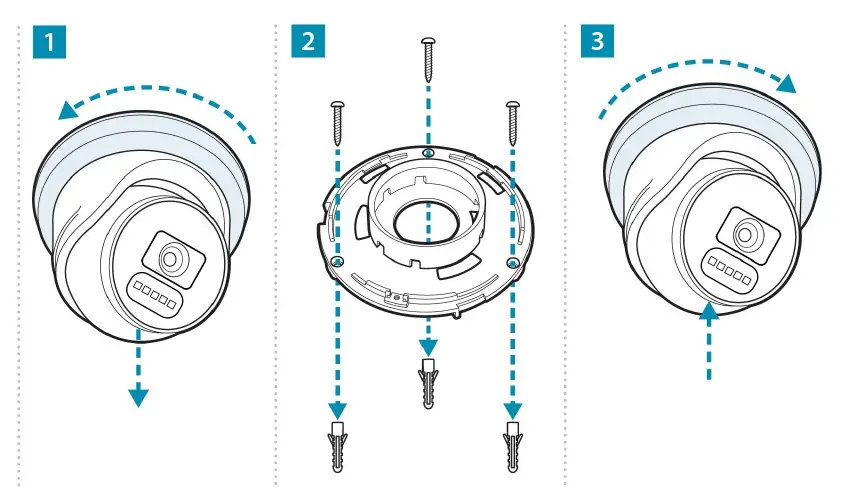
Mini-Eyeball
A template is provided in the box for marking the hole positions for fixing screws.
Setup Options
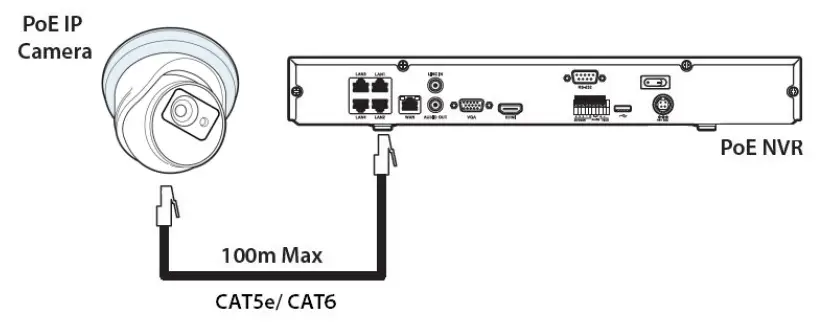
PoE ZIP NVR
When connecting to a ZIP PoE NVR, plug the camera directly into the NVR’s built-in PoE switch. After approximately 1 minute of being connected, the camera should become visible. The 100m distance for a camera can be increased when the PoE Mode is set to EPoE. In the menu on a ZIP PoE NVR, go to Video > IP Channels > PoE Mode.
Product Usage Instructions
- Choose one of the two methods to power the camera: either via a 12V DC connection or a PoE 48V RJ45 socket.
- If performing local recording, install an SD card in the camera. Note that the recording time will depend on the size of the SD card and encoding settings.
- For optimal recording time, set the camera to only record when triggered by motion detection, alarm input, or AI smart.
- If connecting to a ZIP PoE NVR, plug the camera directly into the NVR’s built-in PoE switch. In the menu on a ZIP PoE NVR, go to: Video > IP Channels > PoE Mode to increase the distance for a camera when the PoE Mode is set to EPoE.
- When mounting the camera, use the provided template to mark the hole positions for fixing screws.
- Remove power from the camera before inserting or removing the SD card.
Key Features – IP-CAM828
4K NiteDevil HERO IP Camera Color in Low Light with a Built-In Warning Strobe
- Full Colour 24/7
- Vehicle Detect
- 4K
- PoE & 12V
- Perimeter cross
- 2-way audio
- NiteDevil® tech
- Line Cross
- SD card slot
- White light LEDs
Connections and Dimensions
IP-CAM828
Powering the camera
Option 1 – Power the camera from 12V DC (via the 2.1mm DC Socket), the current consumption is 420mA. The camera is polarity sensitive so connections must be correctly made.
Option 2 – Power the camera using a PoE 48V RJ45 Socket
When connecting ZIP PoE NVR plug the camera directly into the NVR built-in PoE switch. The camera should automatically become visible after being connected for approximately 1 minute.
Dimensions
Mounting and SD Card Installation
For local recording on the camera itself, an SD card must be installed. Recording time will vary dependent on SD card size and encoding settings
- 32GB SD Card 31 hours
- 64GB SD Card 62 hours
- 128GB SD Card (MAX) 124 hours
- 256GB SD Card (MAX) 248 hours
The camera can be set to only record when triggered via motion detection, alarm input, or AI smart, this maximizes the recording time achievable. Remove power from the camera when inserting/removing the SD card.
Mini-Eyeball
A template is provided in the box for marking the hole positions for the fixing screws.
Setup Options
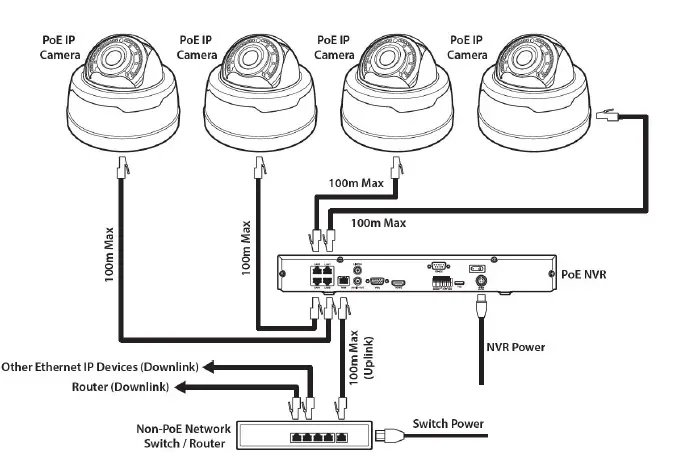
PoE ZIP NVR
When connecting to a ZIP PoE NVR plug the camera directly into the NVR’s built-in PoE switch. The camera should automatically become visible after being connected for approximately 1 minute. The 100m distance for a camera can be increased when the PoE Mode is set to PoE. In the menu on a ZIP PoE NVR go to:- Video > IP Channels > PoE Mode
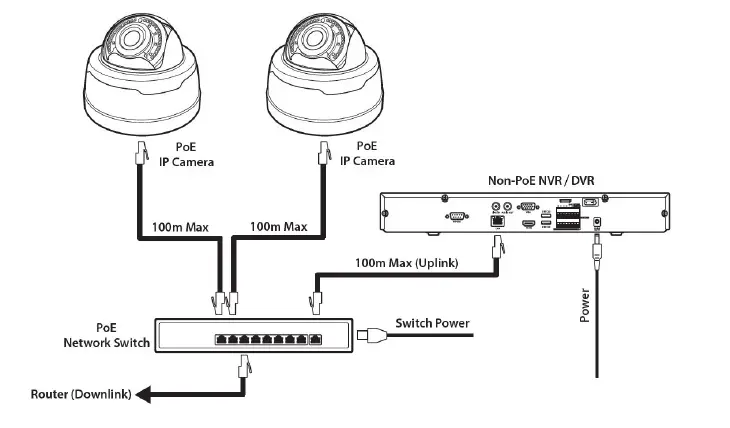
Non-PoE ZIP NVR
When connecting cameras to a Non-PoE NVR, they are first connected to an external network switch which is in turn connected to the NVR as shown below. See Extra Resources for more information on Adding IP Cameras manually to
a ZIP Recorder
How to log in via Browser
The AI smart features can be configured in a ZIP recorder or directly in the browser the interface of the camera (standalone) Only one smart detection feature can be enabled at any given time. See the NVR or DVR manual for information on configuring these features with a ZIP recorder. Follow the steps below for configuring the settings directly in the camera via a browser for a standalone setup.
You will need…
- Windows Based PC/ Laptop connected to router/ PoE switch
- ZipVision Pro App on Mobile Devices
- PoE Switch connected to Network/ Router
- Ethernet network cable
- ZipFinder software is available via this link below:- www.softcctv.com/store/Item/Zip-Finder-IP-CCTV-Security-Camera-Discovery-Tool
NOTE If the PC being used is on a different IP range to the PC then add the IP range of the camera to the PC using the below guide:-
PDF Version:- http://www.cctvmanuals.com/pdf/tips/How_to_add_an_IP_Range.pdf
HTML Version:- http://www.cctvmanuals.com/tips/How_to_add_an_IP_Range/index.html
- Plug the camera’s RJ45 port with a network cable into a PoE switch
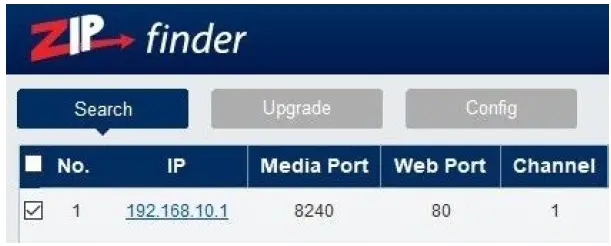
- Using ZipFinder on a Windows Based PC/ Laptop Search and then tick the camera

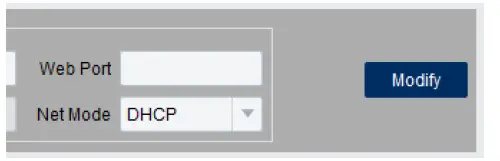
- Select Net Mode = DCHP, then click Modify

- Search again, to get the updated IP address.
- Select the IP address of the camera, Internet Explorer will pop-up, up and ask you to download and install the plug-in.
- Download, install, and follow the steps for the plug-in installation, then re-load the browser by selecting the IP address again.
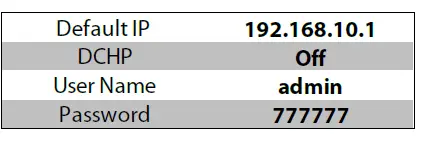
- log in to the IP Camera, the default login details are:-

Browser Menu Settings
IP-CAM828
The menu be configured directly in the browser interface of the camera (standalone), in Remote Setting you will find the menu settings below:-
| Video | Live | Name | Camera (user editable) | |
| Image Control | Date Format | DD/MM/YYYY / MM/DD/YYYY / YYYY/MM/DD | ||
| Time Format | 24 Hour / 12 Hour | |||
| Flicker Control | 50Hz / 60Hz | |||
| Show Name | Enable / Disable | |||
| Show Time | Enable / Disable | |||
| Save / Refresh | ||||
| Image Control | Image Setting | Full Colour Mode / Day / Night Mode / Schedule | ||
| White Light | Manual / Automatic mode / Schedule / OFF | |||
| Angle Trad | 180 / 0 | |||
| Mirror | Disable / Vertical / Horizontal / All | |||
| Backlight | WDR / HLC / Back Light / Disable | |||
| White Balance | Automatic mode / Manual | |||
| Shutter | Automatic mode / Manual | |||
| Time Exposure | 1/5 to 1/200000 / Flickerless | |||
| Defog | OFF / Automatic mode / Manual | |||
| 3D Noise Reduction | OFF / Automatic Mode / Manual | |||
| Save / Default / Refresh | ||||
| Privacy Mask | Enable / Disable | |||
| Record | Encode | Mainstream | Resolution | 3840 x 2160 |
| FPS | 1 -15 | |||
| Video Code Type | H.265 / H.264 | |||
| Video Code Level | Main Profile | |||
| Bitrate Control | CBR / VBR | |||
| Bitrate Mode | Predefined / User-Defined | |||
| Bitrate | 512 to 6144 | |||
| I Frame Interval | 1 to 100 | |||
| Audio | Enable / Disable | |||
| Save / Refresh | ||||
| Substream | Resolution | 1920 x 1080 | ||
| FPS | 1 -15 | |||
| Video Code Type | H.265 / H.264 | |||
| Video Code Level | Main Profile / Baseline / High Profile | |||
| Bitrate Control | CBR / VBR | |||
| Bitrate Mode | Predefined / User-Defined | |||
| Bitrate | 128 to 2048 | |||
| I Frame Interval | 1 to 60 | |||
| Audio | Enable / Disable | |||
| Save / Refresh | ||||
| Mobilestrea m | Enable | Enable / Disable | ||
| Resolution | 640 x 480 / 320 x 240 | |||
| FPS | 1 – 25 | |||
| Video Code Type | H.265 / H.264 / H.264+ / H.265+ | |||
| Video Code Level | Main Profile | |||
| Bitrate Control | CBR / VBR | |||
| Bitrate Mode | Predefined / User-Defined | |||
| Bitrate | 8 to 1536 | |||
| I Frame Interval | 1 to 60 | |||
| Audio | Enable / Disable | |||
| Save / Refresh | ||||
| Record | Record | Stream Mode | Mainstream / Substream | |
| Record | Enable / Disable | |||
| PreRecord | Enable / Disable | |||
| Netbreak | Enable / Disable | |||
| Save / Refresh | ||||
| Schedule | User Definable | |||
| Save / Refresh | ||||
| Event | Setup | Motion | Enable | Enable / Disable |
| Sensitivity | 1 to 8 | |||
| Save / Refresh | ||||
| Deterrence | Save / Default / Refresh | |||
| Alarm | Post Recording | OFF / 5s / 10s / 20s / 30s | ||
| Send Email | Enable / Disable | |||
| FTP Picture Upload | Enable / Disable | |||
| Enable Record | Enable / Disable | |||
| Deterrent | Enable / Disable | |||
| Save / Schedule / Refresh | ||||
| AI | Setup | PD & VD | Enable | Enable / Disable |
| Sensitivity | 0 to 100 | |||
| Snap Mode | Default / Realtime Mode / Interval Mode | |||
| Min Pixel | 64 – 1080 | |||
| Max Pixel | 320 – 1080 | |||
| Detection Type | Pedestrian & Vehicle / OFF / Person / Vehicle | |||
| Detection Mode | Motion Mode / Static Mode | |||
| Detection Range | Full Screen / Customize | |||
| Save / Refresh | ||||
| LCD | Enable | Enable / Disable | ||
| Sensitivity | 1 to 4 | |||
| Dynamic Marking | Enable / Disable | |||
| Detection Type | Pedestrian & Vehicle / Person / Vehicle | |||
| Rule Number | 1 to 4 | |||
| Rule Enable | Enable / Disable | |||
| Rule Type | / / B | |||
| Save / Refresh | ||||
| Alarm | PID / LCD | Post Recording | OFF / 5s / 10s / 20s / 30s | |
| Send Email | Enable / Disable | |||
| FTP Picture Upload | Enable / Disable | |||
| Enable Record | Enable / Disable | |||
| Deterrent | Enable / Disable | |||
| Save / Schedule / Refresh | ||||
| Networ k | General | General | DCHP | Enable / Disable |
| IP Address | User-definable | |||
| Subnet Mask | User-definable | |||
| Gateway | User-definable | |||
| DNS 1 | User-definable | |||
| DNS 2 | User-definable | |||
| Video Encryption Transmission | Enable / Disable | |||
| Save / Refresh | ||||
| Port Configura tion | HTTP Port | User-definable | ||
| Client Port | ||||
| HTTPS Port | ||||
| RTSP Port | ||||
| P2P Enable | Enable / Disable | |||
| Save / Refresh | ||||
| Enable / Disable | ||||
| Encryption | OFF / SSL / TLS / Automatic mode | |||
| SMTP Port | 1 – 65535 | |||
| SMTP Server | User-definable | |||
| Username | ||||
| Password | ||||
| Sender | ||||
| Receiver 1 | ||||
| Receiver 2 | ||||
| Receiver 3 | ||||
| Interval | ||||
| Save / Test / Refresh | ||||
| RTSP | RTSP Enable | |||
| Anonymous Login | Enable / Disable | |||
| Instruction: rtsp://IP:RtspPort/ch01/A | ||||
| Maintain | Log | Log Type | System / CON. / Alarm / Account / Record / Storage / Network / All | Search | |
| Start Time | User-definable | ||||
| End Time | User-definable | ||||
| Load Default | All / Video / Record/ Event / AI / Network/ Storage / System | ||||
| Save / Refresh | |||||
| Upgrade | Path | Search Local Files | Upgrade | ||
| Save / Load | Import File | Search Local Files | Import | ||
| Export File Name | Search Local Files | Export | |||
| Auto Reboot | Auto-maintenance | Enable / Disable | |||
| Time | Date / Week / Month | ||||
| Mon / Tues / Wed / Thur / Fri / Sat / Sun | |||||
| Time | |||||
| Save / Refresh / Reboot | |||||
| Informatio n | Device ID | ||||
| Device Name | |||||
| Device Type | |||||
| Hardware Version | |||||
| Software Version | |||||
| Web Version | |||||
| Mac Address | |||||
| P2P ID | |||||
| Refresh | |||||
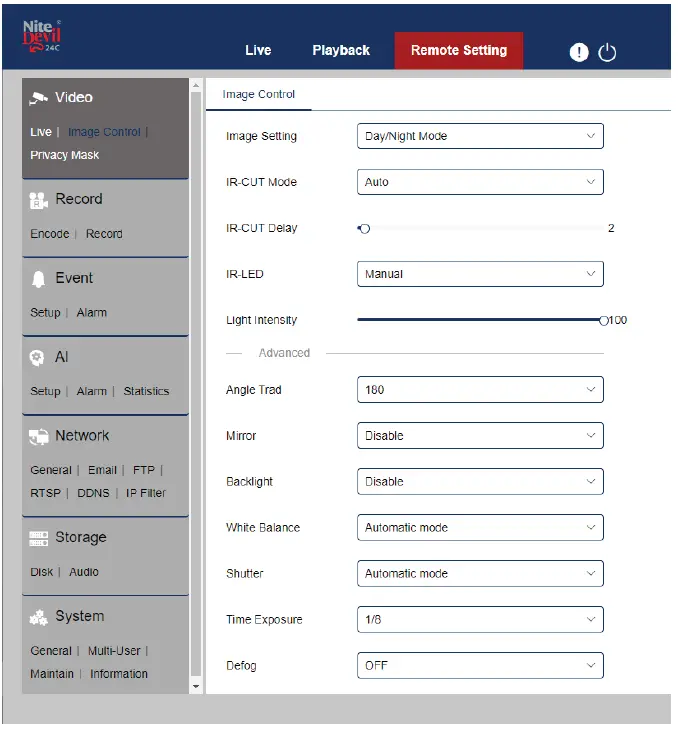
Customizing the Day / Night Setting to IR
Once logged into the camera browser interface:- Go To Remote Settings > Video > Image Control > Image Settings e.g. Day / Night mode if want the camera to B&W & use the IR Suggested setting: IR Cut to Auto
Extra Resources
ZipNVR.com Website
The Zip NVR has a range of information on the cameras and NVRs, manuals, software, tools, and support:- www.zipdvr.com

Adding IP Cameras to a ZIP recorder
How to guide on Adding IP Cameras:- www.zipdvr.com/howto/TIP459-How-To-Add-IP-Cameras.html
AI Setup
See the ZIP NVR full manual for more information on AI setup;
Note: AI Features will vary depending on the model
Full Instruction Manual

ZIP Firmware
Firmware for the zip products is available online:- www.zipdvr.com/firmware.html Compare the firmware in the product against that available online.
General Maintenance
- Routinely clean the camera to prevent dust build-up as this can affect the performance of the camera. It is recommended to use a damp non-abrasive microfibre cloth.
- Routinely check the connections for power and data to ensure no water ingress and corrosion.
- Check that the cameras are firmly attached to the wall or mounting bracket.
- Check playback in the recorder to ensure the camera is recording and triggering properly.
Specifications
9.1 IP-CAM828
| Resolution | 4K (8MP) (3840 x 2160) |
| Lens Type | Wide Angle 3.6mm Fixed |
| Video Compression | H264 / H265 |
| Bit Rate | 512Kbps ~ 6Mbps |
| Shutter | 1/5 ~ 1/20000s ~ Flickerless |
| Min. Illumination | Colour 24/7 with White Light LEDs |
| Day/Night Function | Auto or Scheduled |
| Microphone | Built-in |
| IR LEDs | 1x High Power |
| IR Range | Up to 25m |
| White Light | 2x High Power |
| White Light Range | Up to 20m |
| Gain Control | Auto |
| Video Connection | RJ45 Socket |
| Onvif | Yes |
| Protocol | TCP/IP, HTTP, DHCP, DNS, DDNS, RTP/RTSP |
| Other Protocols | SMTP, NTP, HTTPS |
| White Balance | Auto / Manual |
| Input Voltage | 12V DC (420mA) / PoE 48V |
| Consumption | 1.2 – 5W |
| Power Connection | 12V – 2.1mm DC Socket / PoE – RJ45 |
| IP Rating | IP66 |
| Build | Metal & Plastic |
| Dimensions | 100mm x (H) 90mm |


