![]() JUNIOR
JUNIOR
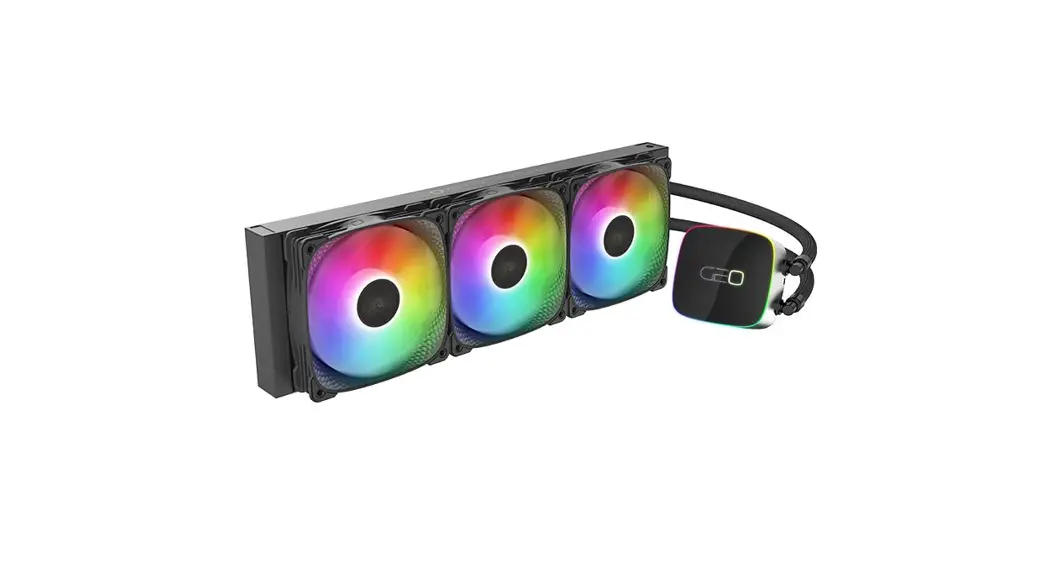
ESKIMO 24/36
240MM/360MM LIQUID COOLER
![]() User Guide
User Guide
This instruction applies to Eskimo 24/36
SPECIFICATIONS
| Model | Eskimo junior 36 | |
| Water Block Dimensions(L*W*H)mm | 78 x 78 x 53 | |
| Thermal Compound | Needle-cylinder type high thermal conductive silicone grease Xinyue7868 | |
| (INTEL) CPU SOCKET SUPPORT | “Intel. LGA2066/2011V3/2011/1200/1156/1155/1151/1150/1700 “ | |
| (AMD) CPU SOCKET SUPPORT | “AM!®. AM3/AM3+/AM4 | |
| Tubes Length | 400 | |
| Tubes Material | Rubber with Nylon braided sleeve | |
| LED Modes | Controller Built-in LED | |
| Pump | Internal Pump | |
| Pump Speed (+PIO% RPM) | 2800 | |
| Bearing Type | Ceramic bearing | |
| Noise Level (dBA) | < 30 | |
| Max.Flow (L/min) | 1.4 | |
| Input Voltage (V) | 12 | |
| Input Current(No Fan)(A) | 0.25 | |
| Rated Power(No Fan)(W) | 3 | |
| Mean Time Between Failure(h) | > 50000 | |
| Radiator | Square radiator | |
| Dimensions(L*W*H)mm | 277 x 120 x 27 mm | |
| Enclosure Technics | Painting&printing | |
| Materials | Aluminum | |
| Connectors | Aluminum Pagoda-Shape Connectors | |
| FAN | SQUAMA 2503B x 2 |
| Dimensions(mm) | 120 x 120 x 25 |
| PWM Speed Mode (+1-10% RPM) | 2000 |
| Noise Level (dBA) | 29 |
| Air Pressure (mmH2O) | 2.92 |
| Airflow (CFM) | 69.11 |
| LED Modes | Motor PWM control ARGB control |
| Model | Eskimo junior 24 |
| Water Block Dimensions(L*W*H)mm | 78 x 78 x 53 |
| Thermal Compound | Needle-cylinder type high thermal conductive silicone grease Xinyue7868 |
| (INTEL) CPU SOCKET SUPPORT | `Intel* LGA2066/2011V3/2011/1200/1156/1155/1151/1150/1700 |
| (AMD) CPU SOCKET SUPPORT | “AMD® AM3/AM3+/AM4” |
| Tubes Length | 450 |
| Tubes Material | Rubber with Nylon braided sleeve |
| LED Modes | Controller Built-in LED |
| Pump | Internal Pump |
| Pump Speed (+/-10% RPM) | 2800 |
| Bearing Type | Ceramic bearing |
| Noise Level (dBA) | < 30 |
| Max. Flow (L/min) | 1.4 |
| Input Voltage (V) | 12 |
| Input Current(No Fan)(A) | 0.25 |
| Rated Power(No Fan)(W) | 3 |
| Mean Time Between Failure(h) | > 50000 |
| Radiator | Square radiator |
| Dimensions(L*W*H)mm | 397 x 120 x 27 mm |
| Enclosure Technics | Painting&printing |
| Materials | Aluminum |
| Connectors | Aluminum Pagoda-Shape Connectors |
| FAN | SQUAMA 2503B x 3 |
| Dimensions(mm) | 120 x 120 x 25 |
| PWM Speed Mode (+1-10% RPM) | 2000 |
| Noise Level (dBA) | 29 |
| Air Pressure (mmH2O) | 2.92 |
| Airflow (CFM) | 69.11 |
| LED Modes | Motor PWM control ARGB control |
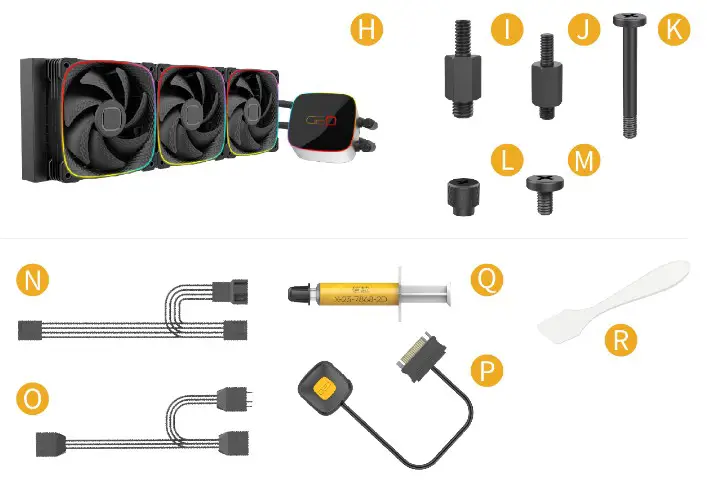
PACKAGE CONTENT
ESKIMO JUNIOR 24
 | 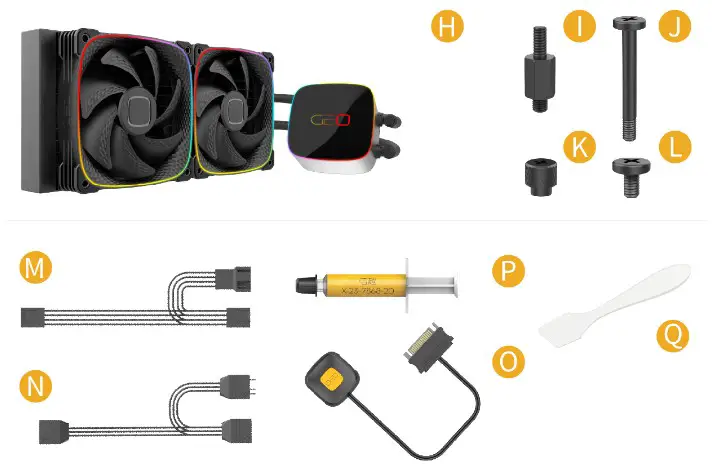 |
| A: Intel Mounting Bracket x2 B: Fan x2 C: AMD Mounting Bracket x2 D: Intel CPU Backplate x1 E: Standoff Screws x4 (115x) F: Standoff Screws x4 (17xx) G: Standoff Screws x4 (20xx) H: 240 Radiator x1 | I: Standoff Screws x4 (AMD) J: Fan Screws x8 K: Thumbscrew Cap x4 L: Radiator Screws x8 M: PWM Cable x1 N: ARGB Cablex 1 O: ARGB One-Click Controller x1 P: Thermal Compound x1 Q: Silicone grease spoonxl |
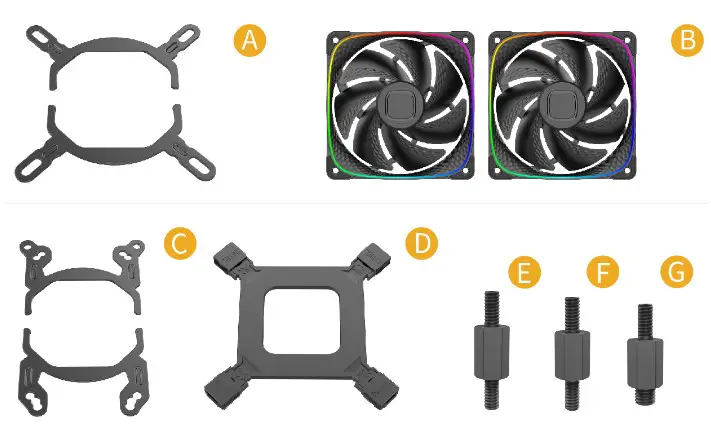
ESKIMO JUNIOR 36
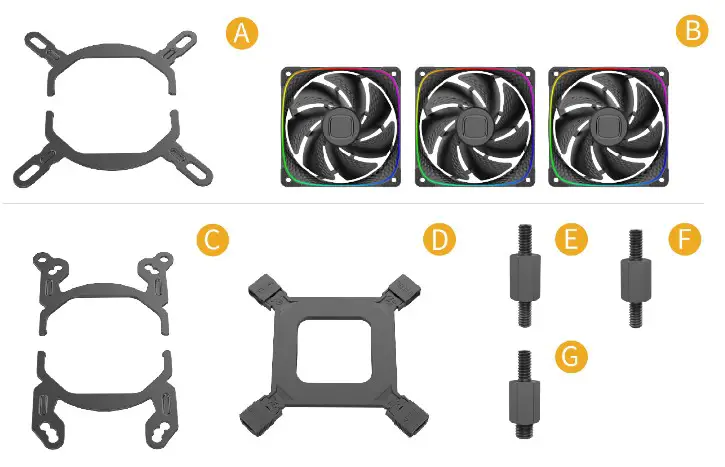 |  |
| A: Intel Mounting Bracket x2 D: Intel CPU Backplate x1 ¢ E: Standoff Screws x4 (115x) F: Standoff Screws x4 (17xx) G: Standoff Screws x4 (20xx) H: 360 Radiator x1 I: Standoff Screws x4 (TR4) J: Standoff Screws x4 (AMD) | K: Fan Screws x12 L: Thumbscrew Cap x4 M: Radiator Screws x12 N: PWM Cable x1 O: ARGB Cable x1 P: ARGB One-Click Controller x1 Q: Thermal Compound x1 R: Silicone grease spoon x1 |
HOW TO ASSEMBLE
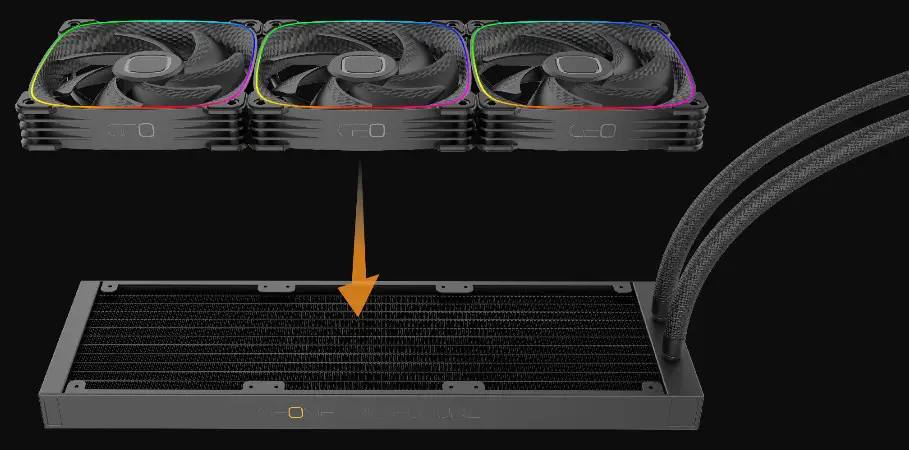
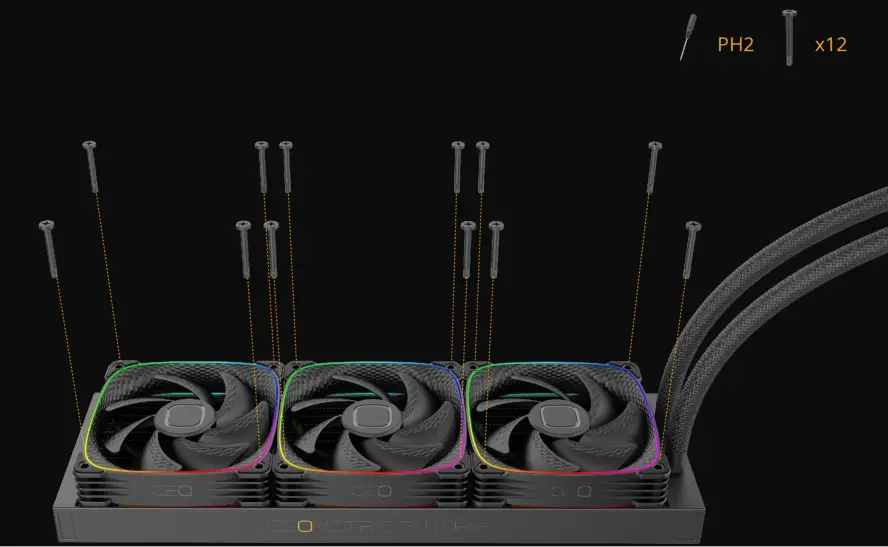
Install Fans
- Install Fans to Radiator

- Install Fan Screws

Install the CPU Cooler
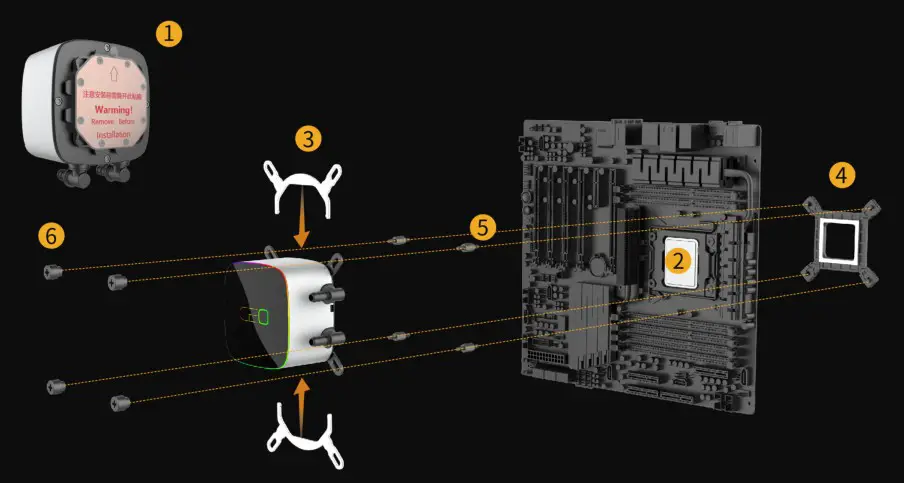
| 1. Remove the protect film from the cold-plate. | 4. Install the Backplate Remove the white double-sided adhesive at the bottom( AMD motherboard does not require backplate installation,just need to remove the mounting bracket in the below picture and then install 4 standoff screws. |
| 2. Apply the thermal compound on the CPU surface,and spread evenly with silicone grease spoon | 5. Install the Standoff Screws Choose the correct 4 standoff screws match with the CPU Mounting Bracket,then install them onto your motherboard and tighten them. |
| 3. Install the Mounting Bracket Choose your Mounting Bracket INTEL or AMD according to your Motherboard. | 6. Install the Water Block Put the water block on the CPU, and then tighten 4 thumbscrew caps |
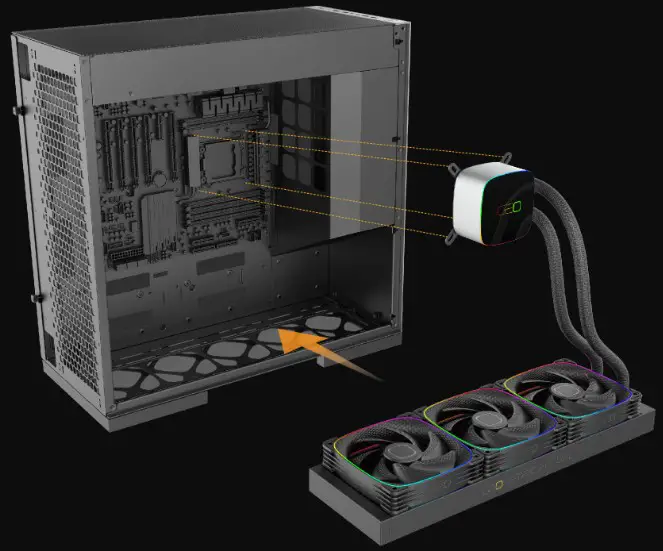
Install Fans and Radiator combo to the PC chassis and tighten them 
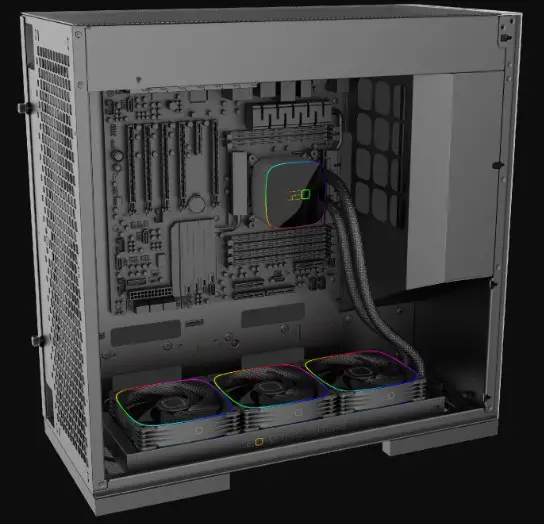
Installation Completion
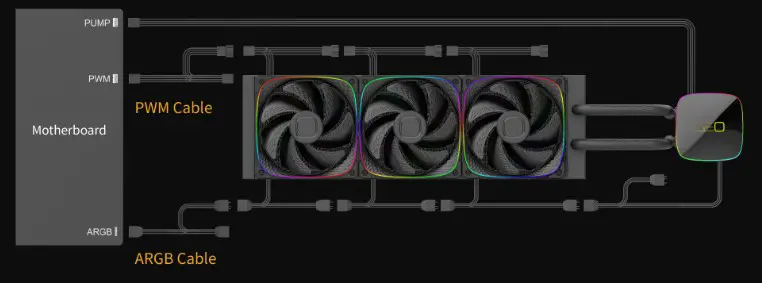
Connection Cables
Fans/ARGB Cable Connecting to the motherboard
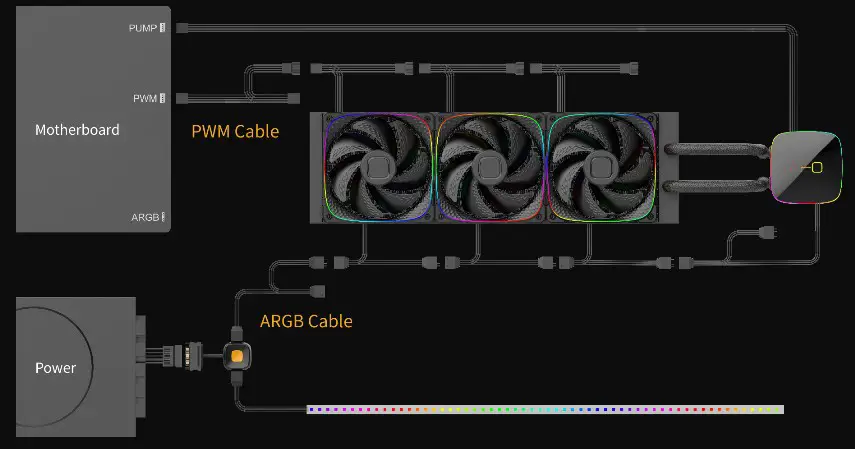
ARGB One-Click Controller Installation
If your motherboard does not support ARGB effect, you could use the included ARGB One-Click Controller to connect to your PSU’ s SATA cable and the Addressable Cable in order to use the different of lighting effects.
Tap the button to change the lighting modes which is as shown in the below. (Hold the button for 2 seconds to turn on or off the lights.)
- GEOMETRIC FUTURE yellow and orange is recommended
- Single color gradient
- Colorful gradient
- Colorful flow
- Lighting Form: Red, green, blue, yellow, purple, white
- Breathing: Red, green, blue, yellow, purple, white
- Flow: Red, green, blue, yellow, purple, white
PRECAUTIONS
- Install in accordance with the user manual’ s instructions.
- Please wear electrostatic discharge (ESD) rings and protective gloves when installing the PC. The products or components to be operated by power supply must be connected in the correct way and line sequence. Otherwise, hardware such as the computer motherboard may be burned down and personal injury may occur.
- Do not use this product for any purpose other than the specified ones, and do not modify this product to avoid failure and damage to the product and related components.
- To move the product and its contents, please remove all components of the product before operation to avoid damage to the product and related components, even more personal injury.
- If you encounter any questions about product assembly or use, please consult the official customer service in time to obtain correct guidance before operation.
- If the product and components are damaged due to unauthorized assembly, you will pay for the repair and the replacement for the components.
- Do not insert foreign materials into the fan blade, so as not to damage the normal operation of the product.
- Do not modify the original fan/pump cable and port in order to avoid short circuit which may burn down the products.
- Do not touch the impeller while the fan is running to avoid injury or damage to the product.
- Please only use this product in a computer case and keep this product away from any liquids.
![]()


