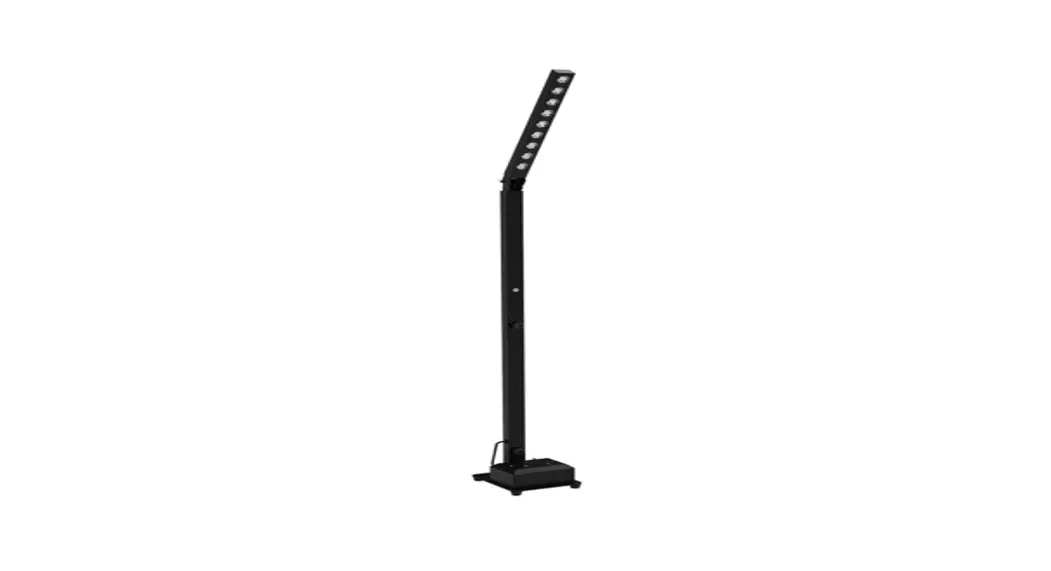
![]() F-L006165 Luminus Pole Battery Lighting
F-L006165 Luminus Pole Battery Lighting
User Manual
F-L006165 Luminus Pole Battery Lighting
This manual contains important information.
Please read before operating the fixture.
SECURITY TIPS
WARNING!!! To reduce the risk of fire, electric shock, or injury to persons, follow these important safety instructions:
- Rated voltage range: AC110V-120V/60Hz or AC200V-240V/50HZ (to be selected).
- Fixtures used in ambient temperature: -15 ℃ -40 ℃, the highest temperature of the surface of the lamp: 60 ℃.
- Keep away from the liquid substance and humid environments.
- Before using the lights must ensure good grounding.
- Do not use the fixture, in case of abnormal behavior.
Technical Specifications
Power Supply: AC 100-240V/50-60Hz.
Power consumption: 90W.
Light source: 9pcs LED RGBWA+UV 6in1 mixing color.
Beam Angle: 25°.
Dimmer: 0-100% dimmer.
Strobe rate: 0-24HZ.
Working Environment: -20℃-40℃.
IP rate: IP20, indoor.
DMX Channels: 2 DMX modes, 6 channels mode & 10 channels mode.
Control Mode: DMX512, Master-slave, Sound, Auto, Wireless, Wi-Fi, Remote.
Battery:
Battery type: Lithium Ion.
Battery Charge Time: 6 hours (full power).
Battery Life: (two colors) 8 hours, (single Color) 24 hours.
Battery Power: 12V, 25Ah.
Wireless effective distance: 400 meters.
Net weight: 11kg
Production function:
- DMX512 console control, which can be controlled online through 2.4G wireless mode.
- Mobile Wi-Fi operation control, support Android Android 2.3 and above, Apple iOS 4.3 and above.
- Mobile APP name: LED LAMP, Language: The software automatically recognizes Chinese or English according to the system.
- Static color selection (6 colors, dimming value 0-255) + strobe function (speed adjustable 0-20).
- Macro color: 16 colors to choose from.
- Automatic color jump function (speed adjustable 1-20)
- Color gradient function (speed adjustable 1-20)
- Color Sudden function (speed adjustable 1-20)
- Strobe (speed adjustable 0-20)
- 2.4G wireless electronic switch, you can turn on or off the 2.4G wireless power through the menu. You can know whether to turn on or off the wireless module through the icon in the upper left corner of the interface. The wireless transceiver frequency can be selected through the menu.
- White balance setting, adjust the brightness of the 6 colors appropriately (also has the function of fine-tuning the current), the value is (127-255)
- The battery icon in the upper right corner of the interface can be turned on or off by setting. For products without batteries, it can be set to off
- Screen saver settings: can be set to normally open or automatically turn off the display backlight after 5 seconds, 10 seconds, 15 seconds
- Infrared remote control function setting: can be turned on or off through the menu setting.
| Menu | Item1 | Item2 | Item3 |
| “Choose Pattern” | “Static” | (Color) | (Dimming) |
| RED | 0-255 | ||
| GREEN | 0-255 | ||
| BLUE | 0-255 | ||
| WHITE | 0-255 | ||
| AMBER | 0-255 | ||
| PURPLE | 0-255 | ||
| STROBE | 0-20 | ||
| “Macro” | 1-32 | ||
| (Speed) | |||
| “Show” | “AUTO” | 0-20 | |
| “FADE” | 0-20 | ||
| “SNAP” | 0-20 |
| “Choose Pattern” | “R-STRO” | 0-20 | |
| “G-STRO” | 0-20 | ||
| “B-STRO” | 0-20 | ||
| “A-STRO” | 0-20 | ||
| (Sensitivity) | |||
| “Sound” | “SOUND1” | 0-100 | |
| “SOUND2” | 0-100 | ||
| “SOUND3” | 0-100 | ||
| (Options) | |||
| “User Settings” | ” Channel” | 006/010 | |
| (Addressed) | |||
| ” DMX512″ | 001-512 | ||
| (Mode) | |||
| ” Slave” | OK | ||
| ” WiFi” | WiFi Icon | ||
| “System Settings” | “1. white Balance” | (Color) | (Brightness) |
| RED | 127-255 | ||
| GREEN | 127-255 | ||
| BLUE | 127-255 | ||
| WHITE | 127-255 | ||
| AMBER | 127-255 | ||
| PURPLE | 127-255 | ||
| “2. Show Battery Icon” | YES/NO | ||
| “3. Display Sleep” | Open/5Sec/10Sec/15Sec | ||
| “4. Autolock” | YES/NO | ||
| “5. FAN Control” | Auto/High/Medium/Low | ||
| “6. Infrared Setting” | ON/OFF | ||
| “7. Wireless Setting” | ON/OFF | ||
| “8. Factory Reset” | Password[— ] |
| “Information” | “1. LED” | (Temperature) | 0-99℃ |
| “2. WORK” | (Hours) | 001-999 | |
| “3. SOFT” | (Version) | 001 | |
| “4. LEVEL” | (Percent) | 10-100 |
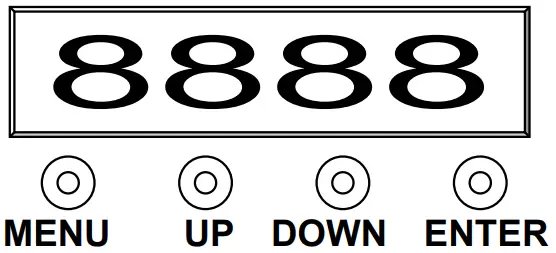
- 3-inch OLED display: display menu functions and parameters;
- Button definition
| MENU | Main menu function selection/exit submenu |
| Select the previous menu/parameter increment | |
| Select the next menu/parameter decreasing | |
| ENTER | Recognize the selected function / enter the next menu |
Switch machine operation:
When the power is off, press and hold the MENU button, after 3 seconds, the display will light up and be in the power-on state, and you can perform the required function operations.
When the power is on, press and hold the MENU button, after 3 seconds, the display will turn off and the power will be cut off.
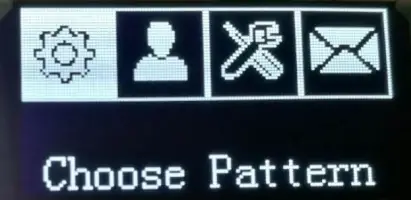
“Choose Pattern” selection pattern
Select “Choose Pattern” and press the ENTER button to confirm. The display will show the corresponding function menu. Such as static color, macro function color mixing, performance mode, and voice control mode. Use the UP/DOWN button to select among the functions. If you press the ENTER button, the display will enter the next menu item, and if you press the Menu button, you will exit the previous menu mode. The parameters will be automatically saved after selection.
“User Settings” user settings
Select “User Settings” (user console mode setting), press the ENTER button to confirm, and the display will enter the channel options, use the UP/DOWN button to select “6Ch” (6 channel mode), “10Ch” (10CH channel mode), When you press the ENTER button again, the menu will automatically jump to the “DMX512” address setting mode. With the UP/DOWN button, you can adjust the address code you need to set between 1 and 512. After you select it, the parameters will be automatically saved. If you press the ENTER key again, it will return to the main interface. When the DMX512 signal is received, the interface will display a “Connection” prompt. If the DMX512 signal is disconnected, the interface will display a “Disconnect” prompt. If you press the ENTER or MENU button, the display will exit to the previous menu mode.
“Slave” slave mode
Select “Slave” (slave mode), press the ENTER button to confirm, and “Slave Mode!” will be displayed. Indicates that it has entered the slave-receiving mode state. After selection, the parameters will be automatically saved. When the host signal is received, the interface will display a “Connection” prompt, if the host signal is disconnected, the interface will display a “Disconnect” prompt, if you press ENTER Or press the MENU button, the display will exit to the previous menu mode.
“System Settings” system settings mode
Select “System Settings” (system settings mode), press the ENTER button to enter the next menu, use the UP/DOWN button to select different settings among the setting functions, and press the ENTER or MENU button, and the display will exit to the previous Level menu mode.
DMX512 console control mode
In the “User Settings” interface, press the ENTER button to confirm. “Channel” (channel mode) is displayed on the screen, use the UP/DOWN button to select “6Ch” (6 channel mode) or “10Ch” (10CH channel mode) as needed, and press the ENTER button to automatically jump to “DMX512” (DMX512 address) Code setting), use the UP/DOWN button to adjust the address code you need to set between 1 and 512, and then you can receive the DMX512 console control signal.
If you want to use this function, please refer to the following diagram to set the DMX512 addresses of the first 4 fixtures:
6CH mode: 1: A001, 2: A007, 3: A015, 4: A022
10CH mode: 1: A001, 2: A011, 3: A023, 4: A035
Master and Slave machine built-in program control
When multiple fixtures are connected in the main and auxiliary mode, except for the first one, select “Slave” (slave mode) for the other fixtures behind, press the ENTER button to confirm, and “OK!” will be displayed. Indicates that it has entered the slave-receiving mode state. After selection, the parameters will be automatically saved. When the host signal is received, the interface will display a “Connection” prompt. If the DMX512 signal is disconnected, the interface will display a “Disconnect” prompt. If you press ENTER Or press the MENU button, the display will exit to the previous menu mode. The first light fixture is used as the host, and all performance modes can be selected, and the auxiliary unit will be controlled by the host to perform the same actions.
WIFI Operation mode
In the “User Settings” interface, press the ENTER button, use the UP/DOWN button to select “Wi-Fi Mode” (WIFI mode), press the ENTER button and the Wi-Fi icon will appear, indicating that the Wi-Fi module has been turned on, and you can use your mobile phone at this time Set up for connection control. Open the phone settings function, find the wireless and network WLAN items, and connect the device with the name LED_xxx, as shown in the figure
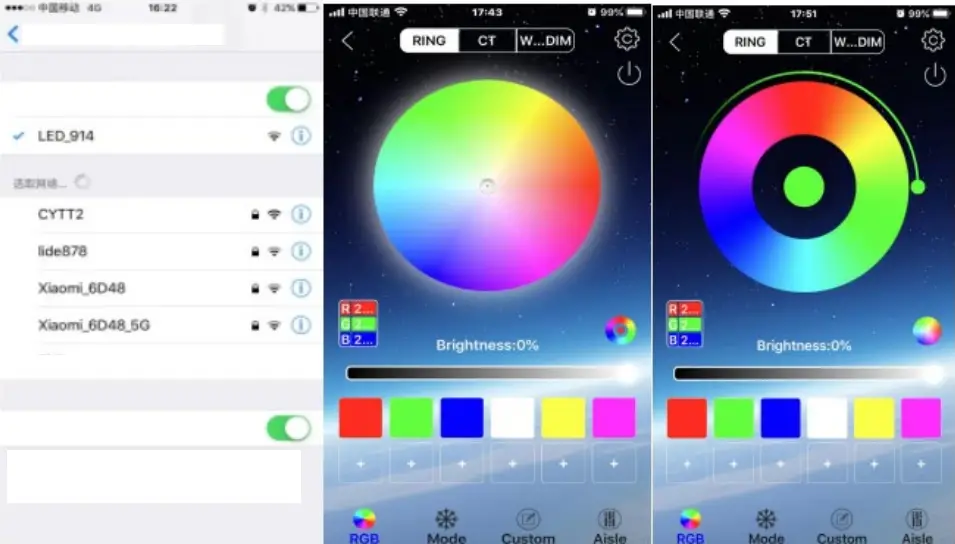 When the connection is successful, exit the mobile phone function settings and open the “Led LAMP” application software, then the corresponding mode operation can be carried out. App interface and mobile phone operating system may be different.
DMX CHANNEL SHEET
6CH mode
| CH | Value | Function |
| 1 | 0-255 | Red |
| 2 | 0-255 | Green |
| 3 | 0-255 | Blue |
| 4 | 0-255 | White |
| 5 | 0-255 | Amber |
| 6 | 0-255 | UV |
10CH mode
| CH | Value | Function |
| 1 | 0-255 | Master dimmer, CH9(0~9) |
| 2 | 0-9 | Strobe close |
| 10-255 | Strobe open, from slow to fast | |
| 3 | 0-255 | Red |
| 4 | 0-255 | Green |
| 5 | 0-255 | Blue |
| 6 | 0-255 | White |
| 7 | 0-255 | Amber |
| 8 | 0-255 | UV |
| 9 | 0-9 | Dimmer mode |
| 10-29 | Choose color: CH10 chooses a color | |
| 30-49 | Jump change: CH10 control speed | |
| 50-69 | Gradual change: CH10 control speed | |
| 70-89 | Pulse change: CH10 control speed | |
| 90-109 | Red On + Strobe: CH10 control speed | |
| 110-129 | Green On + Strobe: CH10 control speed | |
| 130-149 | Blue On + Strobe: CH10 control speed | |
| 150-169 | Amber On + Strobe: CH10 control speed | |
| 170-189 | Purple On + Strobe: CH10 control speed | |
| 190-209 | Sound Jump change | |
| 210-229 | Sound Jump change + Gradual change | |
| 230-255 | Sound Strobe | |
| 10 | 0-255 | CH10 function decided by CH9 When CH9 is on 10-29, CH10 will choose When CH9 is on 30-189, CH10 will control speed, from slow to fast |
FIXED EQUIPMENT
Please fasten the fixture clamp before hanging. The clamp can be fastened by the little hole in the middle of the bracket, then tie with a safety belt. The loading capacity of the safety belt should be 10 times the weight of the fixture itself.
CONNECTION OF DMX-512 AND CONNECTION WITH THE LIGHT EQUIPMENT
Please connect the XLR-XLR control wire with every light from the output of DMX.
XLR connection:
| DMX-OUTPUT | DMX-INPUT | ||
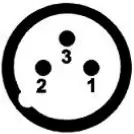 | Pin 1: Screen Pin 2: Signal – Pin 3: Signal + | 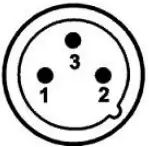 | Pin 1: Screen Pin 2: Signal – Pin 3: Signal + |
ATTENTION: Please do remember to connect one circle circuit plug to the output signal of the last piece of equipment. And this circle circuit plug was connected with a 120ohm resistance between terminals 2 and 3 of the CANON plug, connect this circle circuit plug can avoid the signal flash phenomena of signal DMX512 during the transmission.

Maintenance
| Problems | Checklist | Trouble Shooting |
| The fixture does not work | 1. If your power as the same as the input of the machine. 2. If the fuse was broken. | 1. Make sure the voltage is. 2. Replace the same fuse. |
| LED dimmed | If your power is the same as the input of the machine | Make sure the voltage is input. |
| No DMX input | 1. If the polarity is opposite in the DMX controller. 2. If it is in DMX mode. 3. If there are 2 Master in a loop. | 1. Correct the DMX polarity. 2. Change to the DMX mode. 3. Set one piece into Slave mode. |
| Par Light Set works abnormality | 1. Check if the serial is correct on the Par Light display | 1. Set the right serial No on the single Par Light |
AFTER SERVICE
- Our company offers technical consultation to customers forever.
- If the machine is wrong and needs repairmen, please truthfully fill in the related content and feedback us the problems timely, as well as we must improve the product.
Note: Based on our company’s continuing to improve the product, the statement containing data may have changed, and will not notice the change. The company retains its right to change specifications related to when the product is improved. Thanks for your understanding.
![]()


