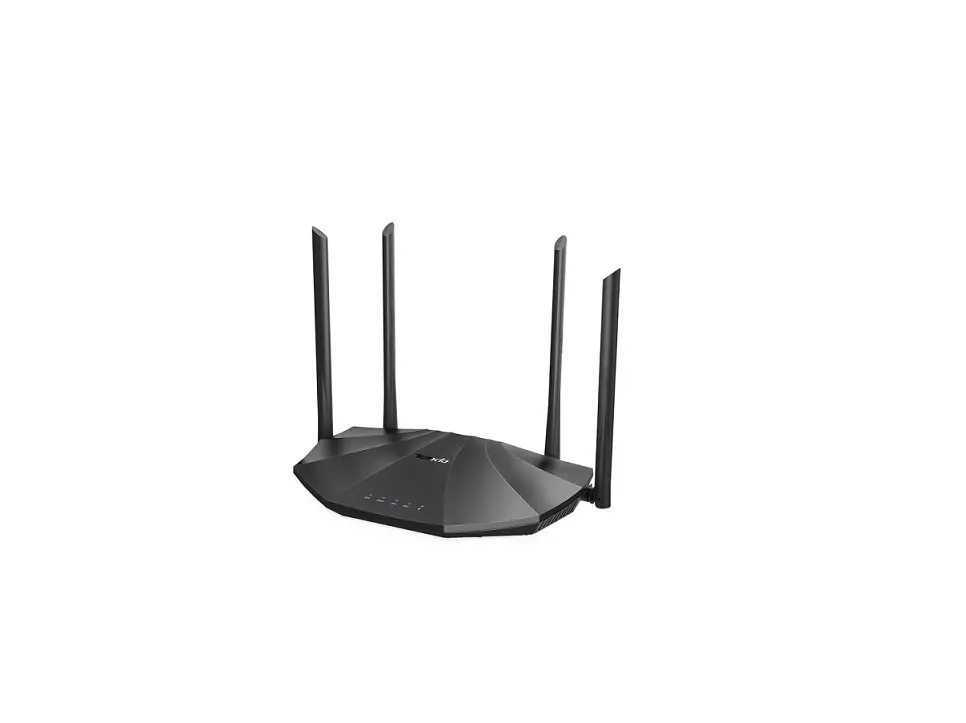
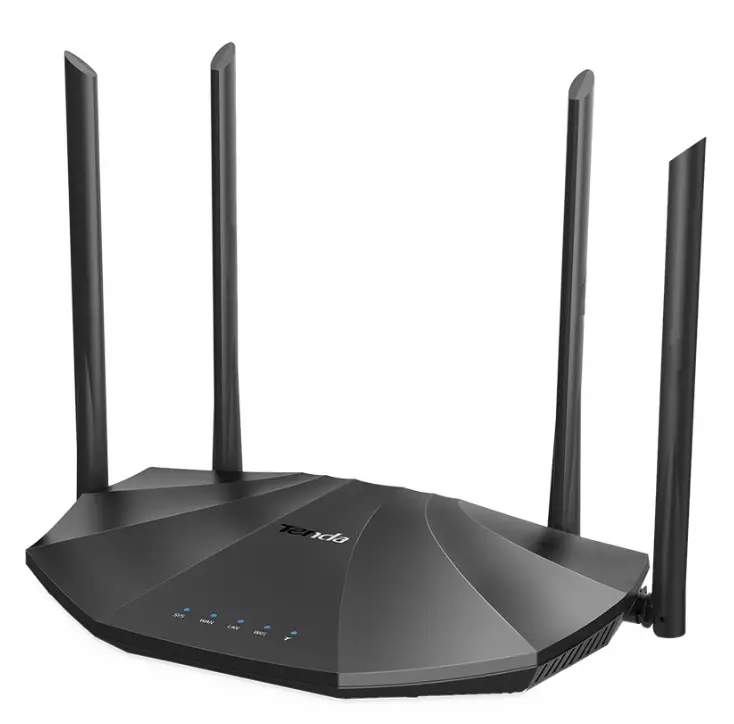
Tenda AC19 Dual Band Gigabit WiFi Router Installation Guide

Package contents
- Wireless router * 1
- Power adapter * 1
- Ethernet cable * 1
- Quick installation guide * 1
I. Connect your router
If you want to copy the PPPoE user name and password from your original router, start from
Step 1. Otherwise, start from Step 2
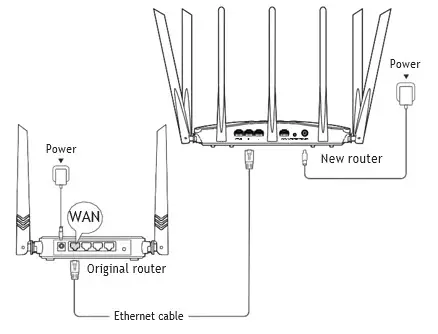
Step 1: Import your PPPoE user name and password from your original router
- Power on your original and new routers.
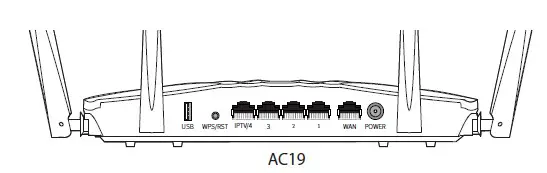
- Connect the WAN port of the original router to a LAN port (port 1, 2,
- and IPTV/4 for AC19; port 1, 2, IPTV/3 for AC23) of the new router using an Ethernet cable.
- When the WAN and LAN LED indicators of the new router turn solid on for 3 seconds after blinking fast, the PPPoE user name and password are imported to your new router successfully.
- Remove the original router.

Step 2: Connect your new router to the internet
- Power on the new router.
- Connect the WAN port of the new router to the LAN port of your modem or the Ethernet jack using an Ethernet cable. The
WAN LED indicator lights on.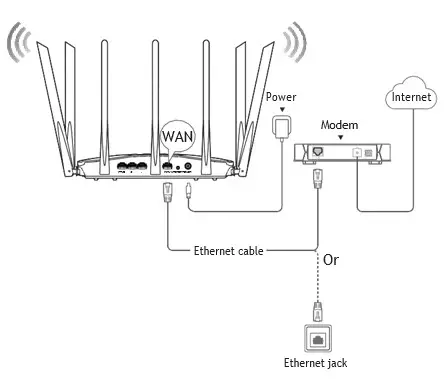
II. Connect your devices to the new router
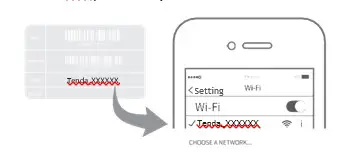
Method 1: Connect your WiFi-enabled device (such as a smart phone) to the new router’s WiFi network using the SSID labeled on the bottom of the router. There is no
WiFi password by default.
Method 2: Connect your wired device (such as a computer) to a LAN port (port 1, 2, 3, and IPTV/4 for AC19; port 1, 2,
PTV/3 for AC23) of the router using an Ethernet cable.
The LAN LED Iindicator lights up.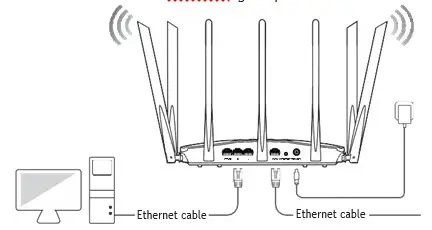
III. Set up the new router for internet access
- Start a web browser on a device that has connectedto the router, and visit tendawif i.com.

Tip If you cannot log in to the web UI of the router, refer to Q1 in FAQ. - Click Start.

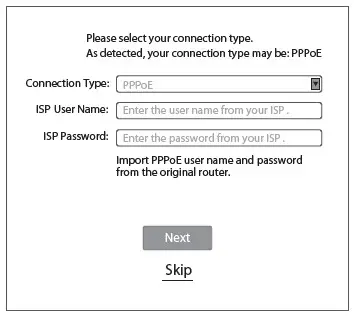
- The router detects your internet connection type automatically. Set required parameters and click Next.

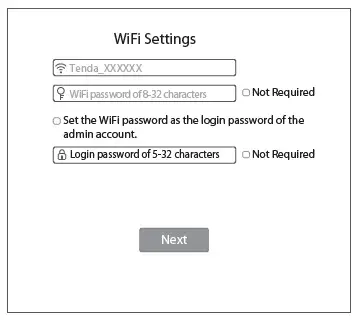
Note PPPoE is used for illustration here. If you migrated your PPPoE user name and password from your original router, this router auto-lls the ISP User Name and ISP Password. - Customize your WiFi name (SSID), WiFi password and the login password as needed, and click Next.

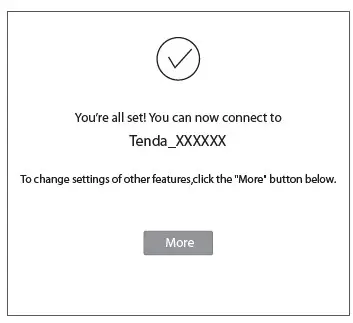
Note The WiFi password is used to connect to the WiFi network, and the login password is used to log in to the web UI of the router. - Done.

IV. Access the internet
WiFi-enabled devices: Connect your WiFi-enabled devices to the WiFi network of the router using the
WiFi name and WiFi password you set.


LED indicators
| LED indicator | Status | Description |
|
SYS |
Solid on | The router is starting. If the indicator still light solid on after the router completes startup, it indicates that the router is connecting to the internet successfully. |
| Blinking | The router works properly, but fails to connect to the internet. | |
| Off | The system is faulty. | |
|
WAN | Solid on | The WAN port is connected properly, but no date is being transmitted |
| Blinking | Data is being transmitted over the WAN port. | |
| Off | The WAN port is disconnected or improperly connected. | |
|
LAN | Solid on | At least one LAN port is connected properly. |
| Fast blinking for twice | A new wired device is connected to the router. | |
| Off | No device is connected to any LAN port of the router properly. | |
|
WiFi | Solid on | At least the 2.4 GHz or 5 GHz WiFi network is enabled. |
| Fast blinking | Data is being transmitted wirelessly. | |
| Slow blinking | The router is performing WPS negotiation. | |
| Off | Both 2.4 GHz and 5 GHz WiFi networks are disabled. | |
| T | This LED is reserved. | |
 Mark Warning
This is a Class B product. In a domestic environment, this product may cause radio interference, in which case the user may be required to take adequate measures.
Operations in the 5.15-5.25GHz band are restricted to indoor use only.
This equipment should be installed and operated with minimum distance 20cm between the device and your body.
The mains plug is used as disconnect device, the disconnect device shall remain readily operable.
NOTE: (1) The manufacturer is not responsible for any radio or TV interference caused by unauthorized modifications to this equipment. (2) To avoid unnecessary radiation interference, it is recommended to use a shielded RJ45 cable.
Declaration of Conformity
Hereby, SHENZHEN TENDA TECHNOLOGY CO., LTD. declares that the radio equipment type AC23 is in compliance with Directive 2014/53/EU.
The full text of the EU declaration of conformity is available at the following internet address: http://www.tendacn.com/en/service/download-cata-101.html Hereby, SHENZHEN TENDA TECHNOLOGY CO., LTD. declares that the radio equipment type AC19 is in compliance with Directive 2014/53/EU.
The full text of the EU declaration of conformity is available at the following internet address: http://www.tendacn.com/en/service/download-cata-101.html
Operating Frequency:
2.4 GHz: EU/2400-2483.5MHz (CH1-CH13)
5 GHz: EU/5150-5250MHz (CH36-CH48)
EIRP Power (Max.):
2.4 GHz: 19.86 dBm 5 GHz: 22.96 dBm
Software Version: V16.03.07.XX
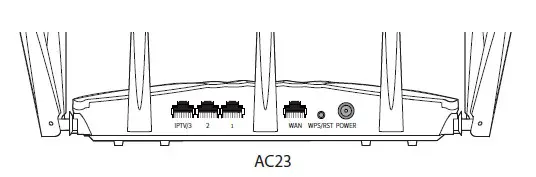
| Jack/Port/Button | Description |
| POWER | Power jack. Used to connect to the included power adapter. |
|
WPS/RST | Used to start the WPS negotiation process, or to reset the router. WPS: Press the button of the router for 1 to 3 seconds. Within 2 minutes, enable the WPS function of the other WPS-supported device to establish a WPS connection. Reset: When the SYS LED indicator blinks, hold the button down for about 8 seconds, release it when all the LED indicators blink once. |
| WAN | Used to connect this router to the internet. |
| 1/2 | They are LAN ports used to connect to the wired devices such as computers or switches. |
| IPTV/3 | By default, it is a LAN port. If the IPTV function of the router is enabled, it serves only as an IPTV port used to connect to a set-top box. |
 FCC Statement
 FCC Statement
This equipment has been tested and found to comply with the limits for a Class B digital device, pursuant to Part 15 of the FCC Rules. These limits are designed to provide reasonable protection against harmful interference in a residential installation. This equipment generates, uses and can radiate radio frequency energy and, if not installed and used in accordance with the instructions, may cause harmful interference to radio communications. However, there is no guarantee that interference will not occur in a particular installation. If this equipment does cause harmful interference to radio or television reception, which can be determined by turning the equipment off and on, the user is encouraged to try to correct the interference by one or more of the following measures:
- Reorient or relocate the receiving
- Increase the separation between the equipment and
- Connect the equipment into an outlet on a circuit different from that to which the receiver is
- Consult the dealer or an experienced radio/TV technician for The device is for indoor usage only.
Operation is subject to the following two conditions: (1) this device may not cause harmful interference, and (2) this device must accept any interference received, including interference that may cause undesired operation.
Radiation Exposure Statement
This device complies with FCC radiation exposure limits set forth for an uncontrolled environment and it also complies with Part 15 of the FCC RF Rules. This equipment should be installed and operated with minimum distance 20cm between the device and your body.
Caution:
Any changes or modifications not expressly approved by the party responsible for compliance could void the user’s authority to operate this equipment.
This transmitter must not be co-located or operating in conjunction with any other antenna or transmitter.
Operating frequency: 2412-2462MHz, 5150-5250MHz, 5725-5850MHz
NOTE: (1) The manufacturer is not responsible for any radio or TV interference caused by unauthorized modifications to this equipment. (2) To avoid unnecessary radiation interference, it is recommended to use a shielded RJ45 cable.
| Jack/Port/Button | Description |
| USB | Used to connect to a USB 2.0 device. |
|
WPS/RST | Used to start the WPS negotiation process, or to reset the router. WPS: Press the button of the router for 1 to 3 seconds. Within 2 minutes, enable the WPS function of the other WPS-supported device to establish a WPS connection. Reset: When the SYS LED indicator blinks, hold the button down for about 8 seconds, and release it when all the LED indicators blink once. |
| IPTV/4 | By default, it is a LAN port. If the IPTV function of the router is enabled, it serves only as an IPTV port used to connect to a set-top box. |
| 1/2/3 | They are LAN ports used to connect to the wired devices such as computers or switches. |
| WAN | Used to connect this router to the internet. |
| POWER | Power jack. Used to connect to the included power adapter. |
![]() Caution: (AC23
Caution: (AC23
Adapter Model: BN037-A18012E/BN037-A18012B
Manufacture: SHENZHEN HEWEISHUN NETWORK TECHNOLOGY CO., LTD. Input: 100 – 240V AC, 50/60Hz, 0.6A
Output: 12V 1.5A
DC Voltage
![]() Caution: (AC19)
Caution: (AC19)
Adapter Model: BN034-A24012E/BN034-A24012B Manufacture: SHENZHEN HEWEISHUN NETWORK TECHNOLOGY CO., LTD. Input: 100 – 240V AC, 50/60Hz, 0.7A
Output: 12V 2A
DC Voltage
 RECYCLING
This product bears the selective sorting symbol for Waste electrical and electronic equipment (WEEE). This means that this product must be handled pursuant to European
directive 2012/19/EU in order to be recycled or dismantled to minimize its impact on the environment.
User has the choice to give his product to a competent recycling organization or to the retailer when he buys a new electrical or electronic equipment.


