![]()
Applicable model:
Breeze 10 pro + / Breeze 10 Pro / Breeze 10
User Manual
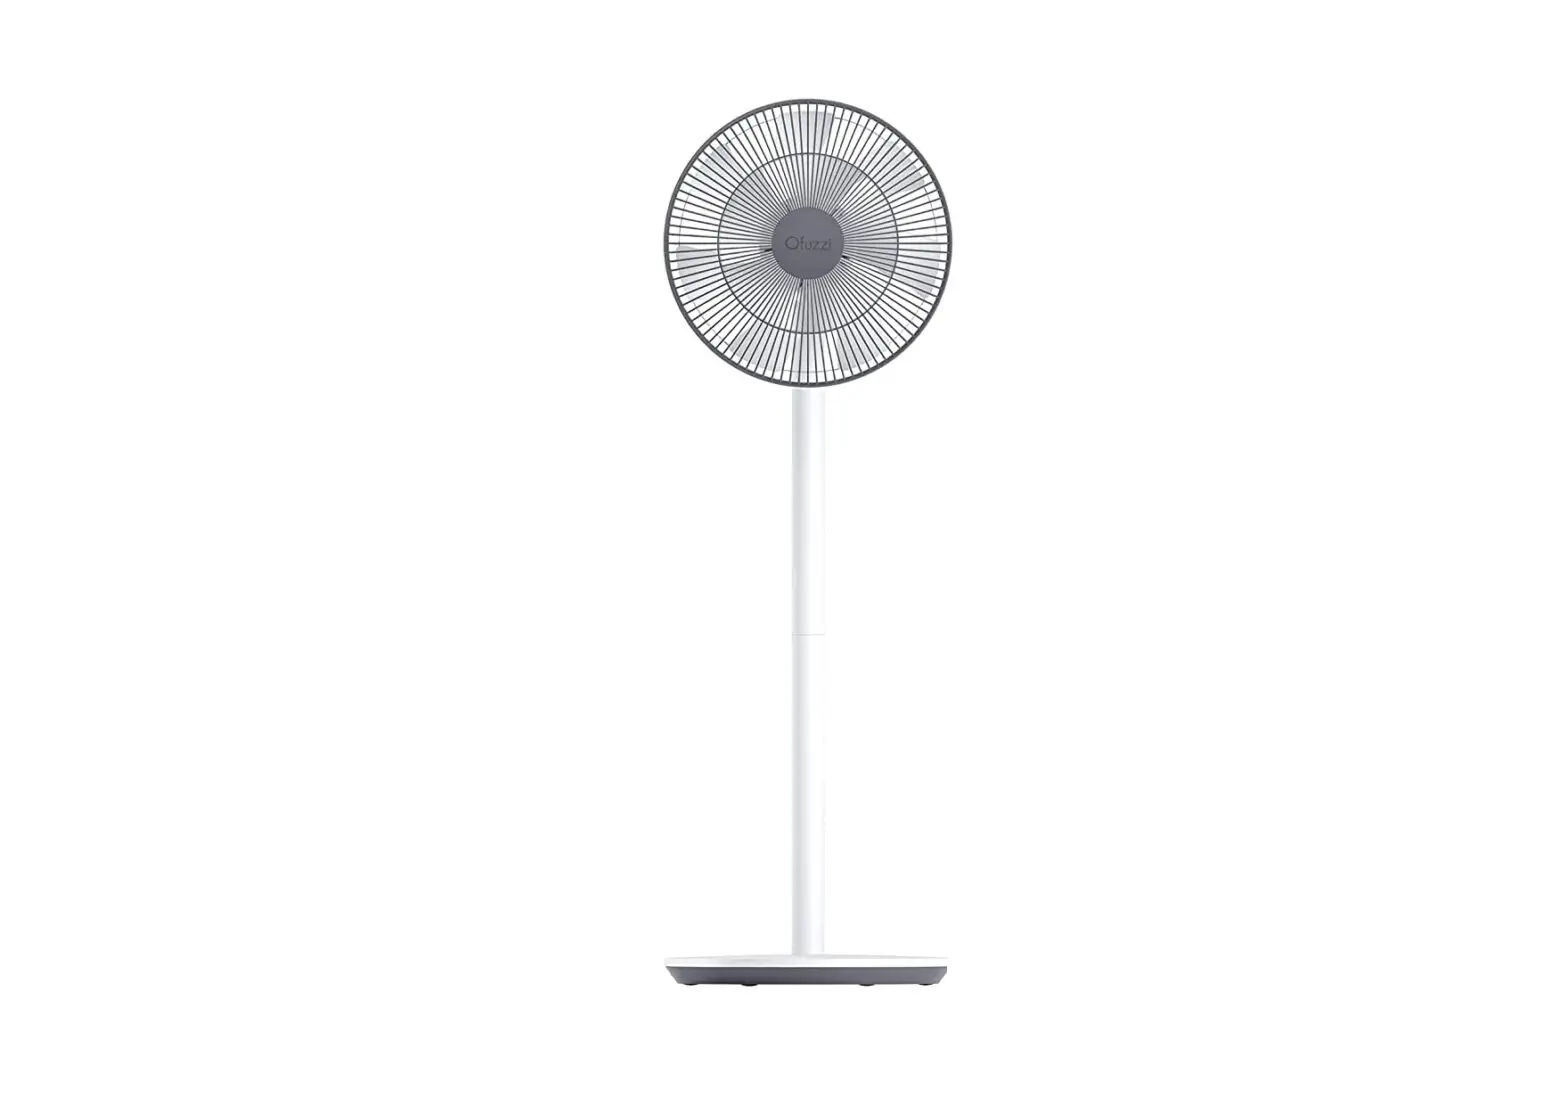
Pedestal Fans
Please read this instruction manual carefully before use and keep it for future reference.
Warnings
Improper use may lead to electric shocks, fire, personal injury, or other damage.
- This appliance can be used by children aged from 8 years and above and persons with reduced physical sensory or mental capabilities or lack of experience and knowledge if they have been given supervision or instruction concerning use of the appliance in a safe way and understand the hazards involved. Children shall not play with the appliance. Cleaning and user maintenance shall not be made by children without supervision. (For European countries or regions)
- This appliance is not intended for use by persons (including children) with reduced physical, sensory or mental capabilities, or lack of experience and knowledge, unless they have been given supervision or instruction concerning use of the appliance by a person responsible for their safety.
Children should be supervised to ensure that they do not play with the appliance. (For no European countries or regions) - Children should be supervised to ensure that they do not play with the appliance.
- Battery is not replaceable.
- The appliance is only to be used with the power supply unit provided with the appliance.
Safety instructions
Please read this manual carefully before using the product and keep it properly.
- Do not use this fan in a place where it will easily fall over or where there are other unstable objects nearby.
- Do not use this fan in hot and humid environments such as a bathroom.
- Do not use this fan if the power cord is damaged or its power plug is loose.
- Do not use this fan if its front grille is not installed, or its rear grille is loose or fell off.
- Do not allow children or adults who are incapable of operating this fan to use this product.
- Do not attempt to disassemble or repair this fan by yourself.
- Do not excessively pinch, bend, or twist the power cord as this may expose or break its core.
- Do not insert your fingers or any object into the front grille, rear grille, or the fan blades when the fan is in use.
- Keep hair and fabrics away from the fan to avoid getting them caught in the fan.
- Do not use any improper power outlet.
- Do not use the charging base provided with this fan for any other device.
- When maintaining and cleaning, disassemble the fan base before removing other parts. Make sure you install the fan base last when assembling the fan.
- Under normal use of condition, this equipment should be kept a separation distance of at least 20cm between the antenna and the body of the user.
- Ensure that the fan is switched off from the supply mains before removing the guard.
- If the supply cord is damaged, it must be replaced by the manufacturer, its service agent or similarly qualified persons in order to avoid a hazard.
- Do not strike, crush, and drop the product, or expose it to pressure.
- Keep the product away from water and heat sources.
- Do not use this product in environments where the temperatures and humidity are extremely high. Avoid direct sunlight.
- Do not remove, disassemble, or destroy the battery.
- Do not charge this product for an extended period of time when it is not in use.
- This appliance contains batteries that are non-replaceable.
Precautions
Installation
![]() To avoid electric shocks, fire, personal injury, or other damage, please strictly follow the installation steps instructed by the user manual, and make sure the fan base is assembled in the last step.
To avoid electric shocks, fire, personal injury, or other damage, please strictly follow the installation steps instructed by the user manual, and make sure the fan base is assembled in the last step.
![]() Do not connect the fan to a power outlet or the charging base if it is not completely assembled.
Do not connect the fan to a power outlet or the charging base if it is not completely assembled.
![]() Turn off or unplug the fan before installing or disassembling it. To not connect the charging base nor touch the buttons to prevent the fan from running and causing danger.
Turn off or unplug the fan before installing or disassembling it. To not connect the charging base nor touch the buttons to prevent the fan from running and causing danger.
Transportation
![]() Firmly hold the fan stand to avoid it from falling down and causing personal injury.
Firmly hold the fan stand to avoid it from falling down and causing personal injury.
Using the Fan
![]() Immediately stop using the fan if it makes unusual sounds, gives off bad odors, overheats, or rotates irregularly.
Immediately stop using the fan if it makes unusual sounds, gives off bad odors, overheats, or rotates irregularly.
![]() Do not lean on or tilt the fan while it is running.
Do not lean on or tilt the fan while it is running.
![]() Do not shake the fan’s head repeatedly so as to avoid damage to the internal mechanism.
Do not shake the fan’s head repeatedly so as to avoid damage to the internal mechanism.
Charging Base
![]() To avoid any damage to the battery, charge the battery immediately by connecting the charging base when it is depleted.
To avoid any damage to the battery, charge the battery immediately by connecting the charging base when it is depleted.
![]() Do not unplug the charging base by directly pulling at the cord or wiggling it out of the outlet. Instead, pull the plug out itself.
Do not unplug the charging base by directly pulling at the cord or wiggling it out of the outlet. Instead, pull the plug out itself.
![]() Do not attempt to repair the charging base by yourself if it is damaged.
Do not attempt to repair the charging base by yourself if it is damaged.
![]() If the charging base is damaged or broken, it is must be replaced by a qualified one purchased from the manufacturer or after-sales service department.
If the charging base is damaged or broken, it is must be replaced by a qualified one purchased from the manufacturer or after-sales service department.
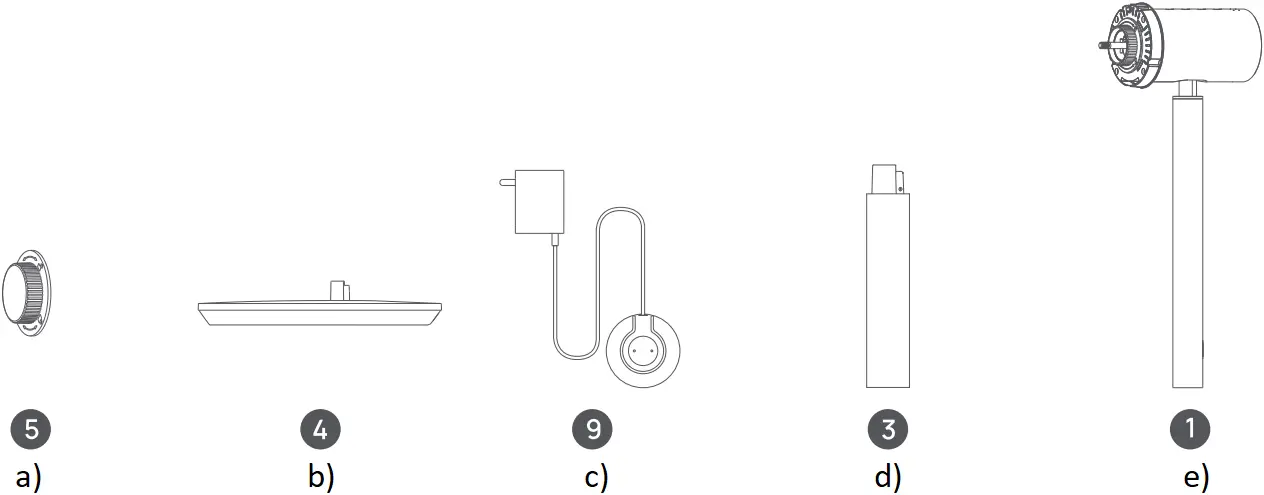
Packing List (Breeze 10 pro +)

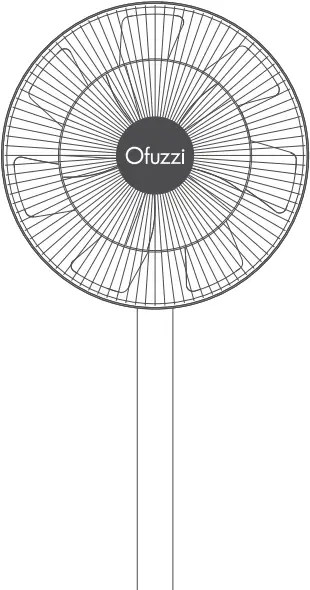
Motor + Upper Support Fan Assembly (Front Air Hood, Fan Blades, Rear Air Hood)
![]()
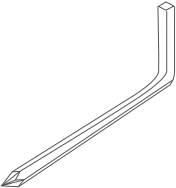
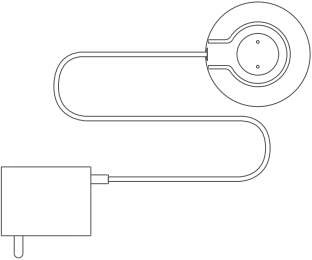
Fan Knob Charging Base Lower Support Special Wrench
![]()
![]()

Rear Hood Knob FanBase Fan Hood Screw x1 Users Manual
Note: The illustrations of products, accessories, and user interfaces in the manual are all schematic diagrams for reference only. The actual product may be slightly different from the illustrations due to product updates and upgrades. Please refer to the actual product.
Packing List(Breeze 10 pro / Breeze 10)
Motor + Upper Support Fan Assembly (Front Air Hood, Fan Blades, Rear Air Hood)

![]()
Fan Knob Charging Base Lower Support Special Wrench
![]()
![]()
Rear Hood Knob FanBase Fan Hood Screw x1 Users Manual
Note: The illustrations of products, accessories, and user interfaces in the manual are all schematic diagrams for reference only. The actual product may be slightly different from the illustrations due to product updates and upgrades. Please refer to the actual product.
Product Introduction
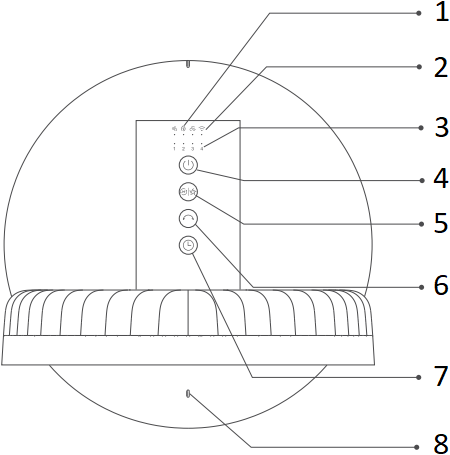
Top View of the Fan


Straight Air Natural Air Smart Air
- Mode Indicator
- Wi-Fi Indicator
- Air flow Control/ Timing Indicator
- Power Key
- Air flow Control/ Mode Switching
- Head-shaking
- Timer Off
- Battery Indicator
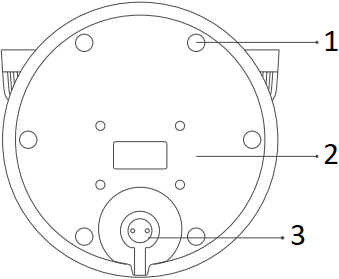
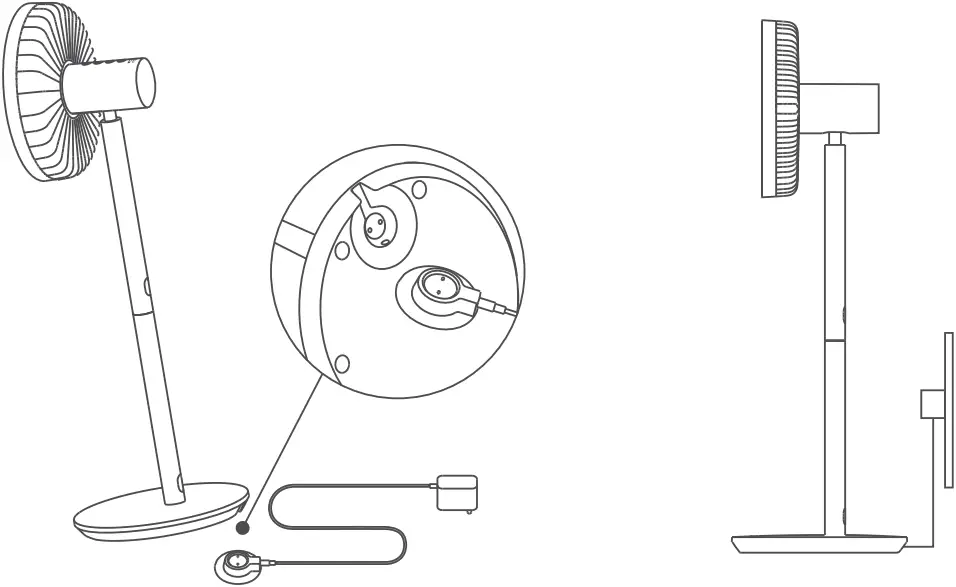
Bottom of Fan Base
- Base Gasket
- Rear Cover of Fan Base
- Charging Base Interface
Charging Base
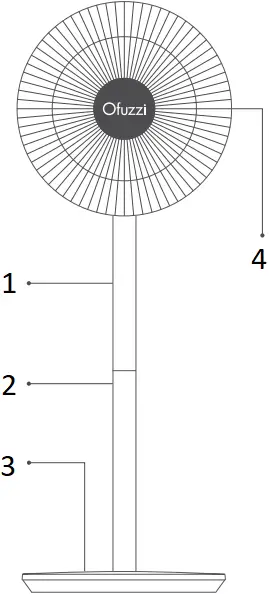
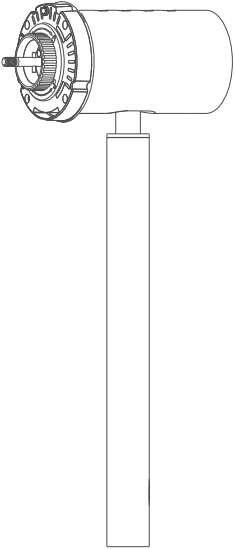
- Motor + Upper Support
- Lower Support
- Fan Base
- Fan Assembly
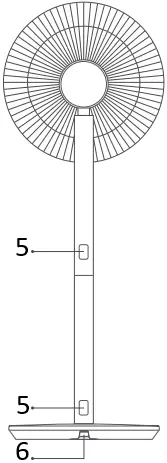
- Disassembly Button
- Charging Base Interface
Installation
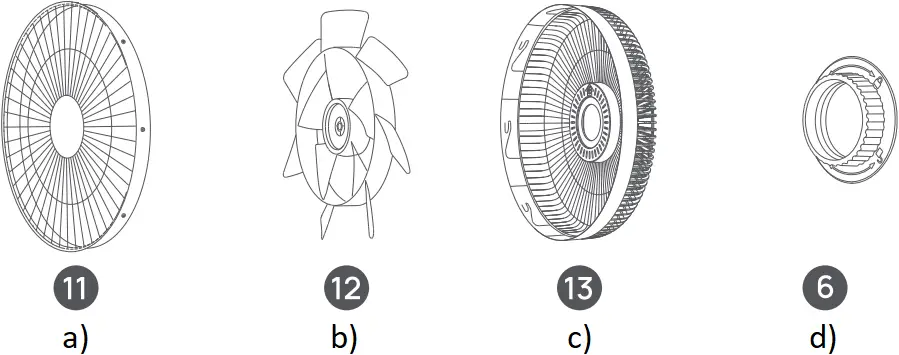
Step 1: Open the fan assembly
Remove the fan assembly (2), as shown in the figure (1), turn the front air hood counterclockwise until the locking ring of the front and rear air hoods gets loose, and remove the front and rear air hoods along the direction as indicated in Figure (2), and then take out the fan blades.

a) Fan Assembly
b) Front Air Hood
c) Fan Blade
d) Rear Air Hood
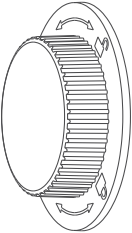
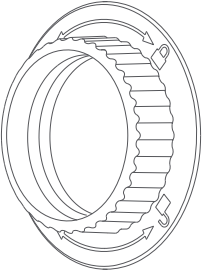
Step 2: Install the rear air hood
Install the rear air hood (13) onto the motor, with its mark “![]() ” being upward, and then install the knob of the rear air hood onto the (6) motor and screw it down clockwise no that the rear air hood is fixed on the motor.
” being upward, and then install the knob of the rear air hood onto the (6) motor and screw it down clockwise no that the rear air hood is fixed on the motor.

Step 3: Install the fan blades
Align the center hole of the fan blade (12) with the motor shaft and install it in place, then install the fan blade knob (5) onto the motor shaft and tighten it counterclockwise no that the fan blades are fixed.
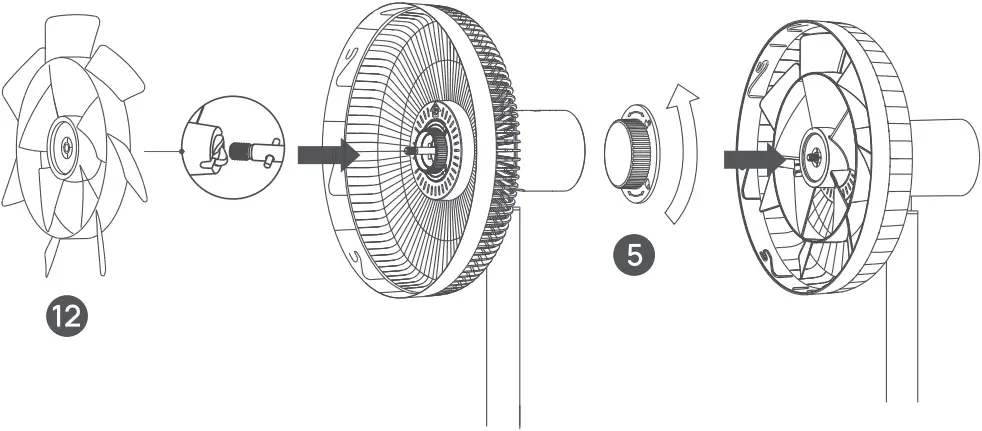
Step 4: Install the front air hood
Align the alignment mark of the front air hood (11) with the left alignment mark of the rear air hood (13), and then insert them into the clamping slot of the rear air hood. Turn the front air hood clockwise to align the and alignment mark of the front wind hood with that of the rear air hood right fix them.
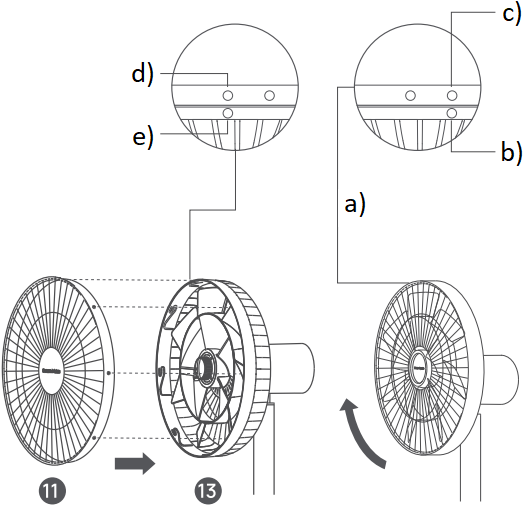
a) After snap-fit of front and rear air hoods
b) Alignment mark of front air hood
c) Right alignment mark of rear air hood
d) Left alignment mark of rear air hood
e) Alignment mark of front air hood Before snap-fit of front and rear air hoods
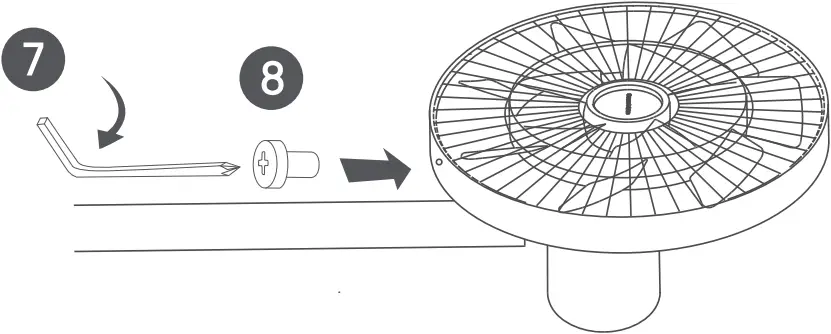
Step 5: Fix the front air hood
Insert the fan hood screw into the hole at the bottom of the fan hood, and screw it down clockwise using a special wrench
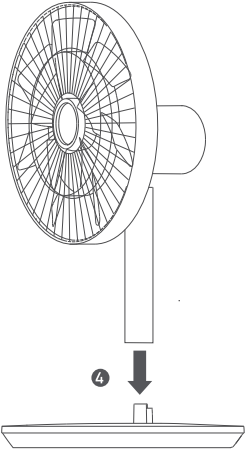
Step 6: Install the base
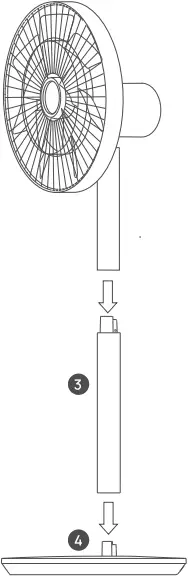
Floor Fan Mode: Install the lower end of the upper support to the upper end of the lower support (3) along the direction indicated in the figure. and then install the lower end of the lower support to the port of the fan base (4). When there is a “click” sound at the lock buckle, it indicates the installation is successful.
Desk Fan Mode: Install the lower end of the upper support to the port of the fan base (4). When there is a “click” sound at the lock buckle, it indicates the installation is successful.
Note. Press the disassembly button to remove the support.
Charging
- It is recommended to fully charge the battery before using the product.
- Connect the charging base to the charging port at the bottom of the fan base, and then turn on the power.
- If the battery indicator flashes, it indicates the power is connected successfully.
- This product can be used with or without a power supply.

- With power connected
| Fan state | Battery Charges | Battery Indicator State |
| On/Off | ≤30% | Orange indicator flashing |
| 30%-100% | White indicator flashing | |
| 100% | Indicator going out |
- Without power connected
| Fan state | Battery Charges | Battery Indicator State |
| On | 100%-30% | White indicator normally on |
30%-1% | Orange indicator normally on | |
0% | Indicator off (automatic shutdown) | |
| Off | 0%-100% | Indicator off |
Note: To maintain battery performance, please connect the product to the charging base during daily use.
How to Use
Turning On/Off
Turning On
Press the ![]() key, and the fan starts to work. When turned on for the first time, it will operate in the straight air mode with Gear 1 air volume as default.
key, and the fan starts to work. When turned on for the first time, it will operate in the straight air mode with Gear 1 air volume as default.
Turning Off
When the fan is in the operation state, press the key to stop it.
Air Volume/Mode Switch
Air Volume Switch
Short Press the ![]() key to switch the air volume gear, and the appropriate air volume indicator will be normally on (see the table below). When the fan is turned on next time, it will start with the air volume gear which is used when it was turned off last time by default.
key to switch the air volume gear, and the appropriate air volume indicator will be normally on (see the table below). When the fan is turned on next time, it will start with the air volume gear which is used when it was turned off last time by default.
Gear | Gear 1 | Gear 2 | Gear 3 | Gear 4 |
| Indicator State |
Note: ![]() On
On ![]() Off
Off
Mode Switch
Long press the ![]() key to switch over direct air, natural air, and smart air modes, and the corresponding mode indicator will light up. When the fan is turned on next time, it will start with the mode which is used when it was turned off last time by default.
key to switch over direct air, natural air, and smart air modes, and the corresponding mode indicator will light up. When the fan is turned on next time, it will start with the mode which is used when it was turned off last time by default.
Direct Air Mode Indicator | Natural Air mode Indicator | Smart Air Mode Indicator |
Enable/Disable Oscillation
Press the ![]() key to enable/disable the head-shaking function. The user may net the head-shaking angle range with the APP. When the fan is turned on next time, it will start with the head-shaking angle which is used when it was turned off last time by default.
key to enable/disable the head-shaking function. The user may net the head-shaking angle range with the APP. When the fan is turned on next time, it will start with the head-shaking angle which is used when it was turned off last time by default.
Note: After Wi-Fi is reset, the fan’s head shaking angle will return to the default angle, i.e. 90°.
Scheduled Turn-off
Press the ![]() key to switch the timing gears cyclically over 1h, 2h, 3h and 4h. When the timing is turned off, the corresponding timing indicator will light up (see the table below). After the timing operation is completed, it returns to the air volume indicator mode.
key to switch the timing gears cyclically over 1h, 2h, 3h and 4h. When the timing is turned off, the corresponding timing indicator will light up (see the table below). After the timing operation is completed, it returns to the air volume indicator mode.
Timing | Timing Off | 1 hour | 2 hours | 3 hours | 4 hours |
Indicator State |
Note: ![]() On
On ![]() Off
Off
Note: You can use the APP to achieve settings of multiple timing gears, and it supports up to 8h timed shutdown.
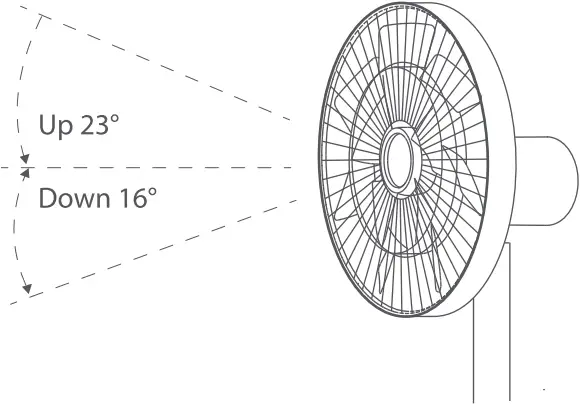
Adjust the Airflow Direction
Gently lift or press the fan head or fan hood to adjust the air blow upward or downward.
Connect the Dream Maker APP
Download the Dream Maker APP on your mobile phone. Search for “Dream Maker+” in the App Store Or scan the QR code to download and install the Dream Maker APP.
Note: The APP is constantly upgraded and updated, please follow the instructions in the latest APP.
Connecting to Wi-Fi
Long press ![]() and
and ![]() keys at the same time, when there is a long beep sound, it means Wi-Fi is reset successfully. Enter the connection waiting state, and bind the App with the fan.
keys at the same time, when there is a long beep sound, it means Wi-Fi is reset successfully. Enter the connection waiting state, and bind the App with the fan.
Description of Wi-Fi indicator:
Wi-Fi State | Waiting for connection | Connecting | Connected | Connection failed |
| Indicator State | Orange indicator flashing | Blue indicator flashing | Blue indicator normally on | Orange indicator normally on |
Resetting Wi-Fi Connection
Long press ![]() and
and ![]() keys at the same time, when there is a long beep sound, it means Wi-Fi is reset successfully. Enter the connection waiting state, and bind the App with the fan. Wi-Fi needs to be reset in the following circumstances:
keys at the same time, when there is a long beep sound, it means Wi-Fi is reset successfully. Enter the connection waiting state, and bind the App with the fan. Wi-Fi needs to be reset in the following circumstances:
- The APP account bound to the fan is changed
- The router to which the fan is connected is changed
- The account and password of the router are changed
- The APP fails to control the fan
Enabling/Disabling Wi-Fi Connection
Simultaneously press the buttons ![]() and
and ![]() when the fan is working, the Wi-Fi connection is disabled and the fan is turned off.
when the fan is working, the Wi-Fi connection is disabled and the fan is turned off.
When the fan is turned on, the Wi-Fi connection is enabled automatically.
Child Lock Function
To disable the function of child lock, go to the page of MI Smart Standing Fan 2 in the Mi Home/Xiaomi Home app, or simultaneously press and hold the buttons ![]() and
and ![]() until you hear a long beep.
until you hear a long beep.
Note: Resetting the Wi-Fi connection or unplugging and plugging in the fan again can also disable this function.
Troubleshooting
Fault | Possible Cause | Solution |
| The fan fails to operate | The product is not powered on. | Connect the power supply that meets the product requirements |
| The power cord is not correctly connected to the power interface | Connect the power cord correctly | |
| The fan support and base are not installed correctly | Install the fan correctly | |
| The child lock is enabled | Disable the child lock | |
| The built-in battery is exhausted | Power it using the charging base | |
| Failure in Wi-Fi connection | The router is at 5GHz band | Connect the router at 2.4 GHz band |
| The fan has been offline for more than half an hour | Reset Wi-Fi | |
| The fan blade is jammed | The fan blade is stuck by a foreign object | Turn off the fan power and remove the foreign object |
| The battery indicator fails to light up | The battery management system is in sleep protection. | Activate by connecting the charging base |
Care & Maintenance
Washable Parts
The following parts can be cleaned by using water or diluted neutral detergent and a soft cloth or sponge.
a) Front Air Hood
b) Fan Blade
c) Rear Air Hood
d) Rear Air Hood Knob
![]() Note: Before cleaning, be sure to stop the fan, and first remove the fan base; after cleaning, completely dry the parts before installing them, and avoid direct sunlight; install the fan base at last during installation.
Note: Before cleaning, be sure to stop the fan, and first remove the fan base; after cleaning, completely dry the parts before installing them, and avoid direct sunlight; install the fan base at last during installation.
Not Washable Parts
Please wipe the following parts gently with a soft dry cloth.
a) Fan Blade Knob
b) Fan Base
c) Charging Base
d) Lower Support
e) Motor + Upper Support
![]() Note: be not rinse the above parts with water.
Note: be not rinse the above parts with water.
Do not clean them using thinner, light gasoline, acid or alkaline cleaners.
Power Adapter
| Information Published | Value and Precision | Unit |
| Manufacturer’s name | Zhongshan Baolijin Electronic CO., Ltd. | – |
| Model Identifier | BLJ24W120200P-V | – |
| Input Voltage | 100-240 | V~ |
| Input AC Frequency | 50/60 | Hz |
| Output Voltage | 12.0 | V⎓ |
| Output Current | 2.0 | A |
| Output Power | 24.0 | W |
| Average Active Efficiency | 89.09 | % |
| Efficiency at Low Load(10%) | 83.11 | % |
| No-load Power Consumption | 0.070 | W |
![]() WARNING: For the purposes of recharging the battery, only use the detachable supply unit provided with this appliance.
WARNING: For the purposes of recharging the battery, only use the detachable supply unit provided with this appliance.
 All products bearing this symbol are waste electrical and electronic equipment (WEEE as in directive 2012/19/EU) which should not be mixed with unsorted household waste.
Instead, you should protect human health and the environment by handing over your waste equipment to a designated collection point for the recycling of waste electrical and electronic equipment appointed by the government or local authorities. Correct disposal and recycling will help prevent potential negative consequences to the environment and human health Please contact the installer or local authorities for more information about the location as well as terms and conditions of such collection points.
WARRANTY CARD
![]() Your Warranty Includes
Your Warranty Includes
- 12-Month Coverage
Within 12 months of purchase, we will provide timely and effective online after-sales service. We will repair or replace any defective product (due to manufacturing fault) within the warranty period.
![]() How to Return Your Ofuzzi Product
How to Return Your Ofuzzi Product
- Contact [email protected] with your order number.
- We will issue you a return label for your return.
- Tear off the ‘Return Details’ page and fill in the details. Include this inside your return package.
- We will issue your replacement/refund on receiving the return package.
![]() Return Details
Return Details
In order to process your return as quickly as possible, we require the following information. Please fill out this form and include it in your return package.
| Purchase Name: | |
| Order Number: | |
| Date of Purchase: | |
| Your Email Address: | |
| Place of Purchase: |
![]() If your purchase was fulfilled by Amazon, please use Amazon’s 30-day return service.
If your purchase was fulfilled by Amazon, please use Amazon’s 30-day return service.
FCC Statement:
This device complies with part 15 of the FCC Rules. Operation is subject to the following two conditions: Of This device may not cause harmful interference, and (2) this device must accept any interference received, including interference that may cause undesired operation.
This equipment has been tested and found to comply with the limits for a Class 13 digital device, pursuant to part 15 of the FCC Rules. These limits are designed to provide reasonable protection against harmful interference in a residential installation. This equipment generates, uses and can radiate radio frequency energy and, if not installed and used in accordance with the instructions, may cause harmful interference to radio communications. However, there is no guarantee that interference will not occur in a particular installation. If this equipment does cause harmful interference to radio or television reception, which can be determined by turning the equipment off and on, the user is encouraged to try to correct the interference by one or more of the following measures:
—Reorient or relocate the receiving antenna.
—Increase the separation between the equipment and receiver.
—Connect the equipment into an outlet on a circuit different from that to which the receiver is connected.
—Consult the dealer or an experienced radio/TV technician for help. Caution: Any changes or modifications not expressly approved by the party responsible for compliance could void the users authority to operate the equipment.
This equipment complies with FCC radiation exposure limits set forth for an uncontrolled environment. This transmitter must not be co-located or operating in conjunction with any other antenna or transmitter.
This equipment should be installed and operated with minimum distance 20cm between the radiator&your body.
![]() Shenzhen Lanbiaoyi Technology Co., Ltd.
Shenzhen Lanbiaoyi Technology Co., Ltd.
![]() RM.1438F, Anjier Bldg., NO.52 Bagua 4th ST.,
RM.1438F, Anjier Bldg., NO.52 Bagua 4th ST.,
Yuanling Ave., Futian Dist., Shenzhen Guangdong China 51800
Made in China