![]()
Installers &
User guide
Keypad.
Version 0.1 03/22 EK1
Welcome!
This guide will get you up and running with your Keypad.
In the meantime, you should follow us on Facebook and Youtube!
 |  |
| https://www.facebook.com/igloohomeco/ | https://www.facebook.com/igloohomeco/ |
As our igloohome app is frequently updated, there may be changes to this manual.
Please refer to our website igloohome. co/support for the latest version of the manual.
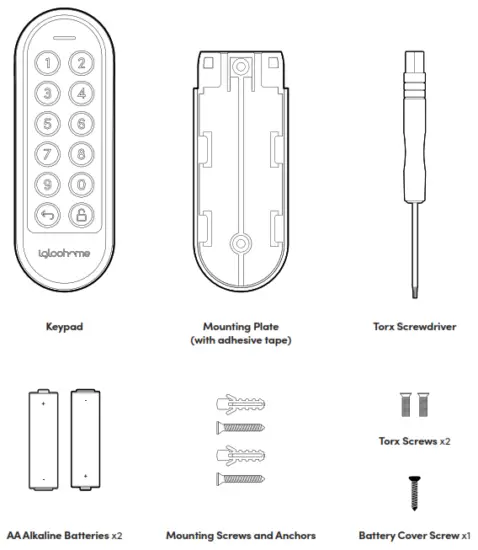
What’s Included

Specifications
| Model | Keypad |
| Battery Type | 2 x AA* Alkaline Batteries |
| Battery Life | Up to 12 months |
| Operation Temp | -20°C to 50°C |
| IP Rating | IP66 |
| Material | ABS, PC,Silicone |
| Weight | Net: 0.1kg, Gross: 0.2kg |

* DO NOT USE: Heavy Duty, Eveready, GP, or rechargeable batteries. Duracell, Energizer and Panasonic alkaline batteries are recommended. Please note that using better batteries will improve the performance and lifespan of the keypad.
User Guide
Keypad Anatomy
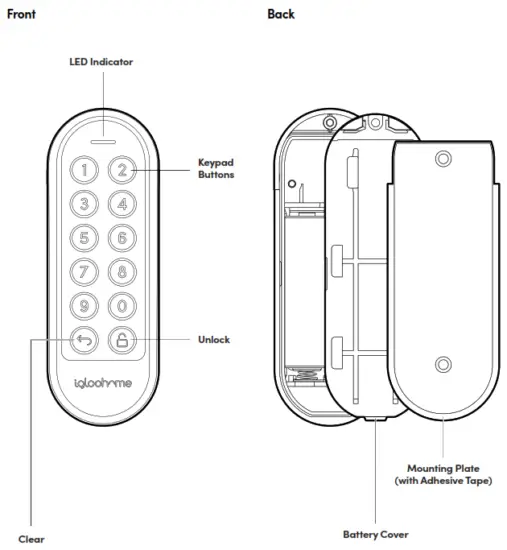
Features
Lock / Unlock![]() Master PIN Code
Master PIN Code
The Keypad unlocks with a permanent Master PIN Code. Manual Relock
User can press and hold the “unlock” icon on the keypad to trigger manual locking on all linked locks.![]() User PIN Code
User PIN Code
The igloohome mobile app can generate multiple types of User Pin codes, e.g. One-Time, Permanent, Recurring & Duration.
Battery Low Battery Alert
Intuitive audio and LED alert will prompt you to change the batteries when it runs low.
Features
Security / Alarms![]() Security Lockout
Security Lockout
The keypad is disabled after several incorrect access attempts to ensure your property is always secure. Users can configure a number of incorrect attempts to trigger lockout.![]() Decoy PIN Code
Decoy PIN Code
Heighten security and throw off onlookers by entering random digits before your actual PIN code.![]() Activity Logs
Activity Logs
PIN Code entries will be logged in the app. PIN Code activity logs are updated when the Keypad is synced with the app.![]() Others
Others
Compatible across multiple locks The Keypad is compatible with selected igloohome locks.
*Selected lock models are listed in specifications.![]() Volume Control
Volume Control
Volume is adjustable to your preference. Select from 0 (mute) to 5 (loudest).![]() Pairs up to 5 locks
Pairs up to 5 locks
Unlock multiple devices simultaneously with one PIN code.
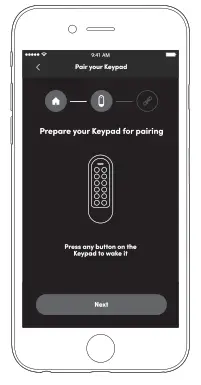
App Onboarding
- Register as a Lock User
a) Download the igloohome app from App store / Play store.
b) Create an account and log in. - Pairing
The Keypad is designed to work with igloohome locks.
Please ensure you have paired your locks to your igloohome account before starting the pairing process for your Keypad.
a) Under, go to [Add and Manage], select [Keypads], tap the [+] sign at the top right corner and follow the instructions.
Creating a link between the Keypad and lock(s)
a) Follow the steps shown in the app after the pairing process is completed. Alternatively,
b) Go to [Settings], tap on [Linked Locks & Devices], and tap the [+] sign to create a link between your Keypad and locks.
Installation Instructions
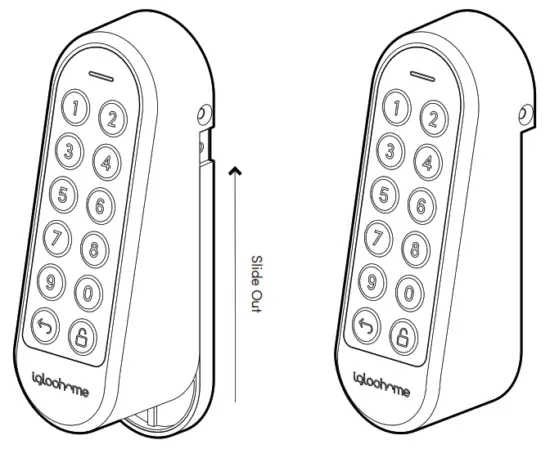
- Remove the Torx screws with the provided Torx screwdriver.

- Slide the Keypad unit off the mounting plate.

- Installing/Replacing Batteries

3a.Remove the screw and pull out the battery cover.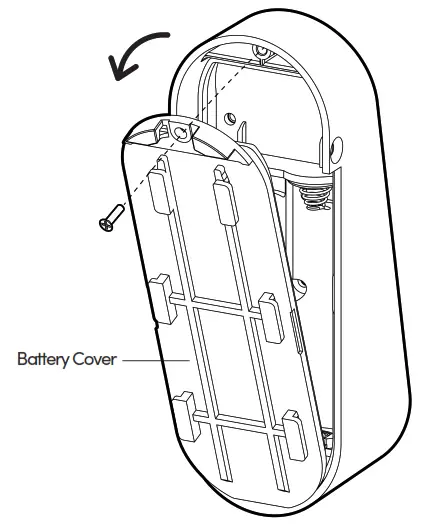
3b. Install or replace with 2 new AA alkaline batteries.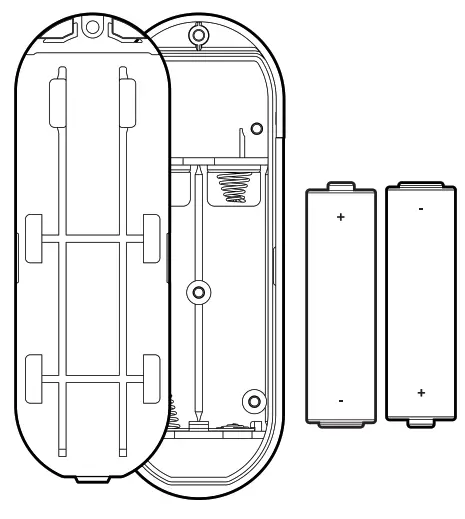
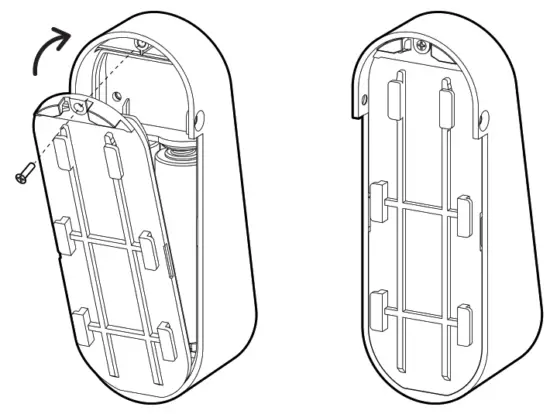
3c. Put the battery cover back and secure with the screw.
4. Peel off the backing of the adhesive on the back of the mounting plate.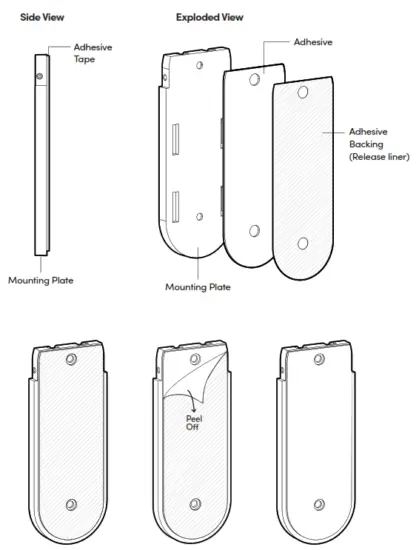
5. Mounting the Keypad
Press the mounting plate against the wall/surface where you want to install the Keypad.
Ensure the location is within the Bluetooth range of the locks you intend to pair it with.
*Before mounting, it is recommended that the Keypad is paired and tested with the locks you want to link to, at the desired installation location. 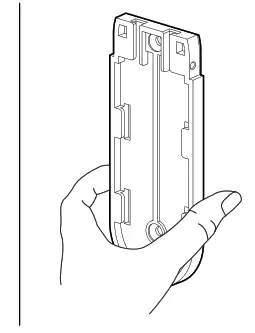
6 Drill the mounting bracket into the wall with the provided screw and screw anchor.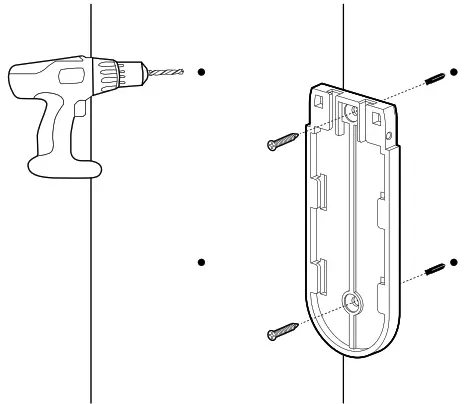
7. Slide the Keypad onto the mounting plate.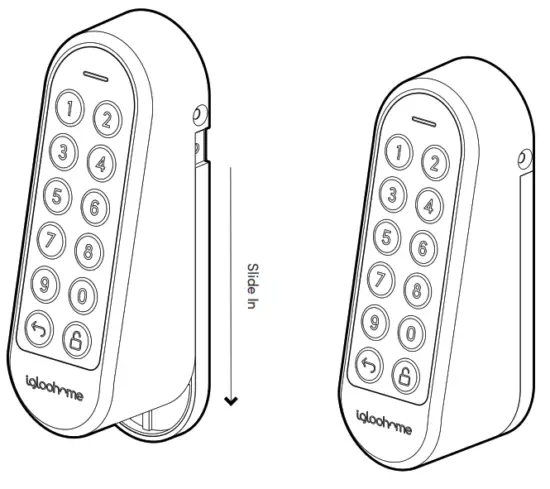 8 Secure the Keypad to the mounting plate with the Torx screws and Torx screwdriver provided.
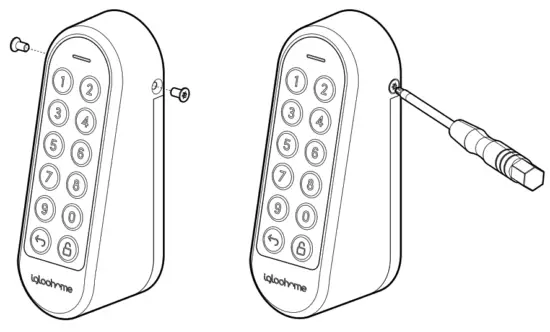
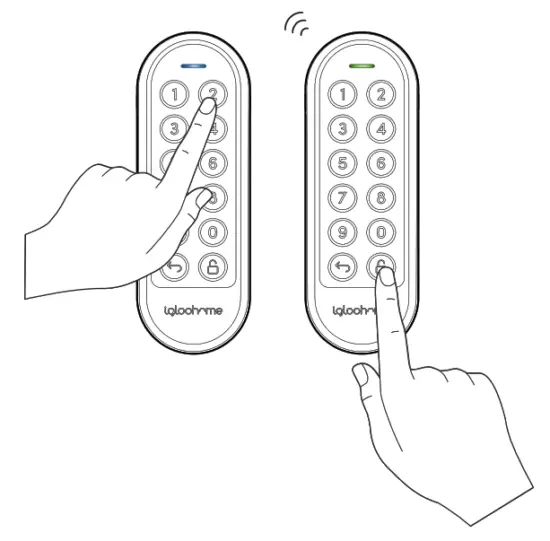
Unlocking
a Unlock
- Key in a valid PIN code (with or without decoy digits), followed by the
 button. LED indicator will start flashing blue.
 - Paired lock(s) within Bluetooth range (up to 5) will unlock, and LED Indicator will turn green with 4 short ascending tones.
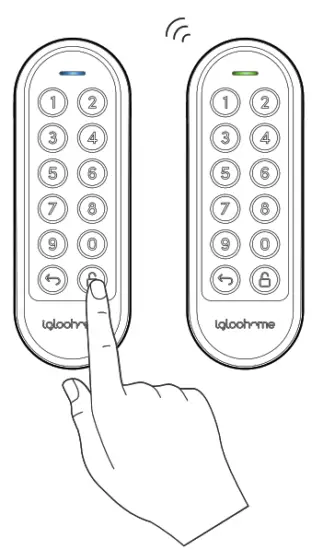
 Locking
 Locking
Lock
- Press and hold the button on the Keypad until LED Indicator starts flashing blue.
- Paired lock(s) within Bluetooth range (up to 5) will lock once the LED Indicator turns green with a single beep.
Keypad Behaviour
- Security Lockout
After several invalid PIN code entries on the keypad, the security alarm will be triggered and the keypad will be not any PINs for a period of time.
| Security Lockout | |
| Triggered by | 5 consecutive PIN Code attempts by default (Configurable via the igloohome app) |
| Disable By | After 1 / 5 / 10 Minutes |
| Behaviour | Keypad will not accept any PINs and the keypad will flash when it is pressed. |
| Duration | Please refer to table below |
| Triggered | Security Alarm | Security Lockout |
| 1st Time | 30 Sec | 1 Min |
| 2nd Time | 60 Sec | 5 Min |
| 3rd and Consecutive Time | 90 Sec | 10 Min |
Compatible igloohome Locks
| Lock | Maximum Keypad to lock distance* |
| Retrofit Lock | Less than 30m |
| Deadbolt 2S Metal Grey | Less than 30m |
| Keybox 3 | Less than 8m |
| Mortise 2/2+ | Less than 10m |
| Push-Pull Mortise | Less than 30m |
| Rim Lock for Metal Gates | Less than 15m |
| Padlock | Less than 6m |
| Glass Door Lock | Less than 5m |
| Other lock models | Newer devices will be launched from time to time. For latest Keypad compability, please contact our support team. |
*NOTE: The distances provided are for reference only and will vary based on actual operating conditions such as physical obstacles and interference from other electronic devices.
Audio and LED Indications
| Actions | Indications |
| Bluetooth Connection | LED Indicator flashes Blue |
| Successfully unlock/ lock all paired locks | Ascending 4 fast tones and flash Green LED 2 times |
| Unsuccessful unlock/lock of all paired locks / Error | Descending 4 short tones and solid Red LED for 4 seconds |
| Incorrect PIN Code | 4 short beeps and flash Red LED 2 times |
| Security Lockout Alarm | Low-high siren for 30 /60 / 90 seconds |
| Security Lockout Deactivated | 2 long beeps |
| Low Battery Alert | When Keypad is woken up: If battery is below 20% – 2 sets of 2 short beeps with pulsing Red LED If battery is below 10% – 4 sets of 2 short beeps with pulsing Red LED |
| Hard Reset / Unpair | Descending 3 slow tones |
| Successful Pairing | Ascending 3 fast tones |
Troubleshoot
Paired locks are not unlocked when a valid PIN Code is used
- Check that the locks you are unlocking are linked to the Keypad in the app.
- Ensure Keypad is within Bluetooth range of the locks with minimal obstruction between devices.
- Check battery levels of the locks you are unlocking.
Compliance
This device complies with part 15 of the FCC Rules. Operation is subject to the following two conditions: (1) this device may not cause harmful interference, and (2) this device
must accept any interference received, including interference that may cause undesired operation.
Any changes or modifications not expressly approved by the party responsible for compliance could void the user’s authority to operate the equipment.
NOTE: This equipment has been tested and found to comply with the limits for a Class B digital device, pursuant to Part 15 of the FCC Rules. These limits are designed to provide reasonable protection against harmful interference in a residential installation.
This equipment generates, uses and can radiate radio frequency energy and, if not installed and used in accordance with the instructions, may cause harmful interference to radio communications. However, there is no guarantee that interference will not occur in a particular installation.
If this equipment does cause harmful interference to radio or television reception, which can be determined by turning the equipment off and on, the user is encouraged to try
to correct the interference by one or more of the following measures:
- Reorient or relocate the receiving antenna.
- Increase the separation between the equipment and receiver.
- Connect the equipment into an outlet on a circuit different from that to which the receiver is connected.
- Consult the dealer or an experienced radio/TV technician for help.
This equipment complies with FCC radiation exposure limits set forth for an uncontrolled environment. This equipment should be installed and operated with a minimum distance of 20 cm between the radiator and your body.
For enquiries go to:
igloohome.co/support


