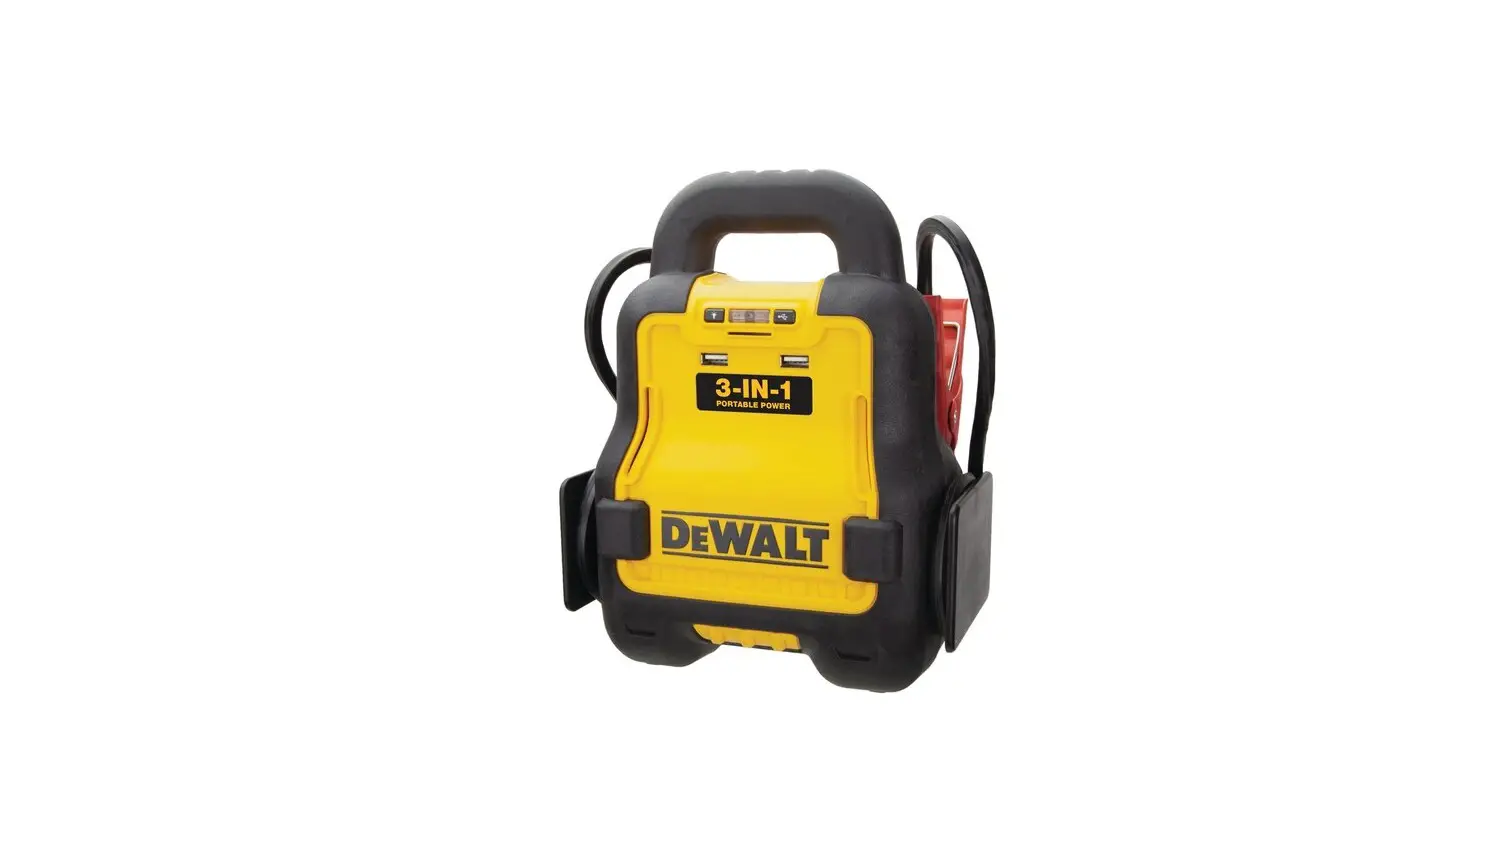
DEWALT DXAE20VBB 20V MAX* Cordless Professional Battery Booster Instruction Manual

![]() WARNING: Read all instructions before operating product.
WARNING: Read all instructions before operating product.
Failure to follow all instructions listed below may result in electric shock, fire and/or serious injury.
![]() WARNING: This product or its power cord contains lead, a chemical known to the State of California to cause cancer and birth defect or other reproductive harm. Wash hands after handling. For more information go to www.P65Warnings.ca.gov
WARNING: This product or its power cord contains lead, a chemical known to the State of California to cause cancer and birth defect or other reproductive harm. Wash hands after handling. For more information go to www.P65Warnings.ca.gov
Definitions: Safety Guidelines
The definitions below describe the level of severity for each signal word. Please read the manual and pay attention to these symbols.
![]() DANGER: Indicates an imminently hazardous situation which, if not avoided, will result in death or serious injury.
DANGER: Indicates an imminently hazardous situation which, if not avoided, will result in death or serious injury.![]() WARNING: Indicates a potentially hazardous situation which, if not avoided, could result in death or serious injury.
WARNING: Indicates a potentially hazardous situation which, if not avoided, could result in death or serious injury.![]() CAUTION: Indicates a potentially hazardous situation which, if not avoided, may result in minor or moderate injury.
CAUTION: Indicates a potentially hazardous situation which, if not avoided, may result in minor or moderate injury.
NOTICE: Indicates a practice not related to personal injury which, if not avoided, may result in property damage.
IF YOU HAVE ANY QUESTIONS OR COMMENTS ABOUT THIS DeWALT TOOL, CALL US TOLL FREE AT: 1-888-394-3392.
Battery Charger
The DeWALT® DXAE20VBB Cordless Vehicle Battery Charger featuresa 20A cordless vehicle battery charging function, two USB ports anda dual LED light.
Important Safety Instructions
- Save these instructions.
- Heed all warnings.
- Follow all instructions.
- DO NOT EXPOSE CHARGER TO RAIN OR SNOW.
- Clean only with a dry cloth.
- Keep children away from the work area. Keep this unit away from children. This is not a toy!
- Store indoors. When not in use, this unit should be stored indoors in a dry and high or locked-up place – out of the reach of children.
- Stay alert. Use common sense. Do not operate this equipment when you are tired or impaired.
- Only use attachments/accessories specified by the manufacturer.
The use of any accessory or attachment not recommended for use with this appliance could be hazardous. - Use only on a flat, level surface. If a cart is used, use caution when moving the cart/apparatus combination to avoid injury from tip-over.

- To reduce risk of electric shock, disconnect the unit from the 20V battery pack before attempting maintenance or cleaning. Turning off controls without disconnecting will not reduce this risk.
- Do not operate charger if it has received a sharp blow, been dropped or otherwise damaged in any way; take it to a qualified serviceman.
- Unit shall not be exposed to dripping or splashing and no objects filled with liquids shall be placed on the unit.
- Do not operate this unit near flammable liquids or in gaseous or explosive atmospheres. Motors in these tools normally spark, and the sparks might ignite fumes.

![]() WARNING – RISK OF EXPLOSIVE GAS MIXTURE
WARNING – RISK OF EXPLOSIVE GAS MIXTURE
- Do not overcharge the battery – See the instruction manual.
- Never smoke or allow a spark or flame in vicinity of vehicle battery, engine or battery charger.
- Do not operate this apparatus in a closed area or restrict ventilation in any way.
NOTICE: This equipment has been tested and found to comply with the limits for a Class B digital device, pursuant to Part 15 of the FCC Rules. These limits are designed to provide reasonable protection against harmful interference in a residential installation. This equipment generates, uses and can radiate radio frequency energy and, if not installed and used in accordance with the instructions, may cause harmful interference to ratio communications. However, there is no guarantee that interference will not occur in a particular installation. If this equipment does cause harmful interference to radio or television reception, which can be determined by turning the equipment off and on, the user is encouraged to try to correct the interference by one or more of the following measures:
- Reorient or relocate the receiving antenna.
- Increase the separation between the equipment and the receiver.
- Connect the equipment into an outlet on a circuit different from that to which the receiver is connected
- Consult the dealer or an experienced radio/TV technician for help.
NOTICE: Per FCC Part 15, changes or modifications to this equipment not expressly approved by manufacturer could void your authority to operate this equipment.
READ ALL INSTRUCTIONS
Specific Safety Instructions for DeWALT® 20V Lithium-Ion Battery Packs (not included)
![]() WARNING – To reduce the risk of fire, electric shock, burst hazard, or injury to persons or property:
WARNING – To reduce the risk of fire, electric shock, burst hazard, or injury to persons or property:
Lithium-ion batteries must be used and charged properly. Improper use can result in serious injury, fire, or death.
- Lithium-ion batteries can explode in the presence of a source of ignition. Do not use the product in the presence of an open flame.
- Do not place this lithium-ion battery powered unit in fire or apply heat to it.
- Do not subject this lithium-ion battery powered unit to strong impacts or shocks. The battery in this unit contains safety and protection devices which, if damaged, may cause the battery to generate heat, rupture or ignite.
- Do not expose this lithium-ion battery powered unit to water or salt water, or allow the battery to get wet.
- Avoid storing this lithium-ion battery powered unit in the basement, bathroom or other areas of the house that are or may become wet or humid or where moisture may concentrate.
- Do not leave this lithium-ion battery powered unit in direct sunlight, or use or store the unit inside cars in hot weather. Doing so may cause the battery to generate heat, rupture, or ignite. Using the battery in this manner may also result in a loss of performance and a shortened life expectancy.
- Never charge this unit near heat or flammable objects.
WARNING: NEVER THROW WATER ON A BURNING LI-ION BATTERY! If a lithium-ion battery does catch on fire, it will burn even more violently if it comes in contact with water or even moisture in the air. A fire extinguisher must be used.
![]() WARNING: DO NOT expose the power pack to fire or excessive temperature. Exposure to fire or temperature above 130°C (265°F) may cause explosion.
WARNING: DO NOT expose the power pack to fire or excessive temperature. Exposure to fire or temperature above 130°C (265°F) may cause explosion.
Specific Safety Instructions for Vehicle Battery Chargers
![]() WARNING – Do not use battery charger for charging dry-cell batteries that are commonly used with home appliances. These batteries may burst and cause injury to persons and damage to property. Use charger for charging a LEAD-ACID battery only. It is not intended to supply power to a low voltage electrical system other than in a starter-motor application.
WARNING – Do not use battery charger for charging dry-cell batteries that are commonly used with home appliances. These batteries may burst and cause injury to persons and damage to property. Use charger for charging a LEAD-ACID battery only. It is not intended to supply power to a low voltage electrical system other than in a starter-motor application.
- Use of accessories and attachments: The use of any accessory or attachment not recommended by manufacturer for use with this battery charger could be hazardous.
- Do not operate the battery charger near flammable liquids or in gaseous or explosive atmospheres. Motors may spark, and the sparks might ignite fumes.
![]() WARNING: To reduce the risk of electric shock, never immerse the battery charger in water or any other liquid, or use when wet.
WARNING: To reduce the risk of electric shock, never immerse the battery charger in water or any other liquid, or use when wet.
![]() WARNING – Risk of explosive gases:
WARNING – Risk of explosive gases:
- Working in the vicinity of a lead acid battery is dangerous. Batteries generate explosive gases during normal battery operation. For this reason, it is of the utmost importance that you follow the instructions each time you use the charger.
- To reduce the risk of battery explosion, follow these instructions and those published by the battery manufacturer and manufacturer of any equipment you intend to use in the vicinity of the battery.
Review cautionary markings on these products and on the engine. - This equipment employs parts (switches, relays, etc.) that produce arcs or sparks. Therefore, if used in a garage or enclosed area, the unit MUST be placed not less than 18 inches above the floor.
- THIS UNIT IS NOT FOR USE BY CHILDREN AND SHOULD ONLY BE OPERATED BY ADULTS.
![]() WARNING – To reduce the risk of fire:
WARNING – To reduce the risk of fire:
- Do not operate near flammable materials, dust, fumes or gases.
- Do not expose to extreme heat or flames.
![]() CAUTION – To reduce the risk of injury or property damage:
CAUTION – To reduce the risk of injury or property damage:
- NEVER charge a frozen battery.
- Stay clear of fan blades, belts, pulleys, and other parts that can cause injury to persons.
- Vehicles that have on-board computerized systems may be damaged if vehicle battery is boosted. Before boosting, read the vehicle’s owner’s manual to confirm that external-starting assistance is suitable.
- Be extra cautious to avoid dropping a metal tool onto the battery.
It might spark or short-circuit the battery or another electrical part, and that may cause an explosion. - Never allow battery acid to come in contact with this apparatus.
- Always turn the Vehicle Battery Charger off and disconnect the DeWALT® 20V Battery Pack it when not in use.
- DO NOT OPEN THE VEHICLE BATTERY CHARGER — there are no user-serviceable parts inside. Opening the battery charger will void manufacturer’s warranty.
- Operate battery charger only as described in this Instruction Manual.
- Check battery charger and components periodically for wear and tear. Return to manufacturer for replacement of worn or defective parts immediately.
![]() WARNING: To reduce the risk of injury, follow these instructions and those published by the battery manufacturer and manufacturer of any equipment you intend to use with this unit. Review cautionary markings on this product and on engine.
WARNING: To reduce the risk of injury, follow these instructions and those published by the battery manufacturer and manufacturer of any equipment you intend to use with this unit. Review cautionary markings on this product and on engine.
Specific Safety Instructions for the USB Ports
- Do not insert foreign objects into the USB Ports.
- Do not attach USB hubs or more than one personal electronic device to each USB Port.
- Do not use this unit to operate appliances that require more than 2.1 amps in total to operate from the USB Ports.
- Some household USB-powered electronics will not operate with this unit.
The RBRC™ Seal
The RBRC™ (Rechargeable Battery Recycling Corporation) Seal on the nickel cadmium, nickel metal hydride or lithium ion batteries (or battery packs) indicate that the costs to recycle these batteries (or battery packs) at the end of their useful life have already been paid by DeWALT. In some areas, it is illegal to place spent nickel cadmium, nickel metal hydride or lithium ion batteries in the trash or municipal solid waste stream and the RBRC program provides an environmentally conscious alternative.
RBRC™, in cooperation with DeWALT and other battery users, has established programs in the United States and Canada to facilitate the collection of spent nickel cadmium, nickel metal hydride or lithium ion batteries. Help protect our environment and conserve natural resources by returning the spent nickel cadmium, nickel metal hydride or lithium ion batteries to an authorized DeWALT service center or to your local retailer for recycling. You may also contact your local recycling center for information on where to drop off the spent battery.
RBRC™ is a registered trademark of the Rechargeable Battery Recycling Corporation.
Important Safety Instructions for All DeWALT® 20V Battery Pack Chargers (not included)
IMPORTANT: Before using the charger, read all instructions and warnings included with the charger and the battery pack.![]() WARNING – Shock hazard: Do not allow any liquid to get inside the charger. Electric shock may result.
WARNING – Shock hazard: Do not allow any liquid to get inside the charger. Electric shock may result.![]() CAUTION – Burn hazard: To reduce the risk of injury, charge only DeWALT rechargeable battery packs. Other types of batteries may overheat and burst resulting in personal injury and property damage.
CAUTION – Burn hazard: To reduce the risk of injury, charge only DeWALT rechargeable battery packs. Other types of batteries may overheat and burst resulting in personal injury and property damage.
NOTICE: Always unplug the charger from the power supply when there is no battery pack in the cavity. Unplug the charger before attempting to clean.
- DO NOT attempt to charge the battery pack with any chargers other than the ones in this manual. The charger and battery pack are specifically designed to work together.
- These chargers are not intended for any uses other than charging DeWALT rechargeable batteries. Any other uses may result in risk of fire, electric shock or electrocution.
- Do not expose the charger to rain or snow.
- Pull by the plug rather than the cord when disconnecting the charger to reduce the risk of damage to the electric plug and cord.
- Make sure that the cord is located so that it will not be stepped on, tripped over or otherwise subjected to damage or stress.
- Do not use an extension cord unless it is absolutely necessary. Use of improper extension cord could result in risk of fire, electric shock or electrocution.
- When operating a charger outdoors, always provide a dry location and use an extension cord suitable for outdoor use.
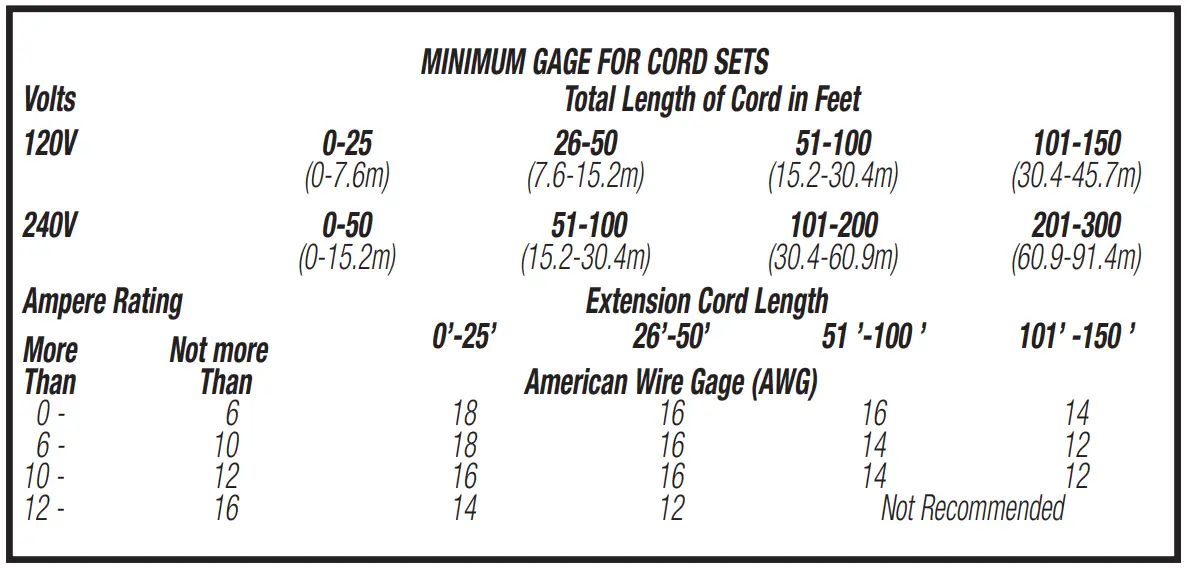
- An extension cord must have adequate wire size (AWG) for safety.
The smaller the gauge number of the wire, the greater the capacity of the cable, that is, 16 gauge has more capacity than 18 gauge.
An undersized cord will cause a drop in line voltage resulting in loss of power and overheating. The following table shows the correct size to use depending on cord length and nameplate ampere rating. If in doubt, use the next heavier gauge. The lower the gauge number, the heavier the cord.
- Do not place any object on top of the charger or place the charger on a soft surface that might block the ventilation slots and result in excessive internal heat. Place the charger in a position away from any heat source.
- Do not operate the charger with a damaged cord or plug.
- Do not operate the charger if it has received a sharp blow, been dropped or otherwise damaged in any way.
- Do not disassemble the charger. Incorrect reassembly may result in a risk of electric shock, electrocution or fire.
- Disconnect the charger from the outlet before attempting any cleaning. This will reduce the risk of electric shock. Removing the battery pack will not reduce this risk.
- NEVER attempt to connect two chargers together.
- The charger is designed to operate on standard 120V household electrical power. Do not attempt to use it on any other voltage.
Personal Precautions
- Consider having someone close enough by to come to your aid when you work near a lead-acid battery.
- Wear complete eye protection and clothing protection. Avoid touching eyes while working near battery.
- Have plenty of fresh water and soap nearby in case battery acid contacts skin, clothing, or eyes.
- Remove personal metal items such as rings, bracelets, necklaces and watches when working with a lead acid battery. A lead acid battery can produce a short circuit current high enough to weld a ring, or similar metal object, to skin causing a severe burn.
- If battery acid contacts skin or clothing, wash immediately with soap and water. If acid enters eye, immediately flood eye with running cold water for at least 10 minutes and get medical attention immediately.
- NEVER smoke or allow a spark or flame in vicinity of battery or engine.
- Be extra cautious to reduce risk of dropping a metal tool onto battery. It might spark or short-circuit battery or other electrical part that may cause explosion.
Important Notes:
Several factors can affect a charger’s ability to charge a vehicle’s battery, including, but not limited to, the size of the vehicle battery, the temperature (hot or cold), whether the battery is damaged or defective, and whether the DeWALT® 20V Battery Pack is fully charged
The DeWALT® Vehicle Battery Charger requires a minimum voltage to detect the correct connection before it will begin to charge. If thevoltage of the vehicle battery is too low, the charger may not be able to detect connection and may not be able to charge the vehicle. While this low battery voltage is rare, it may occur under extreme conditions.
SAVE THESE INSTRUCTIONS FOR FUTURE USE
Components (Fig. 1)
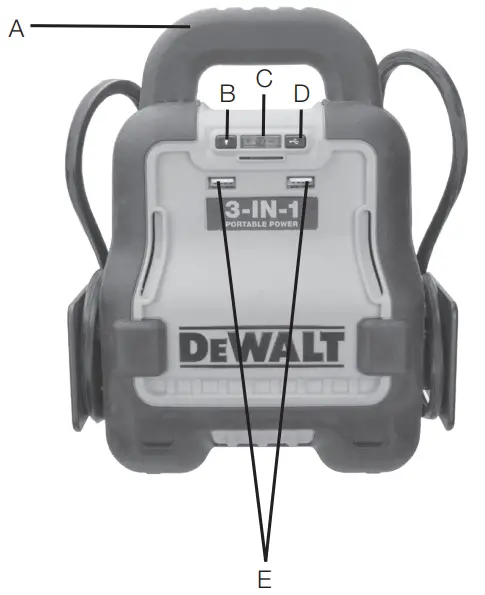
- A. Handle
- B. LED Light Power Button
- C. ONE TOUCH® Boost/Charge Button and status indicator.
- D. USB Power Button
- E. Dual USB Ports
Back Panel Components (Fig. 2a)
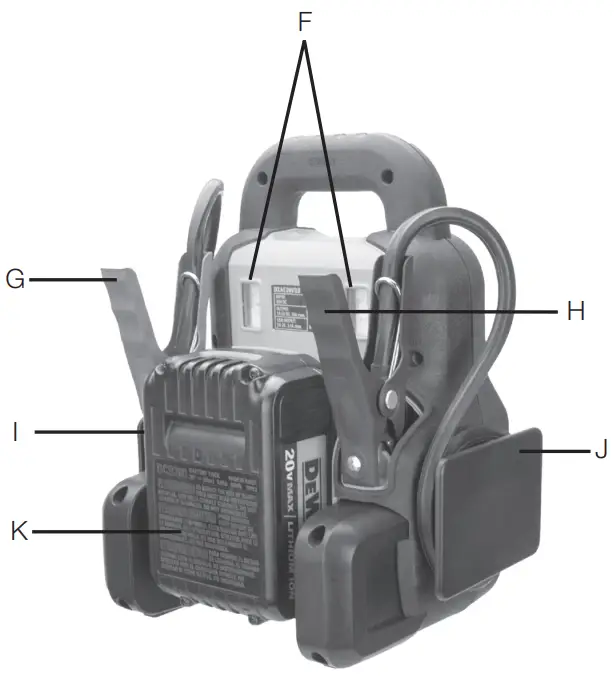
- F. Dual LED Lights
- G. Positive (+) Red Clamp
- H. Negative (–) Black Clamp
- I. Positive (+) Cable Wrap
- J. Negative (–) Cable Wrap
- K. DeWALT® 20V Lithium Battery Pack (not Included)
Back Panel Components (Fig. 2b)
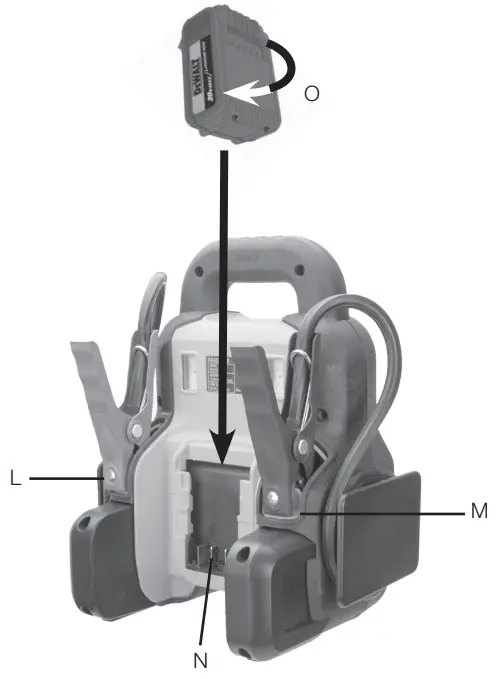
- L. Positive (+) Red Clamp Holder
- M. Negative (–) Black Clamp Holder
- N. Battery Pack Terminal Connector
- O. DeWALT® 20V Battery Pack (fits flush within the brackets of the Battery Pack Terminal Connector – refer to Fig. 2a)
Power Supply
The DeWALT® 20V Battery Pack is not included: This unit is powered exclusively by the DeWALT® 20V Battery Pack (sold separately). It must be fully recharged via the compatible DeWALT® dedicated Battery Charger (also sold separately). Refer to the corresponding instructions included with the Battery Pack and Charger.
In order to operate this Vehicle Battery Charger, the fully charged DeWALT® 20V Battery Pack must be properly installed into the 20V battery terminal connector on the back of unit. Make sure the DeWALT® 20V Battery Pack is properly locked into the battery pack terminal connector (N) (as shown in Figure 2b).
Chargers
- DeWALT® 20V Battery Packs use DeWALT chargers. Be sure to read all safety instructions before using the charger.
- Consult the chart at the end of this manual for compatibility of chargers and DeWALT® 20V battery packs.
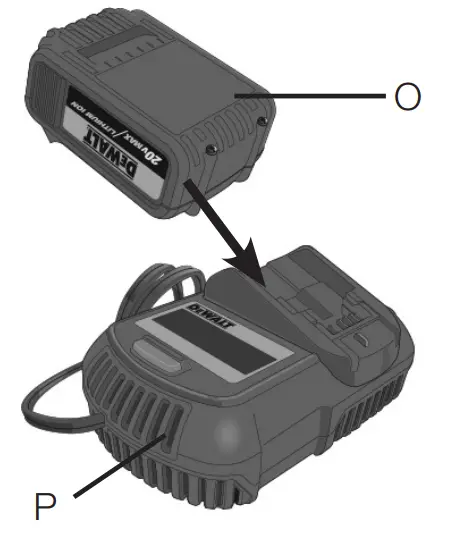
CHARGING PROCEDURE
- Plug the charger into an appropriate outlet before inserting the DeWALT® 20V battery pack.
- Insert the battery pack (O) into the charger (P), as shown in Figure 3, making sure the pack is fully seated in charger. The red (charging) light will blink continuously, indicating that the charging process has started.
(Fig. 3)
- The completion of charge will be indicated by the red light remaining ON continuously. The pack is fully charged and may be used at this time or left in the charger.
Operating Instructions
Automotive Charging Using the Included Battery Clamps
PREPARING TO CHARGE
- Determine voltage of vehicle battery by referring to car owner’s manual and make sure it matches output rating of Vehicle Battery Charger (12V).
- If necessary to remove battery from vehicle to charge, always remove grounded terminal from battery first. Make sure all accessories in the vehicle are off, so as not to cause an arc.
- Be sure the area around the vehicle battery is well-ventilated while the vehicle battery is being charged.
- Clean the vehicle battery terminals, Be careful to keep corrosion from coming in contact with eyes.
- For non-maintenance-free batteries, add distilled water in each cell until battery acid reaches the level specified by the battery manufacturer. This helps purge excessive gas from cells. Do not overfill. For a battery without removable cell caps, such as valve regulated lead acid batteries, carefully follow manufacturer’s recharging instructions.
- STUDY ALL BATTERY MANUFACTURER’S SPECIFIC PRECAUTIONS, SUCH AS REMOVING OR NOT REMOVING CELL CAPS WHILE CHARGING, AND RECOMMENDED RATES OF CHARGE.
CHARGER LOCATION
- Locate the charger as far away from the vehicle battery as DC cable permit.
- Never place the charger directly above the vehicle battery being charged; gases from the battery will corrode and damage the charger.
- Never allow battery acid to drip on charger when reading electrolyte specific gravity or filling battery.
- Never operate the charger in a closed-in area or restrict ventilation in any way.
- Do not set a vehicle battery on top of the charger.
![]() CONNECTION PRECAUTIONS
CONNECTION PRECAUTIONS
- Connect and disconnect output clamps only after removing AC Power Cord from electric outlet.
- Ensure the unit is turned off before connecting or disconnecting the battery clamps.
- Never allow the clamps to touch each other.
- Attach the clamps to the battery and chassis as indicated in the appropriate section (“Charging a battery installed in a vehicle” or “Charging a battery that has been removed from a vehicle”).
- A marine (boat) battery must be removed and charged on shore.
To charge it on board requires equipment specifically designed for marine use. This unit is NOT designed for such use
FOLLOW THESE STEPS WHEN THE BATTERY IS INSTALLED IN A VEHICLE![]() WARNING – A spark near the battery may cause an explosion. To reduce risk of a spark near the battery:
WARNING – A spark near the battery may cause an explosion. To reduce risk of a spark near the battery:
- Do not charge the battery while the engine is operating.
- Position the cords to reduce risk of damage by hood, door, or moving engine part.
- Stay clear of fan blades, belts, pulleys, and other parts that can cause injury to persons.
- Check polarity of the battery posts. The positive post (marked POS, P, +) usually has a larger diameter than the negative battery post (marked NEG, N, –).
- Determine which post of battery is grounded (connected) to the chassis. If negative post is grounded to chassis (as in most vehicles), see 6. If positive post is grounded to the chassis, see 7.
- For a negative-grounded vehicle, connect the positive (red) clamp from the battery charger to the positive (POS, P, +) ungrounded post of battery. Connect the negative (BLACK) clamp to vehicle chassis or engine block away from battery. Do not connect clip to carburetor, fuel lines, or sheet-metal body parts. Connect to heavy gauge metal part of the frame or engine block.
- For a positive-grounded vehicle, connect the negative (black) clamp from the battery charger to the negative (NEG, N, –) ungrounded post of battery. Connect positive (RED) clamp to vehicle chassis or engine block away from battery. Do not connect clip to carburetor, fuel lines or sheet-metal body parts. Connect to a heavy gauge metal part of the frame or engine block.
- See operating instructions for length of charge information.
- When disconnecting charger, press the charge button again to turn the unit off, remove the clamp from vehicle chassis, and then remove the clamp from the battery terminal.
FOLLOW THESE STEPS WHEN THE BATTERY HAS BEEN REMOVED FROM A VEHICLE
![]() WARNING – A spark near the battery may cause an explosion. To reduce risk of a spark near the battery:
WARNING – A spark near the battery may cause an explosion. To reduce risk of a spark near the battery:
- Check polarity of the battery posts. The positive post (marked POS, P, +) usually has a larger diameter than the negative battery post (marked NEG, N, –).
- Attach a 24-inch (minimum length) AWG #6 insulated battery cable to the negative battery post (marked NEG, N, –).
- Connect the positive (RED) clamp to the positive battery post (red or marked POS, P, +).
- Stand as far back from the battery as possible, and do not face the battery when making final connection.
- Carefully connect the negative (BLACK) clamp to the free end of the battery cable connected to the negative terminal.
- When disconnecting the charger, always do so in reverse sequence of connecting procedure and break first connection while as far away from battery as practical.
FUNCTION OF THE CHARGE STATUS/FAULT INDICATOR LED DURING CHARGING/BOOSTING
- After connecting the Vehicle Battery Charger to the vehicle battery and pressing the charge button, the Charge Status/Fault Indicator will flash green for several minutes.
- Once the Charge Status/Fault Indicator turns solid green, your vehicle should be ready to start.
- The light will remain solid green as the unit continues to charge/ boost unless it is either disconnected from the vehicle battery or the DeWALT® 20V Battery Pack is depleted, in which case it will light solid red for 60 seconds before automatically shutting down.
- Once the vehicle starts, remove the Battery Clamps from the vehicle battery. Refer to the Notes that follow.
IMPORTANT NOTES:
- If the battery clamps are incorrectly connected with regard to polarity, the Charge Status/Fault Indicator will flash red until the clamps are disconnected. Remove the clamps and then reconnect them with correct polarity.
- If the voltage of the DeWALT® 20V Battery Pack is low or it has insufficient output power, the Charge Status/Fault Indicator will light solid red for 60 seconds before the Vehicle Battery Charger automatically shuts down. Refer to the “Troubleshooting” section.
- If the DeWALT® 20V Battery Pack is overheated or is too cold, the Vehicle Battery Charger will automatically shut down. Refer to the “Troubleshooting” section.
- If the Battery Clamps are disconnected from the vehicle battery, the Vehicle Battery Charger will automatically shut down.
![]() CAUTION – To reduce the risk of property damage:
CAUTION – To reduce the risk of property damage:
- Excessive engine cranking can damage the vehicle‘s starter motor. If the engine fails to start after the recommended number of attempts, discontinue jump-start procedure and look for other problems that need to be corrected.
- If vehicle fails to start, turn off the ignition, disconnect the booster and contact a qualified technician to investigate why the engine did not start.
Operating the Unit’s Dual USB Ports
The dual USB Ports are located on the front of the unit and are controlled by the USB Power Button. Refer to the “Fig. 1” to locate.
- Press the USB Power Button on the unit once. The Boost Status/Fault Indicator will light amber, indicating both USB ports are ready to use.
- Plug the USB-powered device into the USB port(s) and operate normally.
- Press the Power Button on the unit a second time to turn both USB ports off.
IMPORTANT NOTES:
- Do NOT use the USB Ports while you are attempting to charge an vehicle battery. The Charge Status/Fault Indicator will not reflect USB Port usage (by lighting solid amber) when the unit is used in Charge mode.
- Make sure the USB ports are turned off when the unit is being stored.
- When the USB Ports are in use, the unit will monitor for the following USB fault conditions on all the USB Ports:
- If a low DeWALT® 20V Battery Pack battery voltage fault exists, the Charge Status/Fault Indicator will flash amber for 60 seconds and then the unit will shut down.
- If an overload or short-circuit occurs in either USB port, the Charge Status/Fault Indicator will flash red.
In either of these cases, disconnect the USB-powered device immediately and make sure the unit’s DeWALT® 20V Battery Pack does not need to be recharged. Allow the unit to cool down for several minutes before attempting to use the USB Ports again.
If a fault occurs again, make sure that the total draw of the USB devices plugged into the USB Ports does not exceed 2.1A (5V).
If an individual USB device is within specifications and the fault occurs, have the USB device checked for malfunction and do not continue to use it with these USB Ports.
- This unit’s USB Ports do not support data communication. They only provide power to external USB-powered devices. The USB Ports provide a total of 2.1A (5V).
- Some USB-powered household electronics may not operate with this unit’s USB ports. Check the manual of the corresponding electronic device to confirm that it can be used with this type of USB port.
Operating the Unit’s Led Lights
The dual LED Lights are located on the back of the unit and are both controlled by the LED Light Power Button. Refer to the “Fig. 2a” to locate.
- Press the LED Light Power Button once to turn both LED lights on.
- Press the LED Light Power Button again to turn both LED lights off.
NOTICE: Make sure the LED Lights are turned off when it is being stored.
Maintenance Instructions
Never submerge the unit in water. If the unit gets dirty, gently clean the outer surfaces of the unit with a soft, dry cloth.
There are no user-replaceable parts. Periodically inspect the condition of connectors and wires. Contact manufacturer to replace any components that have become worn or broken.
Troubleshooting
| Problem | Possible Solution |
| The unit will not charge the vehicle battery | Make sure the translucent Charge Button has been pressed to turn the Charger on. |
| Make sure a proper polarity cable connection has been established. | |
| The vehicle battery may in fault condition and cannot accept the charging. Manufacturer recommends taking it to a certified automotive service center for evaluation. | |
| The voltage of the DEWALT® 20V Battery Pack may be low or it has insufficient output power. The Charge Status/Fault Indicator will light red for 60 seconds before the Vehicle Battery Charger automatically shuts down. Disconnect the Vehicle Battery and fully charge the DEWALT® 20V Battery Pack, following the directions included with the dedicated DEWALT® 20V Battery Pack Charger. | |
| If the DEWALT® 20V Battery Pack is overheated or is too cold, the Battery Charger will automatically shut down. Disconnect the Battery Clamps and allow the unit to cool down or warm up for a period before resuming any operation. | |
| The LED Lights will not operate | Make sure the Area Light Power Button has been pressed to turn the LED lights on |
| Check that DEWALT® 20V Battery Pack has a full charge. Recharge if necessary. | |
| USB Port will not power appliance | Make sure the USB Power Button has been pressed to turn the USB Ports on and the Charge Status/Fault Indicator lights solidly in amber. |
| USB Port will not power appliance (continued) | If a fault condition exists in either of the USB Ports, the Charge Status/Fault Indicator will flash red. Refer to the Important Notes in the “Operating the Unit’s Dual USB Ports” section to remedy any faults. |
| Make sure that the draw of the USB device plugged into the USB Port does not exceed 5V/2.1A. | |
| Some USB-powered household electronics will not operate with this USB charging/ power port. Check the manual of the corresponding electronic device to confirm that it can be used with this type of USB charging/power port. | |
| Check that DEWALT® 20V Battery Pack has a full charge. Recharge the battery pack if necessary. |
Accessories
![]() WARNING: Since accessories, other than those offered by manufacturer, have not been tested with this product, use of such accessories with this unit could be hazardous. To reduce the risk of injury, only manufacturer-recommended accessories should be used with this product.
WARNING: Since accessories, other than those offered by manufacturer, have not been tested with this product, use of such accessories with this unit could be hazardous. To reduce the risk of injury, only manufacturer-recommended accessories should be used with this product.
If you need assistance regarding accessories, please contact the manufacturer at 1-888-394-3392 or [email protected].
Service Information
Whether you need technical advice, repair, or genuine factory replacement parts, contact the manufacturer at 1-888-394-3392 or [email protected].
One Year Limited Warranty
The manufacturer warrants this product against defects in material and workmanship for a period of one (1) year from the date of retail purchase by the original end-user purchaser (“Warranty Period”).
If there is a defect and a valid claim is received within the Warranty Period, the defective product can be repaired, replaced or refunded, without charge, in the following ways: (1) Return the product to the manufacturer for repair, replacement or refund at manufacturer’s option.
Proof of purchase may be required by manufacturer. (2) Return the product to the retailer where product was purchased for an exchange (provided that the store is a participating retailer). Returns to retailer should be made within the time period of the retailer’s return policy for exchanges only (usually 30 to 90 days after the sale). Proof of purchase may be required. Please check with the retailer for their specific return policy regarding returns that are beyond the time set for exchanges.
This warranty does not apply to: accessories, bulbs, fuses and batteries; defects resulting from normal wear and tear, accidents;
damages sustained during shipping; alterations; unauthorized use or repair; neglect, misuse, abuse; and failure to follow instructions for care and maintenance for the product.
This warranty gives you, the original retail purchaser, specific legal rights and you may have other rights which vary in certain states or provinces. This product is not intended for commercial use.
90 DAY REFUND POLICY
If you are not completely satisfied with the performance of this product for any reason, you can return it within ninety (90) days from the date of purchase with a receipt for a full refund.
Please visit our website www.baccusglobal.com/register to register your new Baccus Global LLC product and to be kept up to date on new products and special offers.
Specifications
| Input: | 20V DC |
| Output: | 14.5V DC, 20A max. |
| USB Ports: | 5V DC, 2.1A max. |
| LED Lights: | (2x) 2 white LEDs |
Compatible DeWALT® 20V Battery Packs
This Vehicle Battery Charger is compatible (only) with the following 20 Volt DeWALT® Battery Pack:
| Battery Pack Catalog # | 120 Volt Battery Charger Catalog # |
| DCB200 | DCB101, DCB102, DCB103, DCB106, DCB107, DCB112 |
| DCB201 | |
| DCB203 | |
| DCB204 | |
| DCB205 | |
| DCB206 | |
| DCB207 | |
| DCB606 | |
| DCB609 |
Imported by Baccus Global LLC,
621 NW 53rd St., Suite 450, Boca Raton, FL 33487
www.dewalt12volt.com 1-888-394-3392
Made in China
Copyright © 2021 Baccus Global, LLC. DeWALT® and the DeWALT Logo are trademarks of the DeWALT Industrial Tool Co., or an affiliate thereof and are used under license. The yellow/black color scheme is a trademark for DeWALT power tools & accessories.
www.dewalt.com


