
IKEA 104.756.15 Hygienisk Integrated Dishwasher
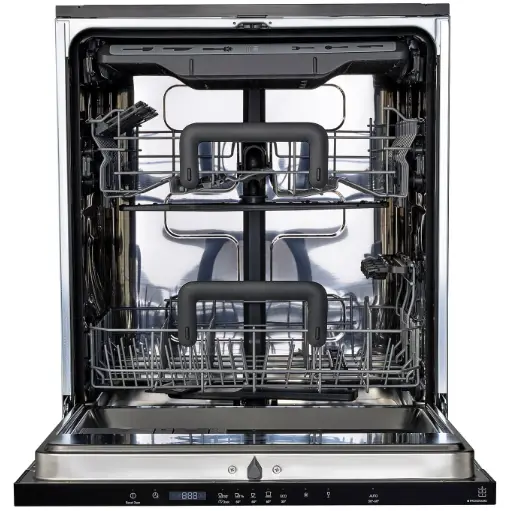
Product description
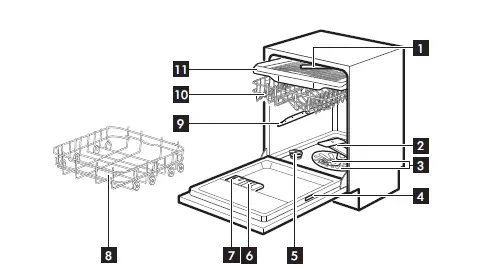
- Ceiling spray arm
- Lower spray arm
- Filters
- Rating plate
- Salt container
- Rinse aid dispenser
- Detergent dispenser
- Lower basket
- Upper spray arm
- Upper basket
- Cutlery drawer
Control panel

- On/Off button / Reset button
- Delay start button
- Display
- Programme buttons
- Option buttons
- AUTO programme button
Display
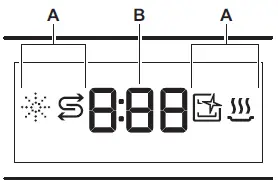
- A. Indicators
- B. Time indicator
| Indicator | Description |
| 1 | Rinse aid indicator. It is on when the rinse aid dispenser needs refilling. |
| 2 | Salt indicator. It is on when the salt container needs refilling. |
| 3 | Machine Care indicator. It is on when the ap‐ pliance needs internal cleaning with the Ma‐ chine Care programme. |
| 4 | Drying phase indicator. It is on when a pro‐ gramme with the drying phase is selected. It flashes when the drying phase operates. |
Programmes overview
| Programme | Dishwasher load | Degree of soil | Temperature (°C) | Time (min) | Options | AutoOpen |
 | Crockery, cutlery | Fresh soil | 50 | 30 |  | |
|
| All types of load | All degrees of soil | Cold water | 15 |  | |
|
| Crockery, cutlery | Fresh, lightly dried-on soil | 60 | 60 | | |
|
| Crockery, cutlery, pots, pans | Normal, lightly dried on soil | 60 | 90 | | |
|
| Crockery, cutlery, pots, pans | Normal to heavy, dried-on soil | 60 | 160 | | |
| Crockery, cutlery, pots, pans | Normal, lightly dried on soil | 50 | 240 | | ||
| Crockery, cutlery, pots, pans | All | 50 – 60 | 120 – 170 | | ||
| For cleaning the appliance interior. Refer to “Cleaning and Maintenance”. | 70 | 60 | | |||

- This programme offers the most efficient use of water and energy consumption for crockery and cutlery with normal soil. This is the standard programme for test institutes. This programme is used to assess compliance with the Ecodesign Comission Regulation (EU) 2019/2022.
- Options
You can adjust the programme selection to your needs by activating options. - Power Clean
Power Clean improves the dishwashing results of the selected programme. The option increases the wash temperature and duration. - Gentle / Glass
Gentle / Glass prevents delicate load, glassware in particular, from damaging. The option prevents rapid changes in the dishwashing temperature of the selected programme and reduces it to 45 °C.
Basic settings
| Number | Setting | Setting value | Water hardness | |
| mmol/l | German de‐ grees (°dH) | |||
| 1 | Water softener | 10 | 8.4 – 9.0 | 47 – 50 |
| 9 | 7.6 – 8.3 | 43 – 46 | ||
| 8 | 6.5 – 7.5 | 37 – 42 | ||
| 7 | 5.1 – 6.4 | 29 – 36 | ||
| 6 | 4.0 – 5.0 | 23 – 28 | ||
| 5 1) | 3.3 – 3.9 | 19 – 22 | ||
| 4 | 2.6 – 3.2 | 15 – 18 | ||
| 3 | 1.9 – 2.5 | 11 – 14 | ||
| 2 | 0.7 – 1.8 | 4 – 10 | ||
| 1 2) | <0.7 | <4 | ||
| 2 | Rinse aid empty notification | 1d (on) / 0d (off) | ||
| 3 | End sound | 1b (on) / 0b (off) | ||
| 4 | Auto door open | 1o (on) / 0o (off) | ||
| 5 | Key tones | 1F (on) / 0F (off) | ||
| 6 | Latest pro‐ gramme selection | 1H (on) / 0H (off) | ||
| 7 | Display on floor | 1C (on) / 0C (off) | ||
- Factory setting.
- Do not use salt at this level.
Setting mode
| Button | Description |
| 1 | Previous button. Press to switch between the basic settings and to change their values. |
| 2 | OK button. Press to enter the selected setting and to confirm changing its value. |
| 3 | Next button. Press to switch between the basic settings and to change their values. |
How to change a setting
- Press and hold simultaneously and for about 3 seconds to enter setting mode.
- The lights: , and are on.
- The display shows the current value of the first available setting.
- Press Previous or Next to select the setting.
The display shows the current setting value (a digit and the dedicated letter). - Press OK to enter the setting. The current setting value flashes.
- Press Previous or Next to change the value.
- Press OK to confirm the setting value.
- The new setting value is saved.
- The appliance returns to the basic settings list.
- Press and hold simultaneously and for about 3 seconds to exit the setting mode.
The appliance switches to the programme selection.
Time Beam
Time Beam displays the following information on the floor below the appliance door:
- The programme duration when the programme begins.
- 0:00 and CLEAN when the programme is complete.
- DELAY and the countdown duration when the delay start begins.
- An alarm code when the appliance has a malfunction.
When AutoOpen opens the door, TimeBeam is off. To check the remaining time of the running programme, look at the control panel display.
AutoOpen
AutoOpen improves the drying results with less energy consumption. The appliance door opens automatically during the drying phase and remains ajar.
Caution! Do not try to close the appliance door within 2 minutes after automatic opening. This can cause damage to the appliance.
Caution! If children, pets or people with disabilities have access to the appliance, deactivate AutoOpen. The automatic opening of the door may pose a danger and expose possible hazards inside the appliance (such as knives, sharp objects, chemicals).
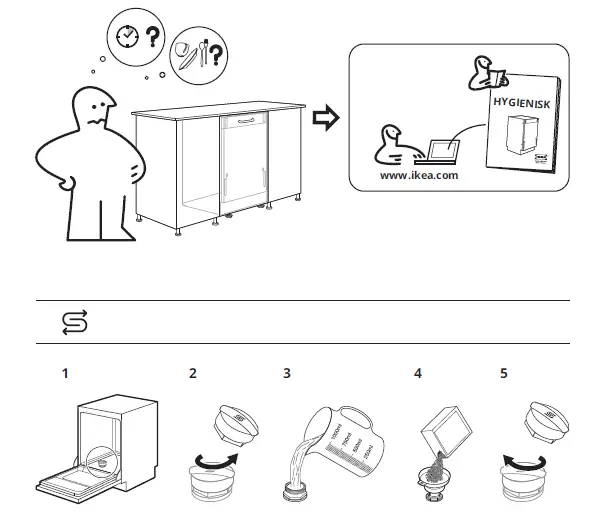
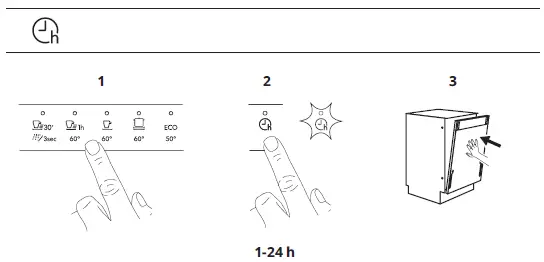
Before first use
Make sure that the current level of the water softener is adjusted to the hardness of the water supply.
Use the programme Quick 30′ to remove residues from the manufacturing process.
- Pour 1 litre of water in the salt container.
- Put 1 kg of salt in the salt container. Use rough salt designed for dishwashers only.
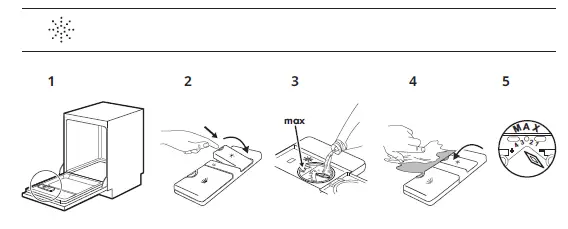
- Fill the rinse aid dispenser.
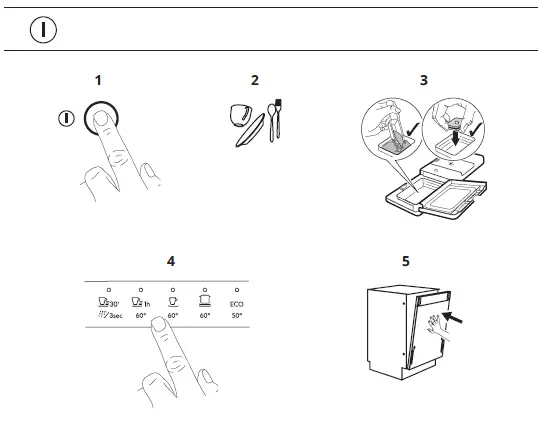
- Open the water tap.
- Select the programme Quick 30′ and close the dishwasher door to start it. Do not use detergent and do not put dishes in the baskets.
Caution! Water and salt may come out of the salt container
when you fill it. After you fill the salt container, immediately start a programme to prevent corrosion. If you do not use the appliance, close the water tap.
Troubleshooting
If you encounter an issue with your appliance, check “Troubleshooting” chapter in the full version of the User Manual available on: www.ikea.com.
Technical information
| Product type | Fully integrated dishwasher | |
| Dimensions | Width / height / depth (mm) | 596 / 818 – 898 / 550 |
| Electrical connection 1) | Voltage (V) | 220 – 240 |
| Frequency (Hz) | 50 | |
| Water supply pres‐ sure | Min. / max. bar (MPa) | 0.5 (0.05) / 10 (1.0) |
| Water supply | Cold water or hot water 2) | max 60 °C |
| Capacity | Place settings | 14 |
- Refer to the rating plate for other values.
- If the hot water comes from alternative source of energy, (e.g. solar panels, aeolian energy), use the hot water supply to decrease energy consumption.
Link to the EU EPREL database
The QR code on the energy label supplied with the appliance provides a web link to the registration of this appliance in the EU EPREL database. Keep the energy label for reference together with the user manual and all other documents provided with this appliance.
It is possible to find information related to the performance of the product in the EU
EPREL database using the link https://eprel.ec.europa.eu and the model name and product number that you can find on the rating plate of the appliance. Refer to the chapter “Product description”. For more detailed information about the energy label, visit www.theenergylabel.eu.


