![]() SL Series LED Video Light
SL Series LED Video Light![]()
Instruction Manual
Foreword
Thank you for purchasing Godox products!
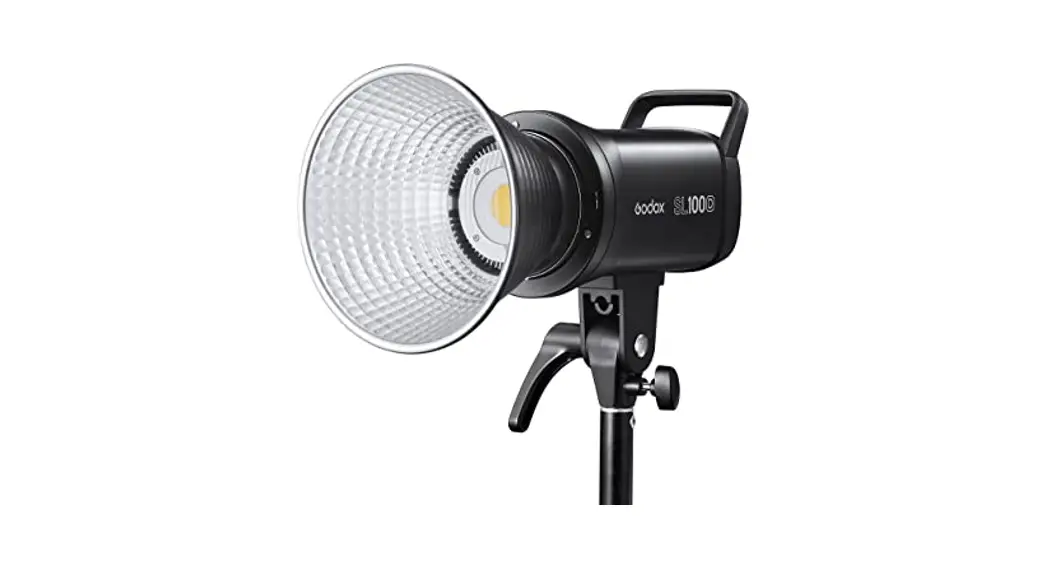
SL Series LED Video Light SL100D is suitable for live recording, video shooting, and many other occasions with stable light resources and even illumination.
Features:
- With a stable light source and adjustable light brightness from 0% to 100%
- Can be remote-controlled by 2.4G and smartphone APP
- With 8 Fx special effects mode to simulate various shooting scenes
- Bowens-mount support various accessories
- Clear LCD display
- With excellent heat dissipation
 Warning
When using your photographic equipment, basic safety precautions should always be followed, including the following:![]() Read and understand all instructions before using.
Read and understand all instructions before using.![]() Close supervision is necessary when any appliance is used by or near children. Do not leave the appliance unattended while in use.
Close supervision is necessary when any appliance is used by or near children. Do not leave the appliance unattended while in use.![]() Care must be taken as burns can occur from touching hot parts.
Care must be taken as burns can occur from touching hot parts.![]() Do not operate an appliance with a damaged cord or if the appliance has been dropped or damaged – until it has been examined by a qualified serviceman.
Do not operate an appliance with a damaged cord or if the appliance has been dropped or damaged – until it has been examined by a qualified serviceman.![]() Position the cord so that it will not be tripped over, pulled, or contact hot surfaces.
Position the cord so that it will not be tripped over, pulled, or contact hot surfaces.![]() If an extension cord is necessary, a cord with a current rating at least equal to that of the appliance should be used. Cords rated for less amperage than the appliance may overheat.
If an extension cord is necessary, a cord with a current rating at least equal to that of the appliance should be used. Cords rated for less amperage than the appliance may overheat.![]() Always unplug appliances from the electrical outlets before cleaning and servicing and when not in use. Never yank the cord to pull the plug from the outlet. Grasp plug and pull to disconnect.
Always unplug appliances from the electrical outlets before cleaning and servicing and when not in use. Never yank the cord to pull the plug from the outlet. Grasp plug and pull to disconnect.![]() This appliance is not a waterproof device. To reduce the risk of electric shock, do not immerse this appliance in water or other liquids.
This appliance is not a waterproof device. To reduce the risk of electric shock, do not immerse this appliance in water or other liquids.![]() Do not disassemble. Should repairs become necessary, this appliance must be sent to an authorized maintenance center. Incorrect maintenance behavior may cause electric shock when the appliance is subsequently used.
Do not disassemble. Should repairs become necessary, this appliance must be sent to an authorized maintenance center. Incorrect maintenance behavior may cause electric shock when the appliance is subsequently used.![]() When this appliance is working, please do not cover the Thermovent, and please do not look directly at or touch the COB lamp beads under any circumstances.
When this appliance is working, please do not cover the Thermovent, and please do not look directly at or touch the COB lamp beads under any circumstances.
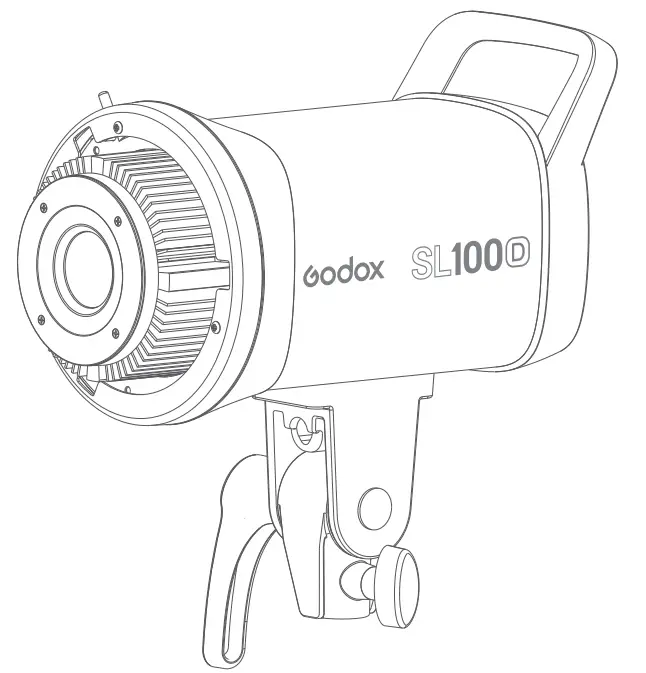
Name of Body
Light Head


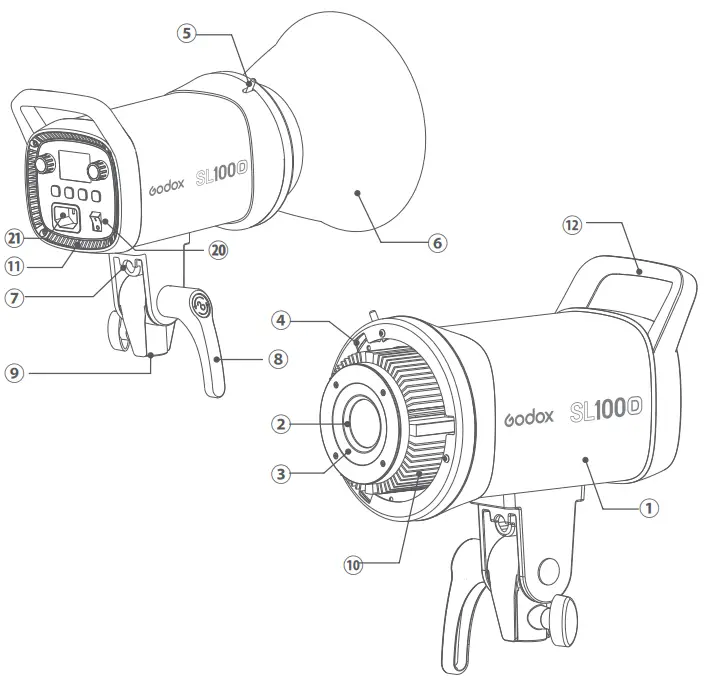
| 01. Light Body 02. LED Beads 03. Protect Cover 04. Bowens-mount 05. Accessory Locking Ring 06. Reflector 07. Umbrella Input 08. Direction Adjust 09. Bracket 10. Thermovent 11. Air Inlet | 12. Handle 13. Display 14. DIM Dial 15. FX Dial 16. FX Button 17. GR Button 18.CH Button 19. Bluetooth 20. Power On/Off 21. Power Jack |
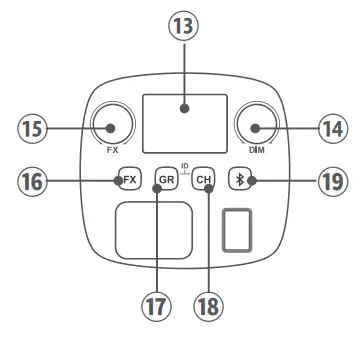
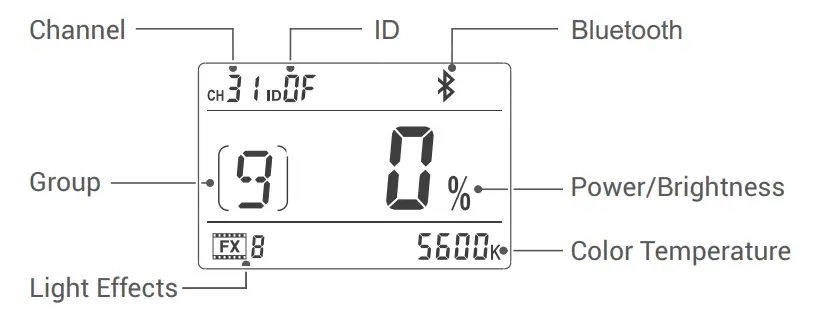
LCD Panel
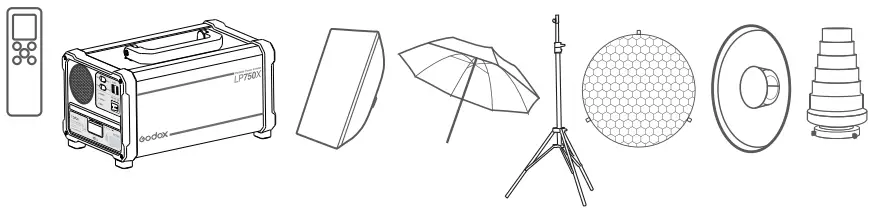
What’s in the Box

Optional Accessories
The product can be used in combination with the following accessories sold separately, so as to achieve the best photography effects: RC-A6 Remote Control, Power Inverter, Softbox, Photographic Umbrella, Light Stand, and Honey Comb, Beauty Dish, Snoot, etc.
Power Source
Connect the LED light to the power source with a power cable. Then, press the power switch to turn it on-off.
Operation
Brightness Adjustment: turn the DIM dial to adjust brightness from 0% to 100%. Turn the FX dial to decrease the value while rightwards to increase.And adjust 1 value in normal operation while 10 values in quick operation.
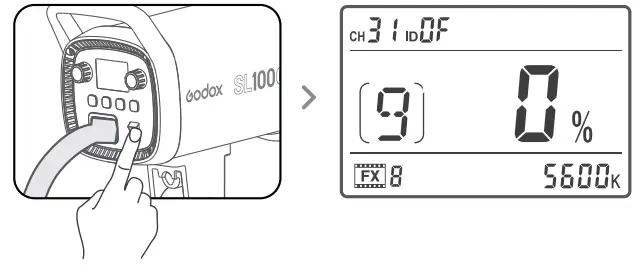
Light Effects Mode
Short press the FX button to enter or exit the special effects. When entering the FX modes, the FX icon will be displayed on the LCD panel. Then, turn the FX dial to choose one mode from the 8 special effects modes to achieve creative shooting.
| Display | FX1 | FX2 | FX3 | FX4 | FX5 | FX6 | FX7 | FX8 |
| Scene | Flash 1 | Flash 2 | Flash 3 | Storm 1 | Storm 2 | Storm 3 | TV | Broken |
2.4G Wireless Setting
With a 2.4G wireless system, LED Video Light SL100D has received and control function.
Up to 16 groups of LED lights can be controlled. 32 channels and 99 wireless IDs are available with strong anti-interference capability. Please set the channels, groups, and IDs of LED light to the same as those of the RC-A6 remote control (optional) before usage.
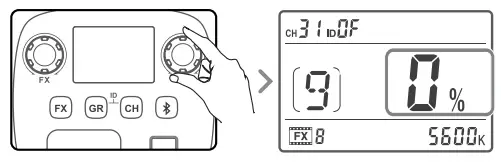
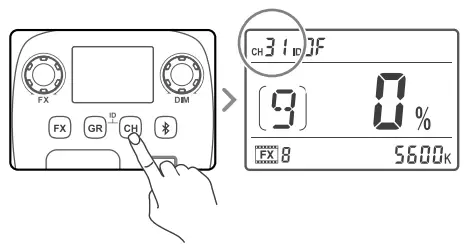
CH Channel adjustment: short press the CH button and the CH values will be blinking on the display. Turn the DIM dial on the right to adjust channels from 1 to 32. Turn the select dial leftwards to decrease the value while rightwards to increase. Short press the CH button again to exit from the CH setting.
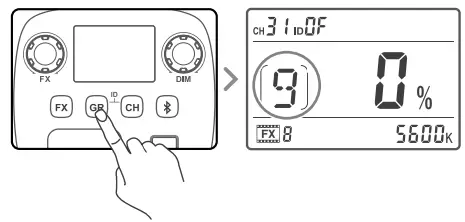
GR Group adjustment: short press the GR button and the GR values will be blinking on the display. Turn the DIM dial on the right to adjust groups from 0 to 9 and A to F. Turn the select dial leftwards to decrease the value while rightwards to increase. Short press the GR Button again to exit from the GR setting.
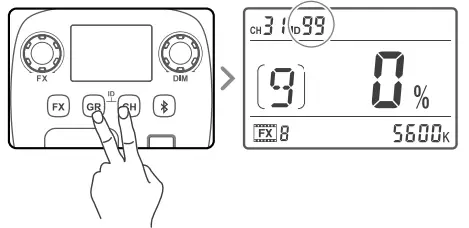
 ID Setting: long-press the CH and GR button together until the ID values is blinking on the display. Turn the DIM dial on the right to adjust IDs from OFF and 1 to 99. Turn the select dial leftwards to decrease the value while rightwards to increase. Then, long-press the CH and button to exit from the ID setting.
Bluetooth Setting
- Bluetooth MAC code checking: short press the Bluetooth button until the Bluetooth MAC code is displayed.
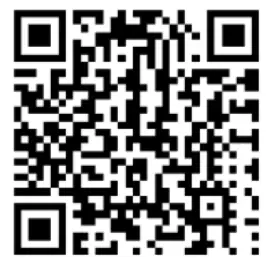
Press the Bluetooth button again and the MAC code will disappear. And the code will be displayed after returning to the main interface. - Scan the QR code to download the “GodoxLight” smartphone APP(which can be used on Android and Apple).
For more smartphone APP operations, please open the “help” in APP to gain detailed guidance. - Bluetooth reset function: long-press the SET button for 2 seconds and the Bluetooth icon will blink because of resetting. And the icon will stop blinking after being successfully reset.
Note: The APP can be used directly on the firstly installed device (smartphone or iPad). When changing to another mobile device (smartphone or iPad), the light shall be reset before the normal connection of the APP.
 http://www.guteleben.com/html/dl_app/c_ble/GodoxLight/index.html
Failures Reminder
![]() lighting indicates fan failure,
lighting indicates fan failure,  flashing indicates failure.
![]() Light indicates a high-temperature alarm,
Light indicates a high-temperature alarm, ![]() flashing indicates high-temperature protection status and light automatically enters the shutdown procedure.
flashing indicates high-temperature protection status and light automatically enters the shutdown procedure.
Technical Data
| LED Light | SL100D |
| Power Supply | AC100V-240V(50/60Hz) |
| Output Power | 100W |
| Channel | 32 |
| Group | 16(0-9/A BCDE F) |
| ID | OFF/1-99 |
| Color Temperature | 5600K |
| Light Adjustment Range | 0%∼100% |
| 100% Illuminance(LUX) (with standard reflector, testing distance, 1 m) | Max. 32100 |
| CRI | ≥96 |
| TLCI | ≥97 |
| The temperature of the Working Environment | -10° – 40° |
| Light Effect Mode | 8 |
| Control Method | Smartphone APP/2.4G Wireless |
| Bluetooth Transmission Distance | ≈30m |
| 2.4G Wireless Transmission Distance | ≈ 30m |
| Beam Angle | 120° |
| Dimension | 243*205*127mm |
| Net Weight | 1.6kg (not including reflector) |
| BT Frequency Range | 2402.0-2480.0MHz |
| Max. Transmitting Power | 5dbm |
Changes made to the specifications or designs may not be reflected in this manual.
Maintenance
- This product, except consumables e.g. battery, power cable and connect cable, is supported with a one-year warranty.
- Avoid sudden impacts and the product should be dedusted regularly.
- Maintenance of the flash must be performed by our authorized maintenance department which can provide original accessories.
- Unauthorized service will void the warranty.
- If the product had failures or was wetted, do not use it until it is repaired by professionals.
- Changes made to the specifications or designs may not be reflected in this manual.
FCC Statement
This device complies with part 15 of the FCC Rules. Operation is subject to the following two conditions: (1) This device may not cause harmful interference, and (2) this device must accept any interference received, including interference that may cause undesired operation.
Any changes or modifications not expressly approved by the party responsible for compliance could void the user’s authority to operate the equipment.
Note: This equipment has been tested and found to comply with the limits for a Class B digital device, pursuant to part 15 of the FCC Rules. These limits are designed to provide reasonable protection against harmful interference in a residential installation. This equipment generates uses and can radiate radio frequency energy and, if not installed and used in accordance with the instructions, may cause harmful interference to radio communications.
However, there is no guarantee that interference will not occur in a particular installation. If this equipment does cause harmful interference to radio or television reception, which can be determined by turning the equipment off and on, the user is encouraged to try to correct the interference by one or more of the following measures:
– Reorient or relocate the receiving antenna.
– Increase the separation between the equipment and receiver.
– Connect the equipment into an outlet on a circuit different from that to which the receiver is connected.
– Consult the dealer or an experienced radio/TV technician for help.
To maintain compliance with FCC’s RF exposure guidelines, This equipment should be installed and operated with a minimum distance between 20cm between the radiator and your body: Use only the supplied antenna.
Warranty
Dear customers, as this warranty card is an important certificate to apply for our maintenance service, please fill in the following form in coordination with the seller and safe-keep it. Thank you!
| Product Information | Model | Product Code Number |
| Customer Information | Name | Contact Number |
| Address | ||
| Seller Information | Name | |
| Contact Number | ||
| Address | ||
| Date of Sale | ||
| Note: | ||
Note: This form shall be sealed by the seller.
Applicable Products
The document applies to the products listed on the Product Maintenance information (see below for further information). Other products or accessories (e.g. promotional items, giveaways, additional accessories attached, etc.) are not included in this warranty scope.
Warranty Period
The warranty period of products and accessories is implemented according to the relevant Product Maintenancelnformation. The warranty period is calculated from the day(purchase date) when the product is bought for the first time, And the purchase date is considered as the date registered on the warranty card when buying the product.
How to Get the Maintenance Service
If maintenance service is needed, you can directly contact the product distributor or authorized service institutions. You can also contact the Godox after-sale service call and we will offer you service. When applying for maintenance service, you should provide a valid warranty card. If you cannot provide valid warranty card, we may offer you a maintenance service once confirmed that the product or accessory is involved in the maintenance scope, but that shall not be considered our obligation.
Inapplicable Cases
The guarantee and service offered by this document are not applicable in the following cases:
- The product or accessory has expired its warranty period;
- Breakage or damage caused by inappropriate usage, maintenance or preservation, such as improper packing, improper usage, improper plugging in/out external equipment, falling off or squeezing by external force, contacting or exposing to the improper temperature, solvent, acid, base, flooding and damp environments, etc;
- Breakage or damage caused by non-authorized institution or staff in the process of installation, maintenance, alteration, addition and detachment;
- The original identifying information of the product or accessory is modified, alternated, or removed;
- No valid warranty card; .
Breakage or damage caused by using illegally authorized, nonstandard, or non-public released software; - Breakage or damage caused by force majeure or accident;
- Breakage or damage that could not be attributed to the product itself. Once met these situations above, you should seek solutions from the related responsible parties and Godox assumes no responsibility. The damage caused by parts, accessories, and software beyond the warranty period or scope is not included in our maintenance scope. The normal discoloration, abrasion and consumption are not the breakages within the maintenance scope.
Maintenance and Service Support Information
The warranty period and service types of products are implemented according to the following Product Maintenance Information:
| Product Type | Name | Maintenance Period(month) | Warranty Service Type |
| Parts | Circuit Board | 12 | The customer sends the product to the designated site |
| Battery | 3 | The customer sends the product to the designated site | |
| Electrical parts e.g.battery charger, power cord, sync cable, etc. | 12 | The customer sends the product to the designated site | |
| Other Items | Flash tube, modeling lamp, lamp body, lamp cover, locking device, package, etc. | No | Without warranty |
Godox After-sale Service Call 0755-29609320-8062
GODOX Photo Equipment Co., Ltd.
Add Building 2, Yaochuan Industrial Zone, Tangwei Community, Fuhai Street, Baoan District,
Shenzhen, China Tel: +86-755-29609320(8062) Fax: +86-755-25723423 E-mail: [email protected]

Made in China
godox.com
705-SL10D0-00


