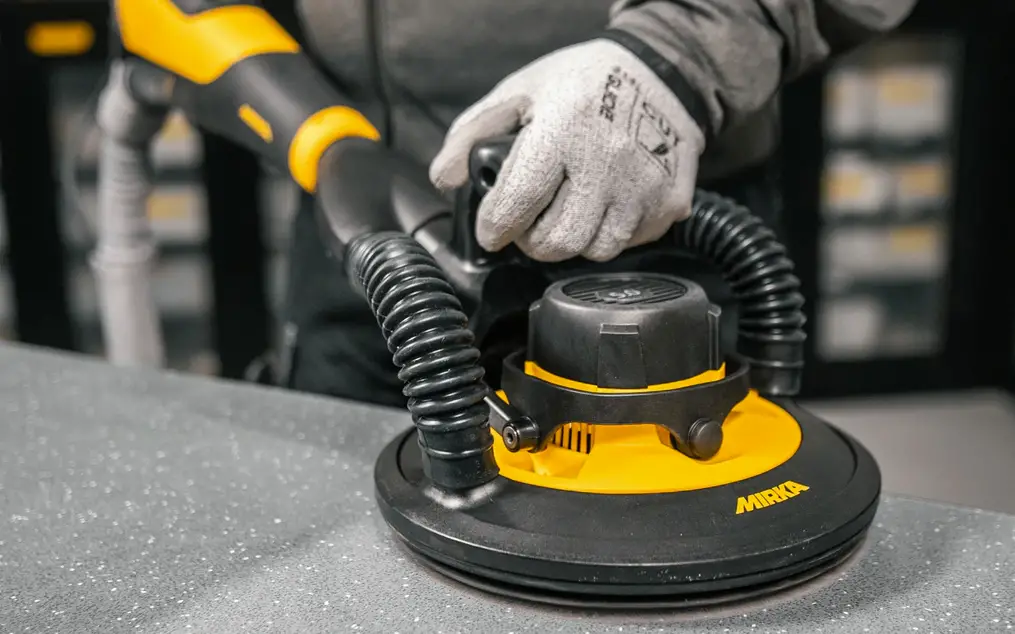
MIRKA LEROS-S 100-240V Compact Length Wall Sander

Exploded View
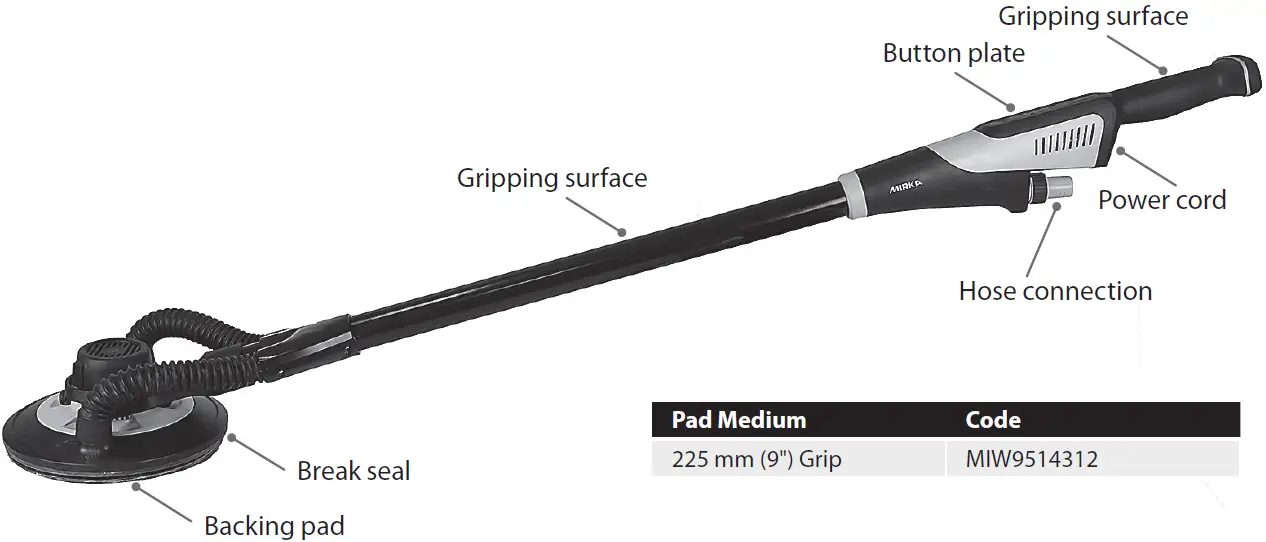
LEROS 950XCV Handle

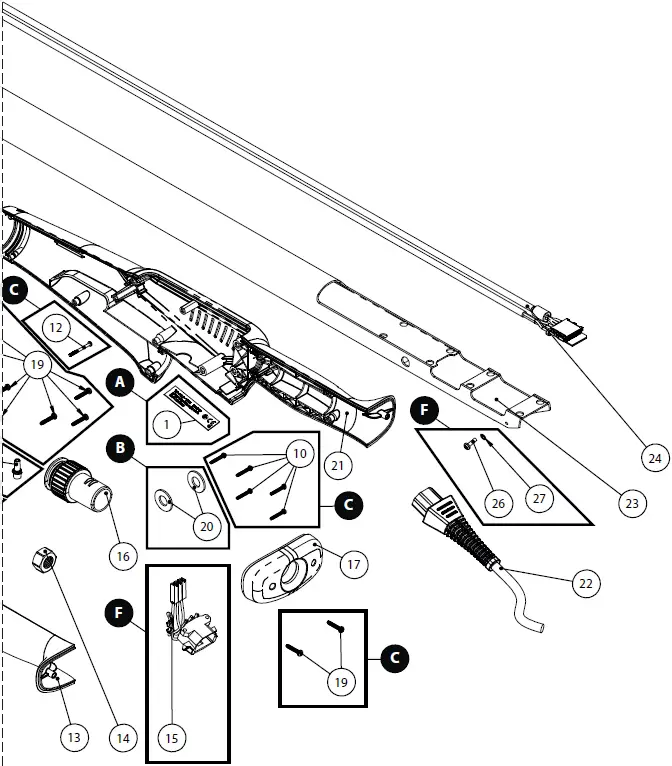
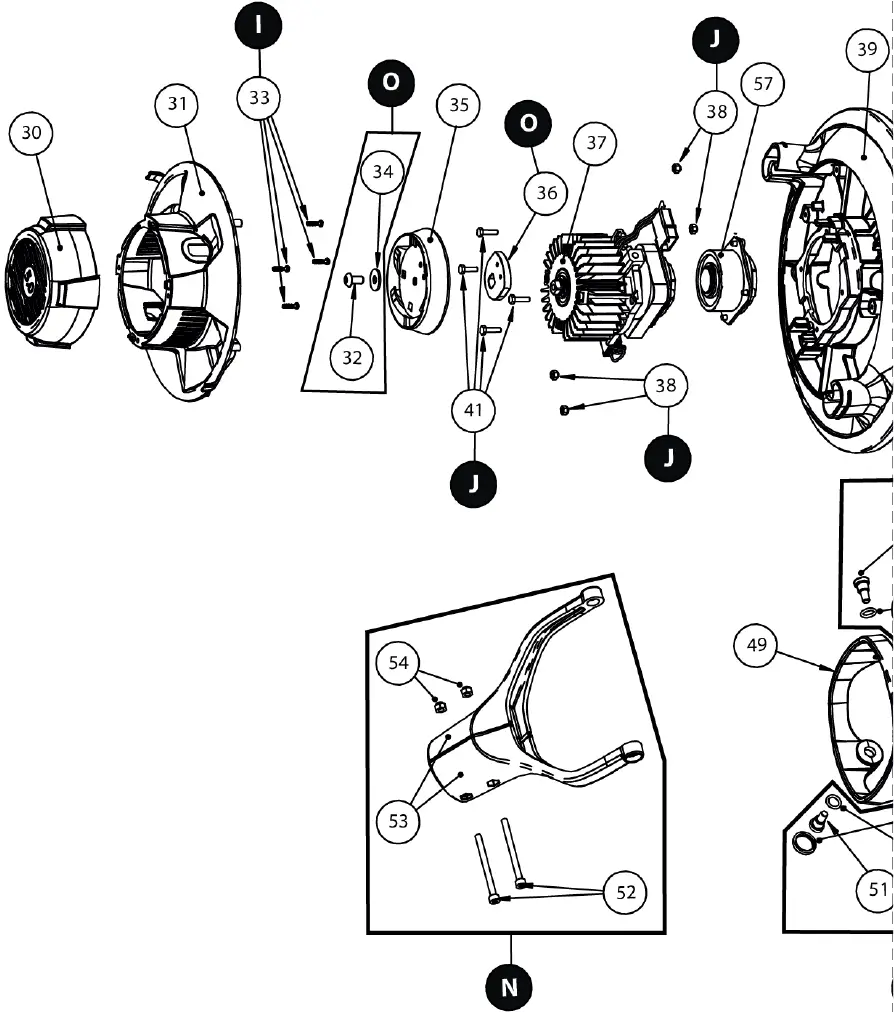
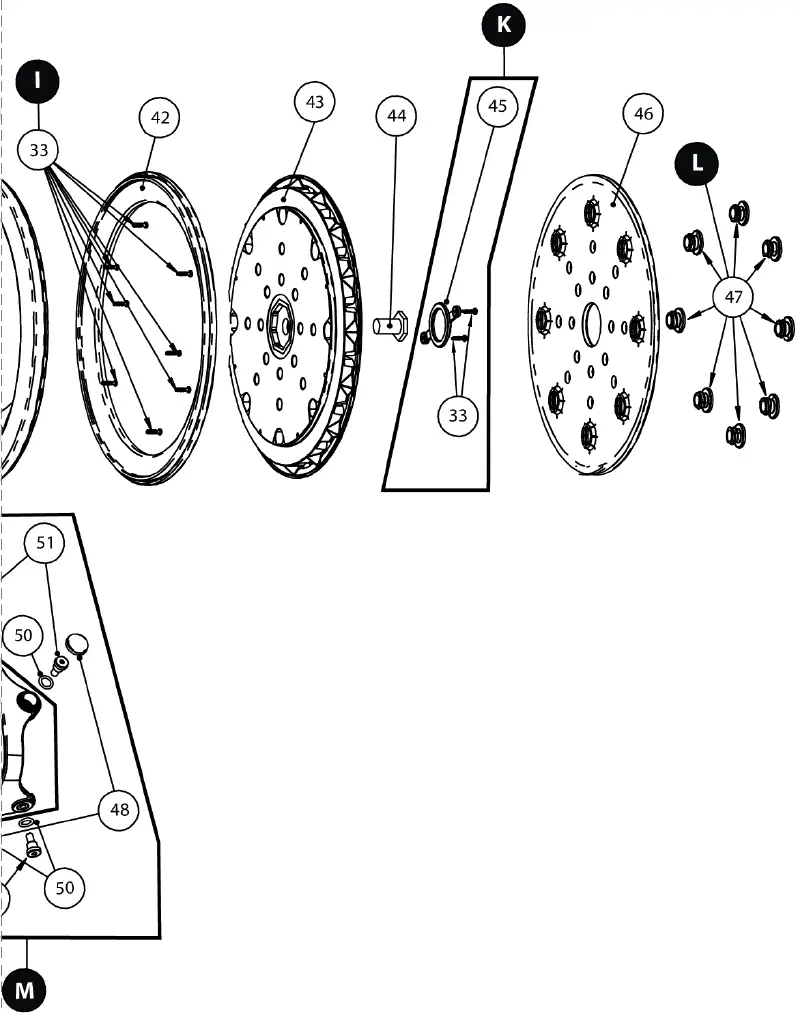
LEROS 950XCV Grinding Head
Parts List – LEROS 950XCV Kits
| Mirka Code | Item | Description | Kit | Quantity | Tightening Torque |
| Type Label kit 100-240 V | A | ||||
| 1 | Type Label | 5 | |||
| MIW9520311 | O-Ring kit | B | |||
| 3 | O-Ring 39,2 x 3,0 | 1 | |||
| 20 | Rubber Washer | 2 | |||
| MIW9521011 | Handle Screw kit | C | |||
| 10 | Screws STP 2,5×16 mm | 7 | 0,8 Nm | ||
| 12 | Screws 2,5×25/10 mm | 1 | 0,8 Nm | ||
| 19 | Screws 3×16 mm | 9 | 1,4 Nm | ||
| MIW9521111 | PCB Spacer kit | D | |||
| 11 | PCB Spacer | 8 | |||
| MIW9521211 | PCB Screw kit | E | |||
| 12 | Screws 2,5×25/10 mm | 8 | 0,5 Nm | ||
| MIW9521511 | Power Socket Assembly kit | F | |||
| 15 | Power Socket Assembly | 1 | |||
| 26 | Grounding Screw | 1 | 0,8 Nm | ||
| 27 | Star Washer M3 | 1 | |||
| MIW9521811 | Screw kit Y-Branch | G | |||
| 18 | Screws 3×14 mm | 6 | 0,8 Nm | ||
| MIW9522511 | Dust Hose kit | H | |||
| 25 | Dust Hose | 2 | |||
| MIW9523311 | Screw kit Fairing | I | |||
| 33 | Screws STS T25x10 | 12 | 0,8 Nm | ||
| MIW9523811 | Screw kit Motor | J | |||
| 38 | Lock Nut | 4 | 1,4 Nm | ||
| 41 | Screws M3x12 mm | 4 | |||
| MIW9524011 | Cover Cap kit | K | |||
| 33 | Screws STS T25x10 | 2 | 0,8 Nm | ||
| 45 | Cover Cap | 1 | |||
| MIW9514711 | Hole Screw kit | L | |||
| 47 | Hole Screws | 8 | 0,8 Nm | ||
| MIW9524811 | Joint Screw kit | M | |||
| 48 | Screw Caps | 2 | |||
| 50 | O-Ring | 4 | |||
| 51 | Joint Screws M5 ** | 4 | 3 Nm / 5 Nm | ||
| MIW9515411 | Joint Fork kit | N | |||
| 52 | Screws M4x50 | 2 | 1,4 Nm | ||
| 53 | Joint Fork | 2 | |||
| 54 | Lock Nut | 2 | |||
| MIW9523211 | Dynamic Weight kit | O | |||
| 32 | Screws M5x10 | 1 | 3 Nm | ||
| 34 | Fan Washer | 1 | |||
| 36 | Dynamic Weight | 1 |
NOTE! Repairs done by non-authorized repairer will breach the Mirka warranty.
Electrical tools must be serviced by a qualified repair person and in accordance with national requirements.
Parts List – LEROS 950XCV Spare Parts & Accessories
| Mirka Code | Item | Description | Kit | Quantity | Tightening Torque |
| 1 | Type Label | A | 1 | ||
| MIW9510211 * | 2 | Speed Controller * | 1 | ||
| 3 | O-Ring 39,2 x 3 | B | 1 | ||
| MIW9510411 | 4 | Button Plate | 1 | ||
| MIW9510511 | 5 | Dust Guide | 1 | ||
| MIW9510611 | 6 | Gap Filler 3 mm | 1 | ||
| MIW9510711 | 7 | Pipe Sealing + 2 Foam Dampers | 1 | ||
| MIW9510811 | 8 | Y-Branch Top | 1 | ||
| MIW9510911 | 9 | Y-Branch Base | 1 | ||
| 10 | Screws STP 2,5×16 mm | C | 7 | ||
| 11 | PCB Spacers | D | 8 | ||
| 12 | Screws 2,5×25/10 mm | C,E | 9 | ||
| MIW9511311 | 13 | Handle Left | 1 | ||
| MIW9511411 | 14 | Nut M12 | 1 | ||
| 15 | Power Socket Assembly | F | 1 | ||
| MIW9511611 | 16 | Hose Connector | 1 | ||
| MIW9511711 | 17 | End Cap | 1 | ||
| 18 | Screws 3×14 mm | G | 6 | ||
| 19 | Screws 3×16 mm | C | 9 | ||
| 20 | Rubber Washers | B | 2 | ||
| MIW9512111 | 21 | Handle Right | 1 | ||
| MIE9017011 | 22 | Rewireable Mains Cable 4,3m CE 230V UK | 1 | ||
| MIE9017211 | 22 | Rewireable Mains Cable 4,3m 100-120V US | 1 | ||
| MIE9017311 | 22 | Rewireable Mains Cable 4,3m 100-120V UK | 1 | ||
| MIW9512311 | 23 | Tube | 1 | ||
| MIW9512411 | 24 | Power and Signal Cable | 1 | ||
| 25 | Dust Hoses | H | 1 | ||
| 26 | Grounding Screw | F | 1 | ||
| 27 | Star Washer M3 | F | 1 | ||
| MIW9513011 | 30 | Fan Cover | 1 | ||
| MIW9513111 | 31 | Fairing Cover | 1 | ||
| 32 | Screws M5x10 | O | 1 | 3 Nm | |
| 33 | Screws STS T25x10 | I,K | 14 | ||
| 34 | Fan Washer | O | 1 | ||
| MIW9513511 | 35 | Fan | 1 | ||
| 36 | Dynamic Weight | O | 1 | ||
| MIW9513711* | 37 | Motor Assembly 230V* | 1 | ||
| 38 | Lock Nuts | J | 4 | ||
| MIW9513911 | 39 | Fairing | 1 | ||
| 41 | Screws M3x12 mm | J | 4 | ||
| MIW9514211 | 42 | Brake Seal | 1 | ||
| MIW9514312 | 43 | Backing Pad 225mm (Grip & Screw Mounting of Interface) | 1 | ||
| MIW9514411 | 44 | Pad Screw | 1 | 10 Nm | |
| 45 | Cover cap | K | 1 | ||
| MIW9514611 | 46 | Interface | 1 | ||
| 47 | Hole screws | L | 8 | ||
| 48 | Screw caps | M | 2 | ||
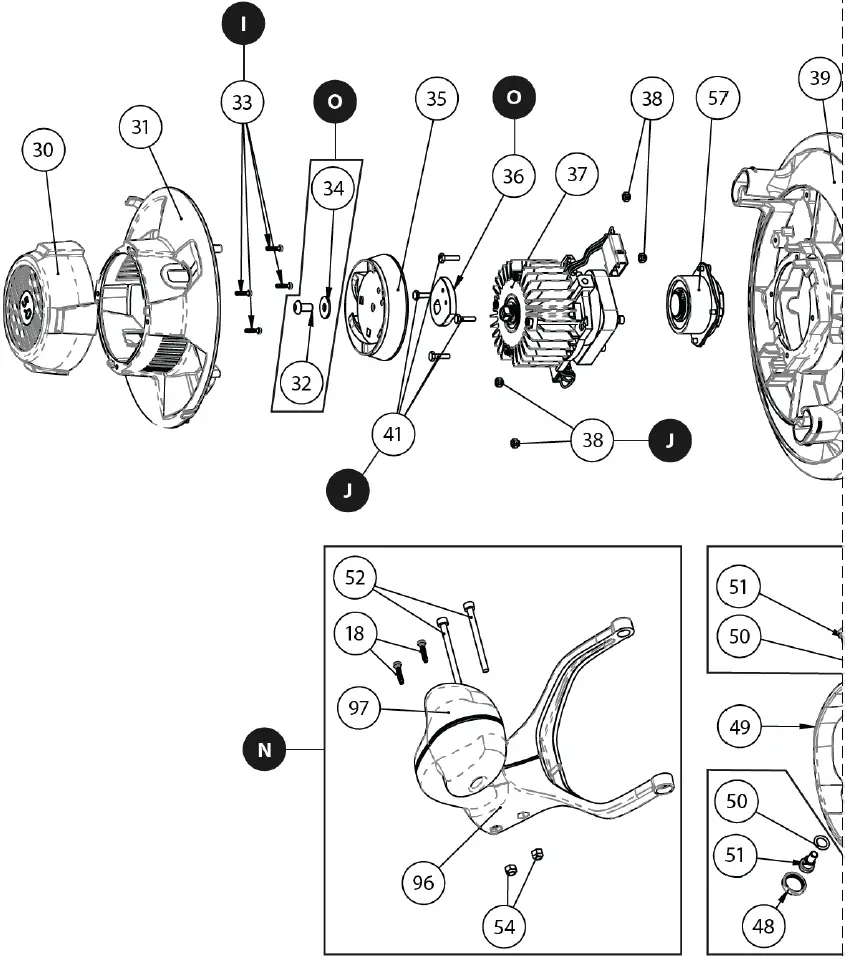
| MIW9514911 | 49 | Joint ring | 1 | ||
| 50 | O-rings | M | 4 | ||
| 51 | Joint screws M5 | M | 4 | ||
| 52 | Screws M4 x 50 | N | 2 | ||
| 53 | Joint forks | N | 2 | ||
| 54 | Lock nuts | N | 2 | ||
| MIW9525711 | 57 | Spindle + Bearing assembly | 1 | ||
* Spare parts only available to authorized repairers.
LEROS-S 950XCV Handle
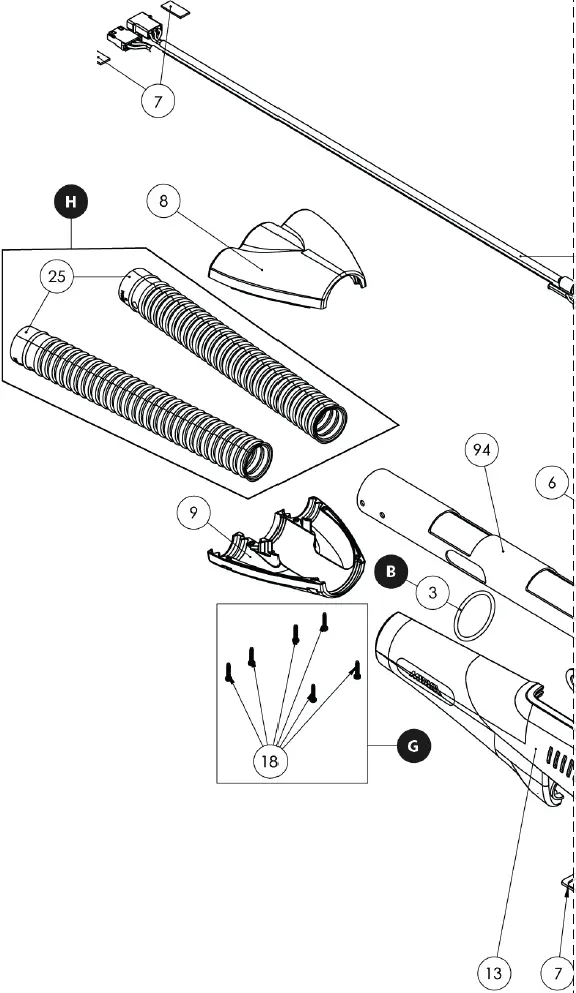
LEROS-S 950XCV Grinding Head
Parts List – LEROS-S 950XCV Kits
| Mirka Code | Item | Description | Kit | Quantity | Tightening Torque |
| Type Label kit 100-240 V | A | ||||
| 92 | Type Label | 5 | |||
| MIW9520311 | O-Ring kit | B | |||
| 3 | O-Ring 39,2 x 3,0 | 1 | |||
| 20 | Rubber Washer | 2 | |||
| MIW9521011 | Handle Screw kit | C | |||
| 10 | Screws STP 2,5×16 mm | 7 | 0,8 Nm | ||
| 12 | Screws 2,5×25/10 mm | 1 | 0,8 Nm | ||
| 19 | Screws 3×16 mm | 9 | 1,4 Nm | ||
| MIW9521111 | PCB Spacer kit | D | |||
| 11 | PCB Spacer | 8 | |||
| MIW9521211 | PCB Screw kit | E | |||
| 12 | Screws 2,5×25/10 mm | 8 | 0,5 Nm | ||
| MIW9521511 | Power Socket Assembly kit | F | |||
| 15 | Power Socket Assembly | 1 | |||
| 26 | Grounding Screw | 1 | 0,8 Nm | ||
| 27 | Star Washer M3 | 1 | |||
| MIW9521811 | Screw kit Y-Branch | G | |||
| 18 | Screws 3×14 mm | 6 | 0,8 Nm | ||
| MIW9522511 | Dust Hose kit | H | |||
| 25 | Dust Hose | 2 | |||
| MIW9523311 | Screw kit Fairing | I | |||
| 33 | Screws STS T25x10 | 12 | 0,8 Nm | ||
| MIW9523811 | Screw kit Motor | J | |||
| 38 | Lock Nut | 4 | 1,4 Nm | ||
| 41 | Screws M3x12 mm | 4 | |||
| MIW9524011 | Cover Cap kit | K | |||
| 33 | Screws STS T25x10 | 2 | 0,8 Nm | ||
| 45 | Cover Cap | 1 | |||
| MIW9514711 | Hole Screw kit | L | |||
| 47 | Hole Screws | 8 | 0,8 Nm | ||
| MIW9524811 | Joint Screw kit | M | |||
| 48 | Screw Caps | 2 | |||
| 50 | O-Ring | 4 | |||
| 51 | Joint Screws M5 ** | 4 | 3 Nm / 5 Nm | ||
| MIW9525411 | Joint Fork kit with Handle | N | |||
| 18 | Screws 3×14 mm | 2 | |||
| 52 | Screws M4x50 | 2 | 1,4 Nm | ||
| 54 | Lock Nut | 2 | |||
| 96 | Joint Fork with Handle Right | 1 | |||
| 97 | Joint Fork with Handle Left | 1 | |||
| MIW9523211 | Dynamic Weight kit | O | |||
| 32 | Screws M5x10 | 1 | 3 Nm | ||
| 34 | Fan Washer | 1 | |||
| 36 | Dynamic Weight | 1 |
NOTE! Repairs done by non-authorized repairer will breach the Mirka warranty.
Electrical tools must be serviced by a qualified repair person and in accordance with national requirements.
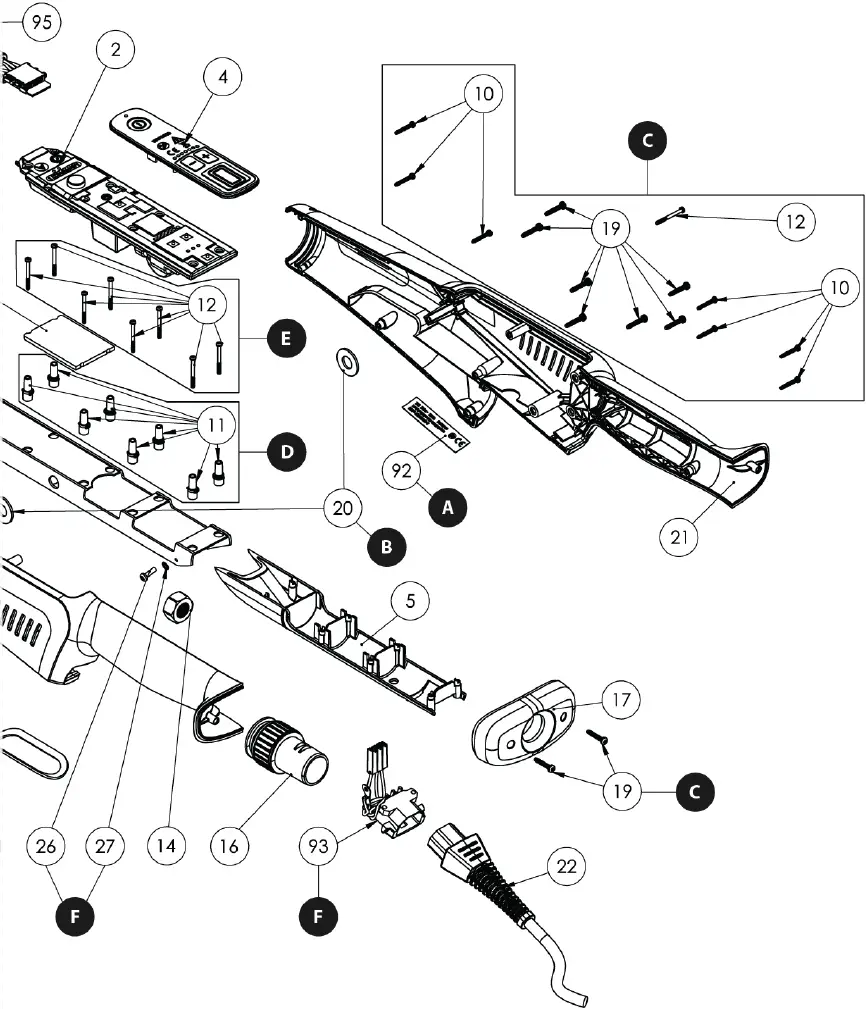
Parts List – LEROS-S 950XCV Spare Parts & Accessories
| Mirka Code | Item | Description | Kit | Quantity | Tightening Torque |
MIW9510211 * | 2 | Speed Controller * | 1 | ||
| 3 | O-Ring 39,2 x 3 | B | 1 | ||
| MIW9510411 | 4 | Button Plate | 1 | ||
| MIW9510511 | 5 | Dust Guide | 1 | ||
| MIW9510611 | 6 | Gap Filler 3 mm | 1 | ||
| MIW9510711 | 7 | Pipe Sealing + 2 Foam Dampers | 1 | ||
| MIW9510811 | 8 | Y-Branch Top | 1 | ||
| MIW9510911 | 9 | Y-Branch Base | 1 | ||
| 10 | Screws STP 2,5×16 mm | C | 7 | ||
| 11 | PCB Spacers | D | 8 | ||
| 12 | Screws 2,5×25/10 mm | C,E | 9 | ||
| MIW9511311 | 13 | Handle Left | 1 | ||
| MIW9511411 | 14 | Nut M12 | 1 | ||
| MIW9511611 | 16 | Hose Connector | 1 | ||
| MIW9511711 | 17 | End Cap | 1 | ||
| 18 | Screws 3×14 mm | G,N | 6 | ||
| 19 | Screws 3×16 mm | C | 9 | ||
| 20 | Rubber Washers | B | 2 | ||
| MIW9512111 | 21 | Handle Right | 1 | ||
| MIE9017011 | 22 | Rewireable Mains Cable 4,3m CE 230V UK | 1 | ||
| MIE9017211 | 22 | Rewireable Mains Cable 4,3m 100-120V US | 1 | ||
| MIE9017311 | 22 | Rewireable Mains Cable 4,3m 100-120V UK | 1 | ||
| 25 | Dust Hoses | H | 1 | ||
| 26 | Grounding Screw | F | 1 | ||
| 27 | Star Washer M3 | F | 1 | ||
| MIW9513011 | 30 | Fan Cover | 1 | ||
| MIW9513111 | 31 | Fairing Cover | 1 | ||
| 32 | Screws M5x10 | O | 1 | 3 Nm | |
| 33 | Screws STS T25x10 | I,K | 14 | ||
| 34 | Fan Washer | O | 1 | ||
| MIW9513511 | 35 | Fan | 1 | ||
| 36 | Dynamic Weight | O | 1 | ||
| MIW9563711* | 37 | Motor Assembly for LEROS X* | 1 | ||
| 38 | Lock Nuts | J | 4 | ||
| MIW9513911 | 39 | Fairing | 1 | ||
| 41 | Screws M3x12 mm | J | 4 | ||
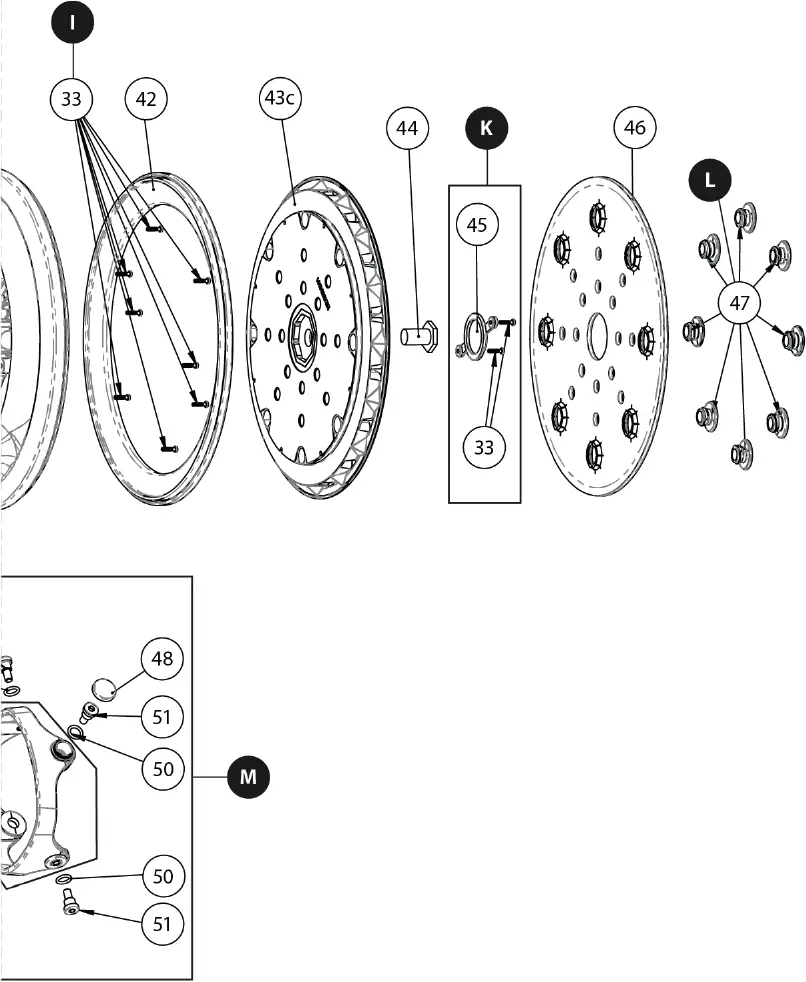
| MIW9514211 | 42 | Brake Seal | 1 | ||
| MIW9514312 | 43 | Backing Pad 225mm (Grip & Screw Mounting of Interface) | 1 | ||
| MIW9514411 | 44 | Pad Screw | 1 | 10 Nm | |
| 45 | Cover Cap | K | 1 | ||
| MIW9514611 | 46 | Interface | 1 | ||
| 47 | Hole Screws | L | 8 | ||
| 48 | Screw caps | M | 2 | ||
| MIW9514911 | 49 | Joint Ring | 1 | ||
| 50 | O-rings | M | 4 | ||
| 51 | Joint screws M5 | M | 4 | ||
| 52 | Screws M4 x 50 | N | 2 | ||
| 54 | Lock nuts | N | 2 | ||
| MIW9525711 | 57 | Spindle + Bearing assembly | 1 | ||
| 92 | Type label | A | 1 | ||
| 93 | Power socket assembly | F | 1 | ||
| MIW9519411 | 94 | Tube (Short) | 1 | ||
| MIW9519511 | 95 | Power and signal cable (short) | 1 | ||
| 96 | Joint fork with handle, right | N | 1 | ||
| 97 | Joint fork with handle, left | N | 1 | ||
* Spare parts only available to authorized repairers.

General Power Tool Safety Warnings
WARNING Read all safety warnings and all instructions. Failure to follow the warnings and instructions may result in electric shock, fire and/or serious injury.
Save all warnings and instructions for future reference. The term “power tool” in the warnings refers to your mains-operated (corded) power tool or battery-operated (cordless) power tool.
- Work area safety
- Keep work area clean and well lit. Cluttered or dark areas invite accidents.
- Do not operate power tools in explosive atmospheres, such as in the presence of flammable liquids, gases or dust. Power tools create sparks which may ignite the dust or fumes.
- Keep children and bystanders away while operating a power tool. Distractions can cause you to lose control.
- Electrical safety
- Power tool plugs must match the outlet. Never modify the plug in any way. Do not use any adapter plugs with earthed (grounded) power tools. Unmodified plugs and matching outlets will reduce risk of electric shock.
- Avoid body contact with earthed or grounded surfaces, such as pipes, radiators, ranges and refrigerators. There is an increased risk of electric shock if your body is earthed or grounded.
- Do not expose power tools to rain or wet conditions. Water entering a power tool will increase the risk of electric shock.
- Do not abuse the cord. Never use the cord for carrying, pulling or unplugging the power tool. Keep cord away from heat, oil, sharp edges and moving parts. Damaged or entangled cords increase the risk of electric shock.
- When operating a power tool outdoors, use an extension cord suitable for outdoor use. Use of a cord suitable for outdoor use reduces the risk of electric shock.
- If operating a power tool in a damp location is unavoidable, use a residual current device (RCD) protected supply. Use of an RCD reduces the risk of electric shock.
- Personal safety
- Stay alert, watch what you are doing and use common sense when operating a power tool. Do not use a power tool while you are tired or under the influence of drugs, alcohol or medication. A moment of inattention while operating power tools may result in serious personal injury.
- Use personal protective equipment. Always wear eye protection. Protective equipment such as a dust mask, non-skid safety shoes, hard hat, or hearing protection used for appropriate conditions will reduce personal injuries.
- Prevent unintentional starting. Ensure the switch is in the off-position before connecting to power source and/or battery pack, picking up or carrying the tool. Carrying power tools with your finger on the switch or plugging in tools when the switch is in the on-position invites accidents.
- Remove any adjusting key or wrench before turning the power tool on. A wrench or a key left attached to a rotating part of the power tool may result in personal injury.
- Do not overreach. Keep proper footing and balance at all times. This enables better control of the power tool in unexpected situations.
- Dress properly. Do not wear loose clothing or jewelry. Keep your hair, clothing and gloves away from moving parts. Loose clothes, jewelry or long hair can be caught in moving parts.
- If devices are provided for the connection of dust extraction and collection facilities, ensure these are connected and properly used. Use of dust collection can reduce dust-related hazards.
- Do not let familiarity gained from frequent use of tools allow you to become complacent and ignore tool safety principles. A careless action can cause severe injury within a fraction of a second.
- Power tool use and care
- Do not overload the power tool. Use the correct power tool for your application. The correct power tool will do the job better and safer at the rate for which it was designed.
- Do not use the power tool if the switch does not turn it on and off. Any power tool that cannot be controlled with the switch is dangerous and must be repaired.
- Disconnect the plug from the power source and/or the battery pack from the power tool before making any adjustments, changing accessories, or storing power tools. Such preventive safety measures reduce the risk of starting the power tool accidentally.
- Store idle power tools out of the reach of children and do not anyone who is unfamiliar with the power tool or these instructions to operate the power tool. Power tools are dangerous in the hands of untrained users.
- Maintain power tools. Check for misalignment or binding of moving parts, breakage of parts and any other condition that may affect the power tool’s operation. If damaged, have the power tool repaired before use. Many accidents are caused by poorly maintained power tools.
- Keep cutting tools sharp and clean. Properly maintained cutting tools with sharp cutting edges are less likely to bind and are easier to control.
- Use the power tool, accessories and tool bits etc. in accordance with these instructions, taking into account the working conditions and the work to be performed. Use of the power tool for operations different from those intended could result in a hazardous situation.
- Keep handles and grasping surfaces dry, clean and free from oil and grease. Slippery handles and grasping surfaces do not allow for safe handling and control of the tool in unexpected situations.
- Service
- Have your power tool serviced by a qualified repair person using only identical replacement parts. This will ensure that the safety of the power tool is maintained.
Additional Safety Warnings
- The safety of the tool is granted only by using original Mirka backing pads.
- Read the Materials Safety Data Sheet (MSDS) for the work surface.
- If any physical hand/wrist discomfort is experienced, stop working and seek medical attention. Hand, wrist and arm injury may result from repetitive work, motion and overexposure to vibrations.
- Always refit the cover cap after installing the backing pad.
- The power supply socket and connector are non-IEC appliance couplers. Only use an original Mirka power supply cable. The Mirka power supply cable can be bought from your Mirka Dealer.
- Check the tool, backing pad, power cord and fittings regularly for wear.
- Clean or replace the dust extractor´s collection bag daily. Dust can be highly combustible. Cleaning or replacing the bag also assures optimum performance.
- If the tool appears to malfunction, stop using it immediately and arrange for service and repair.
- Keep hands clear of the spinning accessory during use.
- Do not allow the tool to free speed without taking precautions to protect surrounding people and objects in the event that the abrasive or backing pad should come loose.
- Do not use in wet conditions.
Additional Warnings
Some dust created by power sanding, sawing, grinding, drilling, and other construction activities contains chemicals known to cause cancer, birth defects or other reproductive harm. Some examples of these chemicals are:
- lead from lead-based paints,
- crystalline silica from bricks and cement and other masonry products, and
- arsenic and chromium from chemically treated lumber.
Your risk from these exposures varies, depending on how often you do this type of work. To reduce your exposure to these chemicals: work in a well ventilated area, and work with approved safety equipment, such as those dust masks that are specially designed to filter out microscopic particles.
Technical Data
| LEROS | 950XCV | -S 950XCV |
| Power | 250 W | 250 W |
| Mains voltage | 100 – 240 VAC | 100 – 240 VAC |
| Speed | 4,000 – 8,000 rpm | 4,000 – 8,000 rpm |
| Orbit | 5 mm (3/16″) | 5 mm (3/16″) |
| Size of backing pad | Ø 225 mm (9″) | Ø 225 mm (9″) |
| Weight | 3.5 kg (7.7 lbs) | 3.2 kg (7.1 lbs) |
| Degree of protection | I | I |
Noise and Vibration Information
Measured values are determined according to EN 62841.
| LEROS | 950XCV | -S 950XCV |
| Sound pressure level (LpA) | 73 dB(A) | 73 dB(A) |
| Sound power level (LWA) | 84 dB(A) | 84 dB(A) |
| Sound measurement uncertainty K | 3.0 dB(A) | 3.0 dB(A) |
| Vibration emission value ah* | 2.5 m/s2 | 2.5 m/s2 |
| Vibration emission uncertainty K * | 1.5 m/s2 | 1.5 m/s2 |
Specifications subject to change without prior notice. Model range may vary between markets.
* The values stated in the table are derived from laboratory testing in conformity with stated codes and standards and are not sufficient for risk evaluation. Values measured in a particular work place may be higher than the declared values. The actual exposure values and amount of risk or harm experienced by an individual are unique to each situation and depend upon the surrounding environment, the way the individual operates the machinery, the par-ticular material being worked, work station design and the user’s exposure time and physical condition. Mirka Ltd accepts no responsibility for the consequences of using declared values instead of actual exposure values for any individual risk assessment.
Further occupational health and safety information can be obtained from the following websites:
https://osha.europa.eu/en (Europe) or http://www.osha.gov (USA)
Proper Use of Tool
This sander is designed for sanding all types of materials, i.e. metals, wood, stone, plastics, etc. using abrasives designed for this purpose. Do not use this sander for any other purpose than that specified without consulting the manufacturer or the manufacturer’s authorized supplier. Do not use backing pads that have a working speed of less than 8,000 rpm free speed. Only use original Mirka backing pads that are designed for optimal performance with the brake seal. Other backing pads may reduce performance and will increase vibration. The cooling air vents on the housing must be kept clean and free of blockages to ensure air circulation. Any maintenance or repair work requiring the motor housing to be opened may only be carried out by an authorized service Centre.
Work Stations
The tool is intended to be operated as a hand-held tool. It is always recommended that the tool should be used when standing on a solid floor. It can be in any position but before any such use, the operator must be in a secure position, having a firm grip and footing and be aware that the tool can develop a torque reaction. See the section “Operating instructions”.
How to Get Started
When unpacking the tool, make sure it is intact, complete and has not been damaged in transport. Never use a damaged tool.
Before use, check that the backing pad is correctly attached and tightened. Connect the power cord to the tool. Connect the power cord to a grounded outlet (100 – 240 VAC, 50/60Hz).
In order to get the maximum power from this tool it is recommended to use it with the Mirka dust extractor (or other suitable dust extraction unit) and Mirka net sanding products. The combination of Mirka sanders, Mirka net sanding products and Mirka dust extractor are the basis of Mirka dust-free sanding solutions.
The power cord from the tool is connected to the mains supply of the dust extractor. By connecting the tool’s power cord to the outlet on the dust extractor it is possible to use the dust extractor’s AutoStart function.
Operating Instructions
- The tool is intended to be operated as a hand held tool. The tool can be used in any position. Note! The sander can develop a torque reaction when started.
- Make sure the sander is switched off. Select a suitable abrasive and secure it to the backing pad. Make sure the abrasive is centered on the backing pad. For optimal performance we recommend a Mirka backing pad and Mirka Net Sanding product.
- Switching on, changing speed and stopping the sander are described in the “Multi-purpose LED indications” chapter.
- The max rpm can be adjusted by pressing speed+ or speed–, Figure 2. The rpm can be adjusted in the range 4,000 to 8,000 rpm.
- When sanding, always place the tool on the work surface before starting the tool. Always remove the tool from the work surface before stopping it. This will prevent gouging of the work surface due to excess speed of the abrasive.
It is strongly recommended that the tool is used in combination with a Mirka Dust Extractor.
Multi-purpose LED Indications
| Indication Meaning | |
| Multi-purpose LED shows green | Power connected |
| Multi-purpose LED shows green | Tool switched on. Speed indication active. |
| Multi-purpose LED flashes green/red | Speed indication shows chosen speed. |
| Multi-purpose LED shows red | Over temperature |
| Multi-purpose LED quick-flashes green / red | Voltage out of range |
Bluetooth
This tool is equipped with Bluetooth® low energy technology and can be connected to an app from which additional tool functionality can be accessed. For more information on the app functionality and if it is available in your country, go to www.mirka.com/mymirka
Activate Bluetooth on your Mirka® LEROS(-S) as follows:
- Connect the power cord to mains outlet.
- Press and hold the Speed+ button while switching the tool on with the On/Off button.
- Communication status LED starts blinking blue, to indicate that Bluetooth is active. The LED turns solid when connection is established.
- Bluetooth is deactivated when the tool is disconnected from mains outlet.
NOTE! If the app is not installed or if it is not available in your country, Bluetooth shall not be activated.
The Bluetooth® word mark and logos are registered trademarks owned by the Bluetooth SIG, Inc. and any use of such marks by Mirka Ltd is under license. Other trademarks and trade names are those of their respective owners.
Maintenance
Always disconnect the power before maintenance!
Only use original Mirka spare parts!
Replacing the Backing Pad and Interface
Tools required: Hex socket 19 mm, Torx T8 screwdriver and flat head screwdriver.
- Remove hole screws (8 pcs).
- Remove the interface.
- Remove the cover cap. Untighten the screw to remove the backing pad.
- Remove the screw.
- Remove the old pad.
- Attach the new backing pad to the spindle (aligned correctly) and tighten the pad screw with the hex socket.
- Attach the cover cap.
- Fit a new interface.
- Refit hole screws (8 pcs).
Replacing the Brake Seal
NOTE! Too much vacuum in your dust extraction system may cause the brake seal to malfunction.
- Remove the backing pad as described above.
- Pull the old brake seal out of its groove.
- Fit the new brake seal in the groove.
- Fit the backing pad as described above.
Further Service
Servicing must always be performed by trained personnel. To keep the tool warranty valid and ensure optimal tool safety and function, servicing must be carried out by a Mirka authorized service centre. To locate your local Mirka authorized service centre, contact Mirka Customer Service or your Mirka dealer.
Troubleshooting Guide
| Symptom Possible cause Solution | ||
| The multi-purpose LED flashes between red and green. | Connected to a mains outlet with wrong voltage. | Connect the sander to a mains outlet that correspond with the nominal voltage of the tool. |
| No light from multi-purpose LED when switched on. | Power cord not properly attached to the sander or to the mains socket. Connected to a mains outlet with a blown fuse. | Connect it properly. Check the main fuse in the power supply. |
| The multi-purpose LED is red and the sander slows down to 4,000 rpm when sanding. | Temperature too high in the sander. Too heavy long term load. | Reduce the load on the sander for some time and the sander will speed up again. |
| The multi-purpose LED is red and rpm is slightly reduced. | Too heavy short term load. | Use lighter load and the LED (right) will automatically change to green. |
| The sander has stopped and multi- purpose LED is red. | The tool is in safety mode due to high temperature. | Wait until the tool has cooled down. |
Disposal Information
DANGER
Render redundant power tools unusable by removing the power cord.
Observe applicable country-specific regulations regarding disposal and recycling of disused machines, packaging and accessories.
EU only: Do not dispose electric power tools in house-hold waste. According to European Directives on waste electrical and electronic equipment and its implementation under national law, electric tools that have reached the end of their life must be collected separately and taken to an environ-mentally compatible recycling facility.
For more information regarding REACH, RoHS and our corporate social responsibility visit www.mirka.com
Mirka Ltd
Finland
Brazil Mirka Brasil Ltda.
Belgium Mirka Belgium Logistics NV
Canada Mirka Canada Inc.
China Mirka Trading Shanghai Co., Ltd
Finland & Baltics Mirka Ltd
France Mirka France Sarl
Germany Mirka GmbH
India Mirka India Pvt Ltd
Italy Mirka Italia s.r.l., Cafro S.p.A.
Mexico Mirka Mexicana S.A. de C.V.
Russia Mirka Rus LLC
Singapore Mirka Asia Pacific Pte Ltd
Spain Mirka Ibérica S.A.U.
Sweden Mirka Scandinavia AB
Turkey Mirka Turkey Zımpara Ltd Şirketi
United Kingdom Mirka (UK) Ltd
United Arab Emirates Mirka Middle East FZCO
USA Mirka USA Inc.
For contact information, please visit www.mirka.com


