![]()
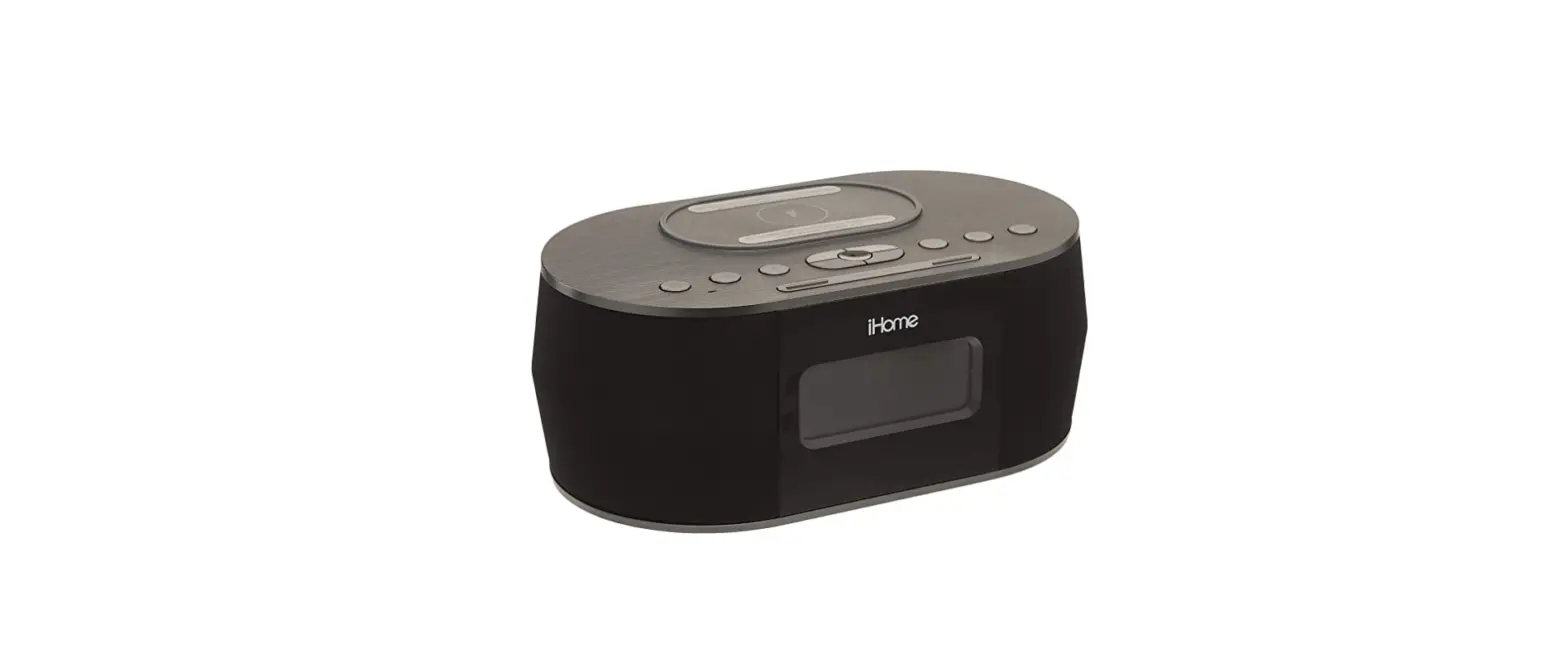
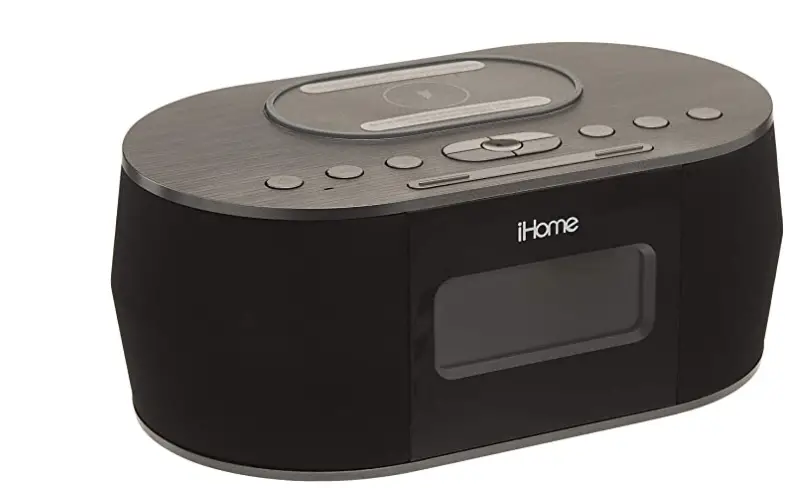
iHome iBTW38 Digital Alarm Clock
 Introduction
 Introduction
Thank you for purchasing the iHome iBTW38. This product is designed to provide high quality wireless sound for your iPad, iPhone, iPod or another Bluetooth audio device. It will also wirelessly charge compatible devices.
This instruction booklet explains the basic operation and care of the unit. Please read it carefully and keep for future reference.
Maintenance
- Place the unit on a level surface away from sources of direct sunlight or excessive heat.
- Protect your furniture when placing your unit on a natural wood and lacquered finish. A cloth or other protective material should be placed between it and the furniture.
- Clean your unit with a soft cloth moistened only with mild soap and water. Stronger cleaning agents, such as benzene, thinner or similar materials can damage the surface of the unit.
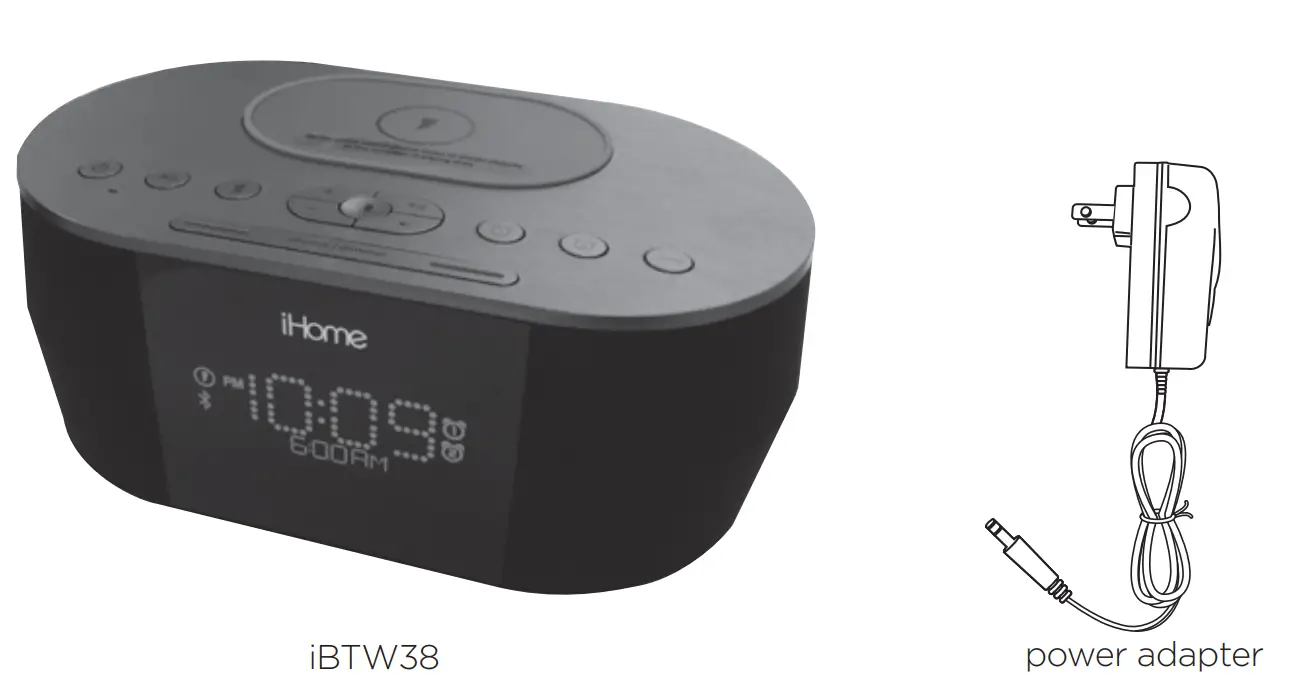
Included
- iBTW38 system
- 100V-240V universal AC adapter

Meet Your iBTW38
Top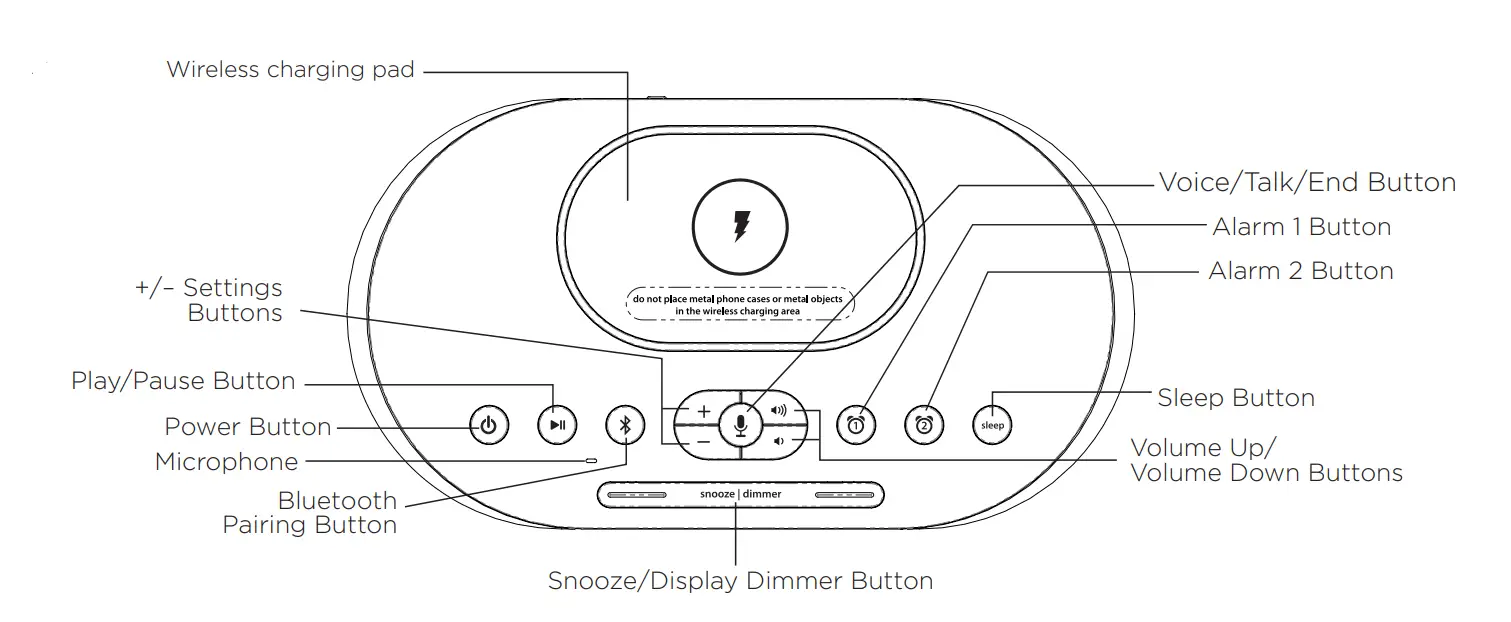
Bottom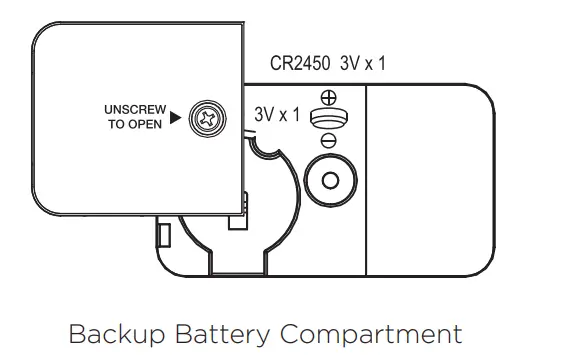
Back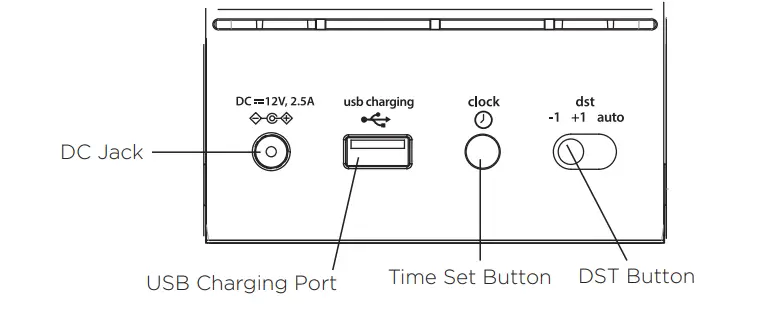 The Display
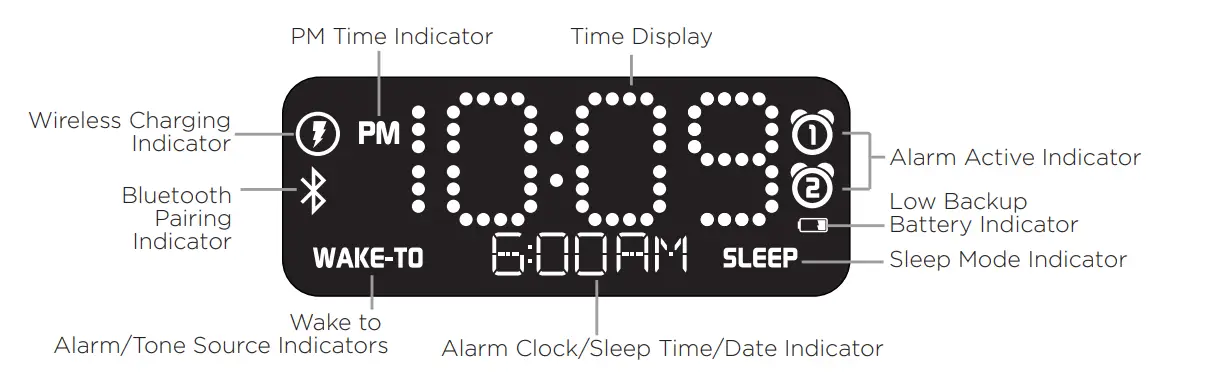
Setting Up the Unit
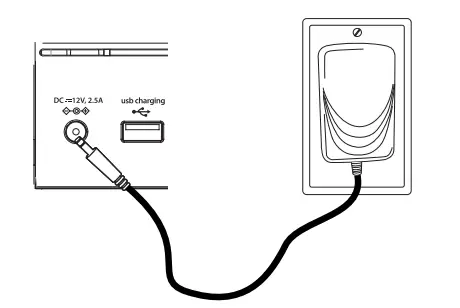
Connect the included AC adapter to the DC jack located on the back of the unit and connect the other end to a working wall outlet.
CR2450 3V battery is included for battery backup. Install it in the backup battery compartment located on the bottom of the unit before using the unit. See page 11 for more on installing and replacing backup batteries.
Setting the Clock
- Press and hold the
 Time Set Button located on the back of the unit for 2 seconds until the clock displays flashes and a beep sounds.
 - Press the – or + Buttons to adjust the clock to the current time (hold for rapid setting). Make sure you set the correct AM/PM time. The PM indicator appears to the left of the display; there is no AM indicator.
- To toggle the clock display between standard 12-hour time and 24-hour (“military”) time display, press the Alarm
 or
or Alarm Button while the display is flashing during the time setting.
 - Press and release the Time Set Button to confirm the current time setting. The YEAR will flash on the display. Press the – or + Buttons to set the correct year.
- Press and release the Time Set Button to confirm the current year setting. The Date will flash on the display. Press the – or + Buttons to set the correct month and day(hold for rapid adjustment).
- Press and release the Time Set Button to confirm the current date setting. 2 beeps will sound to indicate time setting mode is complete.
Setting and Using the Alarm
This unit features dual alarms which can be set to different times and alarm sources. Each is set in the same way. Instructions are given as “Alarm Button”;![]() use Alarm Button or
use Alarm Button or ![]() Alarm Button to set respective alarms.
Alarm Button to set respective alarms.
Note: Each step must be completed while the display is flashing or the step will time out with any changes saved.
- Press and hold the Alarm Button for 2 seconds until the time display and the alarm icon flash. A beep sounds.
- Press the – or + Buttons to adjust the alarm time to the desired time (hold for rapid setting). Make sure you set the correct AM/PM alarm time. The AM/PM indicator appears to the right of the alarm time display.
- Press the Alarm Button to confirm the alarm time setting. The wake-to schedule will flash. Press the – or + Buttons to set the desired alarm schedule. 7 Days (every day), 5 Days (week days only) or 2 Days (weekends only)
- 4. Press the Alarm Button to confirm the alarm schedule. The wake source indicator will flash on the display. Press the – or + Buttons to select the desired wake to alarm source: Bluetooth or tone.
Wake to Bluetooth: You will wake to the currently linked Bluetooth device. If no device is detected, the alarm will default to current Tone.
Wake to Tone: Press the Alarm Button to confirm. Press the – or + Buttons as needed to listen to and to select one of the four built-in wake-to tones (1 – 4). - Press the Alarm Button to confirm the alarm source. The volume display will flash.
- Press the
 Buttons to adjust the alarm volume. Note that the alarm volume setting is stored separately from other volume settings.
 - Press the Alarm Button to confirm the alarm settings and exit alarm setting mode. 2 beeps will confirm alarm setting is complete. The alarm icon will remain on the display, indicating the alarm is armed.
Previewing the Alarm and Turning the Alarm On/OFF
- Press and release the Alarm Button to view the current alarm time.
- Press and release the Alarm Button as needed to toggle the alarm ON and OFF, indicated by the alarm icon and a beep.
Setting The Daylight Daving Time (DST) switch
This unit has a DST switch on the back of the unit to adjust the time for daylight saving time and standard time. By default, it is set to Auto and will automatically adjust the time at the start and end of daylight saving time. If you are located in an area that does not observe daylight saving time or otherwise wish to adjust manually, slide the switch to +1 to add one hour or to –1 to subtract an hour.
- To program Snooze, press and hold the Snooze/Display Dimmer Button during normal operation (when no alarm is sounding).
- Press the – or + Buttons to select the desired snooze time (between 01 and 29 minutes).
- Press and release the Snooze/Display Dimmer Button to confirm Snooze setting. 2 beeps will sound.
- While the alarm is sounding, press and release the Snooze/Display Dimmer Button to temporarily silence the alarm for the set duration (9 minutes is the default). Snooze can be used several times during alarm.
- To adjust the brightness of the display, press and release the Snooze/Display Dimmer Button during normal operation (when no alarm is sounding) to cycle through the brightness display settings.
Sleep Mode
This unit allows you to sleep to the current sound source for a set time before turning the unit off.
- To set Sleep time, press and release the Sleep Button as needed to cycle to the desired sleep duration:120, 90, 60, 30 or 15 minutes or OFF (turns the unit off).
- Press the Buttons to adjust the sleep volume on the unit. Note that the sleep volume setting is stored separately from other volume settings.
Pairing Your Bluetooth Device
When AC power is connected, and the Button OR or Bluetooth Button is pressed, the iBTW38 will announce “Looking for Bluetooth Signal” and attempt to autolink to a previously paired device.
- Turn on your Bluetooth device and make it “discoverable” by turning on Bluetooth mode (check in Options or Settings).

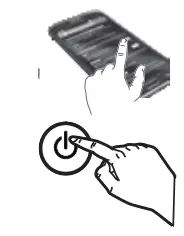
- Press the Button to turn on the iBTW38. The first time the unit is powered on it will enter pairing mode automatically. After this, you will need to pair using the Pairing Button after powering on (see step 3 below).
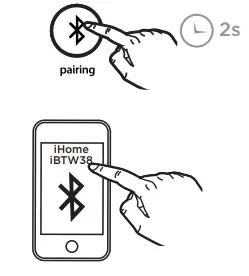
- Press and hold the Pairing Button on top of the iBTW38 for 2 seconds. The iBTW38 will announce “Pairing” and the Bluetooth icon will flash on the display, indicating the iBTW38 is in pairing mode.

- “iHome iBTW38” should appear in your device’s Bluetooth menu. Select “iHome iBTW38” to connect device. If prompted for a passcode, enter “ “1234” on your device’s keypad.
- If pairing is successful, the iBTW38 will announce “Connected” and the Bluetooth icon will appear solid, indicating the iBTW38 is ready to play music. There should also be an indication on your device. If no device is successfully paired within 3 minutes the iBTW38 will default to previous mode. Once the iBTW38 is paired to a device, it will attempt to autolink when the device is within range (about 33 feet).
Playing Audio Via Bluetooth
- Press the Button to turn the unit ON, or press the
 Button. “BT” and the Bluetooth icon appear on the display. To turn on in play mode, press the
 Button.
 - Press the Button on the unit to play audio from your linked Bluetooth device.
- Press the – or + Buttons to go to the previous or next track.
- Press the Buttons to adjust the volume on the unit.
- When done listening, press the Button to turn the unit oFF.
Using the Speakerphone feature
NOTE: The unit must be powered on and linked to a Bluetooth phone to receive a call.
- When a call is received, playing music is muted to hear the ringtone. “Call” will flash on the display. Press the
 Voice/Talk/End Button to answer the call; press and hold the Voice/ Talk/ End Button to ignore the call.
 - When a call is completed, press and hold theTalk/End Button to end the call and resume the previous function.
Using Qi Wireless Charging
This unit will wirelessly charge Qi-compatible wireless charging phones. PMA wireless charging system is not supported.
CAUTION: Remove the metal protective or magnetic case from the phone before charging.
When charging the phone, do not place magnetic-striped or other metal objects on the charger. Doing so could damage the object or this unit. Qi-compatible phones with metallic looking finishes will charge normally.
Center Qi-compatible device with backside down on marked charging target circle.
Check the wireless charging indicator toward the bottom left of the display.
Rapid blinking icon: The device is not charging properly. Reposition device.
Slow blinking icon: The device is charging properly.
Solid icon: The device is charged (some devices do not support this feature).
Using the Voice Control feature
NOTE: The unit must be powered on and linked to an iOS or Android Bluetooth device to use Voice Control. Press and hold ![]() the Button for 2 seconds and wait for a beep to activate voice control with Siri or Google Assistant or Amazon Alexa. Voice control requires an active internet connection on a connected Bluetooth device with iOS 10 and Android 4.1 and later. When activated, the speaker microphone acts as an extension of the microphone in your smartphone to make/take calls, enabling you to ask Siri®/Google Assistant™ or Amazon Alexa to play music and more.
the Button for 2 seconds and wait for a beep to activate voice control with Siri or Google Assistant or Amazon Alexa. Voice control requires an active internet connection on a connected Bluetooth device with iOS 10 and Android 4.1 and later. When activated, the speaker microphone acts as an extension of the microphone in your smartphone to make/take calls, enabling you to ask Siri®/Google Assistant™ or Amazon Alexa to play music and more.
Charging Devices via USB Port
- Connect the standard size end of a USB cable (not included) to the USB Port on back of the unit and connect the other end to the charging port on your device.
- Monitor the charging on your device. Some devices use a proprietary charging method and will not charge using the USB Port. If this happens, you must charge your device using the charger that came with it.

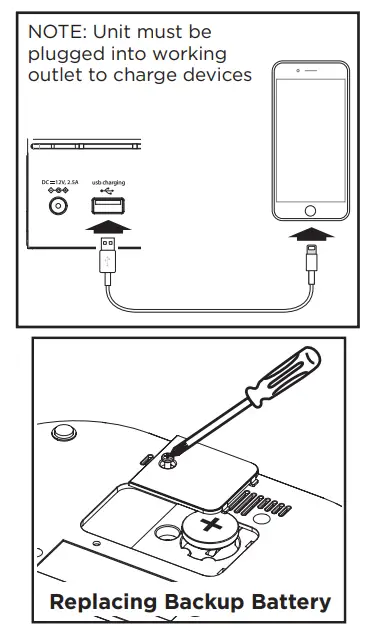
Replacing and Installing Clock Backup Battery
The unit comes with 1 CR2450 back-up battery installed to provide continuous alarm operation and clock settings in the event of a power failure. Remove the battery pull tab before use. When the Battery Low Icon located on the lower right of the display is flashing, it is time to replace the back-up battery. The battery compartment is located on the bottom of the unit.
- Please make sure the AC adaptor is connected, otherwise all settings may be lost during battery replacement.
- Use a Phillips screwdriver to remove the battery compartment cover located on the bottom of the unit.
- Remove exhausted battery. Insert 1 CR2450 battery checking that the + side is facing you. Replace the compartment door. Do not over tighten.
Note: Make sure you dispose of battery properly (see your local regulations).
WARNING: Lithium batteries can explode or cause burns if disassembled, shorted, recharged, exposed to water, fire,or high temperatures. Do not place loose batteries in a pocket, purse, or other container containing metalobjects, mix with used or other battery types, or store with hazardous or combustible materials. Store incool, dry, ventilated area. Follow applicable laws and regulations for transport and disposal.
Troubleshooting
Unit doesn’t respond (no sound)
- Check that all connections are correct and properly plugged in.
- Make sure your device is properly paired with the iBTW38.
- Make sure the Power is ON.
- Make sure volume is up on your Bluetooth device and on unit.
Unit doesn’t respond (locked up or frozen)
- The unit may need to be reset. To do so, unplug the unit from power source and remove the backup battery. Let unit stand for 2 minutes. Re-install backup battery and connect unit to power source. You will need to reset the clock, Bluetooth and any other settings.
Trouble pairing device/computer with iBTW38
Bluetooth implementation varies depending on your device’s hardware and operating system.
Please see our website for updates on pairing.
- When you power ON the unit, it will automatically link with the last previously paired Bluetooth device if the device is still within range (about 33 feet).
- Make sure your device is working properly. Check your device’s manual for details on Bluetooth pairing and linking.
- To clear all Bluetooth devices, press and hold the Bluetooth Button for 10 seconds when unit is not in pairing mode. A tone will sound and “BT CLR” will appear on the display. For further information and to see the latest instructions, visit www.ihome.com/support
Consumer Product Safety Guide
IMPORTANT SAFETY INSTRUCTIONS
When used in the directed manner, this unit has been designed and manufactured to ensure your personal safety. However, improper use can result in potential electrical shock or fire hazards. Please read all safety and operating instructions carefully before installation and use, and keep these instructions handy for future reference. Take special note of all warnings listed in these instructions and on the unit.
- Water and Moisture – The unit should not be used near water. For example: near a bathtub, washbowl, kitchen sink, laundry tub, swimming pool or in a wet basement.
- Ventilation – The unit should be situated so that its location or position does not interfere with its proper ventilation. For example, it should not be situated on a bed, sofa, rug or similar surface that may block ventilation openings. Also, it should not be placed in a built-in installation, such as a bookcase or cabinet, which may impede the flow of air through the ventilation openings.
- Heat – The unit should be situated away from heat sources such as radiators, heat registers, stoves or other appliances (including amplifiers) that produce heat.
- Power Sources – The unit should be connected to a power supply only of the type described in the operating instructions or as marked on the appliance. Only use the AC adapter that came with the unit.
- Power-Cable Protection – Power supply cables should be routed so that they are not likely to be walked on or pinched by items placed upon or against them. It is always best to have a clear area from where the cable exits the unit to where it is plugged into an AC socket.
- Cleaning – The unit should be cleaned only using a warm damp cloth. Do not use solvents, etc.
- Objects and Liquid Entry – Care should be taken so that objects do not fall and liquids are not spilled into any openings or vents located on the product.
- Attachments – Do not use attachments not recommended by the product manufacturer.
- Lightning and Power Surge Protection – Unplug the unit from the wall socket and disconnect the antenna or cable system during a lightning storm or when it is left unattended and unused for long periods of time. This will prevent damage to the product due to lightning and power-line
surges. - Overloading – Do not overload wall sockets, extension cords, or integral convenience receptacles as this can result in a risk of fire or electric
shock. - Damage Requiring Service – The unit should be serviced by qualified service personnel when:
- the power supply cable or plug has been damaged.
- objects have fallen into or liquid has been spilled into the enclosure.
- the unit has been exposed to rain.
- the unit has been dropped or the enclosure damaged.
- the unit exhibits a marked change in performance or does not operate normally.
- Periods of Nonuse – If the unit is to be left unused for an extended period of time, such as a month or longer, the backup battery should be removed from the unit to prevent damage or corrosion.
- Servicing – The user should not attempt to service the unit beyond those methods described in the user’s operating instructions. Service methods not covered in the operating instructions should be referred to qualified service personnel.
Questions? Visit www.ihome.com or call 1-800-288-2792 Toll-Free
FCC Information
This device complies with Part 15 of the FCC Rules, and operation is subject to the following two conditions:
- This device may not cause harmful interference, and
- this device must accept any interference received, including interference that may cause undesired operation.
FCC Radiation Exposure Statement
This equipment complies with FCC RF radiation exposure limits set forth for an uncontrolled environment.
Warning: Changes or modifications to this unit not expressly approved by the party responsible for compliance could void the user’s authority to operate the equipment.
NOTE: This equipment has been tested and found to comply with the limits for a Class B digital device, pursuant to Part 15 of the
FCC Rules.
These limits are designed to provide reasonable protection against harmful interference in a residential installation. This equipment generates, uses and can radiate radio frequency energy and, if not installed and used in accordance with the instructions, may cause harmful interference to radio communications.
However, there is no guarantee that interference will not occur in a particular installation. If this equipment does cause harmful interference to radio or television reception, which can be determined by turning the equipment of and on, the user is encouraged to try to correct the interference by one or more of the following measures:
- Reorient or relocate the receiving antenna.
- Increase the separation between the equipment and receiver.
- Connect the equipment into an outlet on a circuit different from that to which the receiver is connected.
- Consult the dealer or an experienced radio/TV technician for help.
CAN RSS-216/CNR-216
IC Statement
This device complies with Industry Canada license-exempt RSS standard(s). Operation is subject to the following two conditions:
- this device may not cause interference, and
- this device must accept any interference, including interference that may cause undesired operation of the device.
The device meets the exemption from the routine evaluation limits in section 2.5 of RSS 102 and compliance with RSS-102
RF exposure, users can obtain Canadian information on RF exposure and compliance.
2018 SDI Technologies, Inc. All rights reserved
Questions? Visit www.ihome.com or call 1-800-288-2792 Toll-Free
FAQS
No, you have to plug it in. Wireless charging started with iPhone 8.
yes, it will – it provides Qi wireless charging and works great for my iPhone XS and I know the Galaxy S7 works with Qi wireless chargers.
Yes
It does not come with remote control. I’m not sure it will work with some type of universal remote. Also, there is no auto-time sync with your phone feature. The time must be set manually if you unplug without a battery (or if the time changes).
Yes, connect your phone and ihome via Bluetooth
You just set it to play songs on your phone, you can set it softly or turn the volume down on the alarm part
Yes
Yes
Yes, the back up battery at the bottom. There is only one screw that you will have to take out then slide it open.
My grandson said it will charge an iphone XR.
Yes
If iPad is plug in using the charging cord
Yes
Yes, must be connected via Bluetooth
Yeah
No it will no charge s phone that has an otter box case.
Yes you can.


![Emerson Alarm Clock [cks1507 W/ Radio] User Manual](https://static-data1.manualsee.com/1/img/275/8730/2020/10/Emerson-Alarm-Clock-CKS1507.png "Emerson Alarm Clock [cks1507 W/ Radio] User Manual")


