
Clean Freak SAN-CF-3-H Heated Carpet Spot Cleaner

OVERVIEW
Dear Valued Client,
Congratulations on the purchase of your 3-Gallon Spot Extractor carpet and upholstery machine! The world of carpet cleaning is becoming more high-tech and competitive and we strive to provide you with the most innovative products. Our spot extractor with heat is yet another example of this, bringing a new dimension to carpet and upholstery cleaning with its cutting-edge features, quality and value.
Please review this manual, paying careful attention to the Safety Instructions section. Keep in mind that any unnecessary damage, neglect or abuse of this machine will void your warranty. You can be confident that simple maintenance will ensure that your spot extractor with heat provides quality performance for many years to come. If warranty questions arise, please consult your manual or contact your CleanFreak representative Should you have any questions regarding maintenance, replacing parts or ordering parts, please call your CleanFreak representative. Before you begin using your Spot Extractor, please thoroughly review the Owner’s Manual. Again, congratulations on the purchase of your 3-Gallon Spot Extractor carpet and upholstery machine!
Questions or Comments?
- Phone: 920-882-8453
- Toll-Free: 888-722-5508
- Fax: 920-380-0878
- Mailing Address:
5109 N National Dr, Knoxville, TN 37914 - Visit our Web site at www.CleanFreak.com
Safety Instructions
WARNING: PLEASE READ AND SAVE! FOLLOW THESE PRECAUTIONS WHEN USING YOUR SPOT EXTRACTOR.
- DO NOT operate this unit if any part of the unit appears to be damaged.
- DO NOT operate if the ground plug is broken.
- DO NOT operate if the unit is in standing water.
- DO NOT use volatile substances or operate where volatile substances exist.
- DO NOT service while unit is running or connected to electricity. Unplug the unit!
- DO NOT use water more than 120 degrees Fahrenheit.
- DO NOT use solvents with this unit.
- DO NOT use as a dry vacuum.
- DO NOT use the unit unless completely assembled.
- Use only liquid detergents. Powders do not fully dissolve and damage the motor.
- Always use defoamer. Foam will suspend moisture particles that damage the motor.
Setup / Prepare Unit for Use
DO NOT EXPOSE TO RAIN. STORE INDOORS.
- All spot extractors – no matter what the time of year – are shipped with antifreeze in the pump and solution lines. Prior to first use, fill the tank with one quart of warm water. Attach the hose and using the hand tool, flush out the system by spraying the one quart of water through the pump.
- Attach the 1-1/2-inch vacuum hose and the brass quick disconnect.
- Fill the base unit (the recovery tank must be removed) with warm water (less than 100 degrees Fahrenheit). Fill to approximately 4 inches from the top. Use a liquid detergent made for carpet cleaning or upholstery. Read and mix to the dilution ratios as directed.
- DO NOT turn the heater on until the heater is full of water.
- NEVER run the vacuum only with the pump on for more than 3 minutes. Water/solution needs to run through pump at all times to keep the pump cool while in use. Failure to do so will void the warranty.
- Be sure to replace any filters back into the machine prior to use.
- Do not use citrus acid, butanol or harsh degreasers inside the machine.
Vacuum Shut-Off
The spot extractor is designed with a vacuum restrictor to reduce the vacuum when the recovery tank is full. When the vacuum is restricted, the liquid will not travel up the nozzle of the hand tool. The motor speeds up (the sound of the motor will change) and this is your warning to dispose of recovered solution. The restrictor is a foam float that slides up and down the vacuum tube in the recovery tank.
How to Use the 3-Gallon Spotter
- Remove 3-Gallon Spotter from its box.•
- Place on a level surface.
- Open rotating lock on the back of the machine and remove the top tank (recovery tank) from the bottom tank (solution tank). Note: tip tank to allow it to come free from the bottom of the tank.
- Fill the bottom tank with about a quart of water.
- Replace the top tank by tipping the front of the tank to allow it to connect with the bottom tank. Center tank properly and then close rotating lock at back to secure in place.
- Plug the unit into a grounded electrical outlet.
- Attach Solution Hose to Unit: Hold female quick disconnect (female QD) on the hose and slide the collar back on female QD. Slide on to male quick disconnect (male QD) on the machine. Release collar of female QD. You should hear the hose click into place. If you do not hear it click into place, repeat the previous steps.
- Secure vacuum hose securely onto drain spout on the front of the recovery tank. You may have to force the vacuum hose on by turning it back and forth while pushing the hose onto the drain spout. If the tool is not connected to hoses, repeat procedures to attach the tool to hoses.
- Turn on the pump only and depress the trigger on a tool to flush the antifreeze completely from the unit.
- After flushing antifreeze from unit, remove the top tank, fill the bottom tank with desired amount of clean water only (highly recommended), leaving the water level at least 4” from the top. Do not overfill.
- Tip solution tank into the sink or drain if overfilled or to empty tank after use.
- Pre-spray a small section of carpet with carpet cleaning solution. Agitate with a brush. Allow it to dwell a few minutes before extraction begins.
- For a heated unit, turn on the heater for about 3 minutes to preheat the water
- For cold or heated spotters, turn on the pump and depress the trigger on a tool to begin spraying the solution to the carpet. Agitate carpet with the end of tool. Then alternate spraying solution and vacuuming.
- Alternating spraying and vacuuming will allow the heater to keep water at optimal temperature. CAUTION: brass QD’s can get hot. Allow cooling before disconnecting.
- If you are not spraying the solution for more than a few minutes, turn off the heater. Water should remain hot. When you begin to spray the solution again, turn the heater back on. Listen for any changes to the vacuum motors. When the recovery tank fills, the yellow vacuum restrictor slides up-pipe to partially block air. The sound of the motor will be different and this is noticed to shut off the machine completely and empty recovery tank. Failure to stop at this point will void the warranty, as water will be sucked into vacuum motors.
- Remove the top tank from the unit, open hatch on top by unscrewing counter-clockwise to allow air in and tip, and pour recovered solution into a sink, toilet, or drain.•
- Close top hatch by screwing it on clockwise, fill the bottom tank if necessary, reattach top tank to the unit and continue cleaning.
Maintenance
Following Each Use
Remove the vacuum hose from the upper body. Un-clip and rotate the latch on the back of the unit and remove the upper section of the spotter. Dispose of the used solution by pouring the solution out of the vacuum inlet (not the hatch cover) into the toilet or janitor’s closet sink.
IMPORTANT! Be sure to thoroughly drain water out of heater lines prior to storage in colder climates. This heater will freeze and possibly crack, voiding your warranty.
Prevent Mineral Deposit Buildup
Vinegar may be used to prevent mineral deposit buildup in your machine’s lines and pump. Failure to do so may clog your lines and pump. Every two weeks, pour vinegar into the solution tank (dilute with 1/2 water). Run the pump, while squeezing your wand or upholstery tool’s trigger until you smell vinegar or notice it coming out of the tool. Let the machine sit overnight, and no longer, with the vinegar in its lines. The next day, flush the machine with 1 gallon of clean water or until you do not smell vinegar any longer.
PLEASE NOTE: If you choose to use CLR, follow the directions on the bottle. DO NOT leave CLR in the machine’s lines. Be sure to flush thoroughly. CLR may corrode the machine’s components and VOID your warranty. If you choose to use vinegar, you MUST dilute with 1/2 water. Failure to do so may damage the machine’s components and VOID your warranty.
Grounding Instructions
DANGER: IMPROPER INSTALLATION OF THE GROUNDING PLUG CAN RESULT IN A RISK OF ELECTRIC SHOCK!
This product must be grounded. In the event of an electrical short circuit, grounding reduces the risk of electric shock by providing an escape wire with an appropriate grounding plug. The plug must be plugged into an outlet that is installed properly and grounded in accordance with all local codes and ordinances.
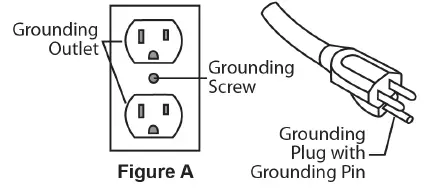
Check with a qualified electrician or serviceman if the grounding instructions are not completely understood, or if in doubt as to whether the product is grounded properly. DO NOT modify the plug provided. If it will not fit into the outlet, have a proper outlet installed by a qualified electrician. This electric equipment is for use on a normal 120-volt circuit. It has a grounded plug that looks like the plug illustrated in (Fig A). The use of a temporary adaptor is NOT recommended.
NOTE: In Canada, the use of a temporary adapter is not permitted by the Canadian Electrical Code.
Machine Schematic Drawing – no Heat
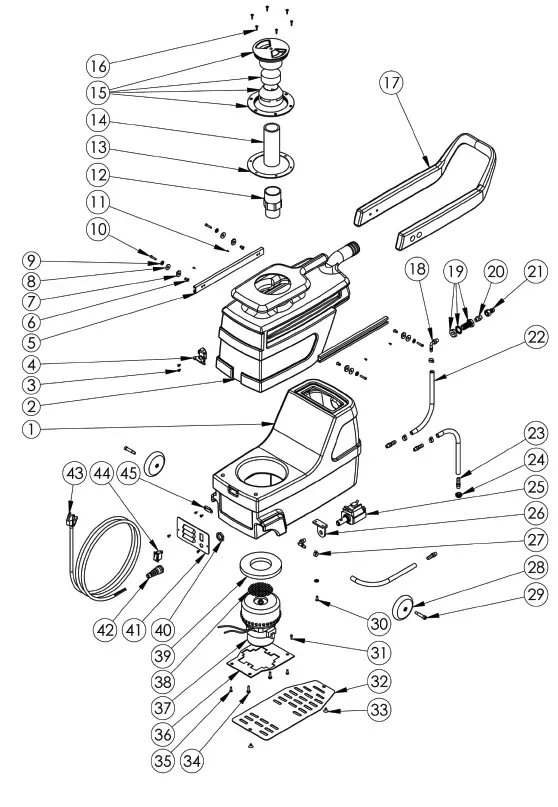
Machine Parts List – No Heat
| 1 | SP-3-ST-BLKGRAN | 3-Gallon Solution Tank – Black Granite | 1.00 |
| 2 | SP-3-R-BLKGRAN | 3-Gallon Recovery Tank – Black Granite | 1.00 |
| 3 | 10-0383 | 6-32 x 1/4” Phil Pan Screw | 6.00 |
| 4 | 10-0400-D | Latch for Sniper | 1.00 |
| 5 | 10-0412 | C-Channel for Spotter Handle | 2.00 |
| 6 | 10-0414 | Rivet for Spotter Handle | 4.00 |
| 7 | 10-0384 | .125 Thick Nylon Washer | 4.00 |
| 8 | 10-0385 | .06 Thick Nylon Washer | 4.00 |
| 9 | 10-0074 | Flat Washer #8 SAE | 5.00 |
| 10 | 10-0216 | Allen Head Screw for Backpack | 4.00 |
| 11 | 10-0379 | 8-32 x 3/8” Screw | 4.00 |
| 12 | 10-0405 | 1-1/2” PVC SCH40 Slip Thread | 1.00 |
| 13 | 10-0302-A | Hatch Cover Gasket for Spotter | 1.00 |
| 14 | 10-0416-A | 1-1/2” Black ABS Stand Pipe | 0.60 |
| 15 | 10-0304 | Spotter Cap and Float Assembly | 1.00 |
| 16 | 10-0419 | Screw for Spotter Hatch | 6.00 |
| 17 | SP-3-H-BLK | 3-Gallon Spotter Handle – Black | 1.00 |
| 18 | 10-0406 | Nylon Barb 90 1/8” NPT 1/4” | 2.00 |
| 19 | 80-0017-2 | Bulk Head fitting for Spotter | 1.00 |
| 20 | 10-0403 | 1/8” Brass Female Coupler | 1.00 |
| 21 | 10-0402 | 1/8” Male QD | 1.00 |
| 22 | 10-0434 | Threaded Hose for Spotter | 2.50 |
| 23 | 10-0407 | 1/8” Strait Nylon Barb NPT | 4.00 |
| 24 | 10-0845-2 | 1/8” Strainer for Spotter | 1.00 |
| 25 | 10-0300 | 55 PSI Pump for Spotter | 1.00 |
| 26 | 10-0301 | L Bracket for Spotter | 1.00 |
| 27 | 10-0435 | Oetiker Clamp | 4.00 |
| 28 | 10-0303 | Roller Blade Wheel for Spotter | 2.00 |
| 29 | 10-0387 | 5/16” x 1” Spotter Wheel Bolt | 2.00 |
| 30 | 10-0022 | Shoulder and Waist Belt Screw | 1.00 |
| 31 | 10-0017 | Deflector Screw | 1.00 |
| 32 | 10-1028 | Bottom Base Plate for Spotter | 1.00 |
| 33 | 10-0492 | Screw for Plates on Spotter | 2.00 |
| 34 | 10-0014 | Motor Screw | 2.00 |
| 35 | 10-0380 | 10-32 x 3/8” Screw | 2.00 |
| 36 | 10-1024 | Motor Mount Plate for Spotter | 1.00 |
| 37 | 10-0354 | 3-Gallon Spotter Motor | 1.00 |
| 38 | 10-0386 | Stamped Motor Screen | 1.00 |
| 39 | 10-1030 | Spotter Motor Gasket | 1.00 |
| 40 | 10-0027-A | Strain Relief Nut | 1.00 |
| 41 | 10-1026 | Switch Plate for 3-Gallon w/ Heat | 1.00 |
| 42 | 10-0027 | Pigtail Strain Relief | 1.00 |
| 43 | 10-0448 | 20-Foot Spotter Cord | 1.00 |
| 44 | 10-0025 | On/Off Switch | 2.00 |
| 45 | 10-0400-C | Keeper Latch for Spotter | 1.00 |
Hoses and Hand Tool Drawing and Parts List 10-0505 4” Stainless Steel Hand Tool with Clear View Head for Machines with No Heat
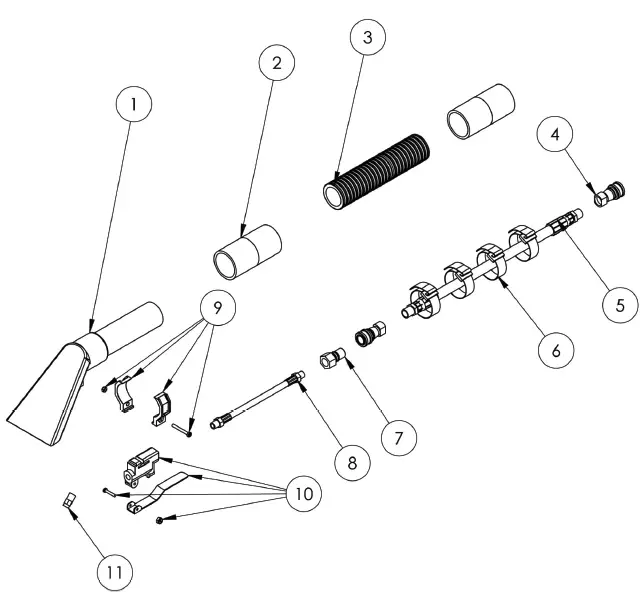
Parts List
| Drawing No. | Item No. | Item Description | Qty. Needed |
| 1 | 10-0505 | 4” Stainless Steel Hand Tool | |
| with Clear View Head | 1.00 | ||
| 2 | 10-0463 | Black Slip Hose Cuff for Spotter | 2.00 |
| 3 | 50-1007 | 7-Foot Black Hose for Spotter | 1.00 |
| 4 | 10-0474 | 1/8” Female QD for Spotter | 1.00 |
| 5 | 10-0475 | Solution Hose for Spotter | 1.00 |
| 6 | 10-0388 | Velcro Strap | 1.00 |
| 7 | 10-0402 | 1/8” Male QD for Stainless Steel Hand Tool | 1.00 |
| 8 | 10-0403 | 1/8” Brass Female Coupler | 1.00 |
| 9 | 10-0506 | Valve Clamp for Stainless Steel Hand Tool | 1.00 |
| 10 | 10-0504 | Valve for Stainless Steel Hand Tool | 1.00 |
| 11 | 10-0502 | Jet for Stainless Steel Hand Tool | 1.00 |
Machine Schematic Drawing – with Heat
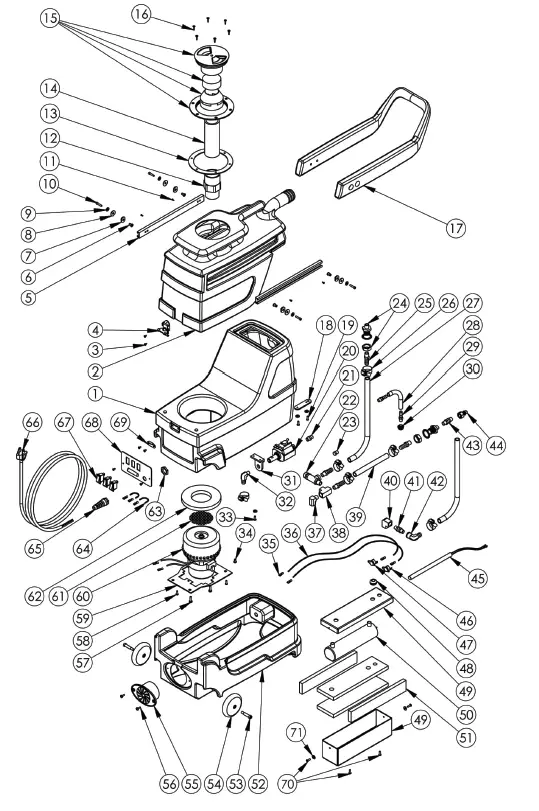
Machine Parts List – with Heat
| 2 | SP-3-RT-GRNGRAN | 3-Gallon Recovery Tank – Green Granite | 1.00 |
| 3 | 10-0383 | 6-32 x 1/4” Phil Pan Screw | 6.00 |
| 4 | 10-0400-D | Latch for Sniper | 1.00 |
| 5 | 10-0412 | C-Channel for Spotter Handle | 2.00 |
| 6 | 10-0414 | Rivet for Spotter Handle | 4.00 |
| 7 | 10-0384 | .125 Thick Nylon Washer | 4.00 |
| 8 | 10-0385 | .06 Thick Nylon Washer | 4.00 |
| 9 | 10-0074 | Flat Washer #8 SAE | 11.00 |
| 10 | 10-0216 | Allen Head Screw for Backpack | 4.00 |
| 11 | 10-0379 | 8-32 x 3/8” Screw | 4.00 |
| 12 | 10-0405 | 1-1/2” PVC SCH40 Slip Thread | 1.00 |
| 13 | 10-0302-A | Hatch Cover Gasket for Spotter | 1.00 |
| 14 | 10-0416-A | 1-1/2” Black ABS Stand Pipe | 1.00 |
| 15 | 10-0304 | Spotter Cap and Float Assembly | 1.00 |
| 16 | 10-0419 | Screw for Spotter Hatch | 6.00 |
| 17 | SP-3-HS-BLKGRAN | 3-Gallon Heater Skirt – Black Granite | 1.00 |
| 18 | 10-0831 | S/R Bracket for Sniper | 1.00 |
| 19 | 10-0832 | S/R Strap Bolts | 2.00 |
| 20 | 10-0300 | 55 PSI Pump for Spotter | 1.00 |
| 21 | 10-0403-M | 1/8” Brass Male Nipple | 1.00 |
| 22 | 10-0901 | 175 PSI Relief Valve for Heater | 1.00 |
| 23 | 10-0510 | 1/8” Brass Plug | 1.00 |
| 24 | 80-0017 | Bulk Head fitting for Sniper | 2.00 |
| 25 | 80-0024-B | 1/4” MPT x 3/8” Barb | 4.00 |
| 26 | 10-0826 | 3/4” Hose Clamp for Sniper | 6.00 |
| 27 | 10-0843 | 3/8” Black Hose for Sniper | 1.00 |
| 28 | 10-0434 | Threaded Hose for Spotter | 1.00 |
| 29 | 10-0407 | 1/8” Strait Nylon Barb NPT | 2.00 |
| 30 | 10-0845-2 | 1/8” Strainer for Spotter | 1.00 |
| 31 | 10-0301 | L Bracket for Spotter | 1.00 |
| 32 | 10-0828 | 90 Degree Brass Fitting for Sniper | 1.00 |
| 33 | 10-0022 | Shoulder and Waist Belt Screw | 3.00 |
| 34 | 10-0017 | Deflector Screw | 1.00 |
| 35 | T-C-011 | Female Terminal Connector | 10.00 |
| 36 | T-WPUR | Purple Wire | |
| 37 | 80-0011-2 | 90 Degree Street Elbow | 1.00 |
| 38 | 80-0010 | 1/4” Brass Tee | 1.00 |
| 39 | 10-0843 | 3/8” Black Hose for Sniper | 1.00 |
| 40 | 10-0852 | 1/4” 90 Degree Brass Elbow | 1.00 |
| 41 | 80-0101-M | 1/4” Male Check Valve | 1.00 |
| 42 | 80-0014 | 3/8” B x 1/4” F 90 Degree | 1.00 |
| 43 | 10-0479 | 1/4” Male Close Nipple | 1.00 |
| 44 | 10-0870 | 1/4” Male QD | 1.00 |
| 45 | 10-1500-B | Heater Element 600 Watt | 1.00 |
| 46 | 10-0814 | Senor for Sniper Heater | 1.00 |
| 47 | 10-0814-B | Manual Sensor for Heater | 1.00 |
| 48 | 10-0907 | Strain Relief for Tube Heater | 1.00 |
| 49 | 10-0906 | Box for Tubular Heater | 1.00 |
| 50 | 10-0900 | Heater Body Tubular | 1.00 |
| 51 | 10-0801-G | Pipe Wrap Insulation for Heater | 1.00 |
| 52 | SP-3-H-BLK | 3-Gallon Spotter Handle – Black | 1.00 |
| 53 | 10-0387 | 5/16” x 1” Spotter Wheel Bolt | 2.00 |
| 54 | 10-0303 | Roller Blade Wheel for Spotter | 2.00 |
| 55 | 10-0822 | Exhaust Grate for Sniper | 2.00 |
| 56 | 10-0419-A | Screw for Sniper Hatch | 2.00 |
| 57 | 10-0014 | Motor Screw | 2.00 |
| 58 | 10-0380 | 10-32 x 3/8” Screw | 2.00 |
| 59 | 10-1024 | Motor Mount Plate for Spotter | 1.00 |
| 60 | 10-0354 | 3 Gallon Spotter Motor | 1.00 |
| 61 | 10-0386 | Stamped Motor Screen | 1.00 |
| 63 | 10-1030 | Spotter Motor Gasket | 1.00 |
| 64 | 10-0027-A | Strain Relief Nut | 1.00 |
| 65 | T-WBLA | Black Wire | |
| Drawing No. | Item No. | Item Description | Qty. Needed |
| 1 | 10-0501 | 4” Stainless Steel Upholstery Tool | 1.00 |
| 2 | 10-0463 | Black Slip Hose Cuff for Spotter | 2.00 |
| 3 | 50-1008 | 15-Foot Black Hose 1-1/4” | 1.00 |
| 4 | 10-0868 | 1/4” Female QD for Spotter | 1.00 |
| 5 | 80-8007 | 1/4” x 15-Foot Extractor Hose | 1.00 |
| 6 | 10-0388 | Velcro Strap | 1.00 |
| 7 | 10-0870 | 1/4” Male QD | 1.00 |
| 8 | 10-0507 | 8” Black Hose for Stainless Steel Hand Tool | 1.00 |
| 9 | 10-0506 | Valve Clamp for Stainless Steel Hand Tool | 1.00 |
| 10 | 10-0504 | Valve for Stainless Steel Hand Tool | 1.00 |
| 11 | 10-0502 | Jet for Stainless Steel Hand Tool | 1.00 |
| Drawing No. | Item ID | Item Description | Qty. Needed |
| 65 | 10-0027 | Pigtail Strain Relief | 1.00 |
| 66 | 10-0448 | 20-Foot Spotter/Air Mover Cord | 1.00 |
| 67 | 10-0025 | On/Off Switch | 3.00 |
| 68 | 10-1026 | Switch Plate for 3-Gallon w/ Heat | 1.00 |
| 69 | 10-0400-C | Keeper Latch for Sniper | 1.00 |
| 70 | 80-0022-A | Screw for 500 PSI Panel | 2.00 |
| 71 | 10-0204 | Motor Mount Back-Up Washer | 2.00 |
Hoses and Hand Tool Drawing and Parts List 10-0501 Stainless Steel Hand Tool for Machines with Heat
Parts List
| Drawing No. | Item No. | Item Description | Qty. Needed |
| 1 | 10-0501 | 4” Stainless Steel Upholstery Tool | 1.00 |
| 2 | 10-0463 | Black Slip Hose Cuff for Spotter | 2.00 |
| 3 | 50-1008 | 15-Foot Black Hose 1-1/4” | 1.00 |
| 4 | 10-0868 | 1/4” Female QD for Spotter | 1.00 |
| 5 | 80-8007 | 1/4” x 15-Foot Extractor Hose | 1.00 |
| 6 | 10-0388 | Velcro Strap | 1.00 |
| 7 | 10-0870 | 1/4” Male QD | 1.00 |
| 8 | 10-0507 | 8” Black Hose for Stainless Steel Hand Tool | 1.00 |
| 9 | 10-0506 | Valve Clamp for Stainless Steel Hand Tool | 1.00 |
| 10 | 10-0504 | Valve for Stainless Steel Hand Tool | 1.00 |
| 11 | 10-0502 | Jet for Stainless Steel Hand Tool | 1.00 |
New Equipment Warranty
Limited Warranty
CleanFreak warrants new equipment against defects in material and workmanship under normal use and service to the original purchaser. Any statutory implied warranties, including any warranty of merchantability or fitness for a particular purpose, are expressly limited to the duration of this written warranty. CleanFreak will not be liable for any other damages, including but not limited to indirect or special consequential damages arising out of or in connection with the furnishing, performance, use or inability to use the machine. This remedy shall be the exclusive remedy of the purchaser. The warranty period is subject to the conditions stated below.
Lifetime Warranty on Body, 2 Years on Vacuum Motors and Pump, 1 Year on Heater and on all Electrical Parts, 90 Days on Tools and Accessories
CleanFreak warrants the roto-molded body to be free from defects in material and workmanship, under normal use and service for a lifetime. CleanFreak warrants the motors and pump to be free from defects in material and workmanship, under normal use and service for two (2) years from the original date of sale, heater for one (1) year, and all electrical parts one (1) year. Parts replaced or repaired under this warranty are warranted for the remainder of the original warranty period. Service labor charges are covered for one (1) year from the date of purchase when performed by a CleanFreak Repair Center. Labor is only provided by a CleanFreak Repair Center. If a CleanFreak Repair Center is not near you, it is the purchaser’s responsibility to take their machine to a CleanFreak Repair Center.
Normal wear items, such as capacitors, cords, finishes or switches, will be warranted for manufacturing defects for ninety (90) days from the purchase date.
All warranties of motors and associated components will be voided: if the machine is serviced by anyone other than a CleanFreak Repair Center; if the machine is mechanically modified; if the machine is operated when not operating properly; or if the machine is misused or abused.
The warranty starts on the purchase date by the original purchaser from CleanFreak subject to proof of purchase. The Machine Registration Card must be completed and returned immediately at the time of purchase. If proof of purchase cannot be identified, the warranty start date is ninety (90) days after the inventory stocking date at the distributor’s warehouse.
5109 N National Dr, Knoxville, TN 37914
Toll Free: 888-722-5508 | Local: 920-882-8453
www.CleanFreak.com
Make a copy of this card for future reference. © All Rights Reserved


