
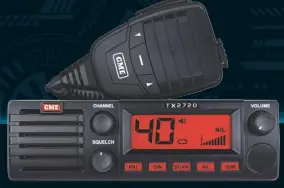
GME TX2720 Din Size 4 Watt 27 MHz AM CB Radio with Rugged Professional Mic
INTRODUCTION
The GME TX2720 is a 27 MHz AM Citizens Band radio. The TX2720 has a number of enhanced features including fully user programmable Channel Scanning, Priority Channel and backlit Liquid Crystal Display with dimming function.
Please read this manual thoroughly to ensure you get the best from the TX2720’s features. For users in New Zealand, South Africa or PNG. Please refer to amendment for local frequencies, channel allocations and licensing requirements.
SAFETY INFORMATION
The TX2720 is a radio transmitting device.
- When transmitting, keep the antenna more than 25 mm from any part of the head or body.
- Do not transmit near electrical blasting equipment or in explosive atmospheres.
- Do not allow children to operate a radio transmitter unsupervised.
FEATURES
- LCD display with lamp dimming function
- Rotary squelch control
- Channel scanning with memory
- Advanced noise Limiter (NL) circuitry
- Surface mount technology
- Priority channel
ACCESSORIES SUPPLIED
- TX2720 Radio unit
- Din mounting kit
- Instruction manual
- Microphone (MC553B)
- Microphone clip
- DC lead
- Screw pack
If any items are missing or damaged, please contact your retailer or place of purchase.
OPTIONAL ACCESSORIES
- MB42 mounting bracket
- CA30 gimbal knobs
- LEM6P 4 m microphone extension lead
CONTROLS
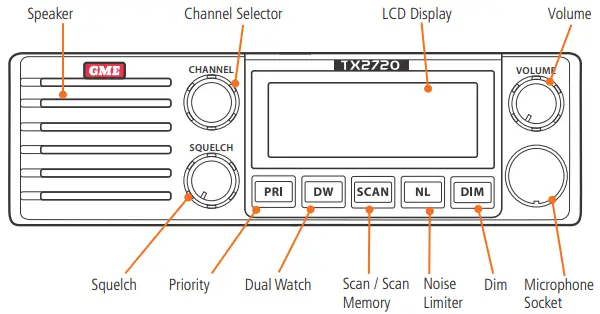
FRONT PANEL
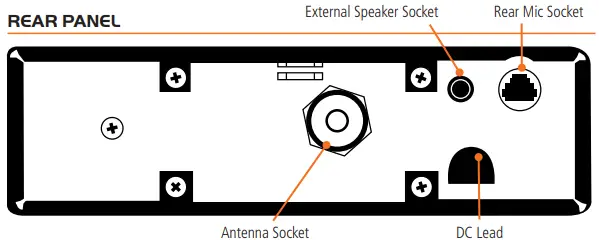
REAR PANEL
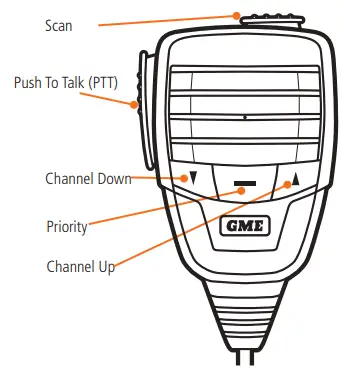
MICROPHONE
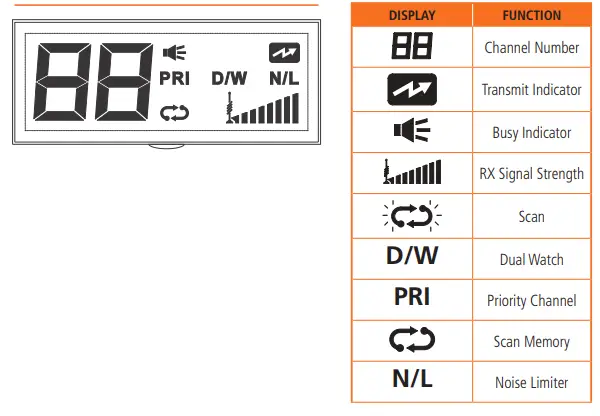
DISPLAY
OPERATION – GENERAL FUNCTIONS
- VOLUME ON/OFF
Rotate the volume control clockwise past the ‘click’ to turn the TX2720 ON. Continue to advance the control clockwise to increase the volume. Rotate the control counter-clockwise to turn the radio OFF. - SQUELCH CONTROL
The Squelch control is used to eliminate the background noise when there are no signals present. To adjust the Squelch, first rotate it fully counter-clockwise until the background noise is heard, then slowly rotate it clockwise until the noise just disappears. If there are signals on the channel, you should wait until the channel is clear before adjusting the Squelch (or select a quiet channel). Once adjusted, the receiver will remain quiet as long as there are no signals present, but an incoming signal will override the Squelch and be heard in the speaker. As the control is advanced further clockwise the Squelch threshold is progressively increased and stronger incoming signals are needed to override it. To receive very weak signals or to disable the Squelch, simply turn the control fully counter-clockwise. - CHANNEL SELECTION
Select the required channel using the rotary the channel switch or by briefly pressing the or
or  keys on the microphone. The selected channel is displayed on the LCD.
 - DISPLAY BRIGHTNESS
The LCD has two brightness levels to provide suitable lighting for day or night use. The default setting is bright.
The desired brightness level can be selected via the ‘Dim’ switch located on the front panel. - TRANSMITTING
To transmit, press the PTT button on the microphone. Hold the microphone 2-6 cm from your mouth and slightly to one side so your voice does not project directly into the microphone. Speak at a normal voice level. Your TX2720 has a built-in speech processor which automatically controls the level of your transmitted voice. It is not necessary to raise your voice or shout into the microphone. - NOISE LIMITER
The NL key activates an extremely effective noise limiter circuit which helps to eliminate most electrical impulse interference caused by engine ignition systems etc. This allows clearer reception of weak signals even under noisy electrical conditions.When the NL key is selected, ‘N/L’ is displayed on the LCD. - SCANNING
The TX2720 is fitted with a Scan function that allows a group of user selected channels to be scanned for activity. Your TX2720 has a Scan memory which remembers which channels you would like to Scan. By default your TX2720 is supplied with all channels in the Scan memory.To See Which Channels are Presently in the Scan Memory
Select each channel one by one using the rotary channel switch or by pressing the or keys on the microphone and check to see if  is displayed to the lower right of the channel number.
If is displayed, the channel is in the Scan memory, otherwise the channel is not in the Scan memory.To Add or Remove a Channel from the Scan Memory
Select the required channel, then press and hold the SCAN key until a beep is heard. If appears to the lower right of the channel number, the channel has been added to the Scan memory, otherwise it has been removed. - To Scan
Adjust the Squelch control so the radio is quiet, then briefly press the SCAN key. A high beep will be heard, will flash on the display and the channel numbers will change rapidly as the radio begins scanning. If a signal is found, the radio will pause on that channel and will remain there as long as the channel remains busy. Once the channel has been clear for 5 seconds, scanning will resume.
NOTE: You must have at least two channels programmed into the Scan memory otherwise the radio won’t scan. - To Change the Scan Direction
Press the or key. The radio will scan in the direction of the selected channel key. - To Skip Over a Busy Channel and Resume Scanning
Briefly press the or key. Scanning will resume. - To Transmit on a Busy Channel
Wait for a break in the conversation, then press the PTT switch. The radio will exit the Scan mode and stay on the channel allowing you to communicate with others on that channel.To resume scanning briefly press the SCAN key again.
NOTE: If the PTT is pressed while the radio is scanning, it will be ignored and a low beep will be heard when the PTT is released. - To Exit the Scan Mode Manually
Briefly press the SCAN key will stop flashing on the display.
NOTE: Excessive noise on a channel can cause the scanning to pause on that channel even if there is no signal there. If this only happens on one channel, you may need to remove that channel from the scan memory. If it happens on all channels, you should try increasing the squelch setting. - PRIORITY CHANNEL
The Priority channel is preset to channel 8 allowing it to be instantly recalled at the press of a key. - To Use the Priority Channel
Simply press the Priority key at any time. The radio will jump straight to channel 8. If Scan or DW was selected, they will be cancelled. - To Return to the Previously Selected Channel
Press the Priority key again - DUAL WATCH
Dual Watch allows your TX2720 to monitor both the Priority channel and another selected channel by quickly switching between them. Any signals received on the Priority channel take precedence over signals on the selected channel. To use the Dual Watch feature, adjust the Squelch control so the radio is quiet, select your preferred channel using the or keys or rotary channel switch then press the DW key. ‘D/W’ will appear on the display and the channel display will alternate between your selected channel and the Priority channel.If a signal is received on your selected channel, the radio will pause on that channel but will continue to switch to the Priority channel every 2 seconds and a brief interruption to the signal will be noticed. Once the signal has gone, normal Dual Watch switching will resume. If a signal appears on the Priority channel at any time, the radio will stop switching and will remain on the Priority channel for as long as the signal is present. Once the signal has gone, normal Dual Watch switching will resume.
NOTE: If you press the PTT switch while Dual Watch is selected, your TX2720 will transmit on the selected channel. If you wish to talk on the Priority channel, press the Priority key to cancel the Dual Watch and switch straight to the Priority channel.
27 MHz CB CHANNEL ASSIGNMENTS
| 27 MHz CB CHANNEL ASSIGNMENTS | ||
| Channel | Frequency | Suggested Usage |
| 1 | 26.965 MHz | General Use |
| 2 | 26.975 MHz | General Use |
| 3 | 26.985 MHz | General Use |
| 4 | 27.005 MHz | General Use |
| 5 | 27.015 MHz | General Use |
| 6 | 27.025 MHz | General Use |
| 7 | 27.035 MHz | General Use |
| 8 | 27.055 MHz | Road Channel |
| 9 | 27.065 MHz | Emergency (1) |
| 10 | 27.075 MHz | General Use |
| 11 | 27.085 MHz | Call Channel |
| 12 | 27.105 MHz | General Use |
| 13 | 27.115 MHz | General Use |
| 14 | 27.125 MHz | General Use |
| 15 | 27.135 MHz | General Use |
| 16 | 27.155 MHz | General Use |
| 17 | 27.165 MHz | General Use |
| 18 | 27.175 MHz | General Use |
| 19 | 27.185 MHz | General Use |
| 20 | 27.205 MHz | General Use |
| 21 | 27.215 MHz | General Use |
| 22 | 27.225 MHz | General Use |
| 23 | 27.255 MHz | General Use |
| 24 | 27.235 MHz | General Use |
| 25 | 27.245 MHz | General Use |
| 26 | 27.265 MHz | General Use |
| 27 | 27.275 MHz | General Use |
| 28 | 27.285 MHz | General Use |
| 29 | 27.295 MHz | General Use |
| 30 | 27.305 MHz | General Use |
| 31 | 27.315 MHz | General Use |
| 32 | 27.325 MHz | General Use |
| 33 | 27.335 MHz | General Use |
| 34 | 27.345 MHz | General Use |
| 35 | 27.355 MHz | General Use |
| 36 | 27.365 MHz | General Use |
| 37 | 27.375 MHz | General Use |
| 38 | 27.385 MHz | General Use |
| 39 | 27.395 MHz | General Use |
| 40 | 27.405 MHz | General Use |
| (1) Legally Designated | ||
INSTALLATION
The TX2720 is supplied with a DIN mounting bracket for mounting into a standard DIN sized cavity in the vehicle’s console or dashboard. Before installing the radio, ensure the DC cable and antenna have been installed correctly (as described further below) and the connectors are accessible through the DIN cavity.
INSTALLING THE DIN MOUNT
To install the DIN mount you will need access to the rear of the vehicle’s console.
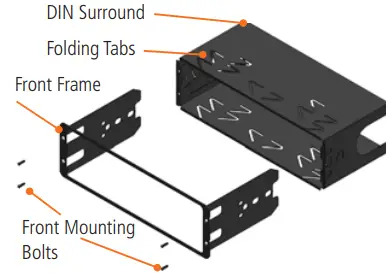
- Remove the four small front mounting bolts from the front edges of the DIN mount and separate the front frame from the DIN surround.
- Slide the DIN surround into the DIN slot in the vehicle’s console and secure it in the desired position by bending the folding tabs.
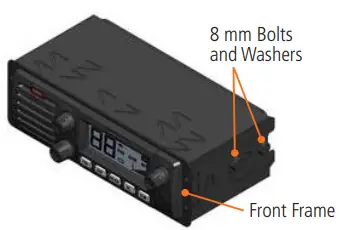
- Slide the TX2720 radio into the front frame so that the threaded holes in the chassis line up with the holes in the front frame.
- Secure the radio using the four 8 mm bolts and washers provided.

- Connect the DC connector and PL259 antenna (and rear microphone extension lead if used) to the sockets on the radio’s rear panel.
- Slide the front frame back into the DIN surround and secure it using the four small front mounting bolts.
You can now refit the console to the vehicle.
DC POWER CONNECTIONS
The TX2720 is designed for 13.8 V DC negative earth installations only (i.e. where the negative side of the battery is connected to the frame or chassis of the vehicle). There are two recommended methods of installation. Please refer to the following diagrams.
Radio remains On when the Ignition switch is Off
Connect the radio’s negative (Black) lead to the vehicle’s chassis or if preferred directly to the battery’s negative terminal. Connect the radio’s positive (Red) lead, via the 2 amp fuse, to the battery’s positive terminal or to a point in the fuse box that has +13.8 volts continuously available.
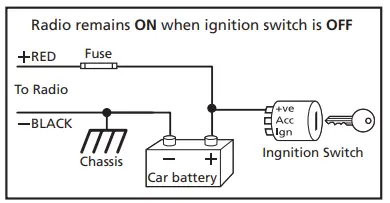
The radio can now be switched ON or OFF at any time using the switch on the volume control.
Radio Turns On and Off with the Ignition switch
Connect the radio’s negative (Black) lead to the vehicle’s chassis or if preferred directly to the battery’s negative terminal. Connect the radio’s positive (Red) lead, via the 2 amp fuse, to the accessory point in the fuse box. This point should supply +13.8 volts ONLY when the ignition is switched ON or in the ACCESSORY position
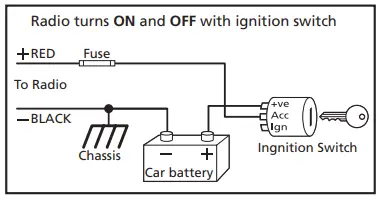
The radio should now switch ON and OFF automatically with the vehicle’s ignition switch.
MICROPHONE
The TX2720 is fitted with two microphone sockets – one on the front panel and one on the rear. The 6 pin microphone connector can be plugged into either socket. In fact, if the situation requires it, two microphones can be connected simultaneously.
Front
The front microphone socket is fitted with a hard protective cover. The cover is a press fit. To remove the cover insert a paper clip or similar into the small slot in the edge of the cover and lift the cover away from the panel. Retain the cover in case you require it later on. Position the microphone plug so the plastic tab faces upwards then press the plug into the socket until it ‘clicks’. Gently press the rubber strain relief grommet into the hole surrounding the socket so that the slot around the grommet fits neatly inside the lip inside the hole.
Rear
If using the rear microphone connection you should obtain the optional LEM6P rear microphone extension lead. Mount the extension lead’s socket on a convenient location and feed the plug through the dashboard to the DIN cavity.
Remove the rubber grommet from the rear microphone socket and retain in case you require it later on. Position the microphone plug so the plastic tab faces upwards then press the plug into the socket until it ‘clicks’.
Removing the Microphone
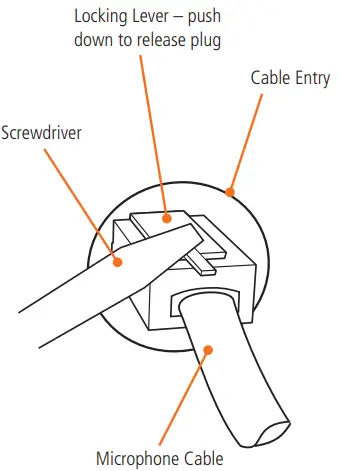
For the front panel connection, first squeeze the grommet to disengage it from the slot then slide it along the microphone cord. Now squeeze the microphone plug’s plastic tab towards the plug to unlock it while gently pulling on the microphone cable. The plug should release from the socket. If the plug does not come out easily, the tab has not been released fully – squeeze the tab again.
ANTENNA INSTALLATION
It is essential to install a good quality, high efficiency, 27 MHz antenna. A poor quality antenna or one not designed for the specific frequency band will give very poor performance. GME have a large range of suitable 27 MHz antennas to suit most installations and applications. We recommend you contact your local GME dealer for advice. After mounting the antenna, feed the antenna cable to the DIN cavity in the vehicles console or dashboard before mounting the radio. Connect the antenna cable to the rear antenna socket using the PL259 connector.
NOISE SUPPRESSION
27 MHz CB radio can be prone to electrical and ignition interference. The reason is that electrical noise is a form of AM transmission similar to that used by your radio and your radio’s receiver is very sensitive. In most cases, ignition noise can be greatly reduced or eliminated by selecting the Noise Limiter (NL) key on the radio. In some severe cases additional suppression may need to be fitted to the ignition system of your vehicle in which case we recommend you consult an auto electrician for advice specific to your installation.
SPECIFICATIONS
ELECTRICAL
General
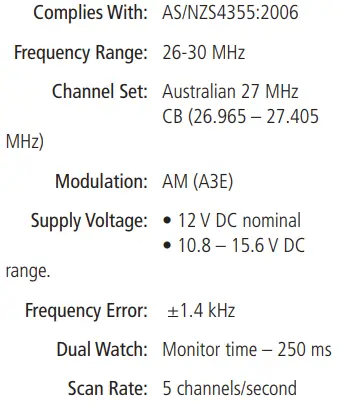
Transmitter
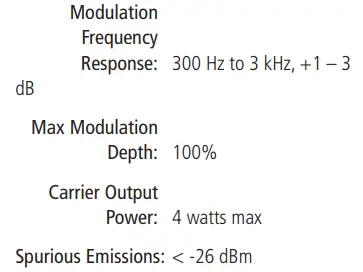
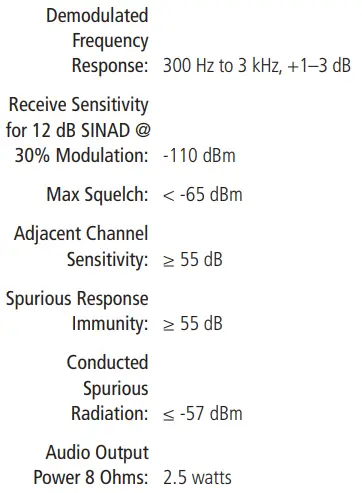
Receiver
MECHANICAL

ENVIRONMENTAL

The TX2720 will operate over the 26-30 MHz frequency range. For information specific to frequencies outside of the Australian CB bands, please refer to the appropriate amendment, or contact GME at: [email protected]
Specifications are typical unless otherwise indicated and may be subject to change without notice or obligation.
STANDARD COMMUNICATIONS CONTRACT WARRANTY AGAINST DEFECTS
- Consumer guarantees
- Our goods come with guarantees that cannot be excluded under the Australian Consumer Law. You are entitled to a replacement or refund for a major failure and for compensation for any other reasonably foreseeable loss or damage. You are also entitled to have the goods repaired or replaced if the goods fail to be of acceptable quality and the failure does not amount to a major failure.
- To the extent we are able, we exclude all other conditions, warranties and obligations which would otherwise be implied.
- Warranty against defects
- This Warranty is in addition to and does not limit, exclude or restrict your rights under the Competition and Consumer Act 2010 (Australia) or any other mandatory protection laws that may apply.
- We warrant our goods to be free from defects in materials and workmanship for the warranty period (see warranty table) from the date of original sale (or another period we agree to in writing). Subject
to our obligations under clause 1.2, we will at our option, either repair or replace goods which we are satisfied are defective. We warrant any replacement parts for the remainder of the period of warranty for the goods into which they are incorporated. - To the extent permitted by law, our sole liability for breach of a condition, warranty or other obligation implied by law is limited
- in the case of goods we supply, to any one of the following as we decide –
- the replacement of the goods or the supply of equivalent goods;
- the repair of the goods;
- the cost of repairing the goods or of acquiring equivalent goods;
- in the case of services we supply, to any one of the following as we decide –
- the supplying of the services again;
- the cost of having the services supplied again.
- For repairs outside the warranty period, we warrant our repairs to be free from defects in materials and workmanship for three months from the date of the original repair. We agree to re-repair or replace (at our option) any materials or workmanship which we are satisfied are defective.
- We warrant that we will perform services with reasonable care and skill and agree to investigate any complaint regarding our services made in good faith. If we are satisfied that the complaint is justified, and as our sole liability to you under this warranty (to the extent permitted at law), we agree to supply those services again at no extra charge to you.
- To make a warranty claim you must before the end of the applicable warranty period (see warranty table), at your own cost, return the goods you allege are defective, provide written details of the defect, and give us an original or copy of the sales invoice or some other evidence showing details of the transaction.
- Send your claim to:
Standard Communications Pty Ltd.
PO Box 96 Winston Hills,
NSW 2153, Australia.
Tel: (02) 9844 6666 Fax: (02) 9884 6600 Email: [email protected] - If we determine that your goods are defective, we will pay for the cost of returning the repaired or replaced goods to you, and reimburse you for your reasonable expenses of sending your warranty claim to us.
- What this warranty does not cover
This warranty will not apply in relation to:- goods modified or altered in any way;
- defects and damage caused by use with non Standard Communications products;
- repairs performed other than by our authorised representative;
- defects or damage resulting from misuse, accident, impact or neglect;
- goods improperly installed or used in a manner contrary to the relevant instruction manual; or
- goods where the serial number has been removed or made illegal.
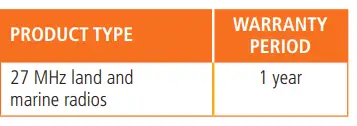
- Warranty period
- We provide the following warranty on
GME and Kingray products. No repair or replacement during the warranty period will renew or extend the warranty period past the period from original date of purchase.
- We provide the following warranty on

A division of Standard Communications Pty Ltd.
Head Office: PO Box 96, Winston Hills, NSW 2153, Australia.
New Zealand: PO Box 58, 446 Botany, Auckland 2163 (09) 274 0955 All other international enquiries email: [email protected]


