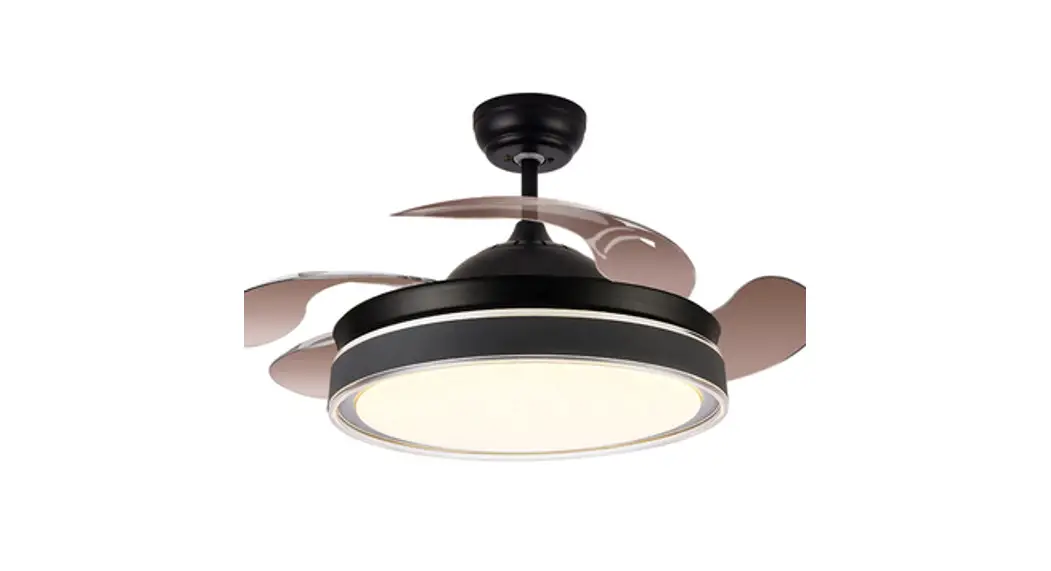
Bladeless Ceiling Fan with Dimmable LED Light
KBF-42
INSTALLATION AND CARE GUIDE
SAFETY INFORMATION
![]() Read and save these instructions for safe installation and fan operation.
Read and save these instructions for safe installation and fan operation.![]() Before beginning installation, read and understand all instructions and safety information. Thoroughly review all assembly information and drawings and be sure you understand the assembly requirements.
Before beginning installation, read and understand all instructions and safety information. Thoroughly review all assembly information and drawings and be sure you understand the assembly requirements.![]() Installation and wiring must be in accordance with the National Electrical Code and all local codes. If you are unfamiliar with or unable to comply with these requirements, it is strongly recommended that the electrical installation is performed by a qualified licensed electrician.
Installation and wiring must be in accordance with the National Electrical Code and all local codes. If you are unfamiliar with or unable to comply with these requirements, it is strongly recommended that the electrical installation is performed by a qualified licensed electrician.![]() To reduce the risk of fire, electric shock, or personal injury, turn the electricity off at the circuit breaker or main fuse box before installation and wiring.
To reduce the risk of fire, electric shock, or personal injury, turn the electricity off at the circuit breaker or main fuse box before installation and wiring.![]() When cutting or drilling into a wall or ceiling, do not damage electrical wiring and other hidden utilities.
When cutting or drilling into a wall or ceiling, do not damage electrical wiring and other hidden utilities.![]() To reduce the risk of fire or electric shock, do not use this fan with any solid-state speed control device.
To reduce the risk of fire or electric shock, do not use this fan with any solid-state speed control device.![]() Mount the ceiling fan directly to a structural framing member or to a metal outlet box capable of reliably supporting a minimum of 35 lbs. (15.9 kg). Use only UL-listed metal outlet boxes marked acceptable for fan support up to 3Slbs. (15.9 kg) and use screws provided with the outlet box Plastic outlet boxes and outlet boxes commonly used for the support of lighting fixtures may not be acceptable for fan support and may need to be replaced.
Mount the ceiling fan directly to a structural framing member or to a metal outlet box capable of reliably supporting a minimum of 35 lbs. (15.9 kg). Use only UL-listed metal outlet boxes marked acceptable for fan support up to 3Slbs. (15.9 kg) and use screws provided with the outlet box Plastic outlet boxes and outlet boxes commonly used for the support of lighting fixtures may not be acceptable for fan support and may need to be replaced.![]() The fan must be installed with a minimum of 7ft (2.1m) of clearance from the floor.
The fan must be installed with a minimum of 7ft (2.1m) of clearance from the floor.![]() Do not place foreign objects in between or in the path of the rotating fan blades.
Do not place foreign objects in between or in the path of the rotating fan blades.![]() After making electrical connections, spliced conductors should be turned upward and pushed carefully up into the outlet box. The wires should be spread apart with the grounded conductor and the equipment-grounding conductor on one side of the outlet box.
After making electrical connections, spliced conductors should be turned upward and pushed carefully up into the outlet box. The wires should be spread apart with the grounded conductor and the equipment-grounding conductor on one side of the outlet box.![]() To avoid personal injury or damage to the fan and other items, use caution when working around or cleaning the fan.
To avoid personal injury or damage to the fan and other items, use caution when working around or cleaning the fan.![]() Do not use water or detergents when cleaning the fan or fan blades. A soft brush or a lint-free dry or lightly dampened cloth will be suitable for most cleaning.
Do not use water or detergents when cleaning the fan or fan blades. A soft brush or a lint-free dry or lightly dampened cloth will be suitable for most cleaning.![]() The electrical diagram is for reference only.
The electrical diagram is for reference only.![]() The fan is suitable for indoor use only. Do not expose the fan to high temperature and/or high humid conditions.
The fan is suitable for indoor use only. Do not expose the fan to high temperature and/or high humid conditions.
| Fan Blade Span | Rated Voltage | Rated Power (Motor) | Light Power | Features |
| 19.7 in. | 110/120V – 60Hz | 35W | LED 28W | AC Motor Tri-Color Temperature Dimmable LED Light Adjustable 3-Speed Fan Compatible with: Tuya Smart App, Amazon Alexa and Google Home |
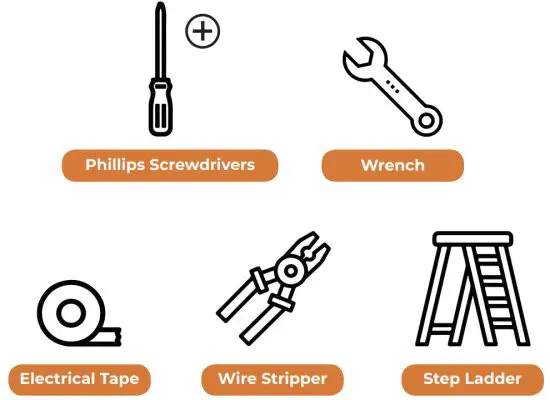
TOOLS FOR INSTALLATION
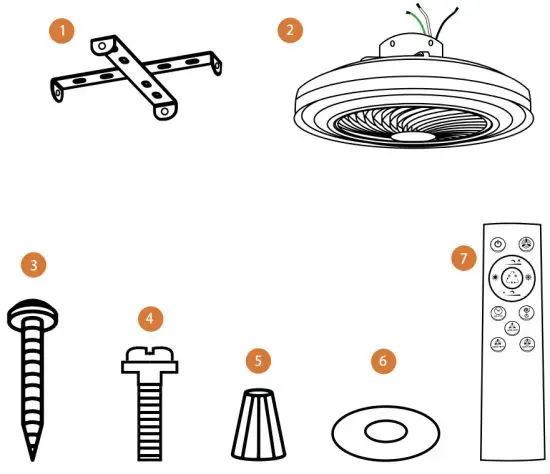
| Part | Description | Quantity |
| 1 | Mounting Bracket | 1 |
| 2 | Fan Assembly | 1 |
| 3 | Wood Screws | 4 |
| 4 | Motor Case Screws | 4 |
| 5 | Plastic Wire Connecting Nut | 3 |
| 6 | Washers | 8 |
| 7 | Remote Control | 1 |
INSTALLATION
INSTALLING THE MOUNTING BRACKET
WARNING: To reduce the risk of fire, electric shock, or personal injury, turn the electricity off at the circuit breaker or main fuse box before installation and wiring.
The ceiling fan must be installed in a location with a minimum of 1ft (0.3m) of clearance to the nearest objects or walls.
- Outlet Box (NOT INCLUDED)
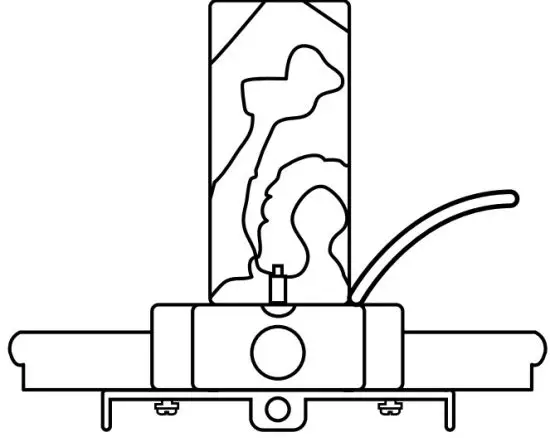
 If your installation site does not have an existing UL-listed metal outlet box, one must be installed before proceeding. Make sure the outlet box is mounted directly to the building structure using ceiling joist screws provided with the outlet box and verify it is marked acceptable for fan support up to 35 lbs (1S9 kg).Remove any existing ceiling fan or light where you intend to install this ceiling fan. Using the screws provided with the outlet box, attach the mounting bracket to the outlet box, passing the 120V electrical supply wires through the sides of the mounting bracket.
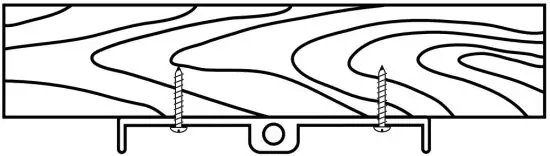
- Wood Ceiling Mark four points in the wood ceiling based on the center of the four holes located in the corners of the mounting bracket. Drill pilot holes in each marked point in the wood ceiling using a drill bit that matches the inner diameter of the threaded part of the screw, not the diameter of the threads. Make sure to drill the same depth as the screw length. Screw the four screws through the mounting bracket and into the pilot holes to secure the mounting bracket.

MAKING THE ELECTRICAL CONNECTIONS
![]() WARNING: To reduce the risk of fire, electric shock, or personal injury, turn the electricity off at the circuit breaker or main fuse box before installation and wiring.
WARNING: To reduce the risk of fire, electric shock, or personal injury, turn the electricity off at the circuit breaker or main fuse box before installation and wiring.
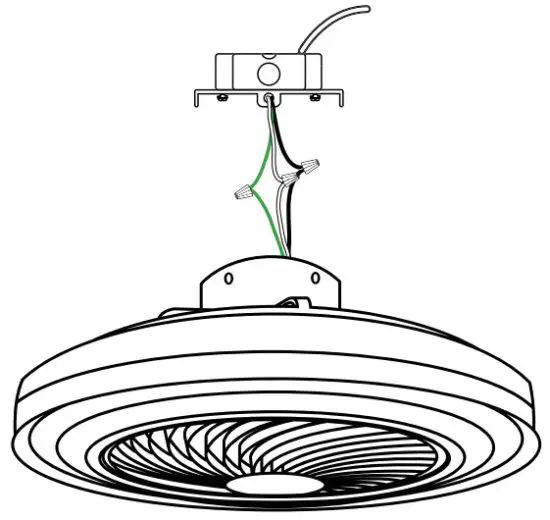
- Lift the fan assembly and place it flat on a surface, so it is near your home wiring and can make the electrical connections. The top flat of a ladder should work.
- Connect the fan assembly green wire (GROUND) to the household green or bare wire using a wire connecting nut.
- Connect the fan assembly white wire (NEUTRAL) to the household white wire using a wire connecting nut.
- Connect the fan assembly black wire (LIVE) to the household black wire using a wire connecting nut.
- Secure each wire connecting the nut using electrical tape.
- Make sure there are no loose strands or connections.
- Turn the wire connecting nuts upward, spreading them apart so the ground and neutral wires will be on one side of the outlet box and the live wires will be on the other side. Carefully tuck the connections up into the outlet box.
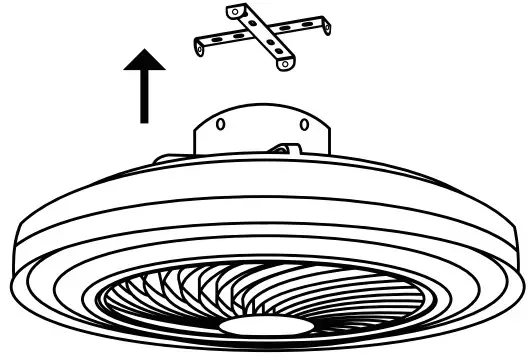
HANGING THE FAN TO THE MOUNTING BRACKET
![]() WARNING: To reduce the risk of fire, electric shock, or personal injury, turn the electricity off at the circuit breaker or main fuse box before installation and wiring.
WARNING: To reduce the risk of fire, electric shock, or personal injury, turn the electricity off at the circuit breaker or main fuse box before installation and wiring.
- Lift the fan assembly and align the holes in the motor case with the mounting bracket holes. Ensure the electrical wiring is not damaged during this step.

- Secure the fan assembly to the mounting bracket using the motor case screws and washers provided.

OPERATION
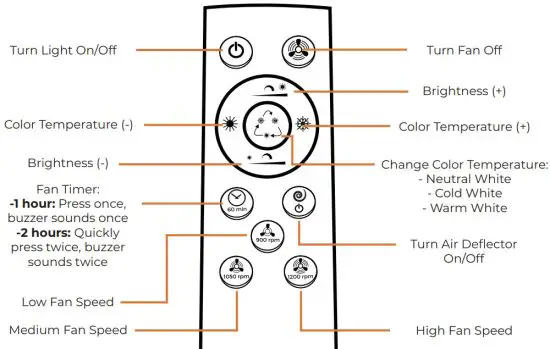
This ceiling fan is compatible with Tuya Smart App,
Amazon Alexa and Google Home.
Access the following links or scan the QR codes to get user guides on how to install the Tuya Smart App, connect your home devices, and set up third-party smart virtual assistant devices.
*Remote control uses two AAA 1.5V batteries (NOT INCLUDED)
 |  |  |
https://bit.ly/30qi0gh | https://bit.ly/3nbgbMS Set up Amazon Alexa and enable Tuya Smart Quick Guide | https://bit.ly/30qPfjm |
GENERAL CARE AND CLEANING
Problem | Solution |
| The fan does not start
| Check the main and branch circuit fuses or breakers. |
| Check the line wire connections to the fan and switch wire connections in the switch housing. | |
| Check the battery in the remote control. | |
| Ensure you are in the normal range of 10-20 feet. | |
| The fan is noisy
| Ensure the wire nut connections are not rattling against each other or the interior wall of the outlet box. |
| Ensure the screws that attach the mounting bracket to the outlet box or ceiling are tight. | |
| Ensure all motor case screws are snug. | |
| Allow a 24-hour “breaking in” period. Most noises associated with a new fan disappear during this time. |
This device complies with Part 15 of the FCC Rules. Operation is subject to the following two conditions: (1) this device may not cause harmful interference, and (2) this device must accept any interference received, including interference that may cause undesired operation
NOTE: This equipment has been tested and found to comply with the limits for a Class B digital device, pursuant to Part 15 of the FCC Rules. These limits are designed to provide reasonable protection against harmful interference in a residential installation. This equipment generates, uses, and can radiate radio frequency energy and, if not installed and used in accordance with the instructions, may cause harmful interference to radio communications. However, there is no guarantee that interference will not occur in a particular installation.
If this equipment does cause harmful interference to radio or television reception, which can be determined by turning the equipment off and on, the user is encouraged to try to correct the interference by one or more of the following measures:
- Reorient or relocate the receiving antenna.
- Increase the separation between the equipment and receiver.
- Connect the equipment into an outlet on a circuit different from that to which the receiver is connected.
- Consult the dealer or an experienced radio/TV technician for help.
Warning: Changes or modifications not expressly approved by the party responsible for compliance could void the user’s authority to operate the equipment
The devices have been evaluated to meet general RF exposure requirements.
References
 User Guide (v3.34.5)-Tuya IoT Development Platform-Tuya Developer search arrDown arrDown arrDown arrDown arrDown arrDown arrDown arrDown arrDown arrDown arrDown arrDown arrDown arrDown arrDown layout like dislike like dislike like dislike
-
Quick Guide of Using Google Home to Control Smart Devices-Tuya IoT Development Platform-Tuya Developer search arrDown arrDown arrDown arrDown arrDown arrDown arrDown arrDown arrDown arrDown arrDown arrDown arrDown arrDown arrDown arrDown arrDown arrDown ar
-
Quick Guide of Using Amazon Echo to Control Smart Devices-Tuya IoT Development Platform-Tuya Developer search arrDown arrDown arrDown arrDown arrDown arrDown arrDown arrDown arrDown arrDown arrDown arrDown arrDown arrDown arrDown arrDown arrDown arrDown ar


