
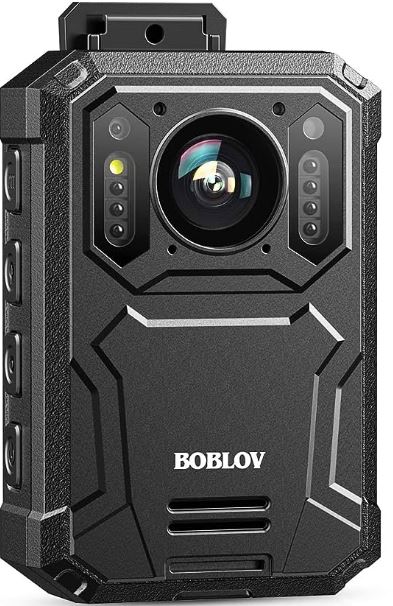
BOBLOV LYY2420 Body Camera
Product Information
- Product Name: Body Camera
- Model: KJ23
- Manufacturer: BOBLOV
- Customer Service
- Email: [email protected]
- Website: www.boblov.com
Product Usage Instructions
Caution
- Always fully charge the battery before use. It is advised to charge for at least 4 hours. Use a compatible charger plug with 5V, 1A.
- When connected to power, the camera will boot automatically. It is recommended to power off the camera manually for stable and quick charging.
- Avoid exposing the camera or battery to high/low-temperature environments. Stop using if the battery leaks or bulges. Incorrect placement of the battery may cause an explosion.
- Avoid direct sunlight on the LCD or lens.
- Do not attempt to replace the battery yourself. Contact customer service if there is any problem with the battery.
- Never dismantle, crush, or pierce the product, or allow it to short-circuit. Seek professional assistance if the product doesn’t work properly.
- If the machine is not in use, it is recommended to charge it occasionally to prevent gradual battery damage.
Caution
- Always fully charge the battery before use. It is advised to charge at least 4 hours. Compatible Charger Plug: 5V, 1A
- Once connect to the power, the camera will boot auto, better to power off the camera manually for stable&quick charging.
- Do not expose the camera or battery being placed in a high/ low temperature environment. If the battery leaks or bulges, stop using. Risk of explosion if the battery is placed by an incorrect type.
- Do not put the LCD or lens under the sunshine.
- Never replace the battery on your own. It may cause damage or an explosion. Please contact us if the battery has any problem.
- Never dismantle, crush, or pierce the product, or allow the product to short-circuit. Please persuade for professional assistance if the product doesn’t work properly.
- If you do not use the machine, please charge the machine every once in a while, otherwise, the battery of the machine will be damaged slowly.
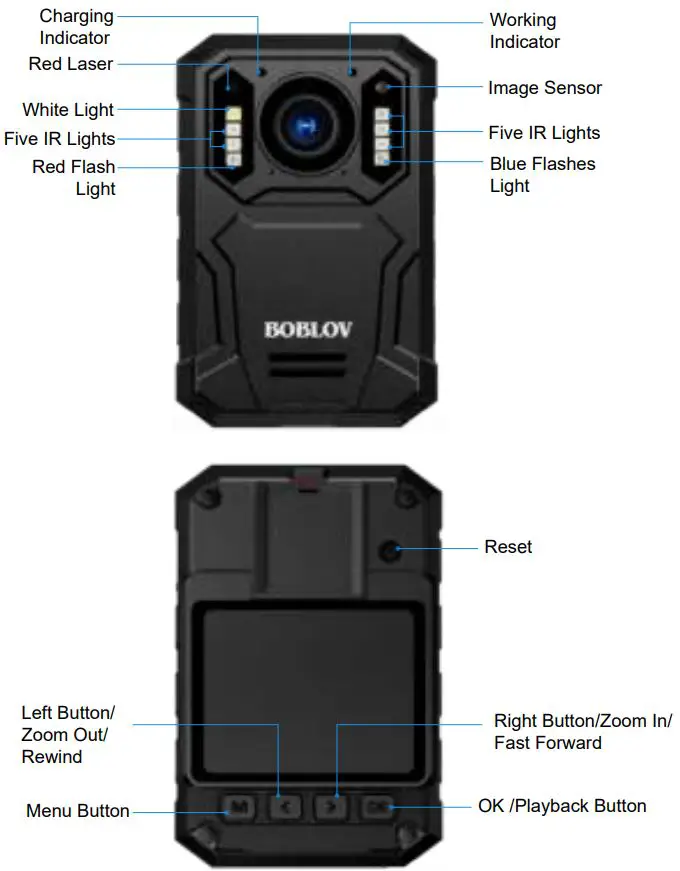
Structure Diagram


Quick Setup
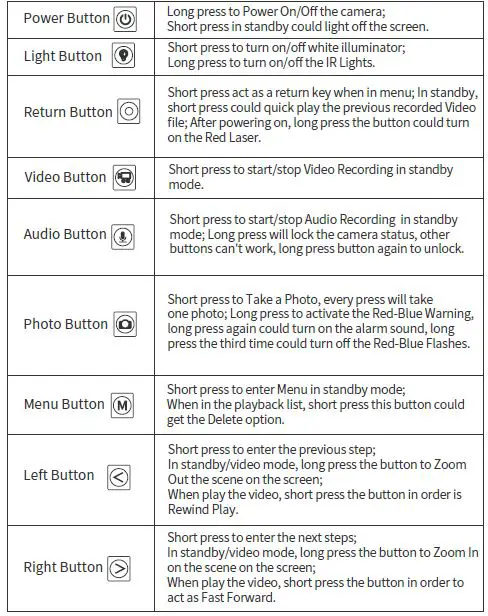
Power On / Off / Standby Mode
Power On / Off
- Long press the power button
 to boot, long press to power off the device.
Standby Mode/Screen Save
When the device is powered on, short press the ![]() button to turn the screen off/on. In the power-on state, the working indicator stays green. Turns on the LCD Power Save option in the menu. If without any operation after 10min after powering on, the screen will turn off. Tap any button to light up the display screen / activate the camera.
button to turn the screen off/on. In the power-on state, the working indicator stays green. Turns on the LCD Power Save option in the menu. If without any operation after 10min after powering on, the screen will turn off. Tap any button to light up the display screen / activate the camera.
Video Recording
- In standby,short press
 to record video, during this process, there is a red dot on the screen and working indicator is solid red, press it again to stop recording and save, and video files are named after the date and time, saved MP4 format.
 - The camera support one key to record videos: in powering off ,status, long pressing the button could activate the camera and start video recording.
Video Locked
- During video recording, long press the OK Button could mark / lock the videos, long press the Ok Button again could release/cancel the lock, then press the button to save this file.
- Or you could refer to 3.6 Files View / Playback section of the lock and unlock in the playback page.
Take Photo
- Single shot: in standby mode, short press the
 once, working indicator flashes red once, and take one photo, photo files are named after the date and time, saved in JPG format.
 - Photo Burst Mode: If you set “Snapshot” to “2P/3P/5P/10P/15P/20P/30P” in menu, short press once, red light flashes, and take several photos continuously.
- Snapshot: During video recording, short press button to get a snapshot. Every press will take one photo.
Audio Recording
- This device is able to record separate audio files. After powering on it, short press
 to record the audio, when reconding, the cress displays a microphone logo and reconding details, and the working indicator is solid yellow, press it again to stop recording and save, audio files are named after the date and time, saved in MP3 format.
 - The camera support one key to record audios: when powering off, long pressing the button could activate the camera and start audio recording.
Night Vision
The infrared night vision of camera default is “Manual”. Long press the![]() button to turn on/off the night vision in standby or video mode. If you want the camera night vision to be activated auto, please go to menu setting, and set “Infrared mode” to “Auto”. Then the camera can be switched to the night vision mode according to the brightness of the environment.
button to turn on/off the night vision in standby or video mode. If you want the camera night vision to be activated auto, please go to menu setting, and set “Infrared mode” to “Auto”. Then the camera can be switched to the night vision mode according to the brightness of the environment.
Files View /Playback

- After recording files, you could enter the Playback Files Page to check through them.
- In standby mode, short press OK Button could enter the playback page, and you could mange files here.
- Short press OK Button again, enter the files list, take video file as example:
- Long Press OK Button could mark/lock the videos, and a 5-stars icon appear on the left corner, long press Button could release the mark/ lock.
File Deletion
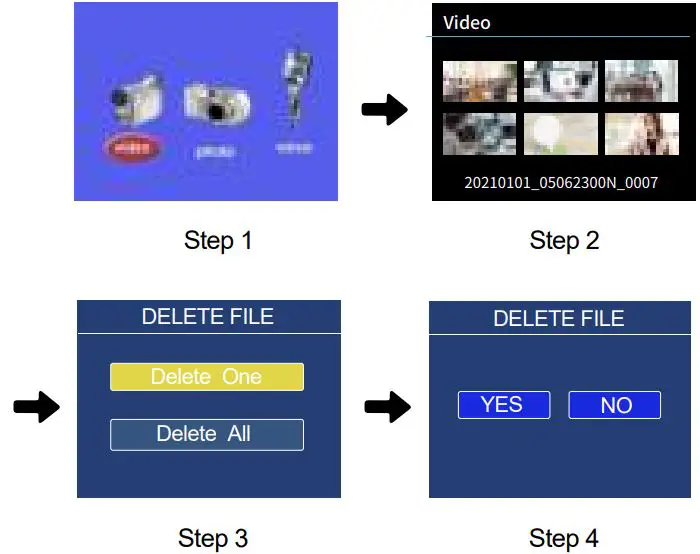
- Enter the Playback Files Page, you could delete the files as you desired.
- In the file list, short press M button could get the delete option, then short press
 /
/ / OK button to select an option and confirm.
Note: the mark videos can’t be deleted, you need to long press OK the Button to release the mark first.
Connect to Computer
Connect to the computer by the USB cable attached. Then enter USB disk mode (If turn on “Password” option in the menu, need to input the password you set first, ( the default password is 000000 ) then could review or delete the files in the computer
Reset
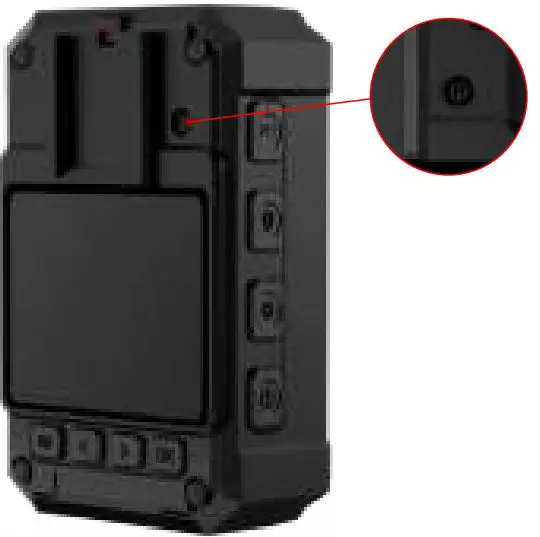
- If the camera crashes or stops working, you could do a reset by poking the reset hole with a pin or thimble (be careful not to use excessive force).
- The device will auto shut down after the reset and can be restarted by long pressing the Button to turn it on.
Features You May Concern
Loop Recording
If you enable the loop recording feature, when storage is full, the device will keep recording by covering old files. (Note: this action will not cover videos that are marked/ locked.) Video recording is saved as video clips/fragments, avoiding the large file from being damaged. Video length can be set to 5 min/10 min/15 min/20 min/30 min.
Time&Date Stamp
- The camera defaults enabled the time&date stamp, enter the menu, could set the time as you want.
One Key to Play
- In standby mode, short press the
 button could play the previous video file you recorded.
 - After play over, it will go back to the preview screen.
- One key to play feature only works to the video file.
Camera Password
- There is “Password” option in the menu setting.
- If want to turn it on, you need to insert the default password: 000000 first then short press / /OK button to select “ON” option and confirm.
- If you forget the password, just email our support team for help: [email protected]
After turning on the “Password” option, the below circumstance need to verify the password, including but not limited to:
- When connecting the camera to the PC side;
- Enter the menu page;
- Try to enter the Playback Files Page;
- Choose to change the camera password , need to verify the old password ( If the new camera, need to enter the default password);
- Change the Device ID/Police ID;
Zoom in/ Zoom Out
- In standby/video mode, long press the button to zoom in the scene on the screen, and long press the button to zoom out of the image. The zoom in and zoom out can be adjusted in the range of 1.0X-16.00X.
Rewind/ Fast Forward
- When playback the video files, short press the button in order is rewind play, short press button act as fast forward.
- Short press the or button once to increase the speed two times, The fast forward and rewind can be adjusted in the range of 4X-8X.
Indicator Light
| Working Indicator | Charging Indicator | |
| Power On/Standby | Solid Green | / |
| Charging | When powering on for charging, this will be Solid Green | Solid Blue |
| Fully Charged | / | Blue indicator will be off |
| Video Recording | Solid Red | / |
| Take Photos | Every press will flash red once | / |
| Audio Recording | Solid Yellow | / |
Red-Blue Warning/Laser/White Light
- Red-Blue Warning: After powering on, long press the button to turn on the warning function. The camera will sound an alarm and flash Red-Blue warning lights. Long press the button again to turn off the alarm sound first, then long press the third time could turn off the Red-Blue Flashes.
- Laser Light: After powering on, long press the button to turn on/off the laser light, the camera emits a red laser beam to locate the shooting direction.
- White Light: After powering on, short press the
 button to turn on/ off the white light, which acts as an illuminating light.
- Short press menu button M to enter menu page.
- Short press / /OK button to select an option and confirm.
- Short press button to exit menu page.
| Description | Options | |
| 2304×1296 P30, | ||
| 1920×1080 P30 | ||
| Video resolution | Video Resolution. | (default), 1440×1080 P30, 1280×720 P30, |
| 848×480 P30, | ||
| 720×480 P30 | ||
| Photo pixel | Photo Resolution. | 4M, 8M, 10M, 12M, 16M, 21M, 24M, 32M, 38M(default) |
| Video quality | Video quality level. | High(default), Low, Medium |
| Snapshot | Photo Burst Mode: Capture several photos in 1 second, so it is perfect for capturing fast-moving activities. | OFF(default), 2P, 3P, 5P, 10P, 15P, 20P, 30P |
| Pre-recording | Merge the first 3-4 seconds of the recording into the recorded video, need to press the video button twice to save this pre-record. | ON, OFF(default) |
| Post-recording | After pressing the video button to stop the video, video countdown for a certain time and save. | OFF(default), 10S, 60 Sec, 10 min, 20 min, 45 min |
| Video clip | Video recording is saved as video clips/fragments, avoid the large file from damage. | 5 min, 10 min (default), 15 min, 20 min, 30 min |
| Motion detect | Once the moving object is detected by the camera, it will be activated and recorded a 30sec-1min video and saved it. | ON, OFF(default) |
| Infrared mode | Night Vision mode, image will turns to black-white once enable this feature. | Auto, Manual (default) |
| LCD Power Save | Without any operation, the LCD screen will auto off, press any key to light up again. | OFF, 5 min, 10min(default) |
| Power off | Without any operation, the camera will auto shut off, long press the power button to power on camera. | OFF, 5 min, 10min(default) |
| Beep | Button sound. | ON(default), OFF |
| Microphone | Video recording with sound, if turn off, recorded video will have no voice. | ON(default), OFF |
| Volume | Button sound volume / prompt sound can be adjusted from 0 to 10 level. | 8(default) |
| Loop recording | When on, once the camera storage is insufficient, the camera will auto cover the old video files for further recording. | ON(default), OFF |
| Voice report | Voice prompt when video/audio recording (video recording; video recording end; audio recording; audio recording end). | ON, OFF (default) |
|
Stealth mode | Disabled all sound alarm and Key Tone, and all led indicator lights go off. (The camera record video still has voice, Red-Blue Warning/White illuminator/Red Laser still can be work when Stealth Mode is on). |
ON, OFF (default) |
|
Password | If password is on, user needs to enter password to get access to change new password/ Device ID/ Police ID, enter menu page& playback files page, and connect to PC. | Need to verify the default password: 000000, then could turn on |
| Set Device ID | Edit device numbers. | 0000000 (default) |
| Set Police ID | Set a police ID number or user number. | 000000 (default) |
| Change password | Verify and edit new password. | default password: 000 000 |
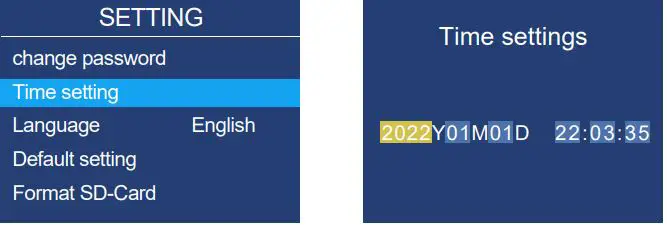
| Time setting | Set to your local date and time. | Can be edited |
| Language | Camera text language display. | 简体中文,繁體中文, English(default) |
| Default setting | Restore default value after password verify. All settings will be reset to factory default. | |
|
Format SD-Card | Do a format of the camera, will delete all files of the storage. After formatting, the camera will shut off auto after moments, since the camera, needs to read the storage again. need to manually power on the camera again. | |
| FW Version | Total Space; Battery info; Camera Firmware Version. |
| Password | If password is on, user needs to enter password to get access to change new password/ Device ID/ Police ID, enter menu page& playback files page, and connect to PC. | Need to verify the default password: 000000, then could turn on |
| Set Device ID | Edit device numbers. | 0000000 (default) |
| Set Police ID | Set a police ID number or user number. | 000000 (default) |
| Change password | Verify and edit new password. | default password: 000 000 |
| Time setting | Set to your local date and time. | Can be edited |
| Language | Camera text language display. | 简体中文,繁體中文, English(default) |
| Default setting | Restore default value after password verify. All settings will be reset to factory default. | |
|
Format SD-Card | Do a format of the camera, will delete all files of the storage. After formatting, the camera will shut off auto after moments, since the camera, needs to read the storage again. need to manually power on the camera again. | |
| FW Version | Total Space; Battery info; Camera Firmware Version. |
Specifications
| Resolution | 2304×1926, 1920×1080, 1440×1080, 1280×720, 848×480, 720×480 |
| Video File | AVI; H.264 compressed |
| Photo File | JPEG |
| Photo Size | 4570×8000 |
| Wide Angle | 140° |
| Night Vision | Supported; 5 pcs infrared lights |
| Battery capacity | 3200 mAh |
| Use Time | 14 Hour of video recording (1080P,IR Off, fully charged) |
| Charging Time | 4-6 Hours |
| Memory capacity | Internal Memory; 64GB/128GB optional |
| Operating temperature | Recommend: -20℃ ~ +70℃, -4 ~+158°F |
| Working Humidity | 40%-80% |
| Storage Temperature | Recommend: -20-55℃, -4~+131°F |
| Storage Humidity | < 93 %(40℃/104°F) |
| Waterproof Level | IP66 |
| Size | 84x56x27mm 3.3×2.2x1inch |
| Weight | 142g / 4.9oz |
| Compatible System | Windows 7 / 8 / 10 / 11 / VISTA and Mac 10.5 or above |
Troubleshooting
- Q: The camera couldn’t power on, does it stop working?
- A: Connect the charger and cable to charge the device and check whether the problem is solved after 4 hours of charging;
- Please check whether the charger and the USB cable are normal.
- Connect your device to the wall socket, then press the power button to check whether it could be powered on.
- Use a pin to do a reset of the camera and re-power on to check again.
- If the problem cannot be solved, please contact customer service for further help.
- Q: Why did the camera stop recording? Can’t store video anymore?
- A: Make sure the camera storage capacity is enough. Turn on Loop Recording to let the camera record continuously by covering the old files once the memory is full.
- Physical Double check: Check whether the Video Button is intact and could be pressed down normally.
- Format the camera and do a hard reset then record again.
- If the problem cannot be solved, please contact customer service for further help.
- Q: A video or audio cannot be played? Or no sound for videos?
- A: Please check the menu and turn on the Record with sound function.
- Turn to the loudest volume of the camera to check whether the sound could playback normally with the camera itself.
- It is recommended to play back videos/audio on the VLC media player on the computer.
- Q: Why the screen turns off auto?
- A: The camera enters the “LCD Power Save” mode in default without 10 minutes of operation. If you want the display always on, please enter the menu to set the “LCD Power Save” option to Off. “LCD Power Save” option can be set to off/ 5 min/ 10min.
- Q: Why does the camera shut off auto ?
- A: Please check whether the “Power Off” option in the menu is on. If you want the camera to stay power-on state, please enter the menu to set “Power Off” to Off. “Power Off” can be set to off/5min/10min.
- If you format the camera, the camera will shut off auto after moments, since the camera needs to read the storage again. Need to manually power on the camera again.
- Q: I forgot my password, how to reset it?
- A: We could send you the universal password to restore the camera password. Please email our support team for help: [email protected]
- Q: I lost the clips, can I get the replacement part?
- A: If you need the spare accessories or replacement parts, feel free to email our after-sale service: [email protected]
Packaging List

Please note: Accessories may be updated without prior notice, please refer to the actual receipt of the items.
Customer Service
BOBLOV is dedicated to offer the best service to our valuable customer.
To reach BOBLOV customer service, please e-mail us:
- Official Email address: [email protected]
- Official Website: www.boblov.com
- Facebook: www.facebook.com/BOBLOVGlobal/
- Tel: + 1(213) 905-9206
- Address: 10700 Jersey Blvd #730 Rancho Cucamonga, CA 91730 USA
Scan