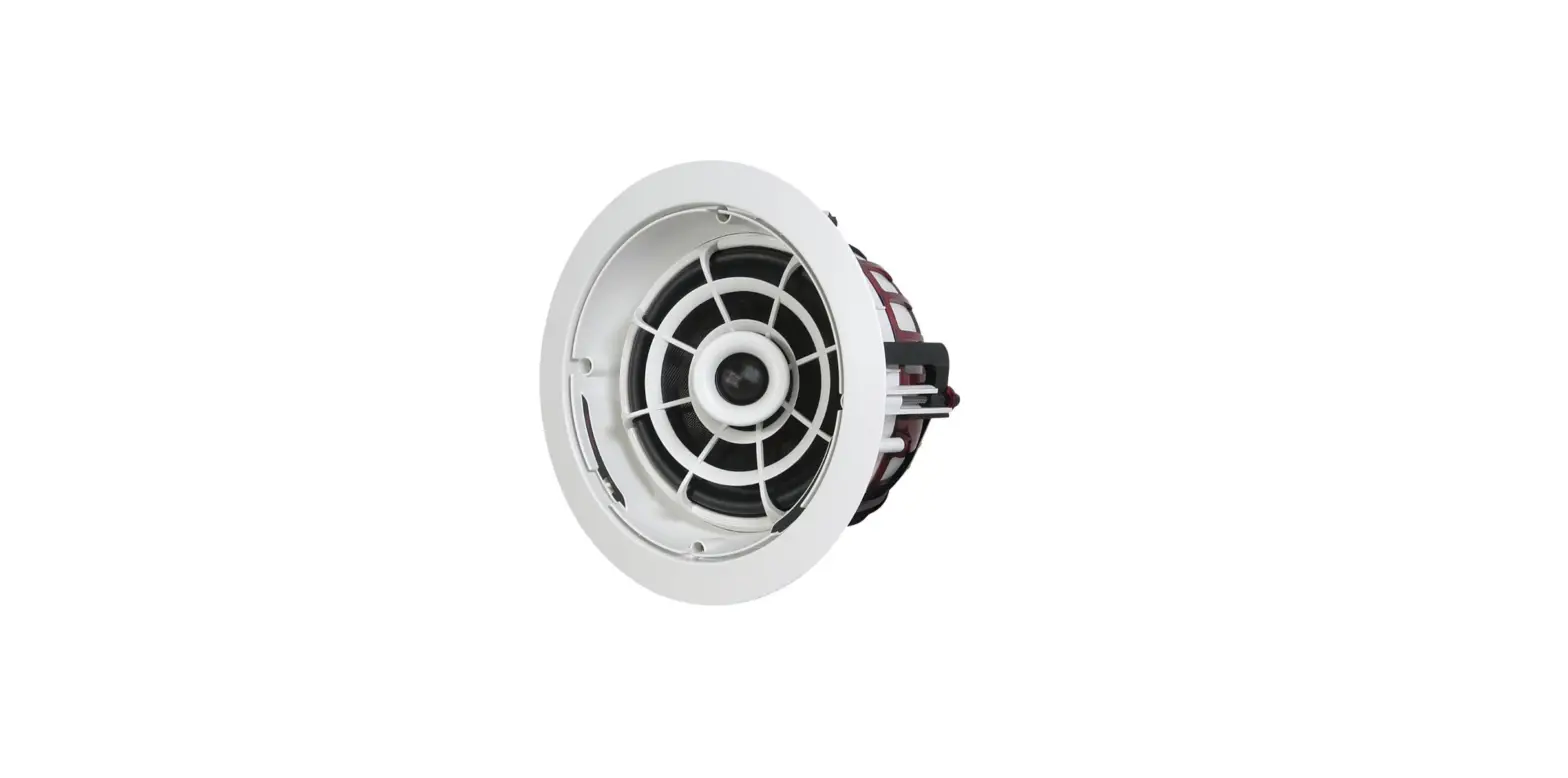
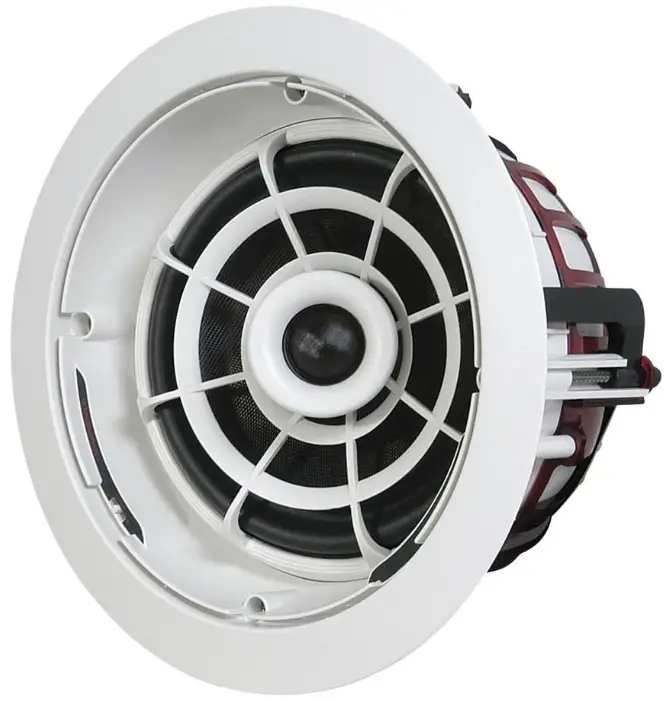
Speakercraft ASM82721 Aim-7 In-Ceiling Pivoting Speaker
SPEAKER PLACEMENT
When following the below recommendations, please keep in mind that placement is always in the ceiling. AIM7 speakers can be used as a pair for stereo listening, or for all five channels of a home theater system: front left and right, center, and rear left and right. SpeakerCraft recommends the use of a qualified custom installation specialist when installing your AIM7 speakers. f you need assistance in locating an installer, please contact SpeakerCraft at 1-800-448-0976.
- Determine Your Primary Listening Area
The area where you will most likely be sitting when listening to your speakers is your primary listening area. - Placement of Stereo Pair / Front Channels for Home Theater
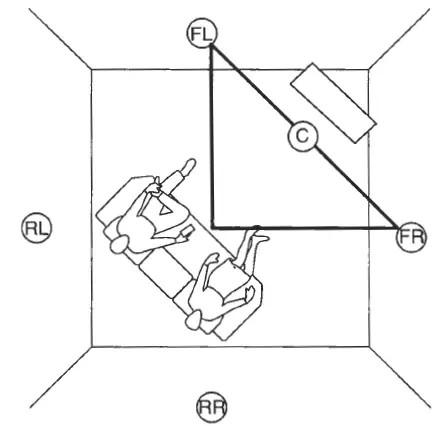
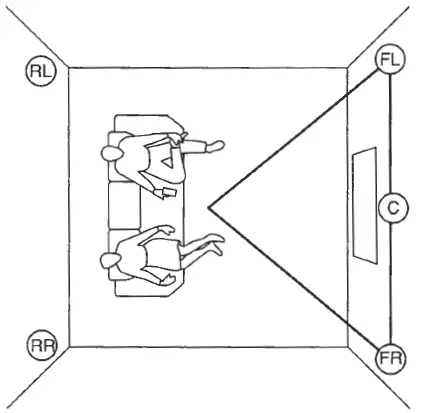
Consider how far apart the speakers should be. To do this, think of your listening area as one tip of a triangle with each leg of the triangle being equal. See speakers FL (front left) and FR (front right) in Figure 1. Place the speakers as close as possible to the two points they represent on the triangle. If the speakers are to be part of a home theater speaker system, they should be placed as close as possible to the area above the screen. However, in some cases, it may be better to place the speakers farther away from the screen in order to maximize speaker separation. An example of a case, when this would be desirable, is when the television is positioned directly in a corner (See Figure 2).
- Placement of Center Channel for Home Theater
Place the center channel speaker in a line between the front left and right speaker directly above the screen. See C (center) in Figure 1.
- Placement of Rear Channels for Home Theater
Rear channels should be placed behind the listening area. See RL (rear left) and R (rear right) in Figure 1. - Checking for Obstructions
Before confirming the placement of the speakers, you should carefully consider the location of ceiling joists, electrical, plumbing, and other fixtures that may get in the way. If you are installing the speakers into an existing ceiling, you can locate obstructions by noting the placement of fixtures and, if possible, gaining access to an attic or crawl space for further analysis A good stud_finder found at any building supply store will help you determine further analysis. A good stud-finder, found at any building supply store, will help you determine where the joists are located in the ceiling.
INSTALLATION CONSIDERATIONS
Prior to the actual installation of the speakers, it will be necessary to run cables to the speaker location. See your Authorized SpeakerCraft dealer for more information on cable installation. After the cable has been installed, you are ready to mount the speakers.
Preparation for and mounting of the speakers can happen at two different stages. If you are building a new ceiling, follow the section titled INSTALLATION PREPARATION – NEW CONSTRUCTION. If you are placing the speakers into an existing ceiling, follow INSTALLATION PREPARATION – FINISHED CEILING. There are different considerations for each application. Please carefully follow the recommendations for your application.
INSTALLATION PREPARATION – NEW CONSTRUCTION
When installing the speakers into a newly built ceiling, please follow these instructions carefully:
- Determine Placement Determine where in the ceiling the speakers will be placed using the recommendations under SPEAKER PLACEMENT. Pay careful attention to the section on avoiding obstructions.
- Mount InstaLLock Bracket For best results, mount the SpeakerCraft InstalLock New Construction Brackets for the AIM7 Series (Part No. BKT9061 1) following the instructions included with the bracket.
- The Location is Ready for Drywall The bracket provides a stable opening around which the drywall installer can cut out an opening, providing a perfect location for the installation of the AIM7 Series speaker.
INSTALLATION PREPARATION – FINISHED CEILING
When the speakers will be installed into a finished ceiling, please follow these instructions carefully:
- Determine Placement Determine where in the ceiling the speakers will be placed using the recommendations under SPEAKER PLACEMENT. Pay careful attention to the section on avoiding obstructions.
- Locate Obstructions Find the joists nearest the desired speaker mounting location. The use of a good stud-finder tool is highly recommended- ed for this procedure. Make sure that there are no joists or obstructions where you plan to install the speaker. Read “Checking for Obstructions” under the section SPEAKER PLACEMENT.
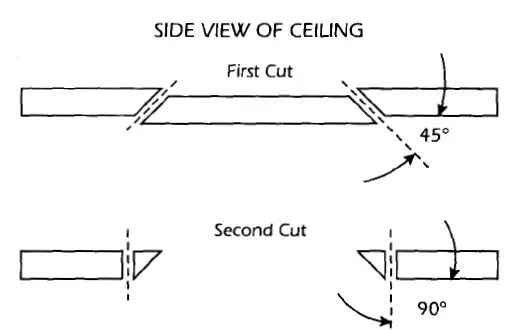
- Cut the Hole CAUTION: This is the most important part of the entire installation. If you are not certain whether or not an obstruction exists behind the desired mounting area, you should start by cutting a small hole in the center of your penciled mounting hole with a drywall saw. Cut at a 45° angle toward the inside of the hole See Figure 3). Cutting the small hole at this angle will make drywall repair much easier as the piece cut out can be installed neatly back into the hole. Once you have determined there are no obstructions in your desired mounting location, start cutting the finished hole at a 90° angle to the ceiling surface.

SPEAKER INSTALLATION
Note: Your AIM7 Series speakers may have come with the optional Jaw speaker wire connector. Before using Jaw, please follow the instructions included with the connector. The unique integral four-foot mounting system incorporated into each speaker allows for quick installation following these easy steps:
- If the grille is on the speaker, remove it. It may be necessary to push one or two of the mounting screws and its attached foot towards the baffle and against the inside surface of the grille to force the grille out of its retaining groove.
- Attach the speaker cable (observing the proper polarity with your amplifier: + to + and – to -). Make sure the left channel of the amplifier is connected to the left speaker, and the right channel is connected to the right speaker.
- Make sure the mounting feet are turned inward to clear the opening and insert the speaker into the ceiling. Position the speaker into the hole.
Note: The flange of the speaker is designed to flex and conform to any small imperfections in the ceiling surface. Tighten the 4 screws on the front of the baffle only enough to make the flange become snug against the ceiling. As you tighten the screws, the feet will automatically flip into an outward position (See Figure 4), clamping the drywall between the feet and the flange.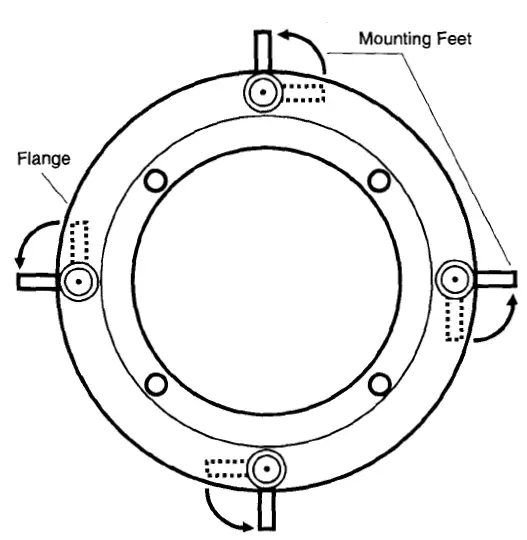
CAUTION: Over-tightening may warp the baffle, crack the ceiling, cause the flange to distort, and make the grille difficult to install.
PAINTING THE SPEAKERS
If you plan to paint your speakers, we recommend that it be done prior to installation. If you decide to paint your speakers sometime in the future, it is best to remove them by simply reversing the steps for SPEAKER INSTALLATION listed above. When painting the speakers, the paint masks provided in the carton must be installed in place of the grille. The grilles can also be painted. However, great care should be taken not to clog the holes, as this will greatly reduce the sound quality of the speakers. Before painting the grilles, remove the material under the grille. Place this material back in place once the grille has been painted. SpeakerCraft recommends only light spray painting using 5 parts thinning agent to I part paint.
SPEAKER ADJUSTMENT
- Adjusting the AIM7 Mechanism
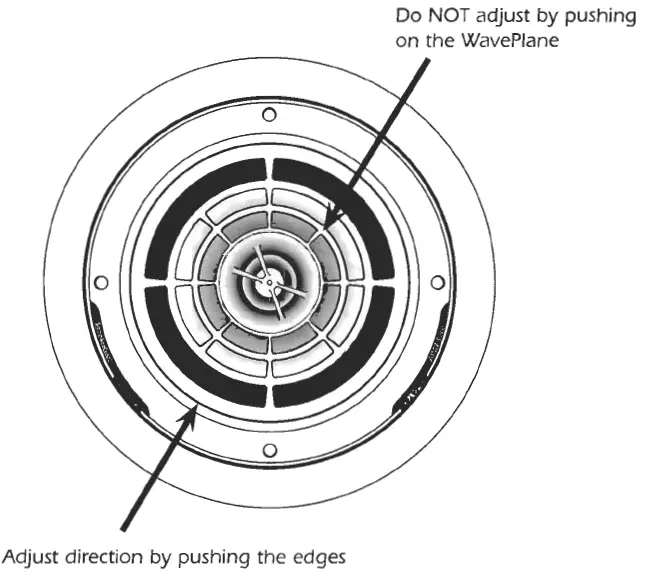
The woofer can be pivoted to best direct the sound towards the listener. The woofer easily rotates and pivots to almost any position desired. Simply apply pressure with fingertips to the outer surface of the pivot ball and move the speaker to the desired position (See Figure 5).
- Adjusting the Pivoting Tweeter
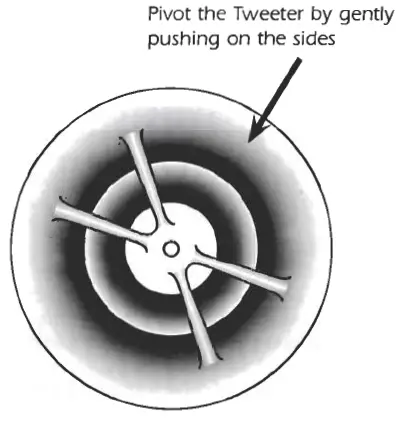
Once the woofer is positioned, further refinement can be made by pointing the tweeter toward the listener. Gently pivot the tweeter to point it in the desired direction (See Figure 6).
ADJUSTING THE FREQUENCY RESPONSE
The output of the woofer and tweeter on the AIM7 Two, Three, Four, and Five can be adjusted to suit any environment. In general, we recommend leaving all of the adjustments at the flat (OdB) setting. To determine which settings will be appropriate for your speakers, you may need to experiment until the desired sound is achieved. Use the chart below to determine the result of the setting you select.
Selecting a Setting on AIM7
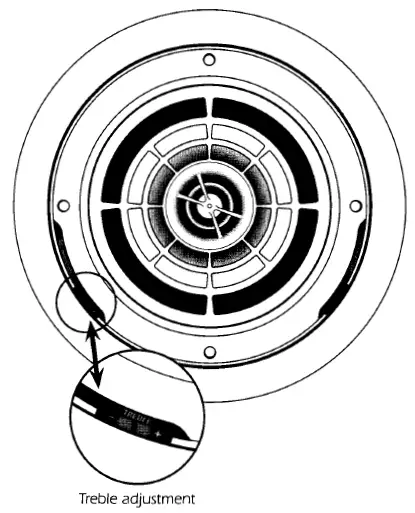
To select a setting, simply use a finger to move the switches mounted on the inner side of the speaker to the desired setting (See Figure 7). AIM7 Two: Treble adjustment Only AIM7 Three, Four, and Five: Treble and Bass adjustments
Frequency Settings
When selected, the settings will have the following result:
- -3dB: Reduces the loudness of the selected frequency (bass & treble)
- 0dB: The selected frequency (bass & treble) remains at a neutral level
- +3dB: Increases the loudness of the selected frequency (bass & treble)
When adjusting the bass frequency, the impedance will be affected as indicated below. Be sure to stay within the impedance guidelines of the amplifier you will be using to power your system.
- -3dB: The impedance is 8 ohms
- 0dB: The impedance is 6 ohms
- +3dB: The impedance is 4 ohms
FREQUENTLY ASKED QUESTIONS


