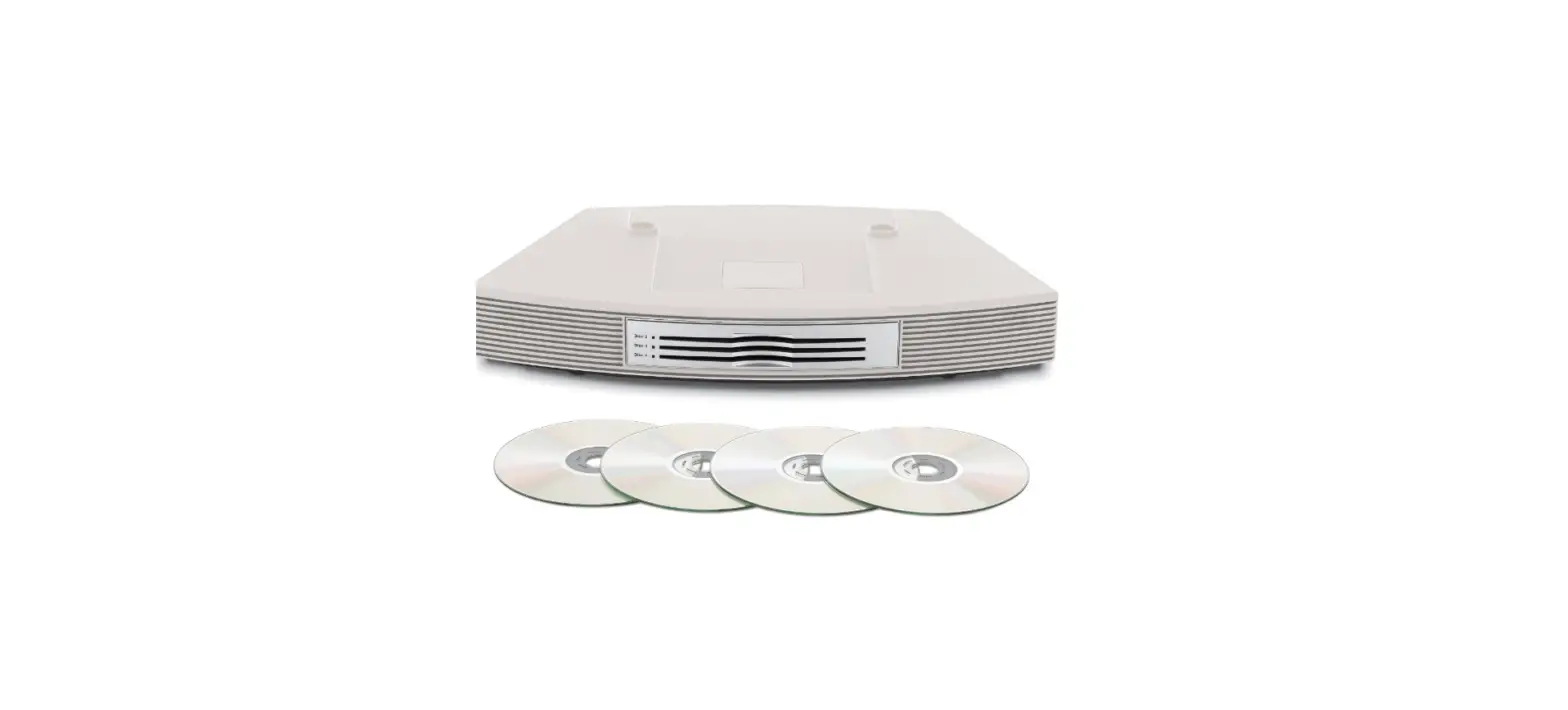
Bose 350496-1200 Wave Multi-CD Changer Platinum
Safety Information
- Please read this owner’s guide
- Please take the time to follow the instructions in this owner’s guide carefully. It will help you set up and operate your system properly and enjoy all of its advanced features.
- Save your owner’s guide for future reference.
- To reduce the risk of fire or electric shock, do not expose the product to rain or moisture.
- The apparatus shall not be exposed to dripping or splashing, and objects filled with liquids, such as vases, shall not be placed on the apparatus. As with any electronic product, use care not to spill liquids into any part of the multi-disc changer. Liquids can cause a failure and/or a fire hazard.
- No naked flame sources, such as lighted candles, should be placed on the apparatus.
Class B emissions limits
- This Class B digital apparatus meets all requirements of the Canadian Interference-Causing Equipment Regulations.
- To prevent electric shock, match the wide blade of the line cord plug to the wide slot of the AC (mains) receptacle. Insert fully.
- DO NOT place the product on any heat-sensitive surface, such as the finished surface of fine furniture. Like all electrical equipment, it generates some heat.
- Use of controls or adjustments or performance of procedures other than those specified herein may result in hazardous radiation exposure. The multi-disc player should not be adjusted or repaired by anyone except properly qualified service personnel.
Class 1 Laser Product
This CD changer is classified as a CLASS 1 LASER PRODUCT according to ! EN 60825-1:1994 + A1+A2, IEC60825-1:1993+A1+A2.
Important Safety Instructions
- Read these instructions – for all components before using this product.
- Keep these instructions – for future reference.
- Heed all warnings – on the product and in the owner’s guide.
- Follow all instructions.
- Do not use this apparatus near water or moisture – Do not use this product near a bathtub, washbowl, kitchen sink, laundry tub, in a wet basement, near a swimming pool, or anywhere else that water or moisture are present.
- Clean only with a dry cloth – and as directed by
Bose Corporation. Unplug this product from the wall outlet before cleaning. - Do not block any ventilation openings. Install in accordance with the manufacturer’s instructions
- To ensure reliable operation of the product and to protect it from overheating, put the product in a position and location that will not interfere with its proper ventilation.
- For example, do not place the product on a bed, sofa, or similar surface that may block the ventilation openings. Do not put it in a builtin system, such as a bookcase or a cabinet that may keep air from flowing through its ventilation openings.
- Do not install near any heat sources, such as radiators, heat registers, stoves or other apparatus (including amplifiers) that produce heat.
- Do not defeat the safety purpose of the polarized or grounding-type plug. A polarized plug has two blades with one wider than the other. A grounding-type plug has two blades and a third grounding prong. The wider blade or third prong are provided for your safety. If the provided plug does not fit in your outlet, consult an electrician for replacement of the obsolete outlet.
- Protect the power cord from being walked on or pinched, particularly at plugs, convenience receptacles, and the point where they exit from the apparatus.
- Only use attachments/accessories specified by the manufacturer.
- Use only with the cart, stand, tripod, bracket or table specified by the manufacturer or sold with the apparatus.
- When a cart is used, use caution when moving the cart/apparatus combination to avoid injury from tip-over.
- Unplug this apparatus during lightning storms or when unused for long periods of time – to ! prevent damage to this product
- Use Proper Power Sources – Plug the product into a proper power source, as described in the operating instructions or as marked on the product.
- Avoid Power Lines – Use extreme care when installing an outside antenna system to keep from touching power lines or circuits, as contact with them may be fatal. Do not install external antennas near overhead power lines or other electric light or power circuits, nor where an antenna can fall into such circuits or power lines.
- Ground All Outdoor Antennas – If an external antenna or cable system is connected to this product, be sure the antenna or cable system is grounded. This will provide some protection against voltage surges and built-up static charges. Section 810 of the National Electrical Code ANSI/
- NFPA No. 70 provides information with respect to proper grounding of the mast and supporting structure, grounding of the lead-in wire to an antenna discharge unit, size of grounding conductors, location of antenna-discharge unit, connection to grounding electrodes, and requirements for the ground electrode. Refer to the antenna grounding illustration on this page a proper power source, as described in the operating instructions or as marked on the product.
- Avoid Power Lines – Use extreme care when installing an outside antenna system to keep from touching power lines or circuits, as contact with them may be fatal. Do not install external antennas near overhead power lines or other electric light or power circuits, nor where an antenna can fall into such circuits or power lines.
- Ground All Outdoor Antennas – If an external antenna or cable system is connected to this product, be sure the antenna or cable system is grounded. This will provide some protection against voltage surges and built-up static charges. Section 810 of the National Electrical Code ANSI/ NFPA No. 70 provides information with respect to proper grounding of the mast and supporting structure grounding of the lead-in wire to an antenna discharge unit, size of grounding conductors, location of the antenna-discharge unit, connection to grounding electrodes, and requirements for the ground electrode. Refer to the antenna grounding illustration on this page.
Antenna grounding
Example of antenna grounding as per National Electrical Code, ANSI/NFPA 70.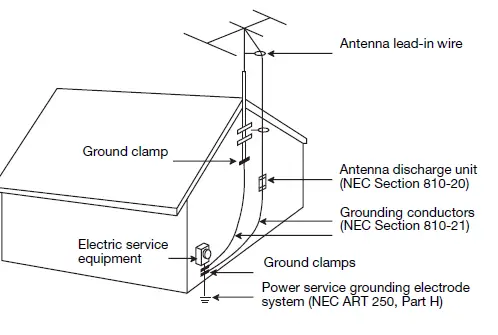
Setup
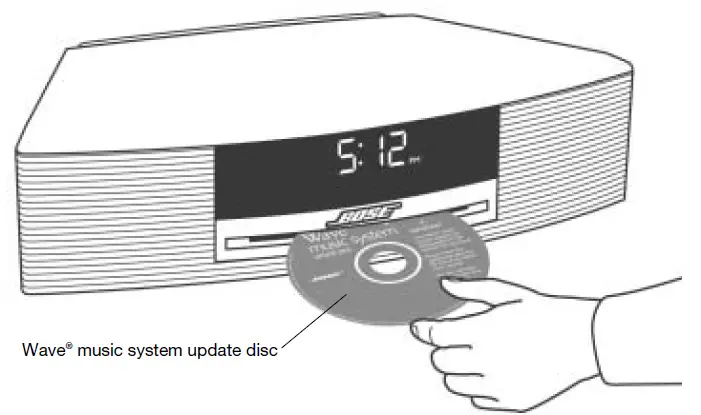
Updating your Wave® music system
To update your Wave® music system:
- Make sure your Wave® music system is plugged in and nothing else is connected to it.
- Insert the update disc into the Wave® music system CD slot.
- Wait approximately 20 seconds while your Wave® music system performs the update. The display will show you a series of messages during this process:
- LOADING UPDATING FINISHED EJECTING
- Wait for the system to automatically eject the update disc after updating is finished. DO NOT eject the disc yourself. After updating your Wave® music system, follow the setup instructions beginning on page 6.

Features and benefits of your Multi-CD Changer
Thank you for purchasing the Bose® Wave® music system Multi-CD Changer accessory. ! Adding the Multi-CD Changer to your Wave® music system provides you with some valuable benefits:
- A four-disc Wave® music system – Allows you to load and play up to four audio CDs.
- Provides hours of uninterrupted CD music.
- Elegant integrated pedestal design – Using the same footprint as the Wave® music system, the changer complements the elegance and simplicity of the system.
- One integrated remote control – Provides the simplicity of using one remote control and one-touch selection of all built-in sources.
- Multiple source switching – By adding two input connections for external audio devices, you can enjoy listening to one or two other audio sources in your home through the Wave®music system.
Unpacking the carton
Carefully unpack your Wave® music system Multi-CD Changer and save all packing materials for possible future use. The original packing materials provide the safest way to transport your new Multi-CD Changer. Make sure you received the parts shown in the following diagram. If any part appears damaged, do not attempt to use it. Notify Bose customer service immediately (see phone numbers on the inside back cover).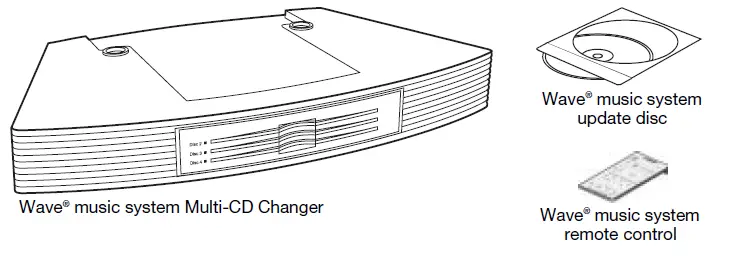
Selecting a location for your system
- Your Multi-CD Changer is designed to fit directly under your Wave® music system. Before you connect the Multi-CD Changer to the Wave® music system, select a good location for the complete system using the following guidelines.
- Place the system on a table or other flat surface.
- To enjoy maximum performance, place the system across the room from where you will be listening.
- Place the system within two feet of a wall, and avoid placing it directly in a corner.
- CAUTION: DO NOT place your system on a heat-sensitive surface. Like all electrical equipment, it generates some heat.
- CAUTION: DO NOT use your system in a damp location or any other place where moisture can get inside.
- Note: DO NOT place your system on a metal surface. It could interfere with AM reception.
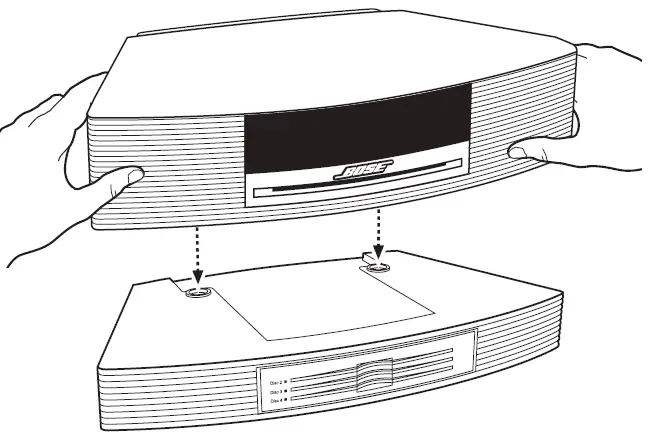
Seating your Wave® music system on the Multi-CD Changer
- With the changer placed in your chosen location, carefully set your Wave® music system on top of the changer.
- Make sure the rear feet of the Wave® music system fit into the recesses on top of the changer.
- Make sure the Wave® music system sits flat and the side edges of both units are aligned.

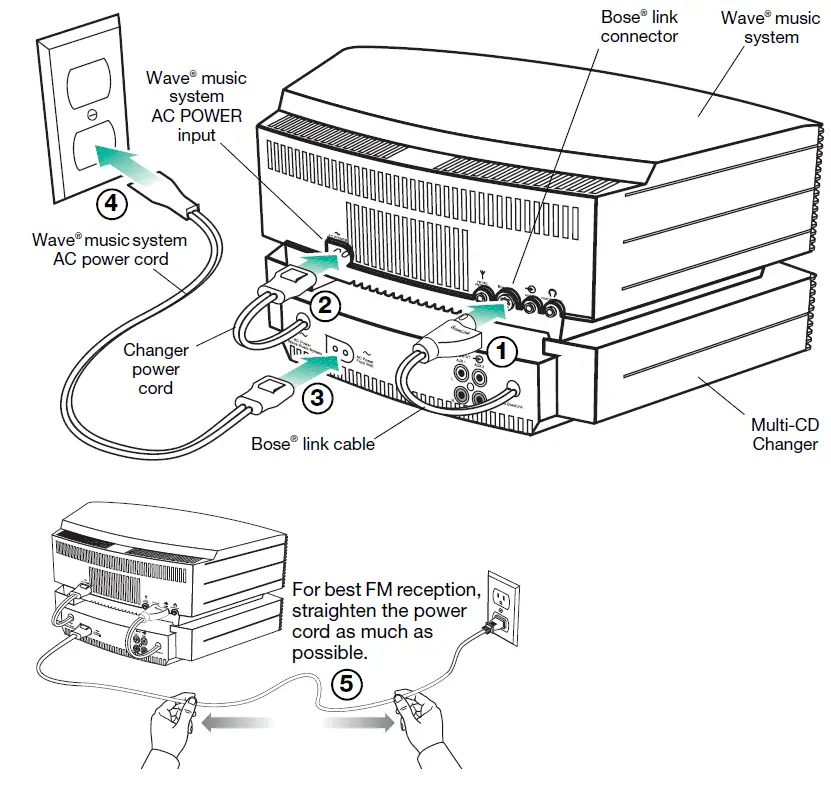
Connecting the Multi-CD Changer to your Wave® music system
- Before you start this setup procedure, disconnect the AC power cord on your
- Wave® music system and set it aside. You will need to use it again in Step 3.
- Plug the Bose® link cable from the changer into the Bose® link connector on your Wave® music system.
- Plug the changer power cord into the AC power input connector on the back of the Wave® music system.
- Plug the Wave® music system AC power cord into the AC power input connector on the back of the changer.
- Plug the other end of the AC power cord into an AC (mains) wall outlet. After applying power, “PLEASE WAIT” appears on the display for about 30 seconds while the system prepares itself for operation. DO NOT insert any discs until this message disappears.
- For best FM reception, straighten the AC power cord as much as possible. Your Wave® music system uses the power cord as an FM antenna.

Operation
Remote control guide
An additional remote control is included with your Wave® music system Multi-CD Changer. This remote is identical to the one used to control your Wave® music system. So, you can use either remote to control the completed multi-CD system. Just aim the remote at the front panel and press the buttons. The remote normally works within 20 feet of the front panel. The following diagram describes the buttons used for playing CDs using the disc changer.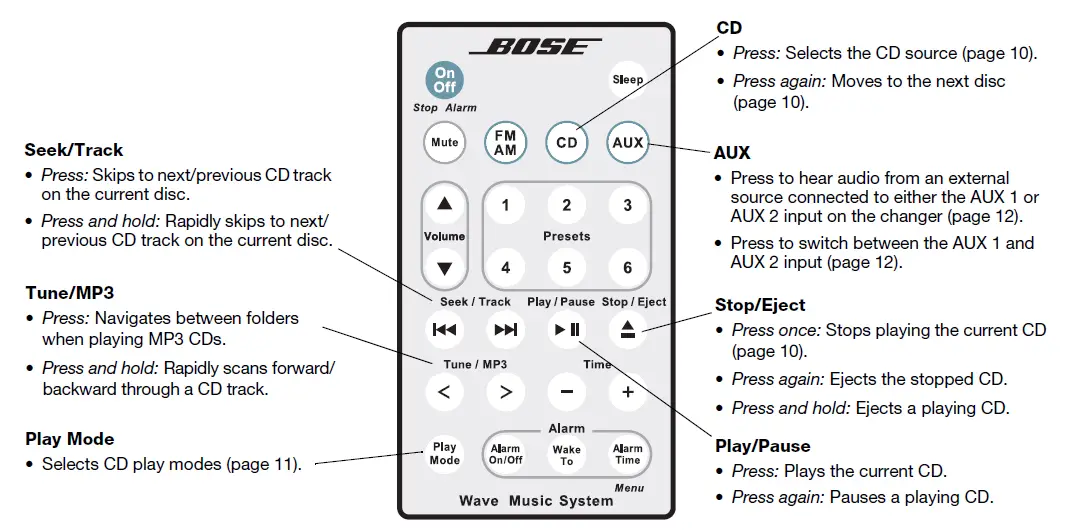
Turning your multi-CD system on and off
 Press On/Off once to turn your multi-CD Wave® music system on or off. The system turns on to the last source played. If the last source was CD, the last disc selected starts to play.
- Press On/Off again to turn the system off.
 Press CD to turn the system on to the CD source. The last disc selected will play.
 Press On/Off once to turn your multi-CD Wave® music system on or off. The system turns on to the last source played. If the last source was CD, the last disc selected starts to play.
Loading and unloading discs
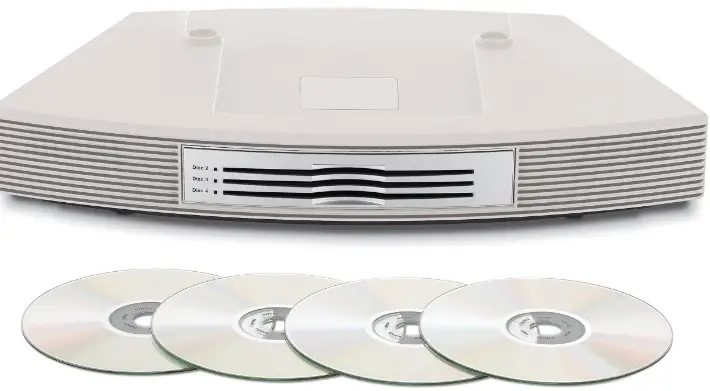
You can load and unload discs with the system on or off. If the system is off or in the CD source mode, the first disc loaded starts playing automatically. Disc slots are numbered 1 through 4. The Wave® music system has disc slot 1. The changer has disc slots 2, 3 and 4.
Loading CDs into the Wave® music system (Disc 1)
Insert the disc, label side up, into the CD slot below the display. The disc player will automatically pull the disc in.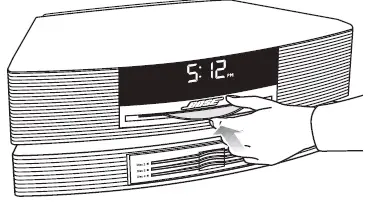
Loading CDs into the Multi-CD Changer (Disc 2 – Disc 4)
Insert a disc, label side up, into an empty slot. An empty slot is indicated by an unlit disc slot indicator. With your fingers on the outside edge of the disc, push the disc all the way into the slot.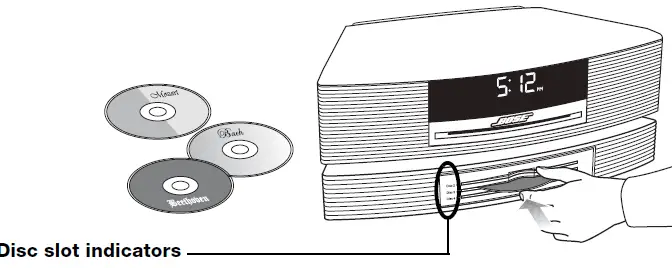
 Unloading discs
You can unload discs while the system is off or in the CD source mode. Press Stop/Eject on the remote control to eject the current disc. After removing the disc from its slot, the system moves to the next available disc which then can be ejected by pressing Stop/Eject again. For more information on using the Stop/Eject key, see “Ejecting a CD” on page 10
Playing CDs
With the Multi-CD Changer installed, your Wave® music system operates as a four-disc changer. Now, when you play CDs, all the normal CD information appears on the display with one addition – the selected CD slot number (d1, d2, d3, or d4) appears above the elapsed track time.
Moving to another CD Press CD to move to the next CD slot. The CD number on the display tells you which CD slot is currently selected.
Stopping a CDPress Stop/Eject once to stop a playing CD.
Ejecting a CDPress CD on the remote to move to the CD you want to eject. Press Stop/Eject once to stop a playing CD and then, press again to eject the CD. For more information on ejecting CDs, see “Unloading discs” on page 9.
Changing Play Modes
While the Multi-CD changer is connected, the following play modes are available. The ! system plays continuously in all modes except SHUFFLE dISC for audio and MP3 CDs, ! and SHUFFLE FOLDR for MP3 CDs only.
Play modes for audio CDs
- NORMAL PLAY………….Plays all CDs in order.
- SHUFFLE ………………… Plays all tracks on the selected CD in random order, then moves to another CD, again playing all tracks in random order.
- SHUFFLE dISC ………… Plays all tracks on the selected CD once in random order.
- SHUFF RPT dISC ………Repeats all tracks on the selected CD in random order.
- REPEAT dISC ……………Repeats all tracks on the selected CD in order.
- REPEAT TRACK ………..Repeats the selected track on the selected CD.
Play modes for MP3 CDs
- NORMAL PLAY………….Plays all CDs in order.
- SHUFFLE …………………. Plays all tracks on the selected CD in random order, then moves to another CD, again playing all tracks in random order.
- SHUFFLE dISC ………… Plays all tracks on the selected CD once in random order.
- SHUFF RPT dISC ………Repeats all tracks on the selected CD in random order.
- REPEAT dISC ……………Repeats all tracks on the selected CD in order.
- SHUFFLE FOLDR …….. Plays all tracks in the selected folder once in random order.
- SHUF RPT FLDR ……….Repeats all tracks in a folder in random order.
- REPEAT FOLDER ………Repeats all tracks in a folder in order.
- REPEAT TRACK ………..Repeats the selected track on the selected CD.
Listening to an External Audio Source
Connecting an external audio source
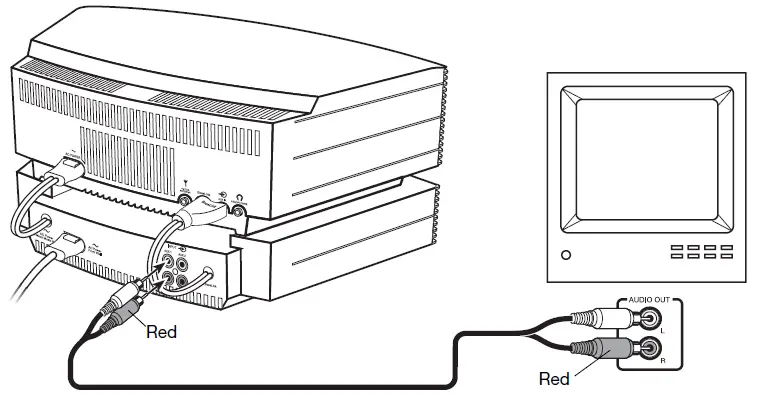
With the Multi-CD changer connected, any external audio devices you may have used with your Wave® music system can be connected to the back of the Multi-CD changer. However, you now need a dual RCA stereo cable.
- The Wave® music system Multi-CD Changer provides two rear panel inputs (AUX 1 and AUX
- for external audio devices such as TV, VCR, DVD player, cassette player, or MP3 player.
- This gives you the advantage of hearing Wave® music system sound from a range of sources.
- To connect a device, connect one end of the cable to the audio output jacks of the source and the other end to one of the AUX inputs on the changer. Be sure to match the red andwhite plugs on the cable to the red (R) and white (L) AUX jacks on the changer.

Playing a connected audio source
To listen to a connected source:
- Turn on the external device.
- Press AUX on the Wave® music system remote control. Press AUX again to switch between the AUX 1 and AUX 2 inputs. AUX 1 or AUX 2 appears on the display to confirm your selection.
- Adjust the volume using the Wave® music system remote control
Cleaning
Use only a soft dry cloth to clean your Wave® music multi-CD system. If necessary, you may use a soft-bristled attachment to gently vacuum across the front. Do not use any liquid cleaning solutions, solvents, chemicals, alcohol, ammonia, or abrasives
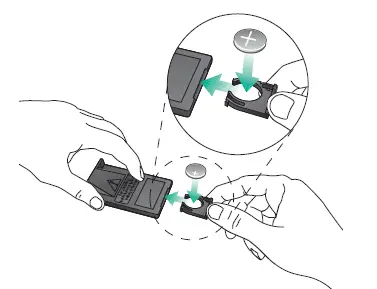
Replacing the remote control battery
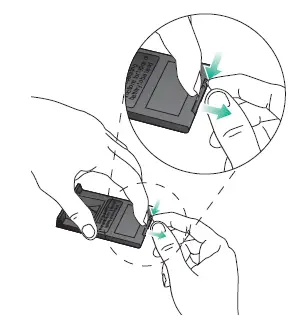
- Place the remote face down on a flat surface.
- Using your finger, push the tab lock to the side as shown and hold. Slide the battery compartment open.

- Remove the old battery and install the new one with the plus (+) symbol facing up

- Gently slide the battery compartment closed. It locks automatically.
Care and Maintenance
Limited warranty
What is covered:
All parts defective in material or workmanship.
For how long:
One year from the purchase date.
What we will do:
We will, at our sole option, repair or replace any defective parts free of charge.
What you must do:
- A. Call Bose® Customer Service and ask for shipping instructions.
- B. Properly pack the unit, if possible, in the original carton for shipping.
Other conditions:
This limited warranty is fully transferable for the one-year period following purchase.
THE PROVISIONS OF THIS LIMITED WARRANTY ARE IN LIEU OF ANY OTHER WARRANTY, WHETHER EXPRESS OR IMPLIED, WRITTEN OR ORAL, INCLUDING ANY WARRANTY OF MERCHANTABILITY OR FITNESS FOR A PARTICULAR PURPOSE. BOSE CORPORATION’S MAXIMUM LIABILITY SHALL NOT EXCEED THE ACTUAL PURCHASE PRICE PAID BY YOU FOR THE PRODUCT. IN NO EVENT SHALL BOSE BE LIABLE FOR SPECIAL, INCIDENTAL, CONSEQUENTIAL, OR INDIRECT DAMAGES.
This limited warranty does not cover a defect that has resulted from improper or unreasonable use or maintenance, accident, improper packing, or unauthorized tampering, alteration, or modification as determined solely by us. This limited warranty is void if the label bearing the serial number has been removed or defaced.
Other Legal Rights:
This limited warranty gives you specific legal rights, and you may also have other rights which vary from state to state or country to country. Some places do not allow limitations on implied warranties or the exclusion or limitation of incidental or consequential damages, so the above limitations or exclusions may not apply to you.
Technical information
- Multi-CD Changer power rating 120V~ 50/60 Hz, 80W
- Dimensions 2.6″H x 14.5″W x 9.9″D! (6.6 cm x 36.8 cm x 25.2 cm)
- Weight 4.5 lb (2.04 kg)
- Color
- Graphite Gray or Platinum White
FAQS
This is designed to be used with the Wave music system or the Wave music system III only
Yes, options in decreasing cost for this AWRCC1/or/2 Wave Music System aka Wave Radio/CD II into the 3.5mm female Aux In are:
FM range is 87.7-107.9. This one has silver body. I will have a Black body in 1.5 weeks. Thank you for your interest.
FM range is 87.7-107.9. This one has silver body. I will have a Black body in 1.5 weeks. Thank you for your interest.
The Bose comes with a one year warranty, a basic owners manual, a small remote, and a very fine shipping box
Yes… It plays compact disks.
No you need the Bose Wave Music System III or IV and the bluetooth accessory.
30 day warranty is included – no extra charge.
I didn’t try try because it has a special connector which controls the play functions
It should but it is up to the person you buy it from.
The Wave Multi-CD Changer is an accessory unit that is only compatible with our Wave Music System and Wave Music System III systems. It will not work on it’s own.
We have never had to replace the remote and I would think you could get one from Bose direct.
You cannot change the tone of voice when hearing books on tape.
This is intended as an add on to a Bose Wave Music System III. It will only work when connected to the Wave Music System III
The Wave Multi-CD Changer requires our Wave Music System or Wave Music System III to operate. It is not compatible with other products.


