![]()
H1 Blackhawk
User Manual
The information in this manual is subject to change without notice.
Rexing All Rights Reserved
www.rexingusa.com
Overview
Thank you for choosing REXING!
We hope you love your new products as much as we do. If you need assistance, or
have any suggestions to improve it, please contact us.
![]() (877) 740-8004
(877) 740-8004
Our support team will respond you as soon as possible.
Always a surprise in Rexing.
Check us out here.
• https://www.facebook.com/rexingusa/
• https://www.instagram.com/rexingdashcam/
• https://www.rexingusa.com/support/registration/
 https://www.instagram.com/rexingdashcam/ https://www.instagram.com/rexingdashcam/ |  https://www.rexingusa.com/support/registration/ https://www.rexingusa.com/support/registration/ |
 https://www.rexingusa.com/support/registration/ https://www.rexingusa.com/support/registration/ |  https://www.rexingusa.com/support/ https://www.rexingusa.com/support/ |
What’s in the box?
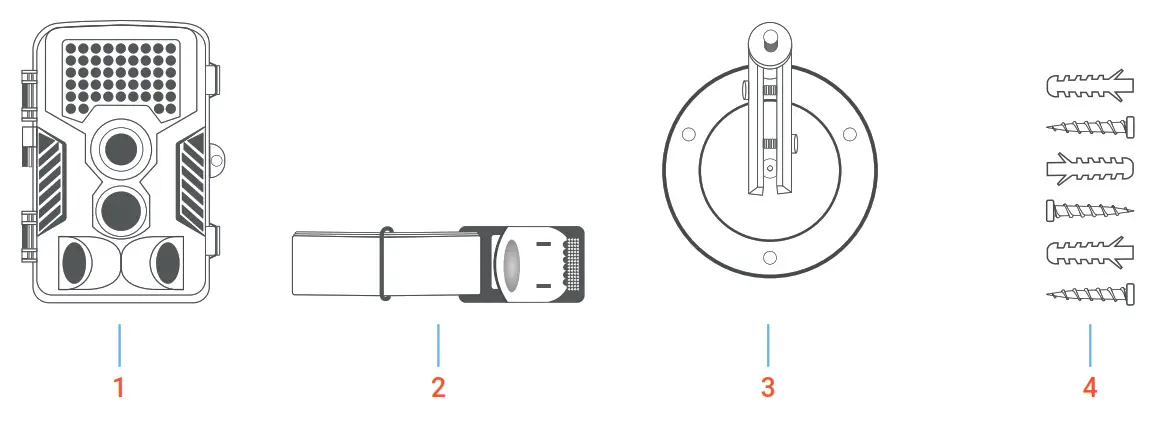
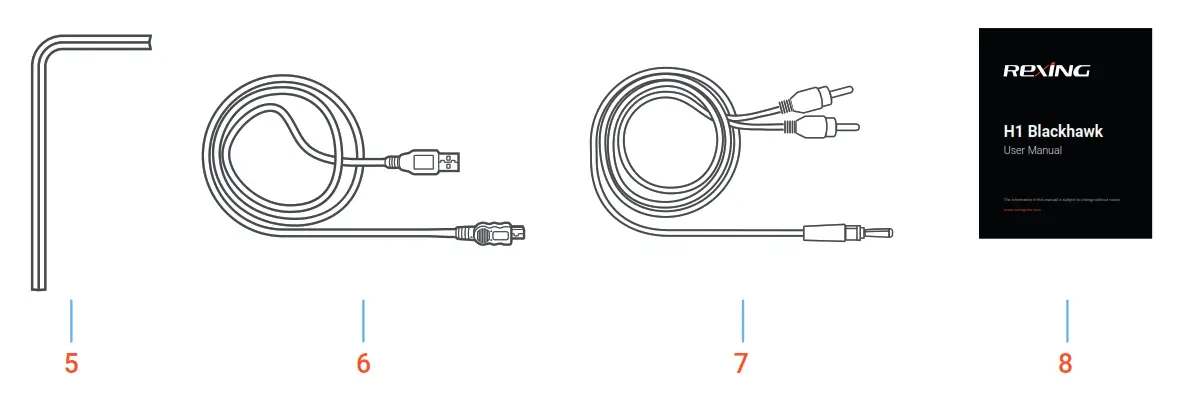
| 1. Rexing Woodlens H1 Blackhawk Camera | 5. Installation Tool |
| 2. Strip Mount | 6. USB to Mini-USB Cable |
| 3. Screw Mount | 7. AV Cable |
| 4. Mounting Screws (3x) | 8. User Manual |
Introduction
Thank you for choosing one of our easy operation highly qualified products. You now may enjoy the excellence reflected on this series product. This camera was totally R&D by our diligent and smart engineers based on feedbacks and requirements from customers globally. May you enjoy and adore this product as we do. And our company is always open-minded with willing to adopt creative ideas from you. Please refer to the notes below and instructions in this manual to ensure that you are completely satisfied with this product.
1.1 Application
This trail camera is an ideal product for housing security, warehouse surveillance, and monitoring wild animals with its camouflage appearance and nice shape. It is convenient to install or fasten, could be used to take photographs manually and carry on long-time videos in Test mode.
a. Instant surveillance camera for home, office, construction site, and warehouse, etc.
b. motion-triggered infrared night vision surveillance
c. Animal observation and hunting
1.2 Power Supply
a. AA Alkaline Batteries
This camera can either work with 4 or 8pcs AA Alkaline batteries.
Please note that the voltage of rechargeable AA batteries (1.2V) is insufficient to power this device.
Batteries electrode may cause device malfunction. Also, we strongly recommend changing the batteries when the power icon on the camera screen is empty.
 Warning
- Do not mix old and new batteries.
- Do not mix battery types – use ALL lithium or ALL alkaline.
- Rechargeable batteries are not recommended.
b. Power Adaptor – Security Surveillance Purpose
This camera can also be powered by an external 6V/2A DC adapter.
Recommend to remove the alkaline batteries when power adapter is used to avoid surcharging.
Electrical power is recommended for security purposes.
1.3 Attention
a. Insert the SD memory card correctly, camera support SD card hot-swap (insertion).
b. Please use an AA battery of good quality in order to prevent batteries from corrosion of leaked acid.
c. Use the right adaptor (6V/2A) of this camera to supply power, and do not invert the electrode when put in batteries.
d. Do not interrupt power supply during a system upgrade, please reach out to our customer support team if the device does not work after upgrading.
e. Do not keep the camera next to hot irrelevant objects, air conditioner exhaust vents, and light, etc. to avoid mistaking photos or videos.
1.4 Key Specification
- 2MP CMOS sensor.
- 42pcs IR LED flash to cover a range of 65 feet.
- Adjustable PIR sensitivity.
- Impressive quick trigger time: 0.2s
- Adjustable delay between motions.
- 4 or 8pcs AA alkaline batteries, stand by 6 months.
- Excellent image quality during the daytime, transition time, and nighttime.
- Time-lapse or video mode(Depending on the setting)
- No motion blur technology under low light situations at 2 feet per second regular motion speed.
- Up to 60 feet flash and detection range.
- Camouflage housing cover.
- Up to 128GB SD card. (SD memory cards are not included in the package).
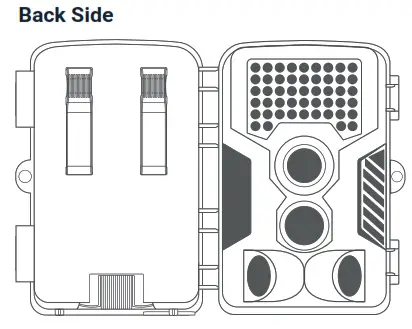
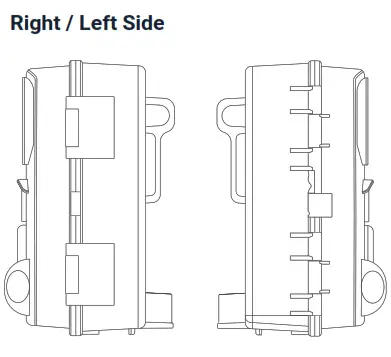
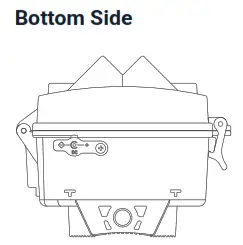
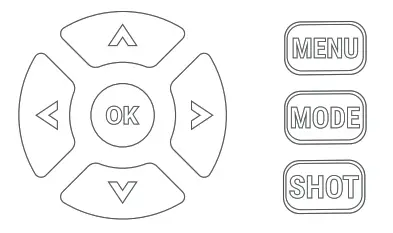
Camera Overview

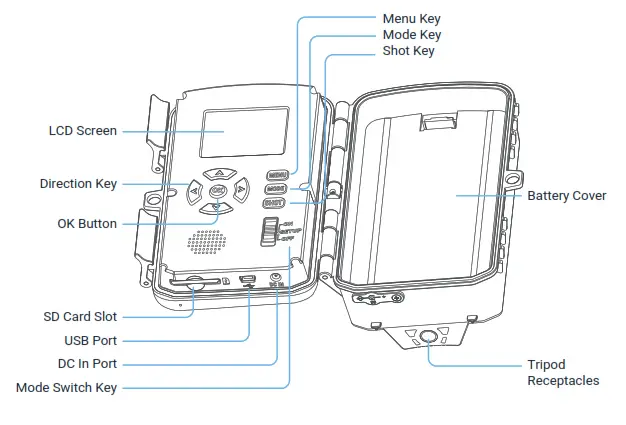
| Switch key | • ON gear, the device enters the automatic monitoring and shooting state, and automatically takes photos or videos. • SETUP gear, users can modify settings, preview, test shot and playback photo and video. • OFF gear, turn off the device. |
| *MENU key | Shift to Settings Menu. |
| *MODE key | Switch mode among Video / Photo / Playback. |
| *SHOT key | Take photo / record video (in photo / video mode); Enlarge photo (in playback mode). |
| *Direction key | UP/DOWN/RIGHT/LEFT |
| *OK key | Confirm the function. |
Attention:
Keys with “*” only work in test mode.
Getting Started
3.1 Install SD card
Open the latches and front housing, insert the SD card, push it until hearing a “Click” sound.
3.2 Install AA Battery
Use 4 pcs or 8 pcs AA battery to power on the device.
a. Open the latches and remove the battery cover.
b. Install 8 pcs AA batteries according to the polarity sign on the battery compartment. If only use 4 pcs batteries, please install them in the top or in the bottom of batteries compartments.
c. Secure the battery cover.
3.3 Setting the camera – SETUP Gear
Push the SWITCH button to SETUP gear. On this gear, users can modify the settings.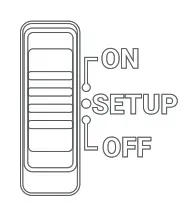
3.4 Menu Setting
Press the MENU button to enter the menu setting, press the UP / DOWN button to choose, and press the OK button to enter the submenu.
Under the submenu, press the UP / DOWN button to choose and press the OK button to confirm.
Press the MENU button to return to the previous menu.
Menu | Default Setting | Description |
| Menu | Photo | Photo / Video / Photo & Video |
| Photo Resolution | 12MP | 16MP/12MP/8MP/5MP/3MP/2MP/VGA |
| Photo Series | 1 photo | 1 photo / 2 photos / 3 photos |
| Video Resolution | 1920x1080P | 1080P/720P/VGA |
| Video Length | 10 seconds | 3 seconds~10 minutes |
| Audio Recording | On | On/Off |
| Shot Lag | 5 seconds | 5 seconds ~ 60minutes |
| Side Motion Sensors | On | On/Off |
| Sensitivity | Middle | Low / Middle / High |
| Target Recording Time | Off | On: Start: 00:00 – 23:59 Off: Stop: 00:00 – 23:59 |
| Time Lapse | Off | Normal / TL video / Off |
| Language | English | English/Deutsch/Dansk/Suomi/Svenska/ Español/Français/Italiano/Nederlands/ Português/Simplified Chinese/ Traditional Chinese/Japanese |
| Endless Capture | Off | On/Off |
| Time & Date | yyyy/mm/dd 24h | Set time & date/Time format/ Date format |
| Photo Stamp | Time | Time/Date/Off |
| Temp Unit | Celsius | Celsius/Fahrenheit |
| Password Protection | Off | On: users can set a 4-digit password / Off |
| Beep Sound | On | On/Off |
| Format Memory | Yes: All data will be deleted / No | |
| Serial No. | Off | On: User can set a 4-digit Serial No. / Off |
| Reset Settings | Yes: All settings will be deleted. / No | |
| Versione | Users can look over the firmware version. |
3.5 PIR Mode – ON Gear
Push the SWITCH button to ON gear after finishing setting on SETUP gear. The device will switch to PIR mode 10s later. The device will work according to the saved settings.
Playback Mode
Photo files and video files recorded by the camera can be played back on the camera. Users can lock, unlock, delete and slide show on the device..
4.1 Playback Video/Photo
On SETUP gear, press MODE button to enter playback mode, press UP/DOWN button to look through photos and videos. To watch videos, press OK button to play and stop.
4.2 Delete
In playback mode, press MENU to enter sub-menu:
a. Delete current file: Delete this video/photo.
b. Delete all files: Delete all videos/photos.
Press UP/DOWN button and press OK to confirm.
4.3 Slide Show
In playback mode, press MENU to enter sub-menu:
Activate slide show: photos will display one by one, 3 s photo.
Press UP/DOWN button and press OK to confirm.
4.4 Write Protect
In playback mode, press MENU to enter sub-menu:
Write protect: to protect the files from being deleted.
Press the UP/DOWN button to choose write protect and press OK to enter the sub-menu,
press the UP/DOWN button to choose Write-protect current file / Write-protect all files /
Unlock current files / Unlock all files, and press the OK button to confirm.
Specification
| Image Sensor | 2M Sensor |
| Lens FOV | 55° |
| IR light / Range | 42 pcs IR LED / 50 feet |
| Storage | SD/SDHC card, Max. to 128GB (Class10 or faster) |
| Photo | Format: JPEG / Resolution: VGA, 2MP, 3MP, 5MP, 8MP, 12MP, 16MP |
| Video | Format: AVI / Resolution: VGA (640×480), 720P (1280×720), 1080P (1920×1080) |
| Trigger Time | 0.2 seconds |
| Video Length | 3 seconds~10 minutes |
| Screen | 2.0 inch TFT screen |
| PIR Detection Distance | 60 feet |
| PIR Detection Angle | 120° 3 PIR lens |
| Series No. | Yes |
| Time Lapse Video | Yes |
| Power Voltage | 6V |
| Battery | 4 pcs or 8 pcs AA battery |
| External Power | DC 6V |
| Standby Time | 4 ~ 6 months (8 pcs AA battery) |
| interface | USB / SD card / DC in |
| Working Temperature | 50°F ~ 140°F |
| Storage Temperature | -22°F ~ 158°F |
| Working Humidity | 5% – 90% |
| Waterproof Level | IP54 |
| Dimension | 5.4″ x 3.8″ x 3.3″ |
Troubleshooting
6.1 Can’t switch on the camera
a. Please check if the battery’s polarity is correct or check battery power level in daylight without enabling IR light.
b. Reload the batteries and reboot the camera without inserting an SD card.
c. If the above step can’t work, please format or replace your SD card and try again.
6.2 Picture color abnormal
Turn off the camera and reload the batteries, and try to reboot the camera.
6.3 Camera can’t take pictures.
Please check if the SD card is NON-WRITABLE.
6.4 PIR not work
a. Must install SD card.
b. Please check if the space of the SD card is full.
c. Please check if the camera in time-lapse or delay mode.
Warranty & Support
Warranty
The Rexing H1 Blackhawk comes with a full 12-month warranty. If you register your product on our official site (https://www.rexingusa.com/support/registration), you can extend the warranty to 18 months.
Support
If you have any questions regarding your product, please do not hesitate to contact us at [email protected], or call us at (877) 740-8004. Queries are typically answered within 12-24 hours.
Your opinion matters
Rexing is firmly committed to always improving our products, services, and user experience. If you have any thoughts on how we can do even better, we welcome your constructive feedback and suggestions. Connect with us today at [email protected] Thank you for choosing Racing!

MADE IN CHINA


